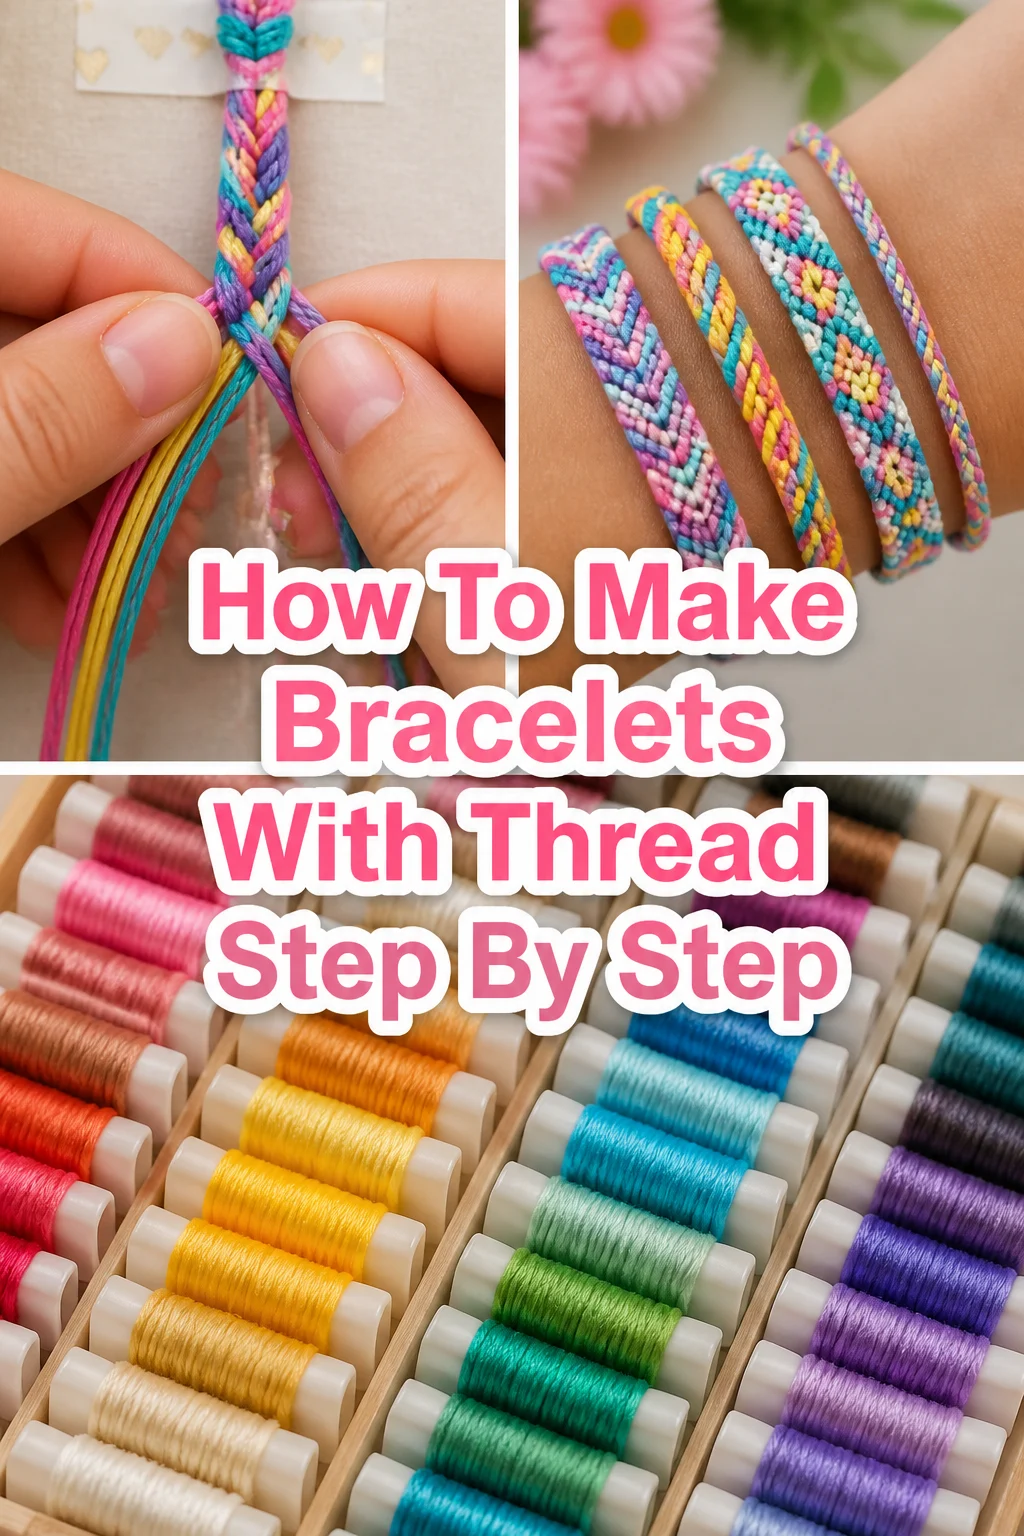
🧵 How To Make Bracelets With Thread Step By Step

Beginner-friendly templates, step-by-step guides,
and weekly project ideas in your inbox.
There’s a special kind of satisfaction that comes from creating something beautiful with your own hands.
I remember making my very first friendship bracelet for my best friend back in elementary school. It was a simple candy stripe, but the joy it brought us both was immeasurable.
This guide will share all the practical tips I’ve learned over the years, ensuring your thread bracelet journey is smooth and rewarding.

Quick Overview
You’re about to embark on a fun, creative project that results in a unique piece of wearable art. This guide focuses on fundamental knotting techniques, perfect for beginners.
- Time needed: 45-90 minutes (depending on complexity and speed)
- Difficulty: Beginner
- What you’ll need: Embroidery floss, scissors, tape or a clipboard
Step-by-Step Instructions
Step 1: Gather Your Materials
Collect all your necessary items before you begin. This helps keep your workspace organized and prevents interruptions.
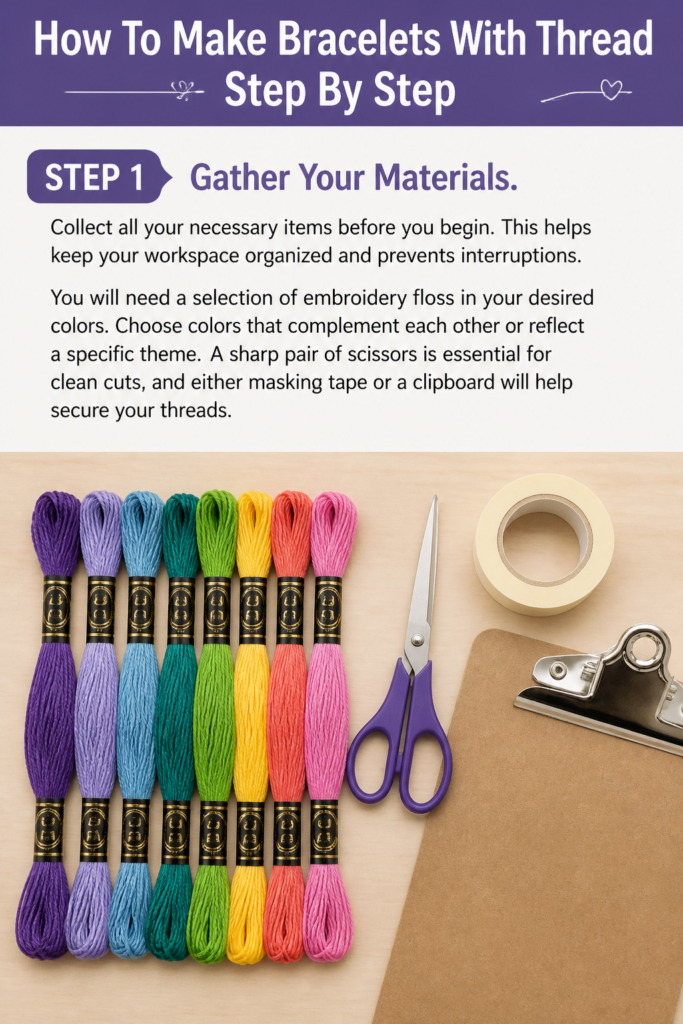
You will need a selection of embroidery floss in your desired colors. Choose colors that complement each other or reflect a specific theme.
A sharp pair of scissors is essential for clean cuts, and either masking tape or a clipboard will help secure your threads.
Step 2: Choose Your Design and Cut Threads
Decide on the type of bracelet you want to make. For beginners, a simple candy stripe or diagonal pattern is a great starting point.
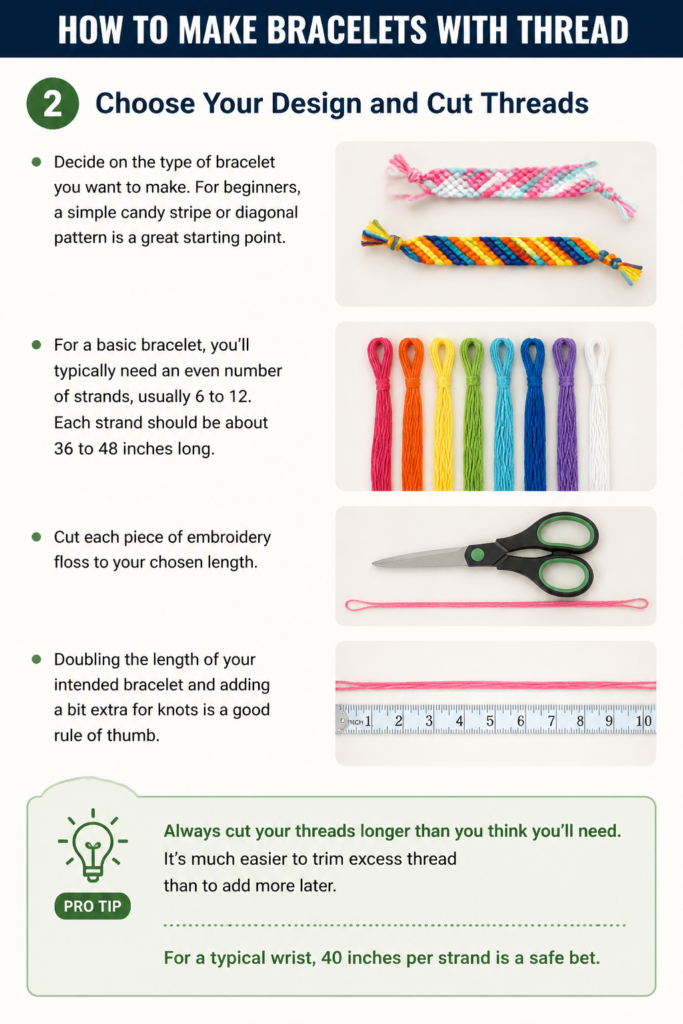
For a basic bracelet, you’ll typically need an even number of strands, usually 6 to 12. Each strand should be about 36 to 48 inches long.
Cut each piece of embroidery floss to your chosen length. Doubling the length of your intended bracelet and adding a bit extra for knots is a good rule of thumb.
Pro Tip: Always cut your threads longer than you think you’ll need. It’s much easier to trim excess thread than to add more later. For a typical wrist, 40 inches per strand is a safe bet.
Step 3: Organize and Secure Your Threads
Align all your cut threads evenly. Fold them in half to find the midpoint, then tie a simple overhand knot about 1/2 inch from the folded loop.
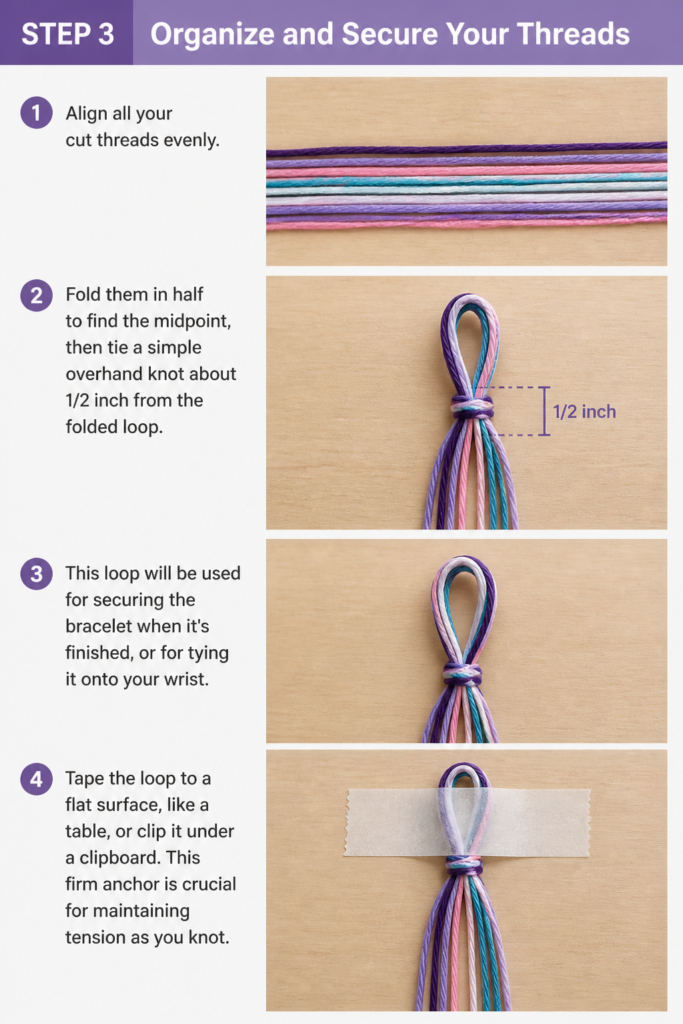
This loop will be used for securing the bracelet when it’s finished, or for tying it onto your wrist.
Tape the loop to a flat surface, like a table, or clip it under a clipboard. This firm anchor is crucial for maintaining tension as you knot.
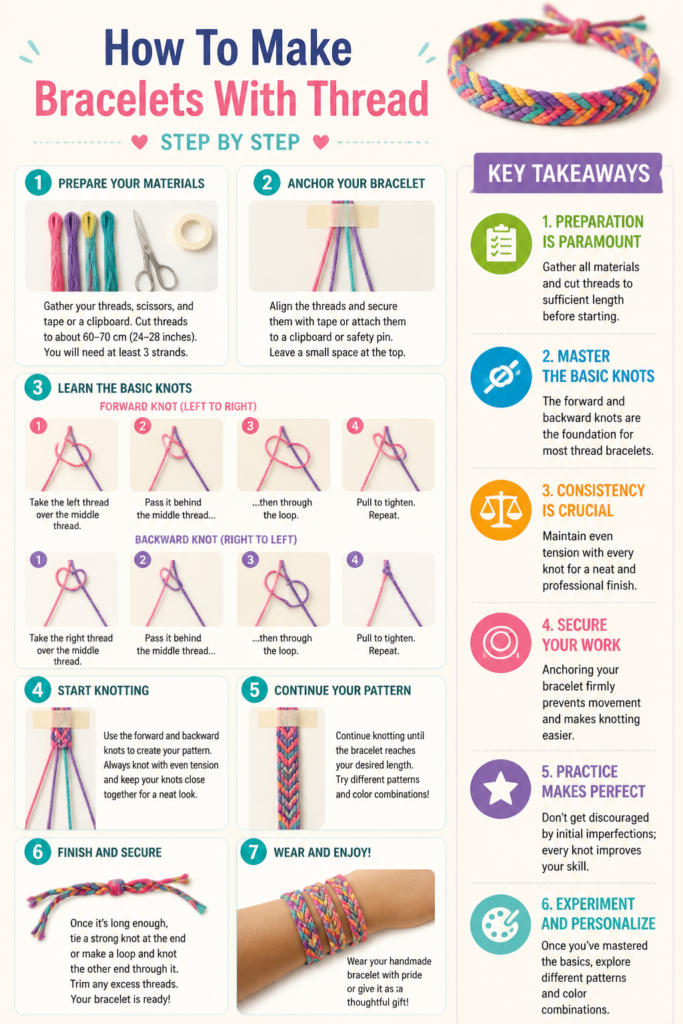
Step 4: Understand the Forward Knot (F Knot)
The forward knot is a fundamental knot for many thread bracelets, especially diagonal patterns.
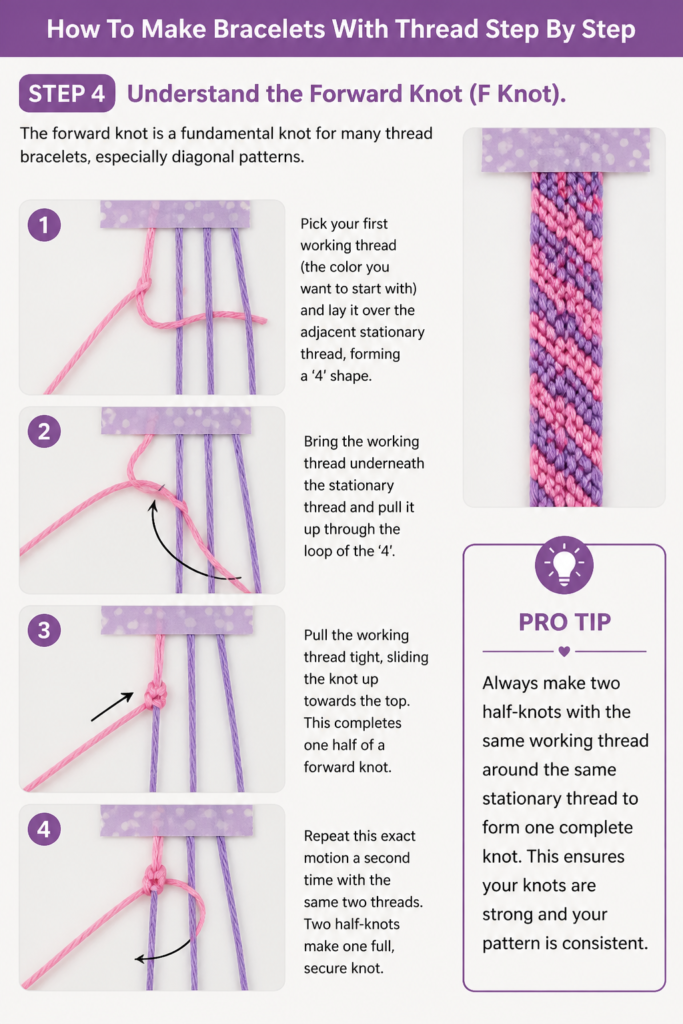
Pick your first working thread (the color you want to start with) and lay it over the adjacent stationary thread, forming a ‘4’ shape.
Bring the working thread underneath the stationary thread and pull it up through the loop of the ‘4’.
Pull the working thread tight, sliding the knot up towards the top. This completes one half of a forward knot.
Repeat this exact motion a second time with the same two threads. Two half-knots make one full, secure knot.
Pro Tip: Always make two half-knots with the same working thread around the same stationary thread to form one complete knot. This ensures your knots are strong and your pattern is consistent.
Step 5: Master the Backward Knot (B Knot)
The backward knot is the mirror image of the forward knot and is essential for patterns that move in the opposite direction.
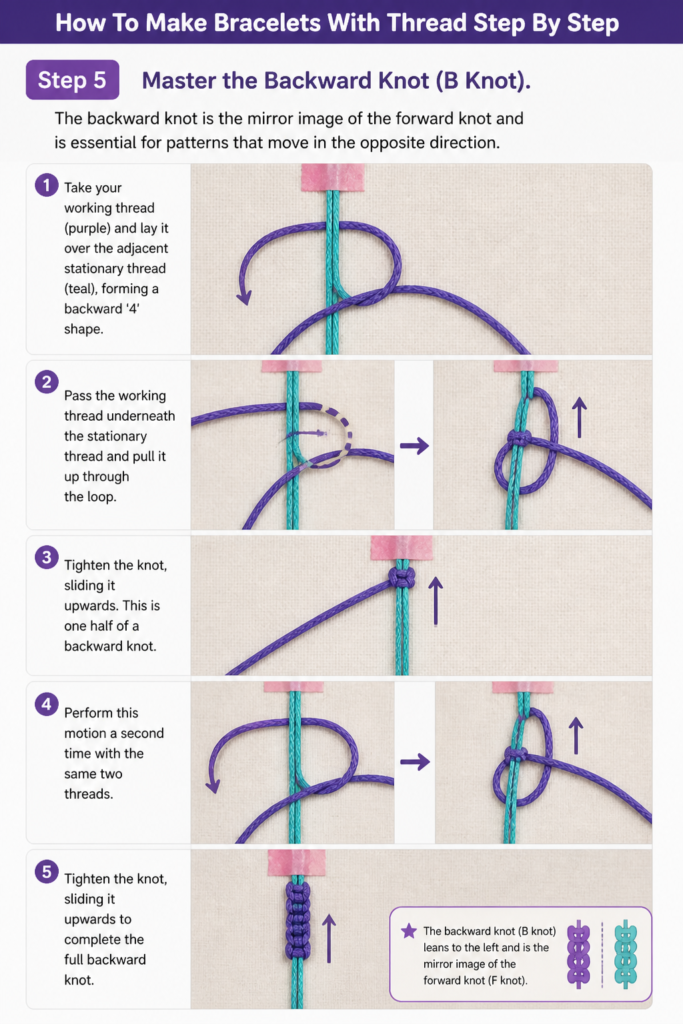
Take your working thread and lay it over the adjacent stationary thread, forming a backward ‘4’ shape.
Pass the working thread underneath the stationary thread and pull it up through the loop.
Tighten the knot, sliding it upwards. This is one half of a backward knot.
Perform this motion a second time with the same two threads to complete the full backward knot.
Step 6: Begin Knotting Your Pattern
Start with your chosen pattern. For a simple diagonal stripe, you’ll work from left to right across your threads.
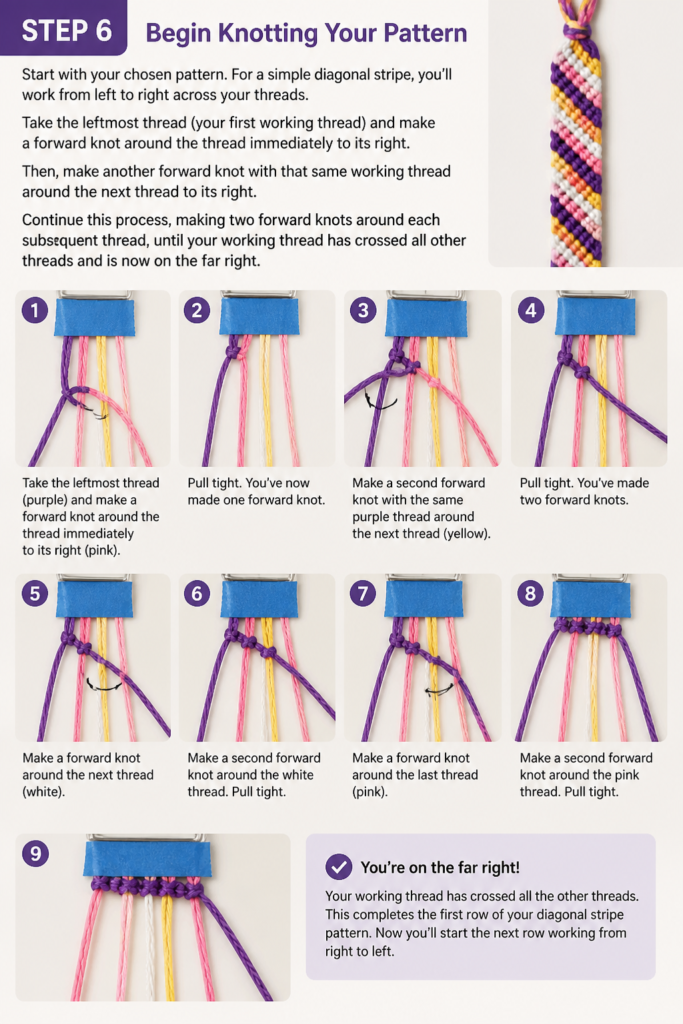
Take the leftmost thread (your first working thread) and make a forward knot around the thread immediately to its right.
Then, make another forward knot with that same working thread around the next thread to its right.
Continue this process, making two forward knots around each subsequent thread, until your working thread has crossed all other threads and is now on the far right.
Step 7: Continue Building Rows
Once your first working thread has moved across all other threads, it has completed one row of your pattern.
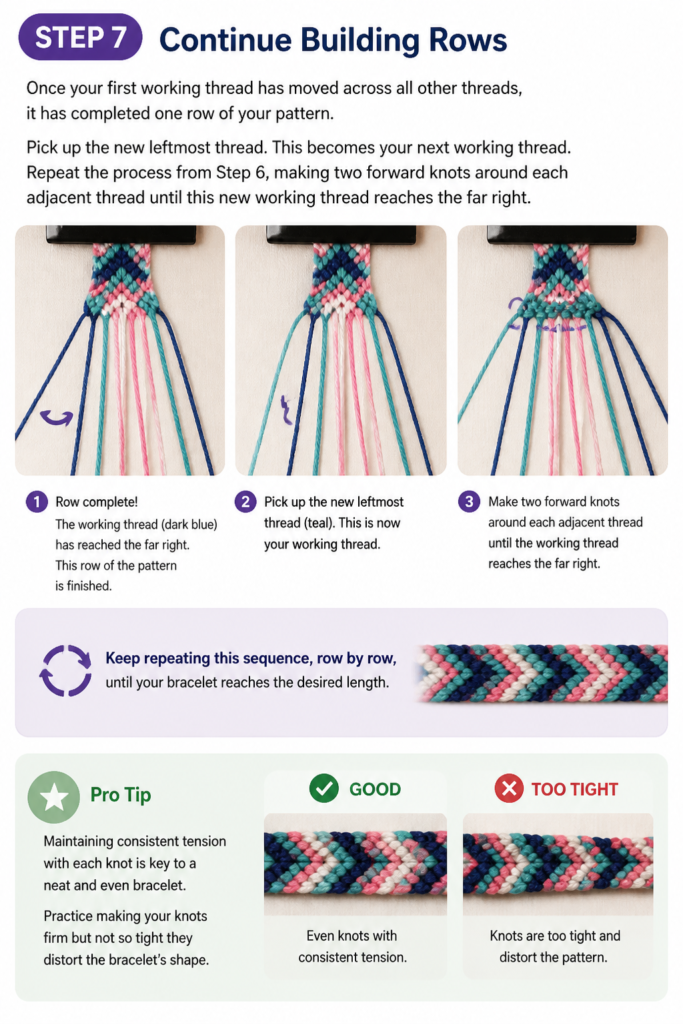
Pick up the new leftmost thread. This becomes your next working thread.
Repeat the process from Step 6, making two forward knots around each adjacent thread until this new working thread reaches the far right.
Keep repeating this sequence, row by row, until your bracelet reaches the desired length.
Pro Tip: Maintaining consistent tension with each knot is key to a neat and even bracelet. Practice making your knots firm but not so tight they distort the bracelet’s shape.
Step 8: Finishing Your Bracelet
Once your bracelet is long enough to fit around your wrist, it’s time to secure the ends.
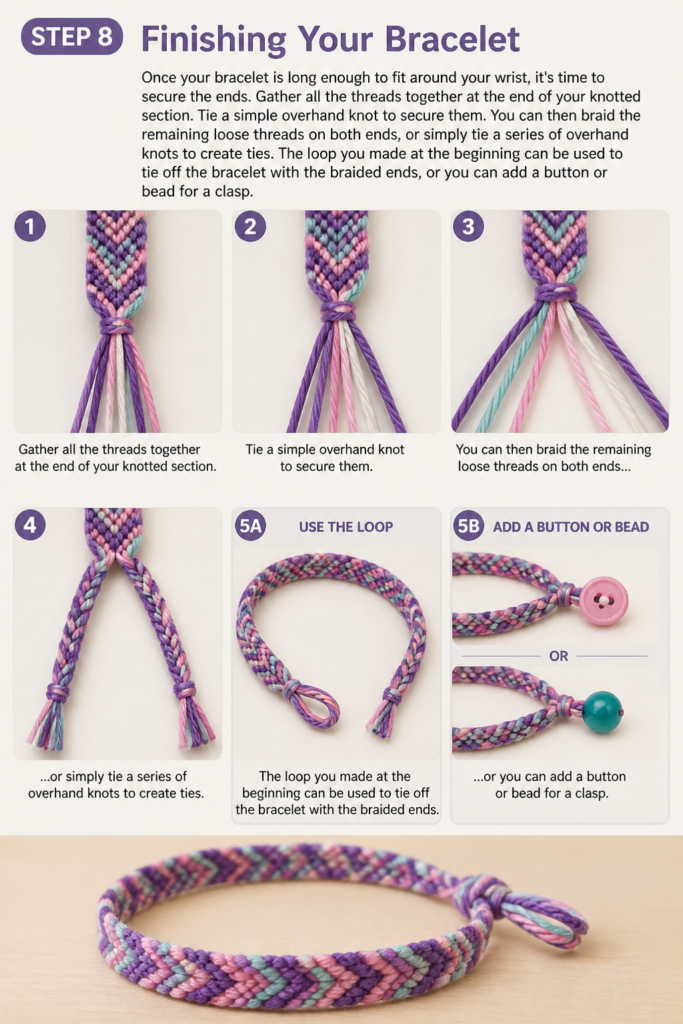
Gather all the threads together at the end of your knotted section. Tie a simple overhand knot to secure them.
You can then braid the remaining loose threads on both ends, or simply tie a series of overhand knots to create ties.
The loop you made at the beginning can be used to tie off the bracelet with the braided ends, or you can add a button or bead for a clasp.
Step 9: Trim and Enjoy Your Creation
Trim any excess thread from the ends, leaving enough for tying or for your chosen clasp method.
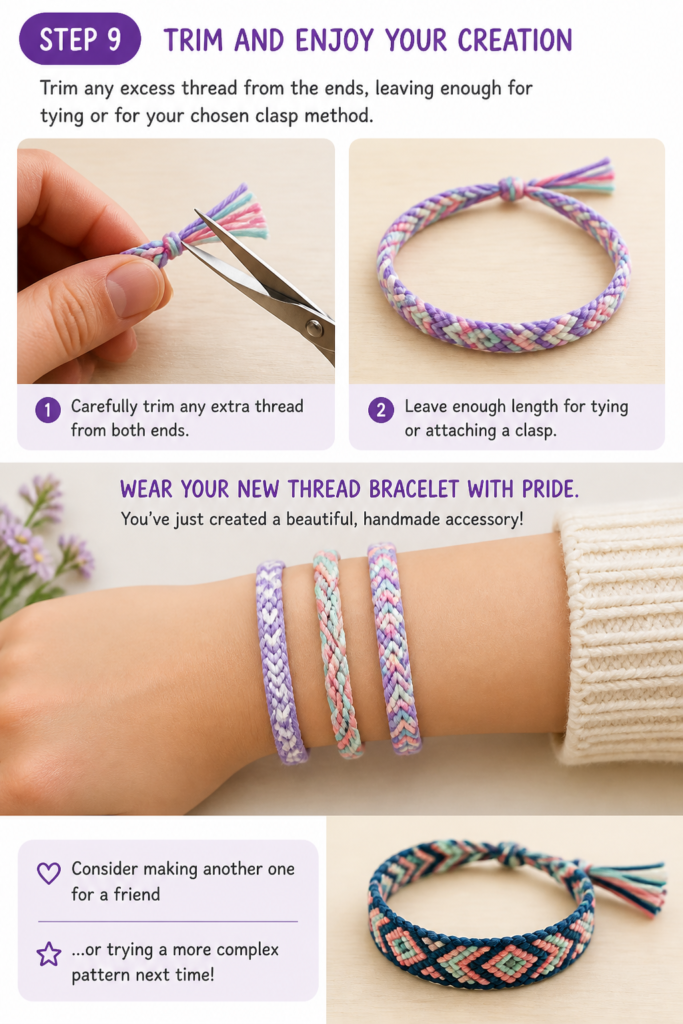
Wear your new thread bracelet with pride. You’ve just created a beautiful, handmade accessory!
Consider making another one for a friend or trying a more complex pattern next time.
Common Mistakes to Avoid
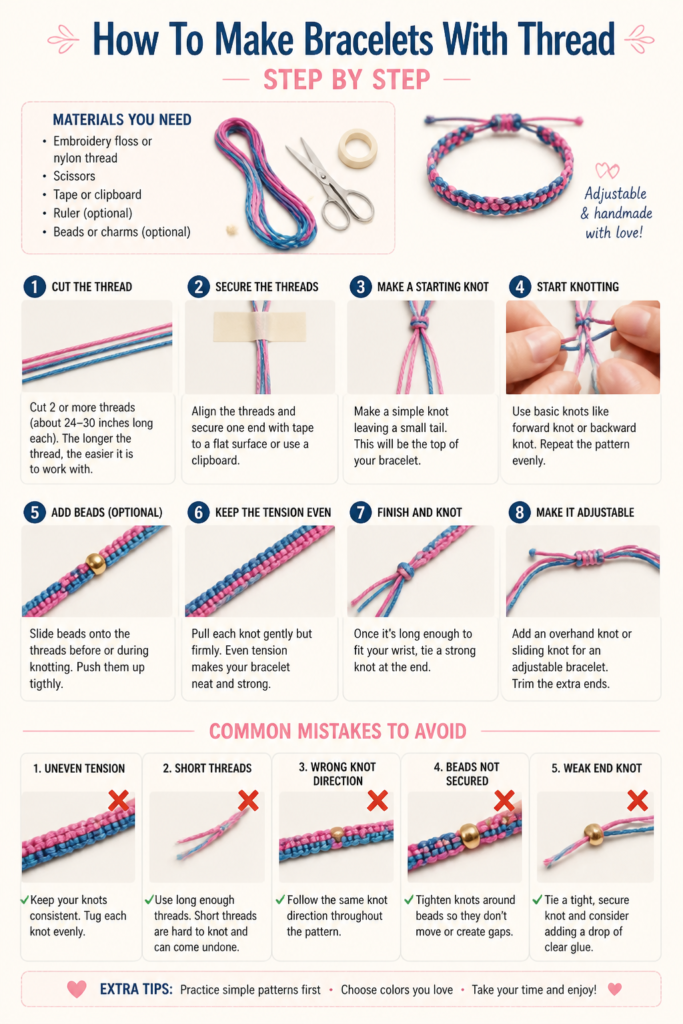
Inconsistent Knot Tension
One of the most frequent issues beginners face is uneven knot tension. Some knots might be too loose, while others are pulled too tight.
This leads to a bracelet that looks bumpy, uneven, or even slightly warped. The pattern won’t lie flat or straight.
To correct this, focus on maintaining a consistent, firm pull on your working thread for every single knot. Practice helps build this muscle memory.
Incorrect Thread Length
Cutting your threads too short is a frustrating mistake, as you can’t easily add more thread mid-bracelet without creating a bulky join.
Conversely, cutting them excessively long leads to a lot of wasted thread and makes tangling more likely.
Always err on the side of slightly longer, especially when starting out. You can always trim excess, but you can’t add what isn’t there.
Losing Track of Your Pattern
When working with multiple colors or complex patterns, it’s easy to forget which thread is next or which knot you just made.
This can result in a misaligned pattern or an unexpected color change. It can be hard to undo many knots to fix one error.
Keep your threads organized, perhaps by taping them in order or using a bracelet-making board. Double-check your knots and thread order after each row.
Not Securing the Bracelet Properly
If your starting loop or the top of your bracelet isn’t firmly secured, it will shift and move as you knot.
This makes it incredibly difficult to maintain tension and control your knots, leading to frustration and a messy result.
Always use strong tape or a reliable clip on a clipboard to anchor your starting point. A stable foundation is key for neat knotting.
Troubleshooting
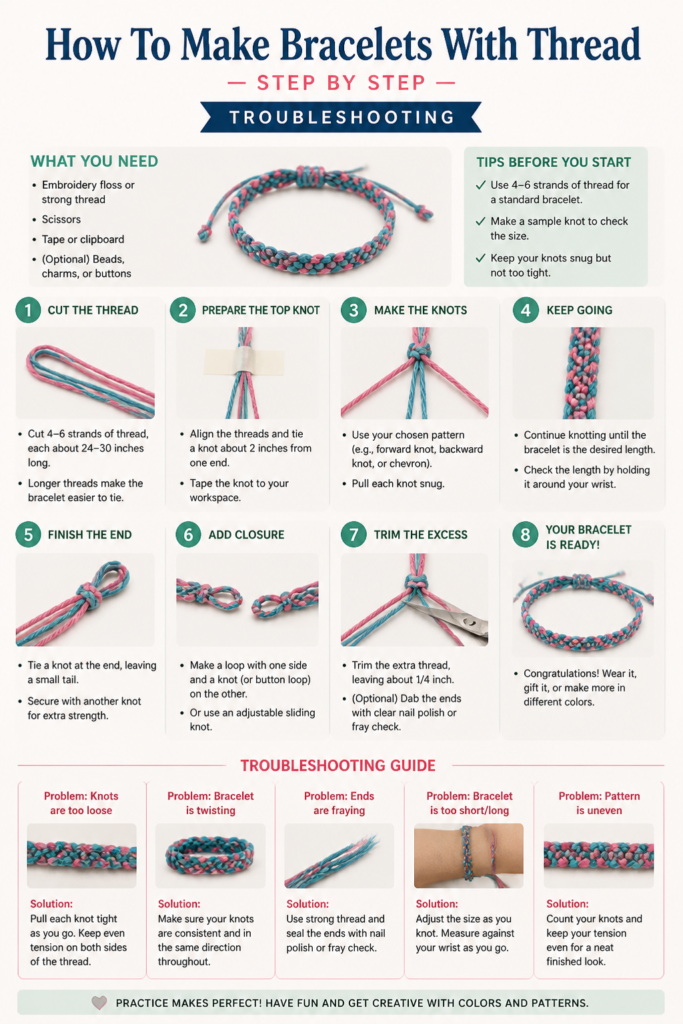
Bracelet is Uneven or “Wobbly”
If your finished bracelet looks uneven, wider in some spots than others, or generally not straight, it’s almost always due to inconsistent tension.
Go back to the basics and practice individual knots, focusing on pulling each knot with the same amount of force.
Ensure you are making two half-knots for every full knot; sometimes an accidental single half-knot can throw off the pattern’s width.
Threads Keep Tangling
Long threads are prone to tangling, especially when you’re maneuvering them around.
Try working with shorter lengths of working thread if possible, or wind the excess length of each strand into a small bobbin or butterfly wrap.
Take frequent breaks to untangle any snags. Keeping your work surface clear also helps prevent threads from catching on other items.
Running Out of a Thread Color
This happens to everyone! If a working thread runs out before your bracelet is finished, don’t panic.
Tie a new, fresh strand of the same color to the short end of the old thread with a small, secure knot close to your last bracelet knot.
Trim the ends of the knot very short, then continue knotting as usual. The new knot will be hidden within the subsequent knots of your bracelet.
Key Takeaways
- Preparation is paramount: Gather all materials and cut threads to sufficient length before starting.
- Master the basic knots: The forward and backward knots are the foundation for most thread bracelets.
- Consistency is crucial: Maintain even tension with every knot for a neat and professional finish.
- Secure your work: Anchoring your bracelet firmly prevents movement and makes knotting easier.
- Practice makes perfect: Don’t get discouraged by initial imperfections; every knot improves your skill.
- Experiment and personalize: Once you’ve mastered the basics, explore different patterns and color combinations.
Frequently Asked Questions
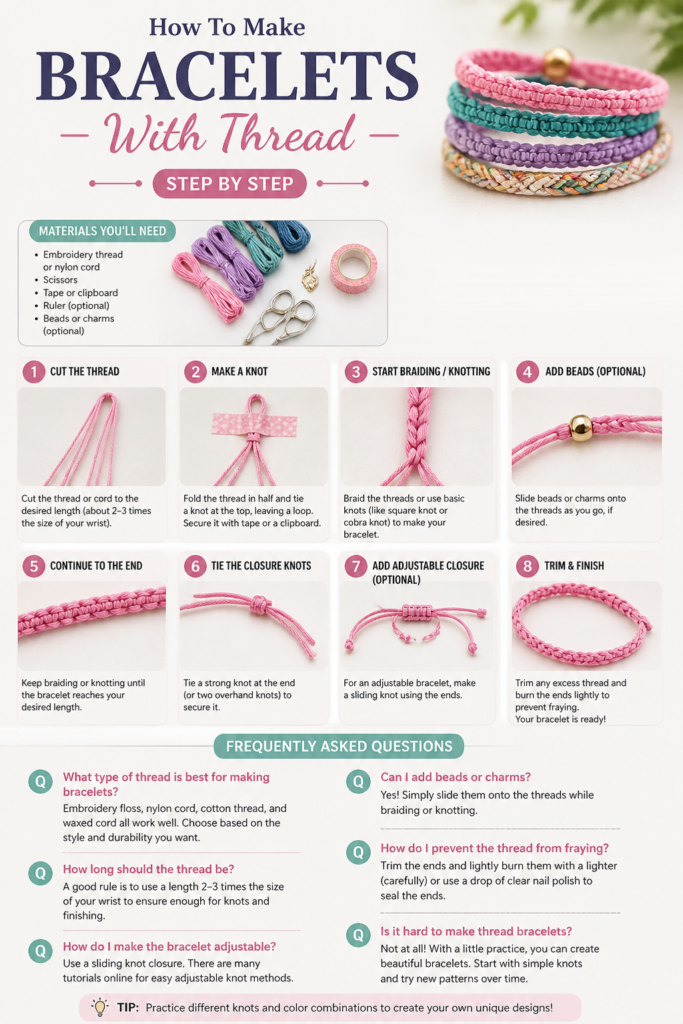
What kind of thread is best for bracelets?
Embroidery floss is the most popular and recommended choice for thread bracelets. It’s affordable, comes in a vast array of colors, and its six-strand construction makes it durable and easy to work with.
How long should my bracelet be?
A typical bracelet length for an adult wrist is about 5-7 inches of knotted pattern, plus extra length on each end for tying (usually 3-5 inches per side).
Can I wash my thread bracelet?
Yes, most thread bracelets made with embroidery floss can be gently hand-washed with mild soap and cool water. Rinse thoroughly and allow them to air dry completely to prevent mildew.
How do I make my bracelet adjustable?
Instead of tying a fixed knot, you can create a sliding knot closure. This involves tying a series of square knots around the two loose ends, allowing the bracelet to be tightened or loosened to fit various wrist sizes.
Our Top Recommended Finds
- DMC Embroidery Floss Variety Pack: A classic choice, offering a wide spectrum of colors and consistent quality for all your projects.
- Bracelet Making Board or Clipboard: An essential tool for keeping your threads organized and securely anchored, making knotting much easier.
- Small, Sharp Craft Scissors: Precision scissors are vital for clean cuts and trimming loose ends, ensuring a tidy finish to your bracelet.
Your Creative Journey Awaits
You now have all the knowledge and practical steps to create beautiful thread bracelets.
Don’t stop here; consider trying out a chevron pattern or a friendship bracelet with beads next.
Grab your threads and start knotting today. The possibilities are endless, and the joy of creating is truly rewarding.
Beginner-friendly templates, step-by-step guides,
and weekly project ideas in your inbox.