✝️ How To Make A Cross With Beads

Beginner-friendly templates, step-by-step guides,
and weekly project ideas in your inbox.
Crafting with beads offers a wonderful blend of creativity and mindfulness.
I’ve spent countless hours in my own studio, transforming simple beads into meaningful pieces.
This guide shares the detailed process I’ve refined over years, ensuring your first beaded cross is a beautiful success.

Quick Overview
You are about to embark on a fulfilling project, creating a unique beaded cross. This guide will walk you through every necessary step, from selecting your materials to the final finishing touches.
- Time needed: 1-3 hours (depending on design complexity and experience level)
- Difficulty: Beginner
- What you’ll need: Beads, beading wire or cord, wire cutters, round-nose pliers, chain-nose pliers.
Step-by-Step Instructions
Step 1: Gather Your Materials
Select your beads. Choose a variety of sizes and colors that appeal to you. Seed beads, pony beads, or even larger decorative beads can work beautifully.
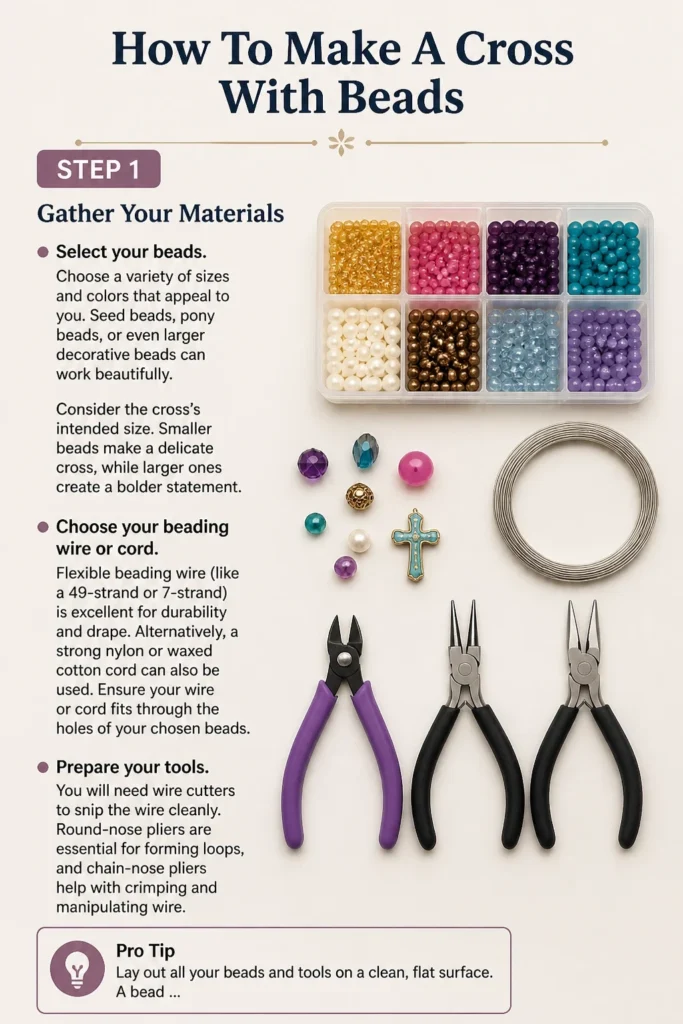
Consider the cross’s intended size. Smaller beads make a delicate cross, while larger ones create a bolder statement.
Choose your beading wire or cord. Flexible beading wire (like a 49-strand or 7-strand) is excellent for durability and drape. Alternatively, a strong nylon or waxed cotton cord can also be used.
Ensure your wire or cord fits through the holes of your chosen beads.
Prepare your tools. You will need wire cutters to snip the wire cleanly. Round-nose pliers are essential for forming loops, and chain-nose pliers help with crimping and manipulating wire.
Pro Tip: Lay out all your beads and tools on a clean, flat surface. A bead mat prevents beads from rolling away, saving you frustration.
Step 2: Plan Your Design
Visualize your cross. Do you want a symmetrical design, or will you introduce variations in bead size and color?
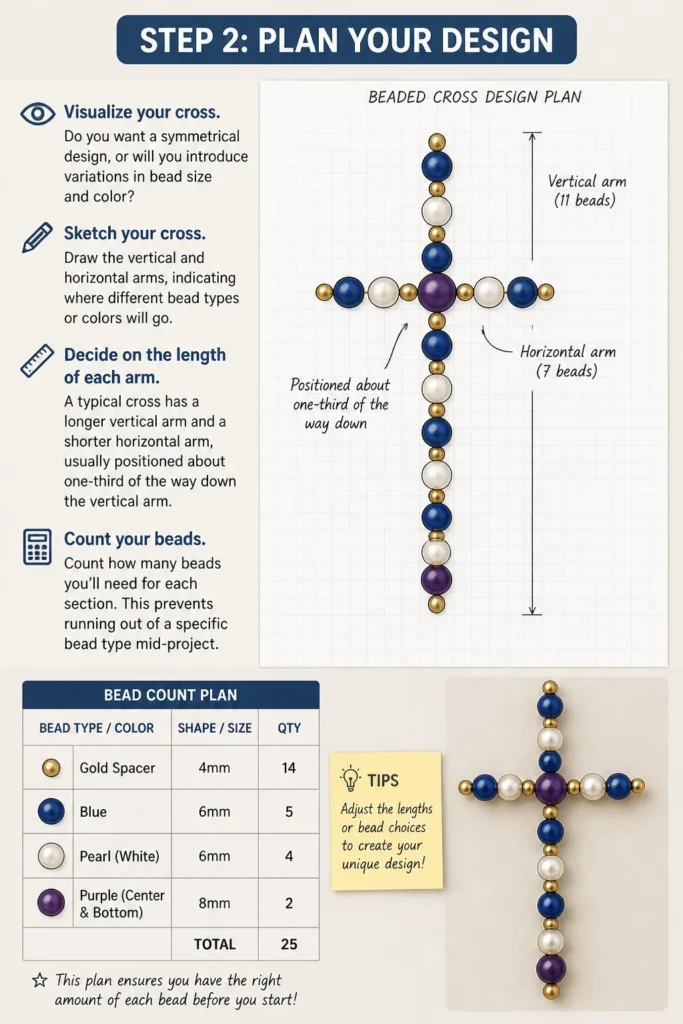
It helps to sketch your cross on paper. Draw the vertical and horizontal arms, indicating where different bead types or colors will go.
Decide on the length of each arm. A typical cross has a longer vertical arm and a shorter horizontal arm, usually positioned about one-third of the way down the vertical arm.
Count how many beads you’ll need for each section. This prevents running out of a specific bead type mid-project.
Step 3: Cut Your Beading Wire or Cord
Measure the wire for the vertical arm. You’ll need enough length to string all the beads for the vertical arm, plus extra for securing the ends and forming any loops.
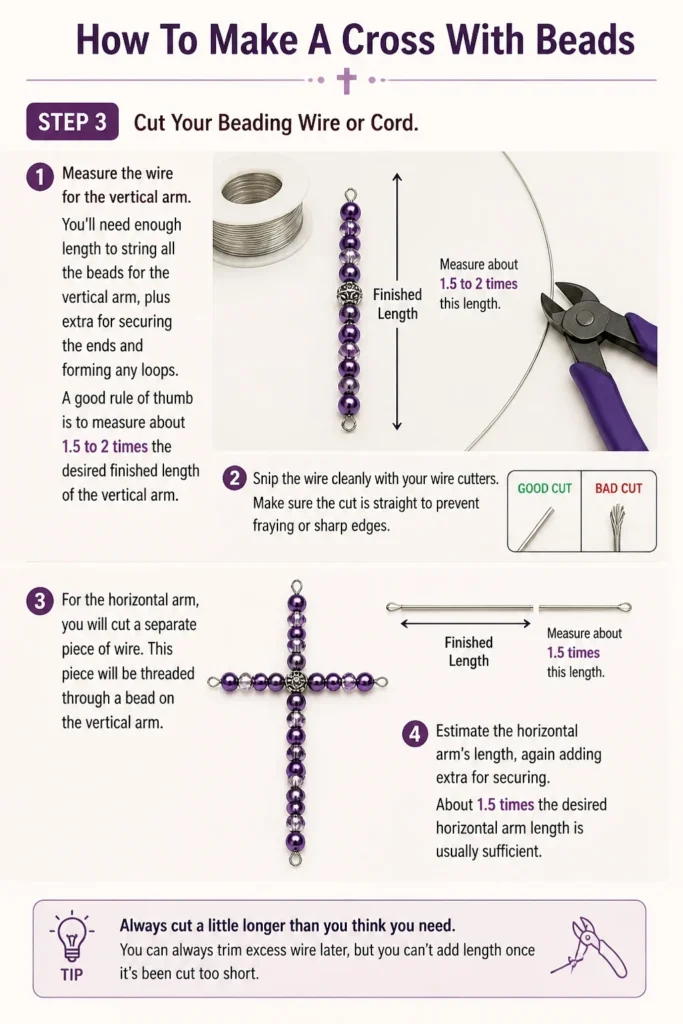
A good rule of thumb is to measure about 1.5 to 2 times the desired finished length of the vertical arm. This gives you ample working room.
Snip the wire cleanly with your wire cutters. Make sure the cut is straight to prevent fraying or sharp edges.
For the horizontal arm, you will cut a separate piece of wire. This piece will be threaded through a bead on the vertical arm.
Estimate the horizontal arm’s length, again adding extra for securing. About 1.5 times the desired horizontal arm length is usually sufficient.
Step 4: Start the Vertical Arm
Begin by threading your first bead onto the wire for the vertical arm. This bead will be at the very bottom of your cross.
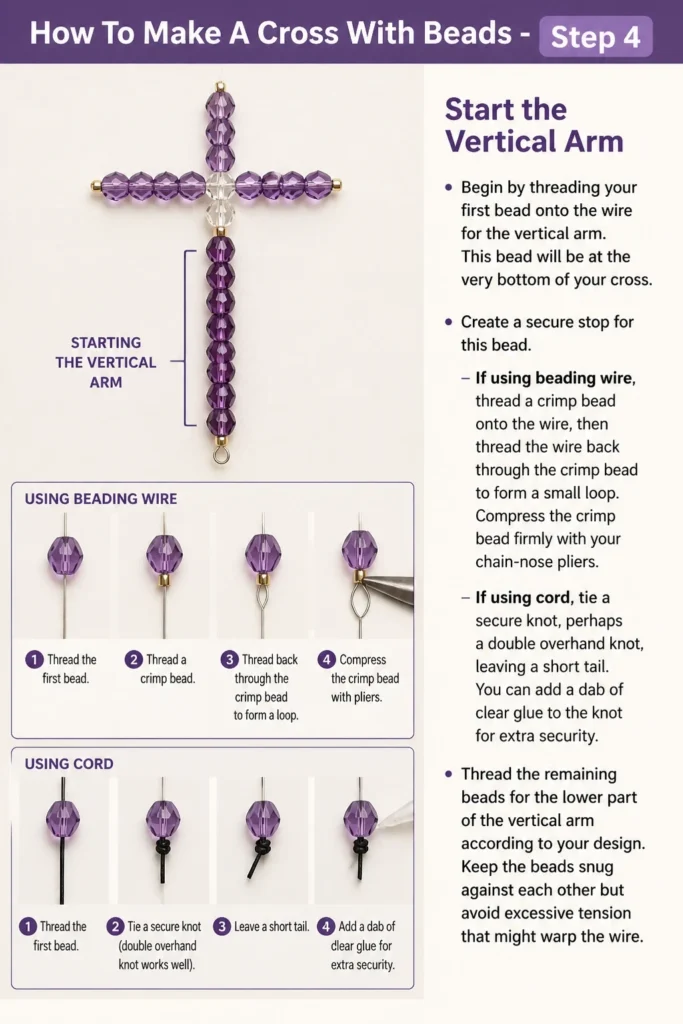
Create a secure stop for this bead. If using beading wire, thread a crimp bead onto the wire, then thread the wire back through the crimp bead to form a small loop. Compress the crimp bead firmly with your chain-nose pliers.
If using cord, tie a secure knot, perhaps a double overhand knot, leaving a short tail. You can add a dab of clear glue to the knot for extra security.
Thread the remaining beads for the lower part of the vertical arm according to your design. Keep the beads snug against each other but avoid excessive tension that might warp the wire.
Step 5: Form the Horizontal Arm
Identify the bead on the vertical arm where the horizontal arm will attach. This is typically about one-quarter to one-third of the way up from the bottom of the vertical arm.
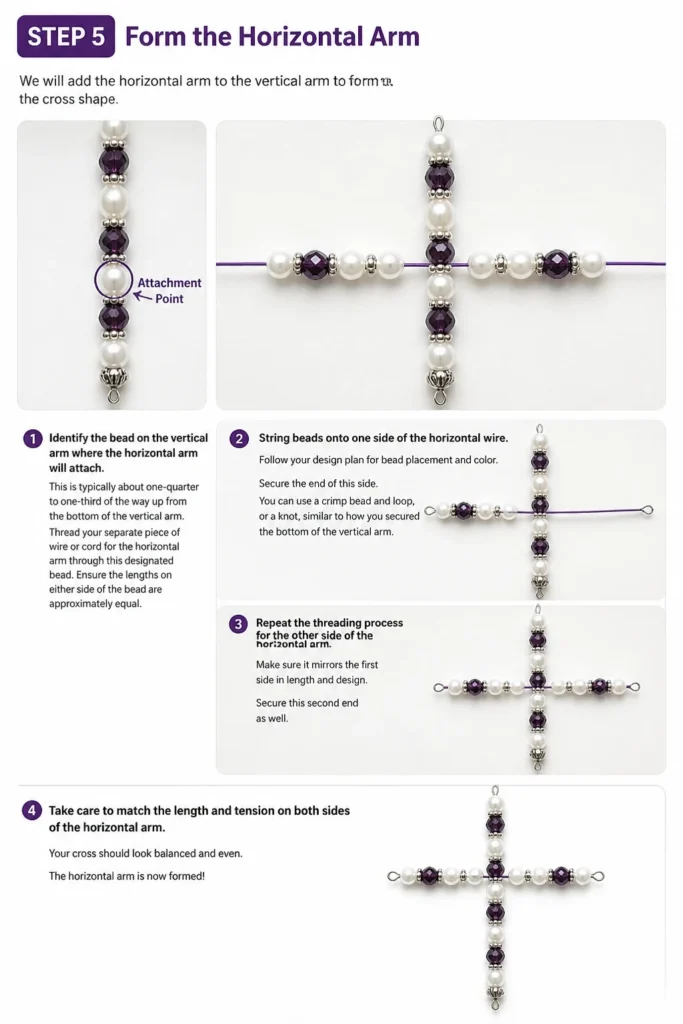
Thread your separate piece of wire or cord for the horizontal arm through this designated bead. Ensure the lengths on either side of the bead are approximately equal.
String beads onto one side of the horizontal wire. Follow your design plan for bead placement and color.
Secure the end of this side. You can use a crimp bead and loop, or a knot, similar to how you secured the bottom of the vertical arm.
Repeat the threading process for the other side of the horizontal arm. Make sure it mirrors the first side in length and design.
Secure this second end as well. Take care to match the length and tension on both sides of the horizontal arm for a balanced look.
Pro Tip: When forming loops with crimp beads, ensure the loop is small and tight against the last bead. This prevents gaps and keeps the cross looking neat.
Step 6: Complete the Vertical Arm
Continue threading beads onto the top section of the vertical wire. These beads will extend from the horizontal arm upwards to the top of your cross.
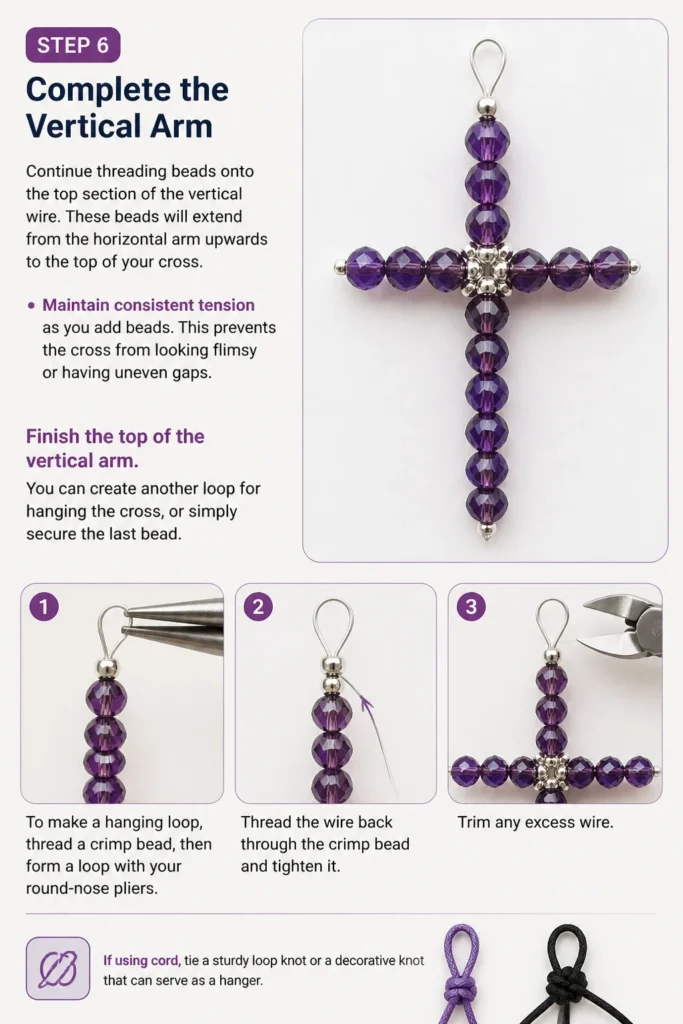
Maintain consistent tension as you add beads. This prevents the cross from looking flimsy or having uneven gaps.
Finish the top of the vertical arm. You can create another loop for hanging the cross, or simply secure the last bead.
To make a hanging loop, thread a crimp bead, then form a loop with your round-nose pliers. Thread the wire back through the crimp bead and tighten it. Trim any excess wire.
If using cord, tie a sturdy loop knot or a decorative knot that can serve as a hanger.
Step 7: Add Finishing Touches
Trim any excess wire or cord tails. Use your wire cutters to make clean cuts close to the crimp beads or knots.
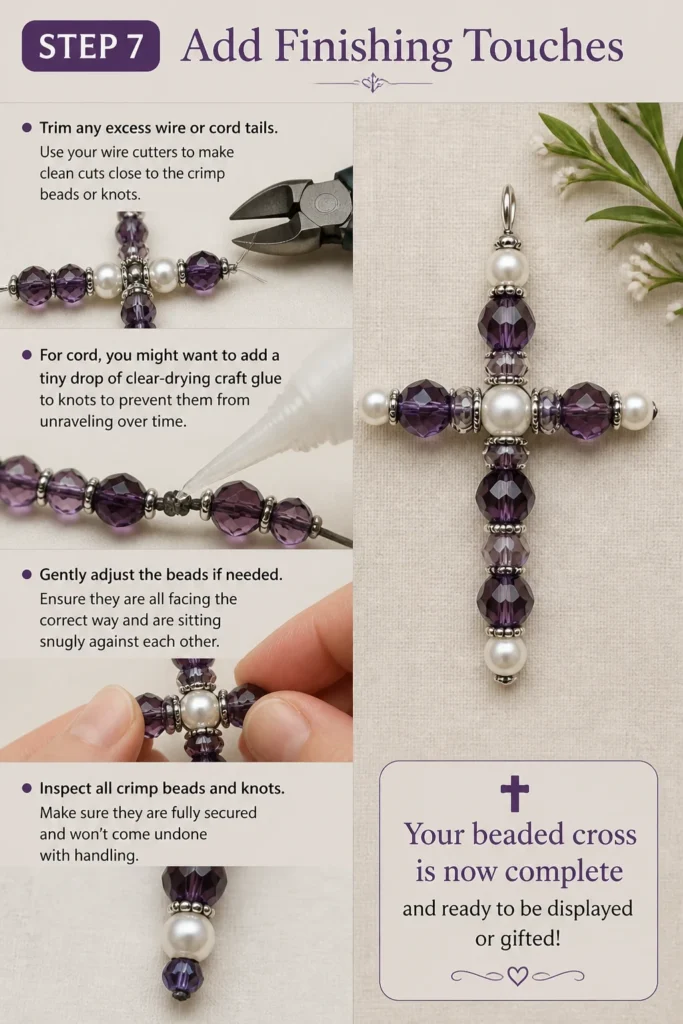
For cord, you might want to add a tiny drop of clear-drying craft glue to knots to prevent them from unraveling over time.
Gently adjust the beads if needed. Ensure they are all facing the correct way and are sitting snugly against each other.
Inspect all crimp beads and knots. Make sure they are fully secured and won’t come undone with handling.
Your beaded cross is now complete and ready to be displayed or gifted!
Common Mistakes to Avoid
Using the Wrong Wire or Cord
Many beginners grab any wire or string they have on hand. Using wire that is too thin can lead to the cross bending or breaking easily, especially with heavier beads. Wire that is too thick might not fit through your beads or will be difficult to manipulate into loops.
Always check the gauge of your wire against the bead hole size. For cord, ensure it’s strong enough not to fray or snap under the weight of the beads. Investing in proper beading wire or specialized cord makes a significant difference in the finished product’s quality and durability.
Inconsistent Tension
A common issue is stringing beads with varying tension. Some sections might be too loose, causing gaps between beads, while others might be too tight, leading to a warped or stiff cross. This can make the cross look uneven and unprofessional.
Aim for a consistent, snug tension throughout the entire project. The beads should sit close together without being squeezed. Practice helps develop a feel for the right amount of tension. If using wire, gently pull the wire taut after every few beads to even them out.
Poorly Secured Ends
The entire integrity of your beaded cross relies on securely fastened ends. Rushing this step or not properly crimping beads or tying knots can result in the cross unraveling over time. This is particularly heartbreaking after spending time on the design.
Take extra care when forming loops with crimp beads. Use the correct slot on your crimping pliers for a firm, rounded crimp. For knots, ensure they are tight and consider adding a small drop of super glue or E6000 glue for added security, especially on non-fraying cords.
Overcomplicating the Design
It’s easy to get carried away with too many bead types, colors, or intricate patterns, especially on your first project. This can lead to a cluttered or overwhelming look that detracts from the cross’s simple beauty. It can also make the construction process more challenging than necessary for a beginner.
Start with a simpler design. Choose 2-3 complementary bead colors or sizes. Focus on mastering the basic construction techniques first. Once you’re comfortable, you can gradually introduce more complex patterns and bead combinations in future projects.
Troubleshooting
Cross Doesn’t Lie Flat or Looks Warped
If your finished cross isn’t lying flat or appears bent, it’s often due to inconsistent tension or uneven wire manipulation. Sometimes, the wire itself might have been bent during handling.
Gently try to reshape the cross with your hands. If the issue is severe, you might need to carefully unstring a section and re-thread it, paying close attention to keeping the wire straight and applying even tension. Ensure your initial wire cuts were straight and not kinked.
Beads Keep Slipping or Cross Unravels
This is almost always a sign of poorly secured ends. The crimp beads may not have been fully compressed, or knots might not be tight enough or properly finished.
Carefully inspect all crimps and knots. If a crimp bead feels loose, you might be able to re-crimp it more firmly. If a knot is coming undone, you may need to re-tie it, possibly adding a tiny dab of glue. Prevention is key here, so double-check securing steps during creation.
Wire Snaps or Cord Fraying
A snapping wire could indicate old, brittle wire, excessive force during crimping, or using a wire gauge too thin for the beads. Fraying cord often means it’s a lower quality material or has been subjected to too much friction.
Unfortunately, a snapped wire usually means starting over on that section, or even the whole arm, especially if it’s in the middle. Always use fresh, good-quality beading wire. For cord, a bit of clear nail polish or Fray Check can sometimes stop fraying at the ends, but if it’s fraying significantly in the middle, replacement is the best option.
Key Takeaways
- Choosing the right quality and type of beads, wire, and tools is fundamental for a durable and attractive cross.
- Planning your design and counting beads beforehand saves time and prevents frustration during the actual threading process.
- Consistent tension throughout the entire project is crucial for a well-formed, professional-looking beaded cross.
- Meticulously securing all wire ends with firm crimps or tight knots is essential to prevent the cross from unraveling.
- Starting with a simpler design allows you to master basic techniques before moving on to more intricate patterns.
- Patience and attention to detail at each step contribute significantly to the overall success and beauty of your handcrafted piece.
Frequently Asked Questions
What kind of beads are best for a beginner?
For beginners, seed beads (size 6/0 or 8/0) or pony beads are excellent choices. They are generally inexpensive, come in a wide range of colors, and have larger holes, making them easier to thread onto wire or cord. Avoid very tiny beads or those with irregular shapes until you gain more experience.
Can I use fishing line instead of beading wire?
While fishing line is strong, it’s generally not recommended for beaded crosses. It can be very stiff and difficult to manipulate into decorative loops or to secure with crimp beads. It also tends to stretch slightly over time, potentially causing gaps between your beads. Dedicated beading wire offers better drape and is designed for crafting.
How do I make a loop for hanging the cross?
To make a hanging loop, thread a crimp bead onto the end of your wire, then thread a few more beads, or just the last bead of the cross’s arm. Create a loop of the desired size with your round-nose pliers, then thread the wire back through the crimp bead (and potentially the last few beads) to secure the loop. Use chain-nose pliers to firmly compress the crimp bead.
What’s the best way to clean a beaded cross?
The best cleaning method depends on the type of beads used. For most glass or plastic beads, a soft, dry cloth is usually sufficient to remove dust. If it needs more, lightly dampen a cloth with plain water and gently wipe. Avoid harsh chemicals or abrasive cleaners, as they can damage bead finishes or wire coatings. Always allow it to air dry completely.
Our Top Recommended Finds
- Beading Pliers Set: A good quality set including round-nose, chain-nose, and flush cutters will make all the difference in your crafting precision and ease.
- Assorted Seed Bead Kit: Provides a variety of colors and sizes, perfect for experimenting with different designs without buying large quantities of individual bead types.
- Flexible Beading Wire Variety Pack: Offers different gauges and sometimes colors, allowing you to match the wire strength and appearance to your specific bead choices.
Your Beaded Journey Continues
You’ve now created a beautiful beaded cross, a testament to your patience and creativity. This project is more than just a craft; it’s an expression of personal touch and care.
Consider gifting your creation to a loved one, or display it proudly in your home. Each bead you threaded tells a story of skill and dedication.
Now that you’ve mastered the basics, explore new patterns and bead combinations. Try different wire techniques, or even integrate other elements like small charms.
The world of bead crafting is vast and rewarding. Keep creating, keep learning, and enjoy every moment of your artistic journey.
Beginner-friendly templates, step-by-step guides,
and weekly project ideas in your inbox.