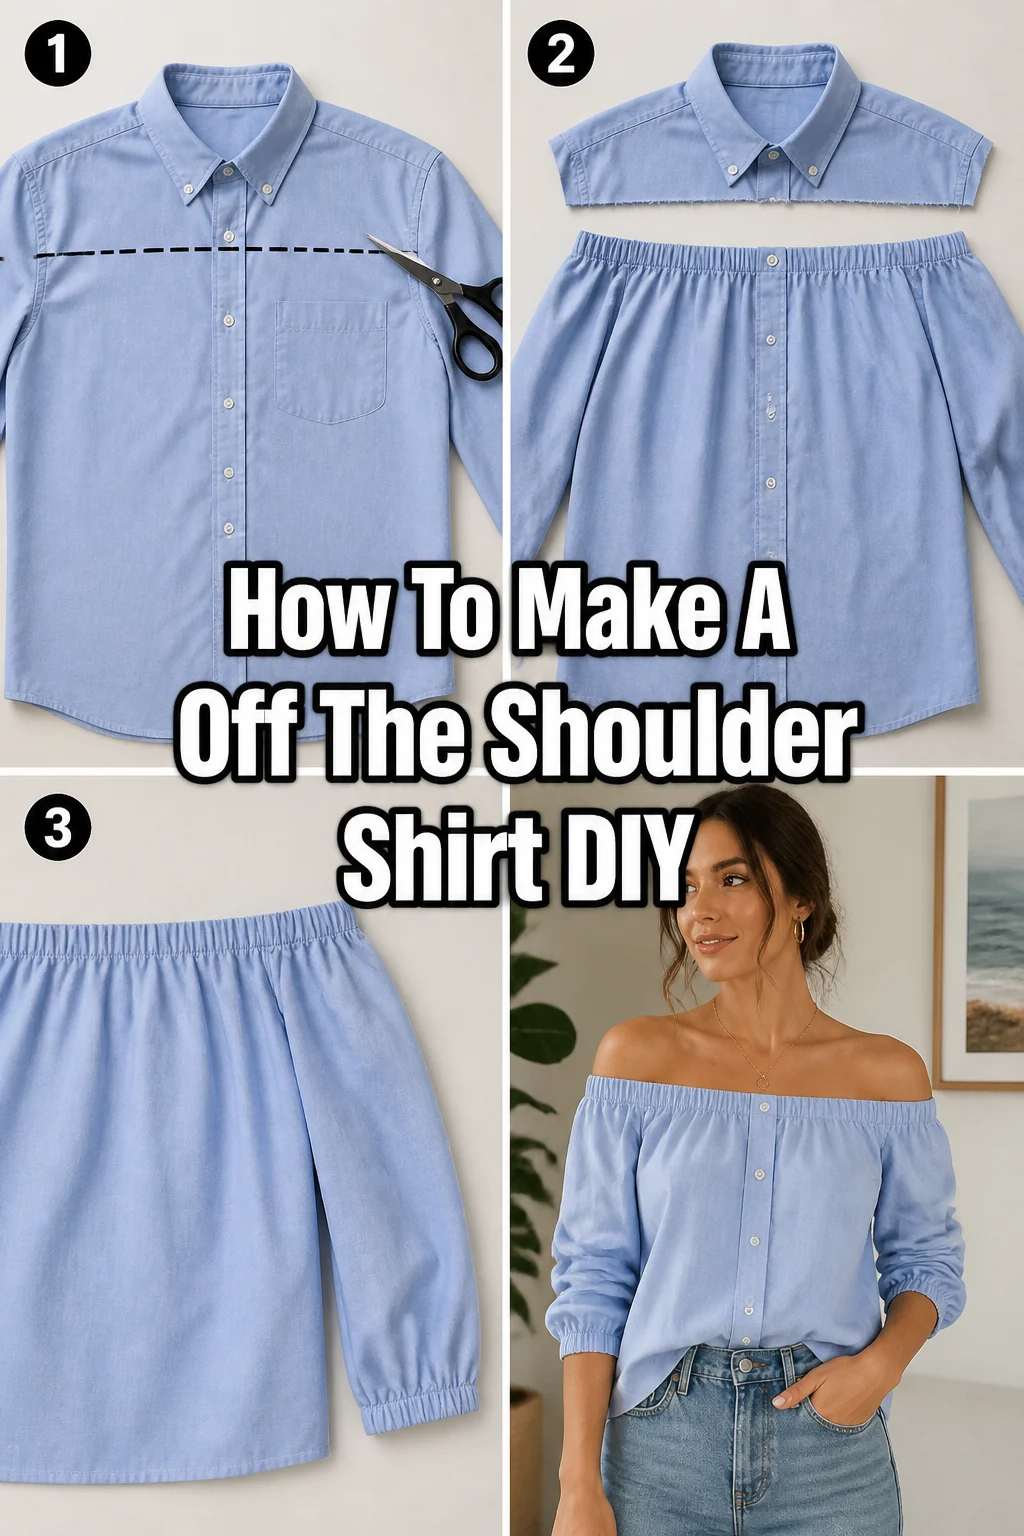
👚 How To Make A Off The Shoulder Shirt DIY

Beginner-friendly templates, step-by-step guides,
and weekly project ideas in your inbox.
Transforming an old t-shirt into a trendy off-the-shoulder top is a super satisfying project.
I’ve personally upcycled countless shirts this way, discovering the simplest methods for stunning results.
This guide will walk you through every detail, ensuring your DIY shirt looks professionally finished.

Quick Overview
You’re about to create a stylish, custom off-the-shoulder shirt from an existing garment. This project is perfect for adding a personal touch to your wardrobe without breaking the bank.
- Time needed: 1-2 hours (with sewing machine), 2-3 hours (hand sewing or no-sew options)
- Difficulty: Beginner
- What you’ll need: An old t-shirt or top, fabric scissors, sewing machine (optional), elastic, measuring tape, fabric chalk or marker, safety pin.
Step-by-Step Instructions
Step 1: Choose Your Starting Shirt
Selecting the right shirt is crucial for a successful off-the-shoulder conversion. A loose-fitting t-shirt or a slightly oversized top works best, providing enough fabric for the new neckline.
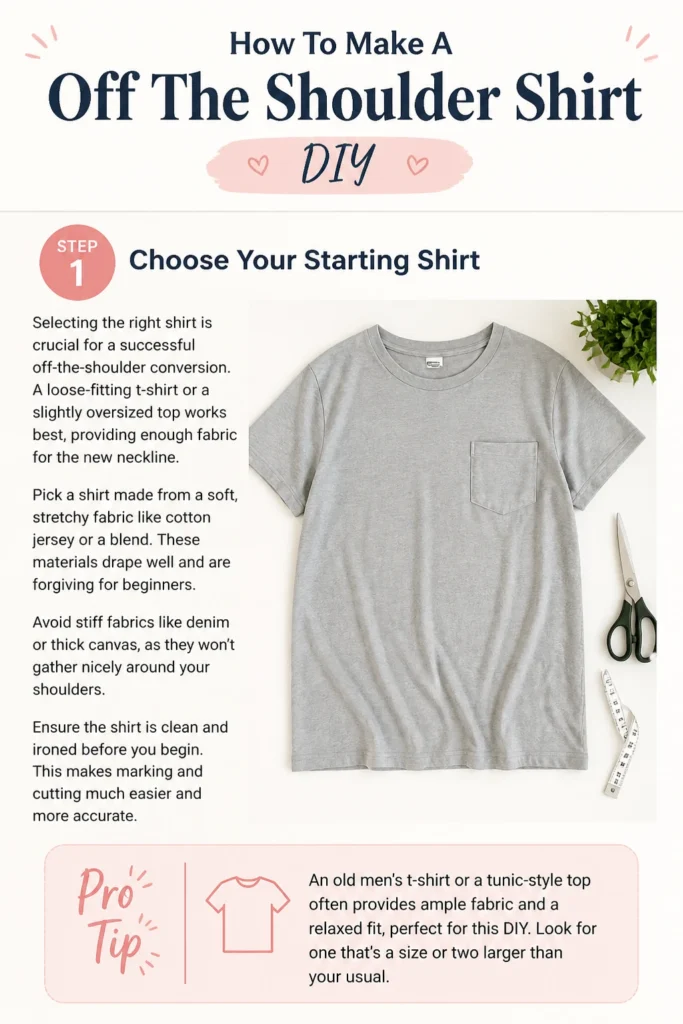
- Pick a shirt made from a soft, stretchy fabric like cotton jersey or a blend. These materials drape well and are forgiving for beginners.
- Avoid stiff fabrics like denim or thick canvas, as they won’t gather nicely around your shoulders.
- Ensure the shirt is clean and ironed before you begin. This makes marking and cutting much easier and more accurate.
Pro Tip: An old men’s t-shirt or a tunic-style top often provides ample fabric and a relaxed fit, perfect for this DIY. Look for one that’s a size or two larger than your usual.
Step 2: Gather Your Tools and Materials
Having everything ready before you start saves time and frustration. A well-prepared workspace makes the process smooth and enjoyable.
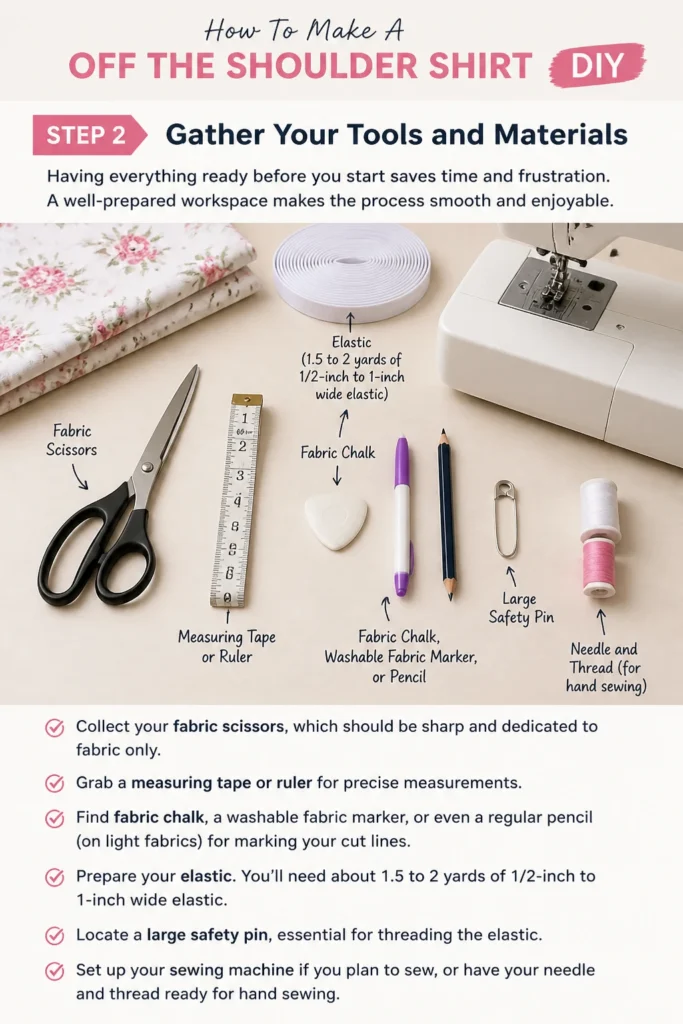
- Collect your fabric scissors, which should be sharp and dedicated to fabric only.
- Grab a measuring tape or ruler for precise measurements.
- Find fabric chalk, a washable fabric marker, or even a regular pencil (on light fabrics) for marking your cut lines.
- Prepare your elastic. You’ll need about 1.5 to 2 yards of 1/2-inch to 1-inch wide elastic.
- Locate a large safety pin, essential for threading the elastic.
- Set up your sewing machine if you plan to sew, or have your needle and thread ready for hand sewing.
Step 3: Mark the New Neckline
This step determines how far off your shoulders the shirt will sit. Take your time to get this measurement right for a comfortable and flattering fit.
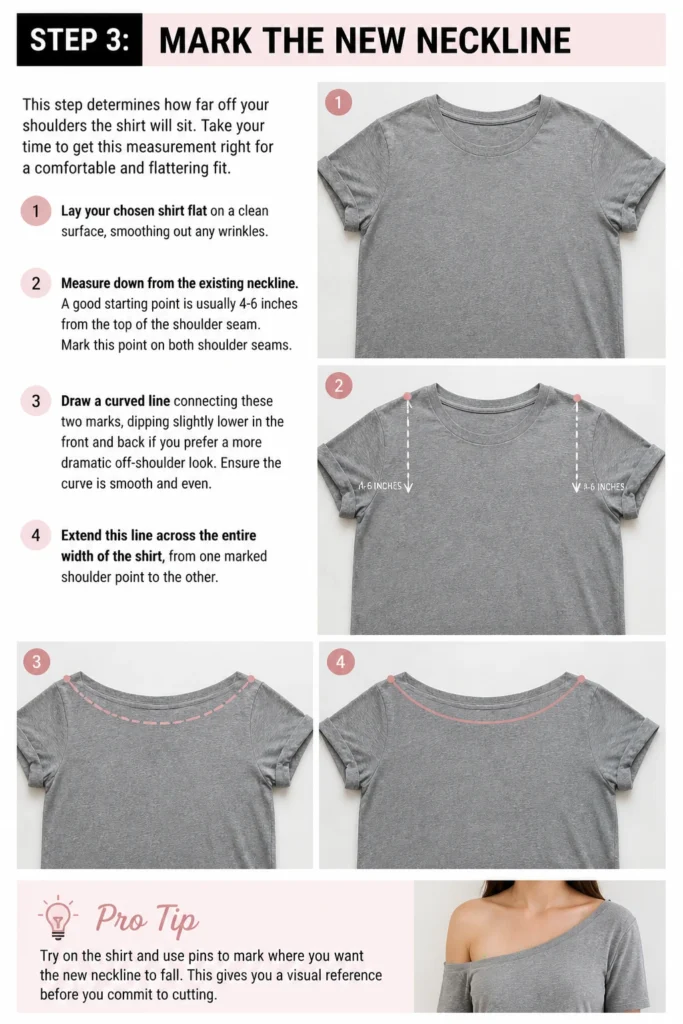
- Lay your chosen shirt flat on a clean surface, smoothing out any wrinkles.
- Measure down from the existing neckline. A good starting point is usually 4-6 inches from the top of the shoulder seam.
- Mark this point on both shoulder seams.
- Draw a curved line connecting these two marks, dipping slightly lower in the front and back if you prefer a more dramatic off-shoulder look. Ensure the curve is smooth and even.
- Extend this line across the entire width of the shirt, from one marked shoulder point to the other.
Pro Tip: Try on the shirt and use pins to mark where you want the new neckline to fall. This gives you a visual reference before you commit to cutting. Remember to account for the elastic casing when marking.
Step 4: Cut the Neckline
Cutting accurately is key to a clean finish. Take slow, steady cuts along your marked line.
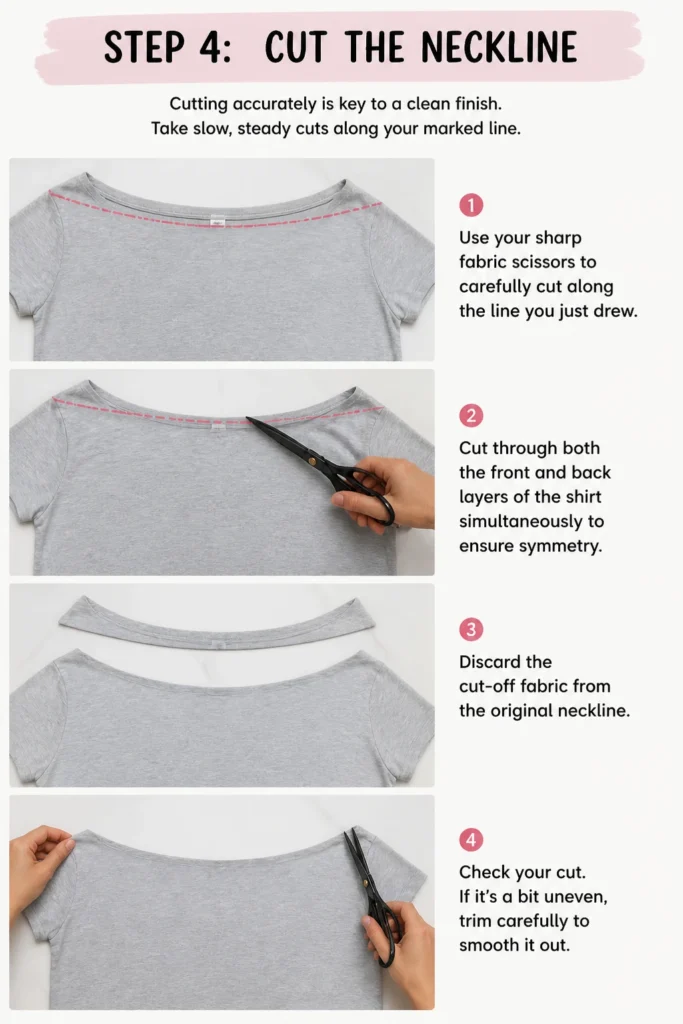
- Use your sharp fabric scissors to carefully cut along the line you just drew.
- Cut through both the front and back layers of the shirt simultaneously to ensure symmetry.
- Discard the cut-off fabric from the original neckline.
- Check your cut. If it’s a bit uneven, trim carefully to smooth it out.
Step 5: Create the Elastic Casing
The casing is where your elastic will sit, creating the gathered off-the-shoulder effect. This is a crucial sewing step.
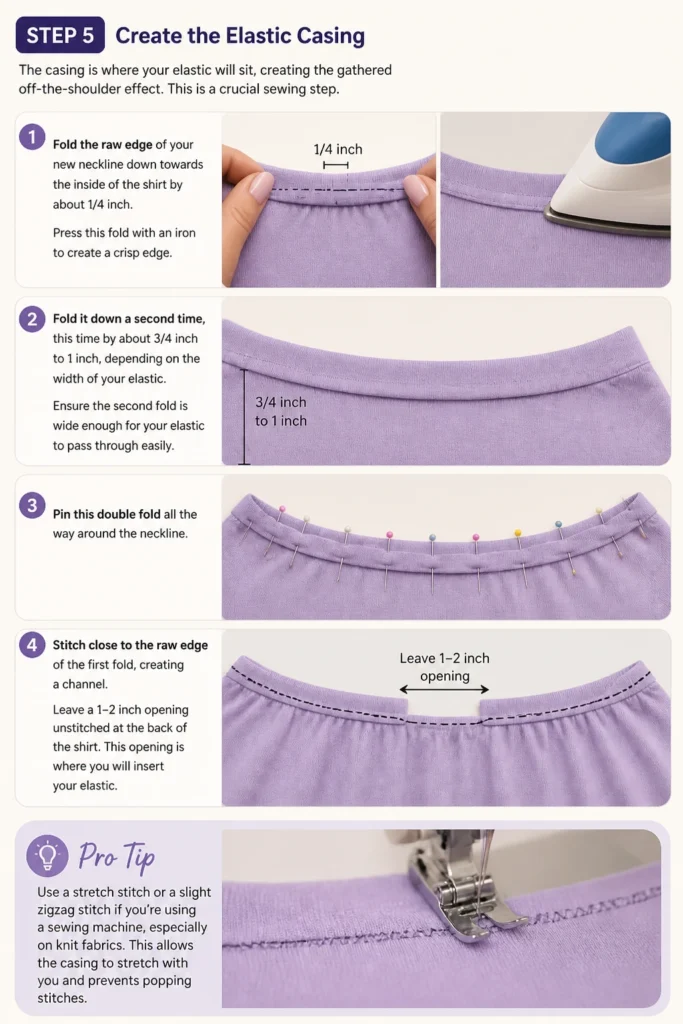
- Fold the raw edge of your new neckline down towards the inside of the shirt by about 1/4 inch.
- Press this fold with an iron to create a crisp edge.
- Fold it down a second time, this time by about 3/4 inch to 1 inch, depending on the width of your elastic. Ensure the second fold is wide enough for your elastic to pass through easily.
- Pin this double fold all the way around the neckline.
- Stitch close to the raw edge of the first fold, creating a channel. Leave a 1-2 inch opening unstitched at the back of the shirt. This opening is where you will insert your elastic.
Pro Tip: Use a stretch stitch or a slight zigzag stitch if you’re using a sewing machine, especially on knit fabrics. This prevents your stitches from popping when the fabric stretches.
Step 6: Measure and Cut Your Elastic
The elastic’s length determines how snug or loose your off-the-shoulder shirt will be. This measurement is highly personal.
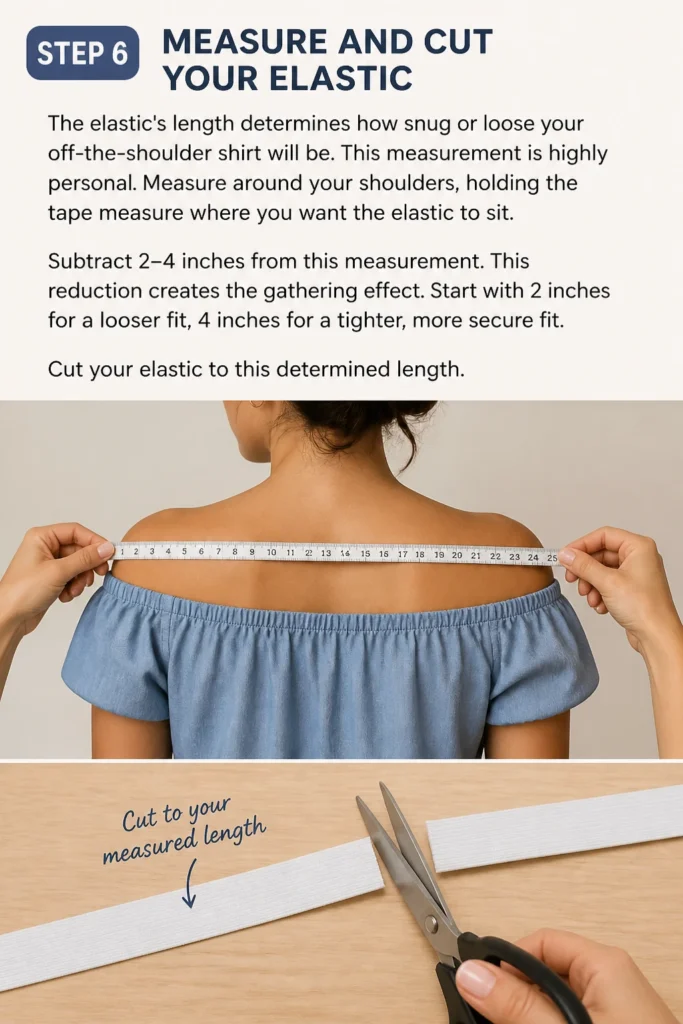
- Measure around your shoulders, holding the tape measure where you want the elastic to sit.
- Subtract 2-4 inches from this measurement. This reduction creates the gathering effect. Start with 2 inches for a looser fit, 4 inches for a tighter, more secure fit.
- Cut your elastic to this determined length.
Step 7: Thread the Elastic
This step can be a bit fiddly but is straightforward with a safety pin.
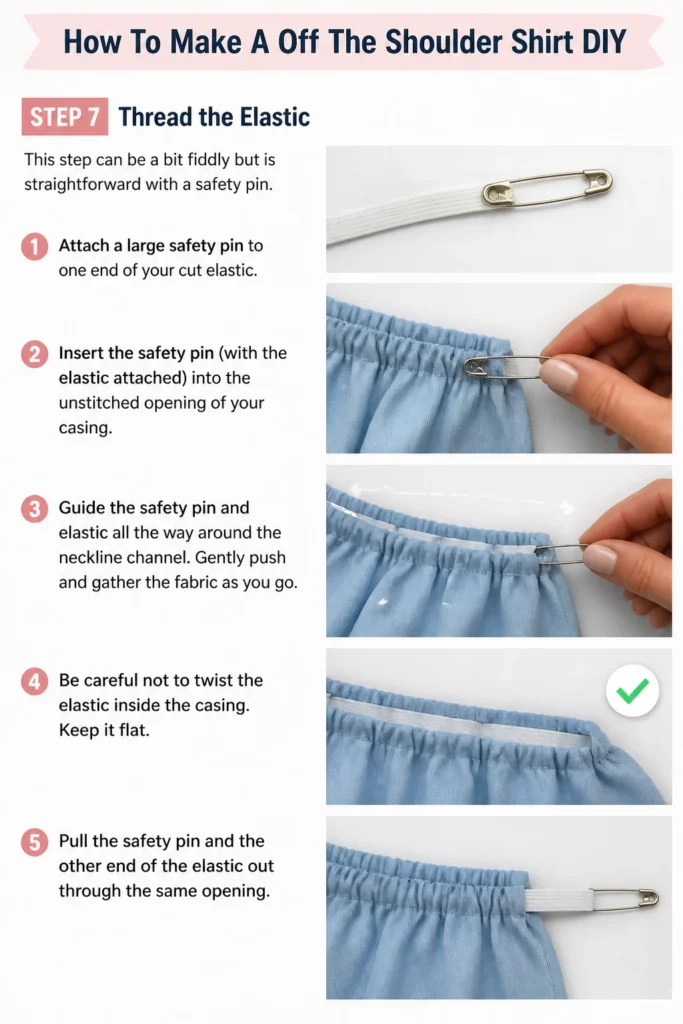
- Attach a large safety pin to one end of your cut elastic.
- Insert the safety pin (with the elastic attached) into the unstitched opening of your casing.
- Guide the safety pin and elastic all the way around the neckline channel. Gently push and gather the fabric as you go.
- Be careful not to twist the elastic inside the casing. Keep it flat.
- Pull the safety pin and the other end of the elastic out through the same opening.
Step 8: Secure the Elastic and Finish
Almost done! Securing the elastic creates the final shape of your shirt.
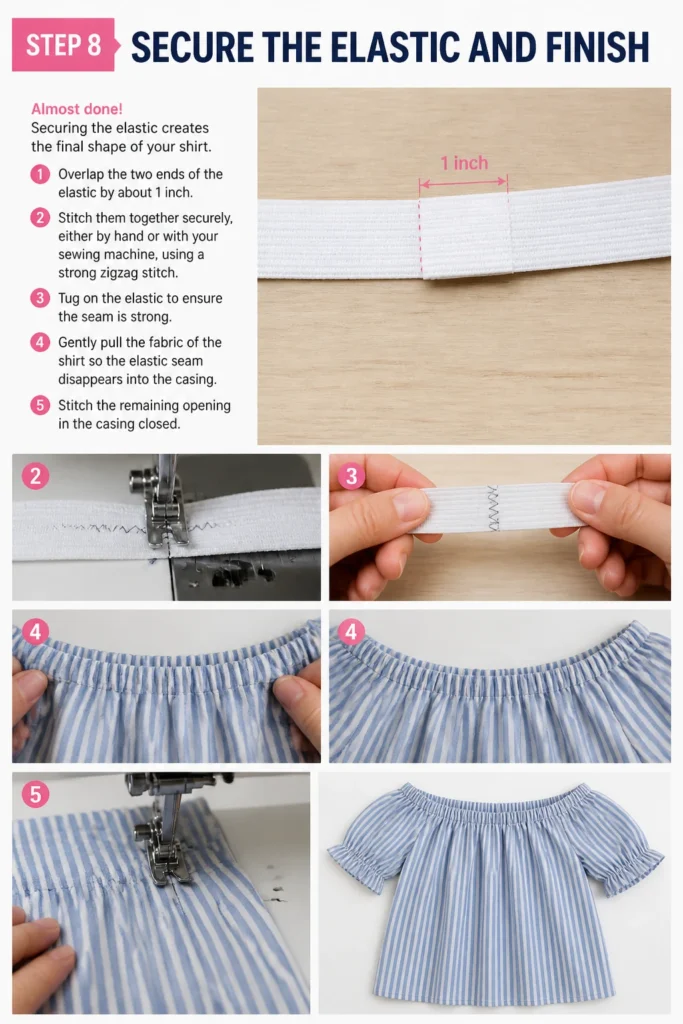
- Overlap the two ends of the elastic by about 1 inch.
- Stitch them together securely, either by hand or with your sewing machine, using a strong zigzag stitch.
- Tug on the elastic to ensure the seam is strong.
- Gently pull the fabric of the shirt so the elastic seam disappears into the casing.
- Stitch the remaining opening in the casing closed.
Step 9: Try On and Adjust
The moment of truth! Trying it on helps you see if any final tweaks are needed.
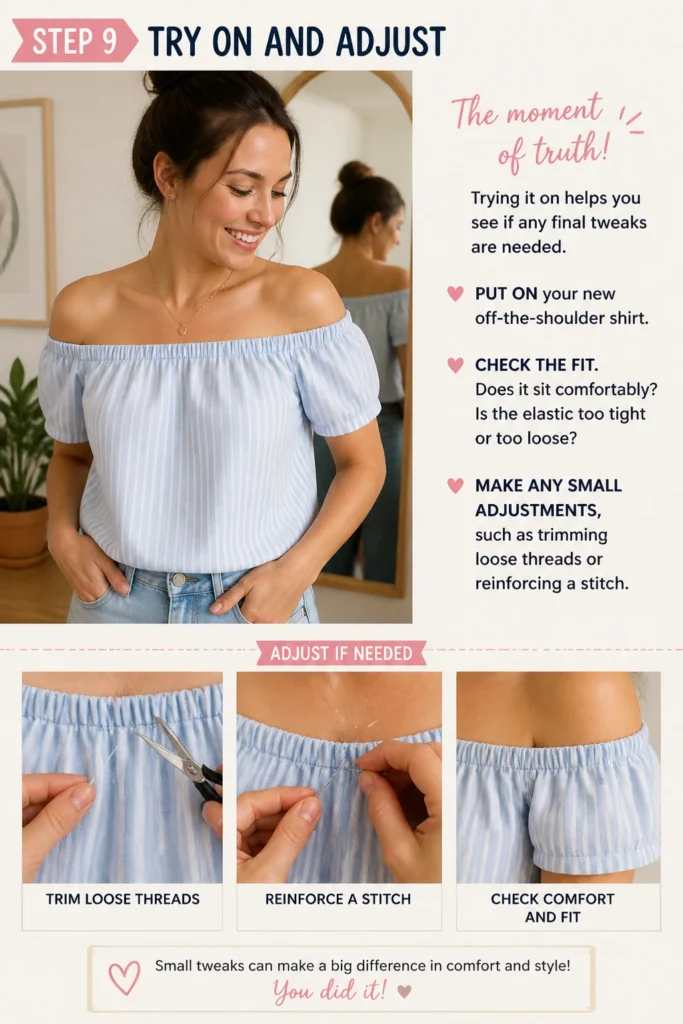
- Put on your new off-the-shoulder shirt.
- Check the fit. Does it sit comfortably? Is the elastic too tight or too loose?
- Make any small adjustments, such as trimming loose threads or reinforcing a stitch.
Common Mistakes to Avoid
Cutting Too Much Fabric
A common pitfall is cutting the neckline too low right from the start. Once you cut, you can’t add fabric back. This can result in a shirt that constantly slips down or reveals more than intended.
Always start by marking a conservative neckline, slightly higher than you think you want it. You can always trim more later if needed. Remember to account for the fabric that will be folded under to create the elastic casing.
Twisting the Elastic
During the threading process, it’s easy for the elastic to get twisted inside the casing. This creates an uncomfortable, uneven pull around the shoulders and can make the shirt look lumpy.
As you thread the elastic, frequently check its position inside the casing to ensure it remains flat. If you feel a twist, gently pull it back and re-thread that section. It’s much easier to fix it before you stitch the ends together.
Incorrect Elastic Length
If the elastic is too long, the shirt won’t stay off the shoulder; if it’s too short, it will feel restrictive and uncomfortable. Getting the length right is key to comfort and style.
Measure your shoulders carefully and subtract a reasonable amount (2-4 inches) for gathering. It’s better to cut the elastic slightly longer initially, secure it with a temporary stitch, try the shirt on, and then trim and re-stitch for the perfect fit.
Forgetting to Leave an Opening
It sounds obvious, but in the excitement of sewing, it’s easy to accidentally stitch the entire casing closed without leaving an opening for the elastic. This means you’ll have to unpick stitches, which can be frustrating.
Always make a conscious effort to mark or remember where your 1-2 inch opening should be before you start stitching the casing. Double-check that you’ve left it open before moving on to threading the elastic.
Troubleshooting
Shirt Slips Up Constantly
If your off-the-shoulder shirt keeps riding up, it’s likely due to the elastic being too long or not gathered enough. This makes the shirt less comfortable and defeats the purpose of the style.
Carefully unpick the stitches where the elastic ends are joined. Trim another 1-2 inches off the elastic, then re-stitch the ends together securely. Try the shirt on again to check the fit. You might need to repeat this process in small increments until it stays put.
Elastic Feels Too Tight
An overly tight elastic can be uncomfortable, dig into your skin, and restrict movement. This makes the shirt unpleasant to wear for extended periods.
If you’ve left an opening in your casing, you can try to unpick the elastic ends and insert a small piece of additional elastic to extend the loop. If the casing is fully sewn, you might need to carefully unpick a small section of the casing, cut the elastic, add a piece, and re-stitch both the elastic and the casing. This is why starting with a slightly longer elastic is often recommended.
Neckline is Uneven
An uneven neckline can look unprofessional and detract from the overall appearance of your DIY shirt. This usually happens during the initial cutting stage.
If the unevenness is minor, you can try to carefully trim the longer sections to even it out. For more significant unevenness, you might need to accept it as part of the “handmade charm” or, in extreme cases, consider cutting a new, lower neckline to correct the flaw, although this will make the shirt more off-the-shoulder.
Key Takeaways
- Choose a loose-fitting, stretchy fabric for the best results and comfort.
- Measure your new neckline carefully and mark it before cutting to avoid mistakes.
- Leave a 1-2 inch opening in your elastic casing for easy threading.
- Cut your elastic 2-4 inches shorter than your shoulder measurement for the perfect gather.
- Always check for twisted elastic before stitching the ends together.
- Try on your shirt for fit and comfort before doing any final finishing stitches.
Frequently Asked Questions
Can I make this a no-sew project?
Yes, you can adapt this for a no-sew option. Instead of sewing a casing, you can use fabric glue designed for clothing or iron-on fusible web tape to create the channel for your elastic. Ensure the adhesive is strong enough to hold the elastic in place and withstand washing.
What if my shirt isn’t stretchy?
While stretchy fabrics are ideal, you can still use a non-stretchy woven fabric. However, you’ll need to cut a wider neckline and ensure your elastic is long enough to allow the shirt to go over your shoulders comfortably, as the fabric itself won’t stretch. The gathers might also appear more structured.
How wide should my elastic be?
For most off-the-shoulder tops, 1/2-inch to 1-inch wide elastic works well. Thinner elastic creates more delicate gathers, while wider elastic provides a more substantial hold. Choose based on your fabric weight and desired aesthetic.
How do I prevent fraying on the cut edge?
If your fabric frays easily (common with woven fabrics), you’ll want to finish the raw edge before creating the casing. You can use a serger, a zigzag stitch on your sewing machine, or even a basic whipstitch by hand to prevent fraying before folding and stitching your casing.
Our Top Recommended Finds
- Sharp Fabric Scissors: A good pair makes all the difference for clean, precise cuts. Look for ones specifically for fabric to avoid dulling them.
- Washable Fabric Marker: These markers disappear with water or heat, ensuring no visible lines are left on your finished garment.
- Braided Elastic (1-inch width): This type of elastic holds its shape well and is durable, perfect for creating a lasting off-the-shoulder effect.
Unleash Your Inner Fashion Designer
You’ve now got all the knowledge to transform a simple shirt into a chic, custom off-the-shoulder piece.
This project is a fantastic entry point into the world of DIY fashion, building your confidence with basic sewing skills.
Grab an old shirt today and start creating your unique style statement. You’ll love wearing something you made yourself!
Beginner-friendly templates, step-by-step guides,
and weekly project ideas in your inbox.