✨ How To Make Tube Top From Tshirt DIY

Beginner-friendly templates, step-by-step guides,
and weekly project ideas in your inbox.
Have you ever looked at a favorite old t-shirt and wished it could be something new? I certainly have. This guide is born from countless hours of experimenting with fabric and a desire for unique, comfortable fashion.
Transforming a simple t-shirt into a stylish tube top is not only fun but also incredibly rewarding. It’s a fantastic way to refresh your wardrobe without spending a dime. Get ready to create something truly your own.

Quick Overview
This project will guide you through transforming an ordinary t-shirt into a custom-fit tube top. You’ll learn essential cutting, measuring, and sewing techniques perfect for beginners. The result will be a comfortable, versatile piece ready for any occasion.
- Time needed: 30-60 minutes
- Difficulty: Beginner
- What you’ll need: An old t-shirt, sharp fabric scissors, measuring tape, sewing machine (or needle and thread), sewing pins, elastic (1-inch wide recommended), fabric chalk or marker.
Step-by-Step Instructions
Step 1: Choose Your T-Shirt Wisely
Selecting the right t-shirt is the first and most crucial step for a successful tube top. A t-shirt with a good amount of stretch works best, as this will help the tube top conform to your body and stay up without slipping. Look for cotton blends or jersey knits.
Pick a t-shirt that is slightly larger than your usual size, or at least not too tight. This gives you enough fabric to work with for a comfortable fit. Consider the color and pattern; a solid color can be a great base for accessorizing, while a fun print adds instant personality.
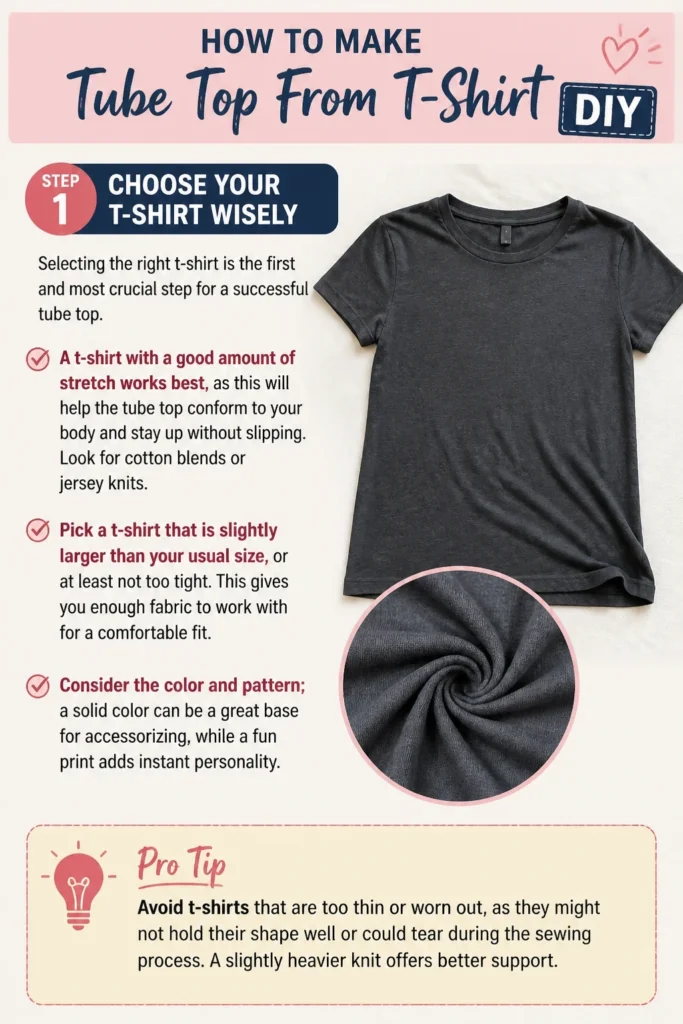
Pro Tip: Avoid t-shirts that are too thin or worn out, as they might not hold their shape well or could tear during the sewing process. A slightly heavier knit offers better support.
Step 2: Prepare Your Work Area and Tools
Clear a large, flat surface where you can lay out your t-shirt smoothly. This ensures accurate measurements and cuts. Gather all your tools before you begin.
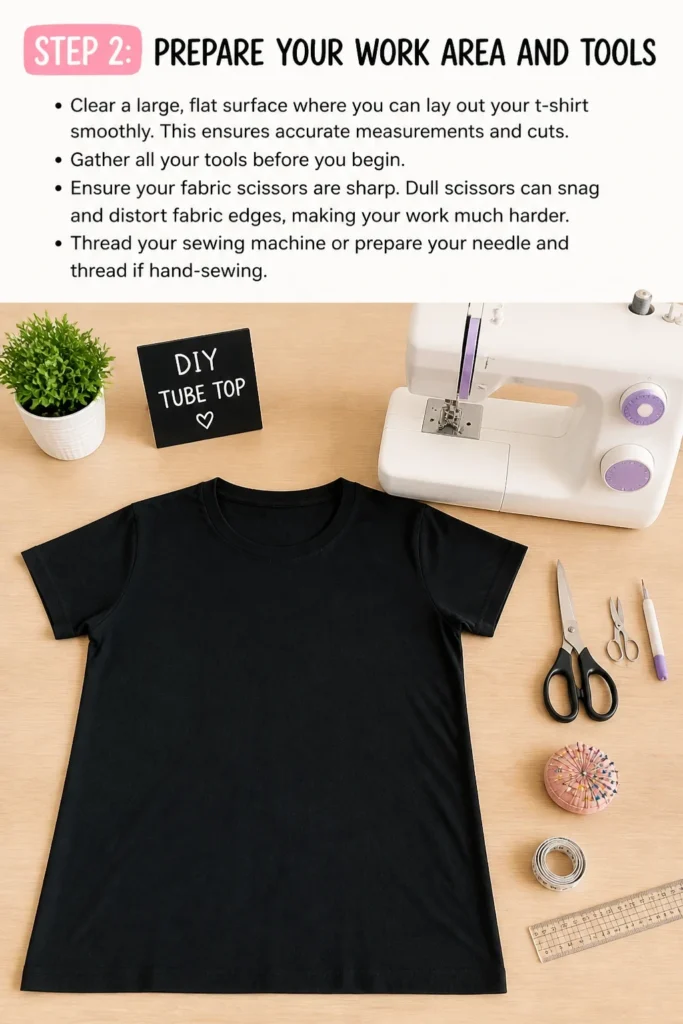
Ensure your fabric scissors are sharp. Dull scissors can snag and distort fabric edges, making your work much harder. Thread your sewing machine or prepare your needle and thread if hand-sewing.
Step 3: Measure and Mark Your T-Shirt
Lay your chosen t-shirt flat and smooth it out, removing any wrinkles. Place it on your prepared work surface.
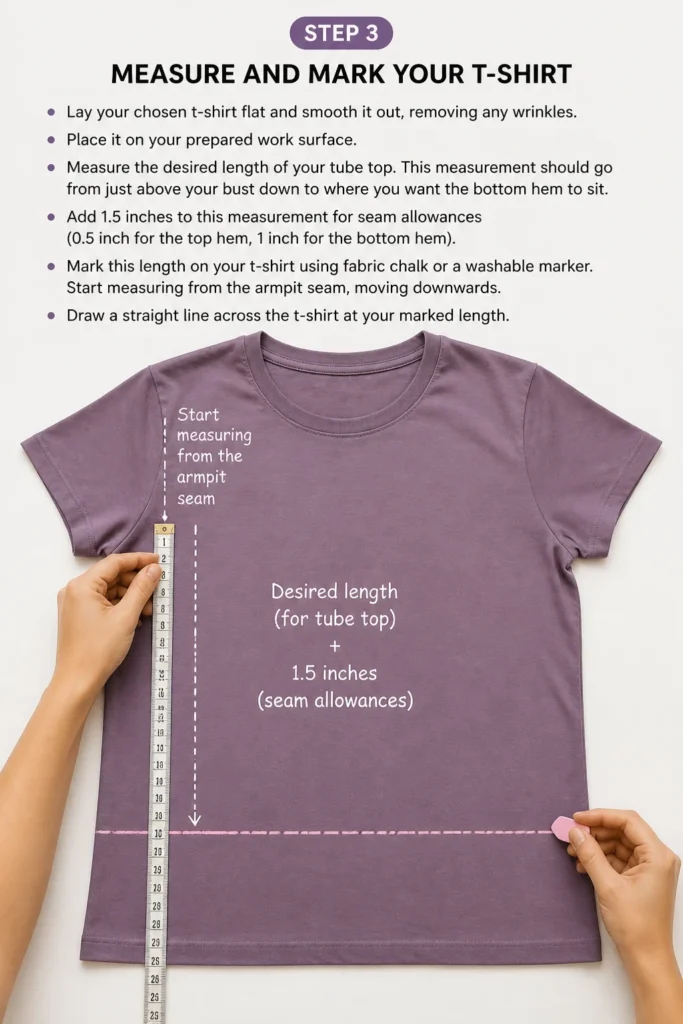
Measure the desired length of your tube top. This measurement should go from just above your bust down to where you want the bottom hem to sit. Add 1.5 inches to this measurement for seam allowances (0.5 inch for the top hem, 1 inch for the bottom hem).
Mark this length on your t-shirt using fabric chalk or a washable marker. Start measuring from the armpit seam, moving downwards. Draw a straight line across the t-shirt at your marked length.
Step 4: Cut the T-Shirt
Carefully cut along the line you just marked. Cut straight across the t-shirt, ensuring both the front and back pieces are the same length.
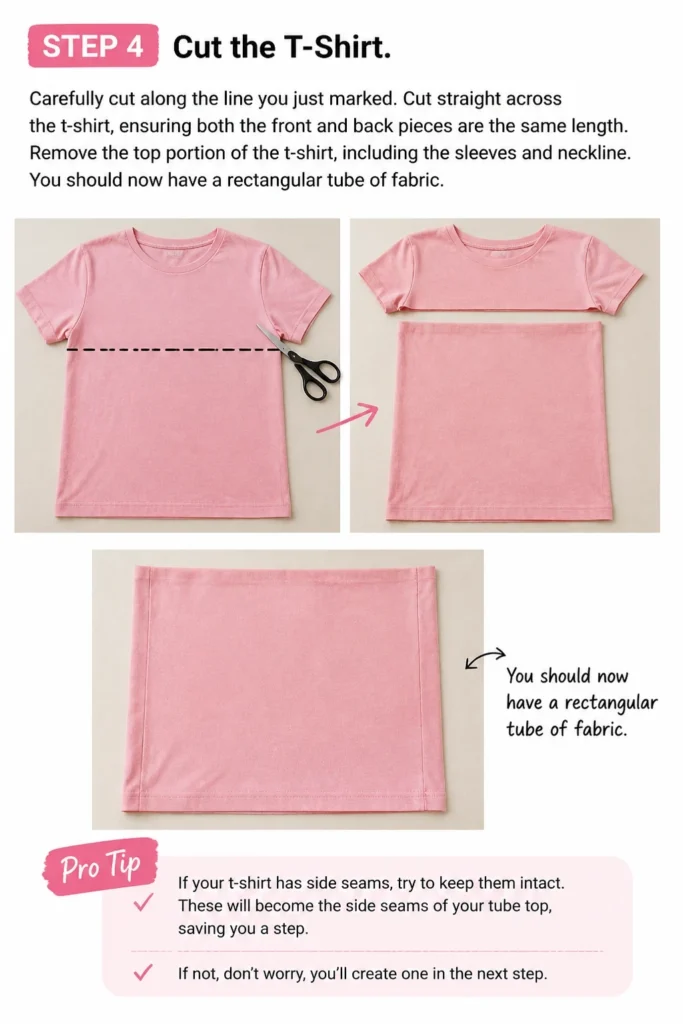
Remove the top portion of the t-shirt, including the sleeves and neckline. You should now have a rectangular tube of fabric.
Pro Tip: If your t-shirt has side seams, try to keep them intact. These will become the side seams of your tube top, saving you a step. If not, don’t worry, you’ll create one in the next step.
Step 5: Create or Adjust the Side Seam
Fold your fabric tube in half lengthwise, right sides together, if it doesn’t already have intact side seams. If your t-shirt had side seams, proceed to the next step.
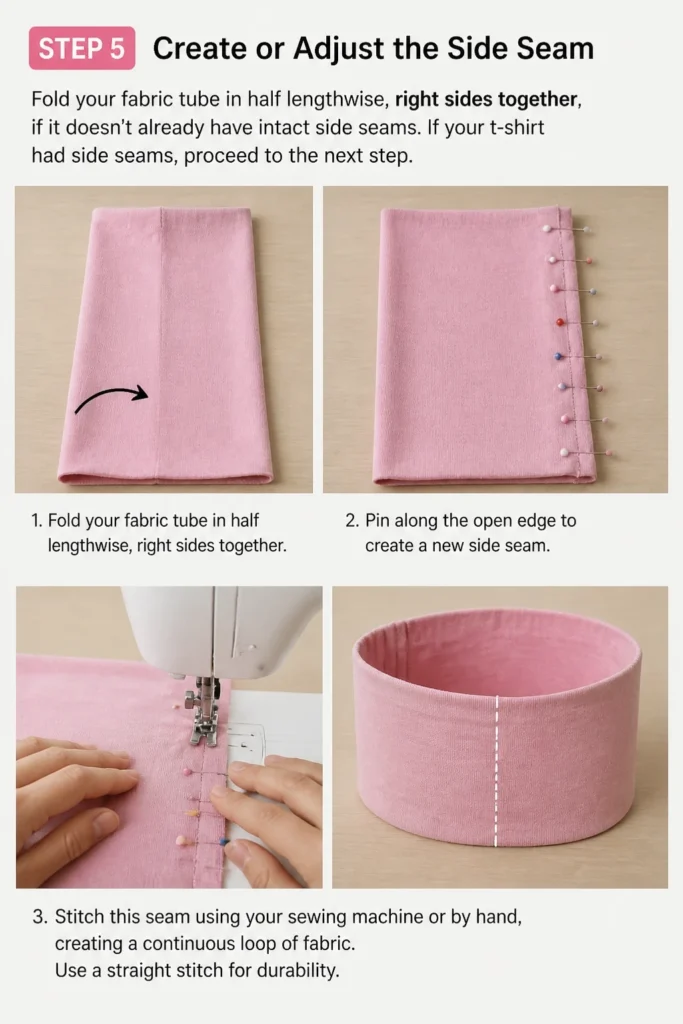
Pin along the open edge to create a new side seam. Stitch this seam using your sewing machine or by hand, creating a continuous loop of fabric. Use a straight stitch for durability.
Step 6: Hem the Top Edge (Elastic Casing)
Fold the top raw edge of your fabric tube down by 0.5 inches towards the inside. Press it flat with an iron if you have one, or just finger-press firmly.
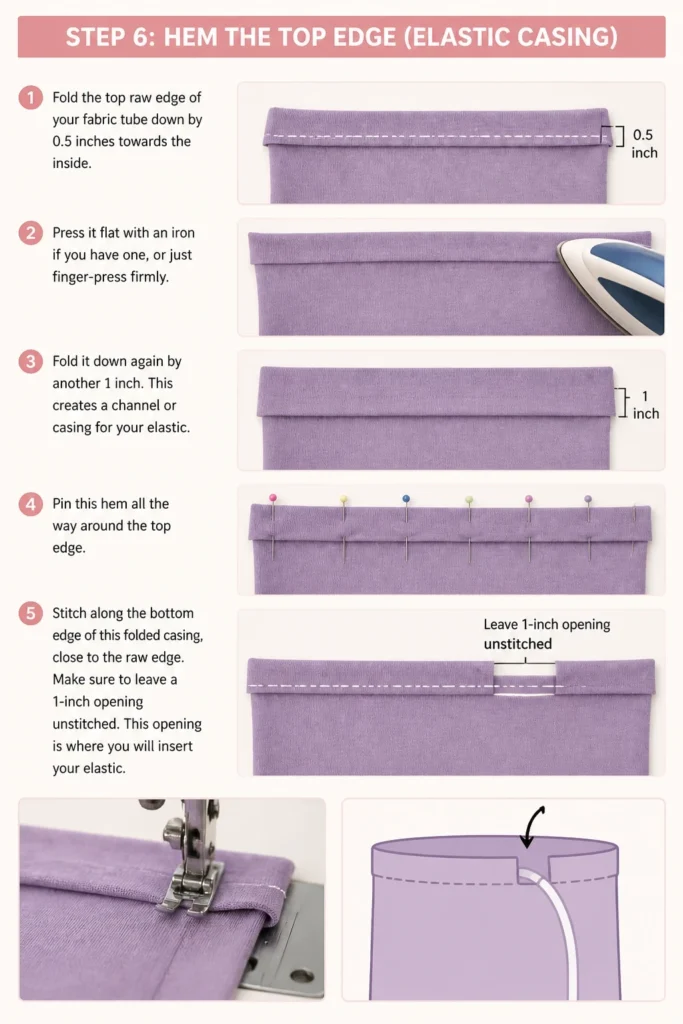
Fold it down again by another 1 inch. This creates a channel or casing for your elastic. Pin this hem all the way around the top edge.
Stitch along the bottom edge of this folded casing, close to the raw edge. Make sure to leave a 1-inch opening unstitched. This opening is where you will insert your elastic.
Step 7: Insert the Elastic
Measure your elastic. Wrap the elastic around your bust, just above where the tube top will sit, ensuring it’s snug but not uncomfortably tight. Subtract about 1-2 inches from this measurement to allow for stretch and ensure it stays up.
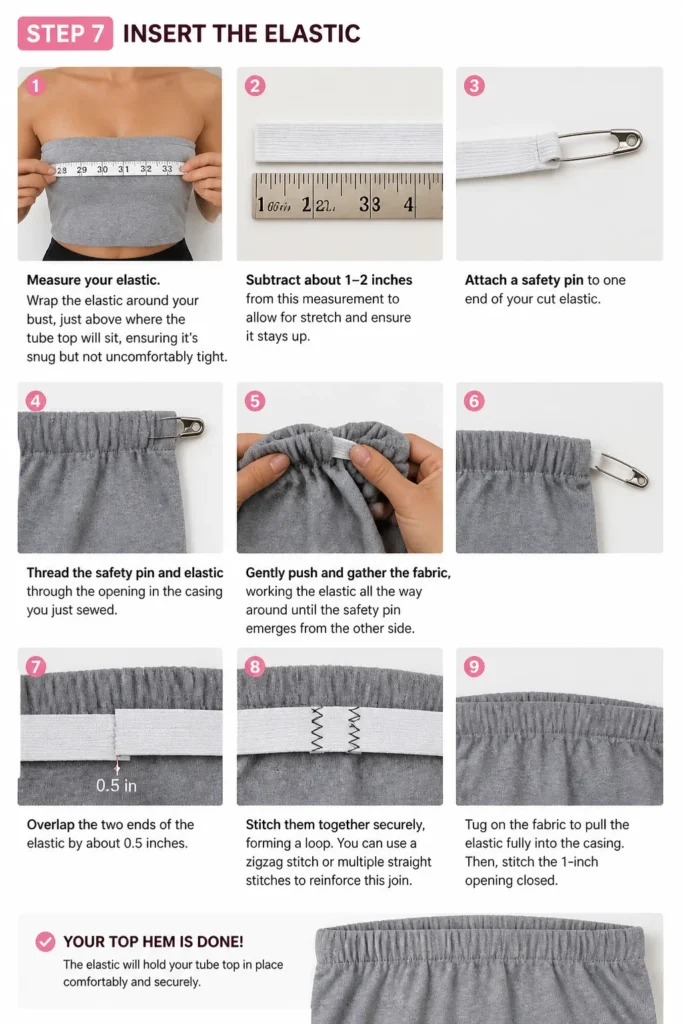
Attach a safety pin to one end of your cut elastic. Thread the safety pin and elastic through the opening in the casing you just sewed. Gently push and gather the fabric, working the elastic all the way around until the safety pin emerges from the other side.
Overlap the two ends of the elastic by about 0.5 inches. Stitch them together securely, forming a loop. You can use a zigzag stitch or multiple straight stitches to reinforce this join.
Tug on the fabric to pull the elastic fully into the casing. Then, stitch the 1-inch opening closed. Your top hem is now complete and elasticized.
Step 8: Hem the Bottom Edge
Fold the bottom raw edge of your tube top up by 0.5 inches towards the inside. Press it flat.
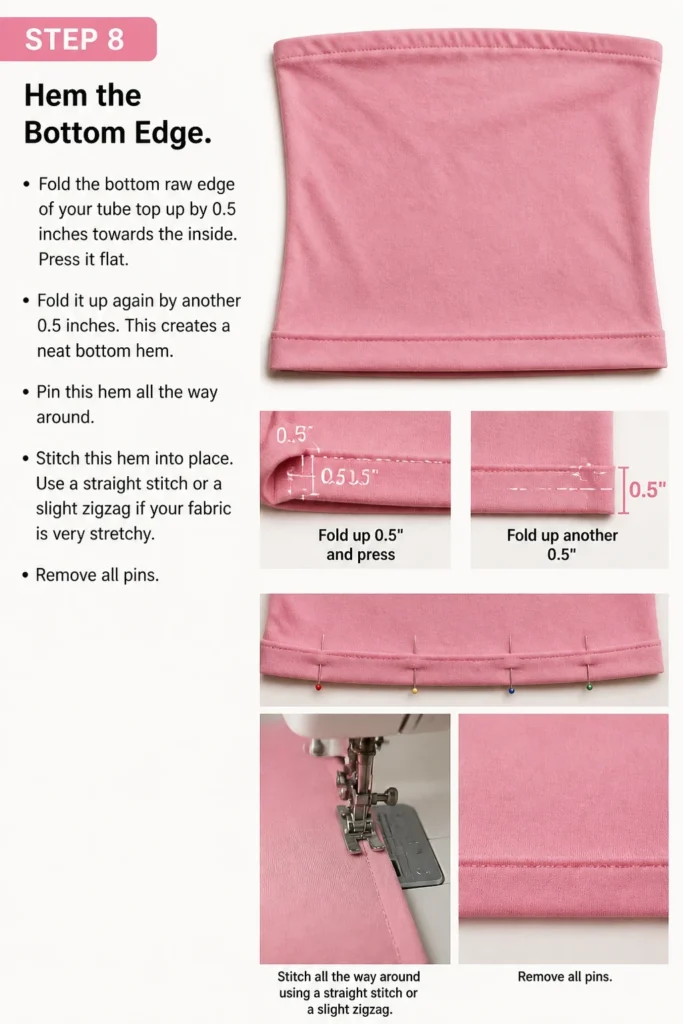
Fold it up again by another 0.5 inches. This creates a neat bottom hem. Pin this hem all the way around.
Stitch this hem into place. Use a straight stitch or a slight zigzag if your fabric is very stretchy. Remove all pins.
Step 9: Try On and Adjust
Carefully try on your new tube top. Check the fit around your bust and the overall length. Does it feel secure? Is it comfortable?
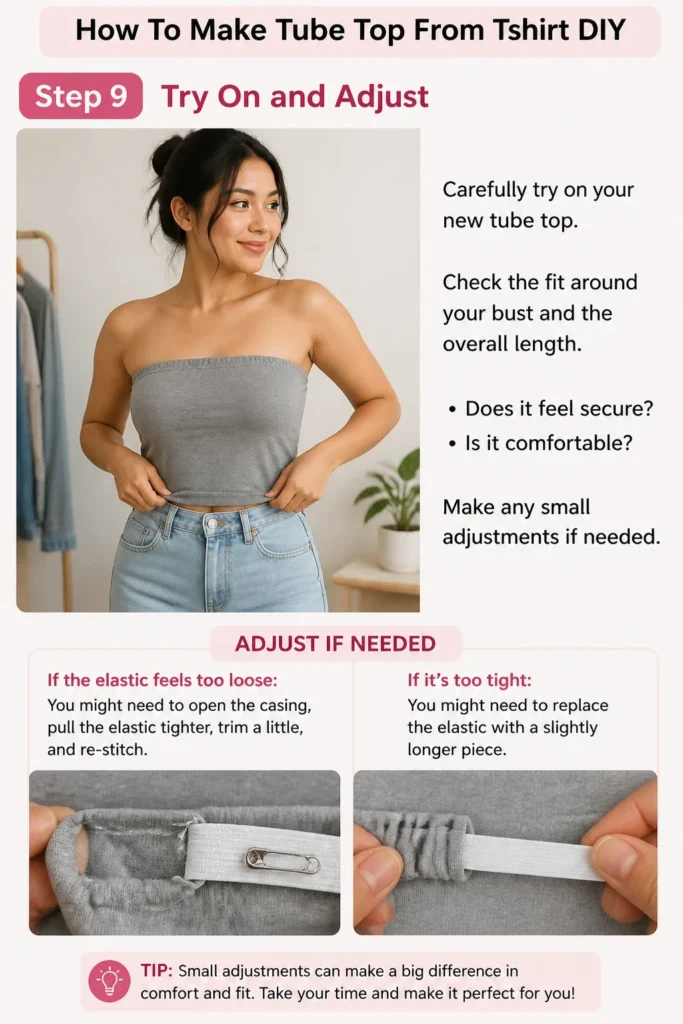
Make any small adjustments if needed. If the elastic feels too loose, you might need to open the casing, pull the elastic tighter, trim a little, and re-stitch. If it’s too tight, you might need to replace the elastic with a slightly longer piece.
Step 10: Final Touches and Enjoy!
Trim any loose threads. Give your new tube top a final press with an iron to set the seams and give it a polished look.
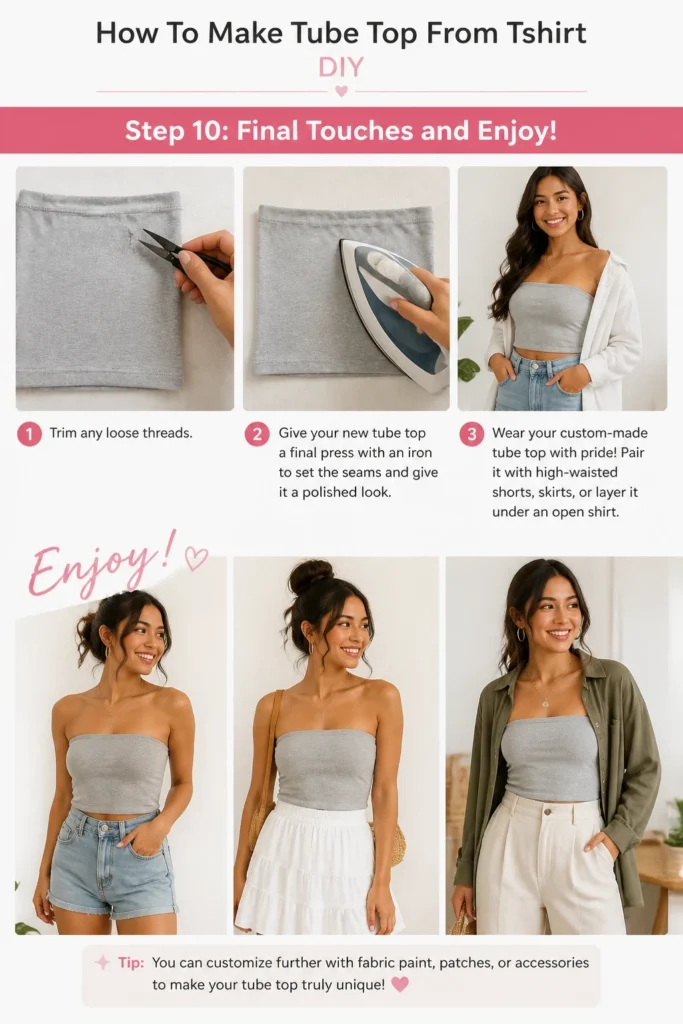
Wear your custom-made tube top with pride! Pair it with high-waisted shorts, skirts, or layer it under an open shirt.
Common Mistakes to Avoid
Cutting Too Short
Many people get excited and cut their t-shirt too short initially, forgetting to account for the hem allowances. This often results in a tube top that is too revealing or uncomfortable. Always add an extra 1.5 to 2 inches to your desired finished length for both the top elastic casing and the bottom hem. It’s always easier to trim off excess fabric than to add more.
Using Non-Stretchy Fabric
A common pitfall is choosing a t-shirt made from a rigid, non-stretchy material. Tube tops rely on the fabric’s natural stretch and the elastic to stay in place comfortably. If your fabric has no give, the tube top will likely be stiff, uncomfortable, and prone to slipping down. Stick to jersey knits, cotton blends, or fabrics with a good spandex content.
Skipping the Measuring Step
Eyeballing measurements might seem quicker, but it often leads to uneven hems or an ill-fitting garment. Taking precise measurements for both the length of the tube top and the elastic ensures a professional finish and a comfortable fit. Use a measuring tape and fabric chalk for accuracy, and don’t rush this crucial step.
Not Securing Elastic Properly
If the elastic isn’t stitched securely when joined, it can come undone inside the casing, causing the tube top to lose its shape and fall down. Overlap the elastic ends by at least half an inch and use a strong stitch, like a zigzag, or multiple straight stitches, to create a durable join. This small detail makes a big difference in the longevity of your tube top.
Troubleshooting
Tube Top Keeps Slipping Down
This is a very common issue, often due to elastic that is too loose or not enough stretch in the fabric. First, check the elastic. If it feels too loose, carefully unpick a small section of your elastic casing, pull out the elastic, and shorten it by 1-2 inches before rejoining and stitching the casing closed. If the fabric itself has minimal stretch, consider adding a second, thinner piece of elastic just above the first, or adding thin straps (which can be made from leftover t-shirt fabric or ribbon) for extra security.
Hem Looks Messy or Uneven
Messy hems usually result from rushing, not pressing the fabric, or using dull scissors. To fix it, carefully unpick the stitches on the problematic hem. Press the raw edge with an iron to make it flat and crisp. Re-fold the hem, using your measuring tape to ensure an even width all the way around, and pin frequently before re-stitching. Take your time, and remember that practice improves your neatness.
Elastic Feels Too Tight
If your tube top feels uncomfortably constricting, the elastic might be too short. You’ll need to unpick the elastic casing, cut the existing elastic, and replace it with a new piece that is slightly longer. When measuring the new elastic, wrap it around your bust and ensure it’s snug but not digging in, then subtract just 0.5-1 inch for the overlap to maintain comfort. This adjustment ensures a much more pleasant wearing experience.
Key Takeaways
- Choose stretchy fabric: A t-shirt with good stretch is crucial for a comfortable and secure fit.
- Measure precisely: Accurate measurements for both length and elastic prevent common fitting issues.
- Secure your seams: Reinforce the elastic join and side seams for durability.
- Don’t skip the hems: Neatly hemmed edges give your tube top a professional, finished look.
- Customize your fit: The beauty of DIY is adjusting it exactly to your body for maximum comfort.
- Practice makes perfect: Don’t be discouraged by initial imperfections; each project builds your skill.
Frequently Asked Questions
Can I use any old t-shirt for this project?
While you can technically use any t-shirt, for best results, choose one with a good amount of stretch (like a cotton-spandex blend or jersey knit). This helps the tube top stay up and conform to your body comfortably. T-shirts that are too thin or worn out might not hold their shape well.
Do I need a sewing machine, or can I hand-sew it?
A sewing machine will make the process much faster and result in stronger, neater seams. However, you can absolutely hand-sew this project. Just be sure to use strong thread and small, consistent stitches for durability, especially on the elastic casing and side seams. It will take more time, but the result can be just as good.
How do I prevent the tube top from falling down?
The key to preventing slippage is correctly sized elastic and a stretchy fabric. Ensure your elastic is snug (but not too tight) around your bust, and choose a t-shirt fabric with good recovery. If it still slips, you can add a second, thinner piece of elastic to the top hem, or sew on thin, removable straps.
Can I add straps to my tube top later?
Yes, adding straps is a great way to customize your tube top or add extra security. You can make straps from leftover t-shirt fabric, ribbon, or even elastic. Simply cut two strips of fabric, hem the edges, and attach them to the inside top corners of your tube top (front and back) with a few strong stitches.
Our Top Recommended Finds
- Sharp Fabric Scissors: A good pair of fabric scissors makes all the difference in achieving clean, straight cuts without fraying.
- 1-inch Wide Braided Elastic: This width provides excellent support and comfort for a tube top, ensuring it stays in place.
- Washable Fabric Chalk/Marker: Essential for accurate marking on your fabric, these tools ensure your measurements are precise and disappear easily.
Your Next Fashion Statement Awaits
You’ve just transformed a simple t-shirt into a stylish and comfortable tube top. This project is more than just sewing; it’s about seeing potential in what you already own and bringing your creative vision to life. The satisfaction of wearing something you made yourself is truly unmatched.
This is just the beginning of your DIY fashion journey. Consider experimenting with different t-shirt colors, adding embellishments like lace or embroidery, or even trying a cropped version. The skills you’ve gained here are transferable to countless other upcycling projects. So, grab another t-shirt, let your imagination run wild, and keep creating!
Beginner-friendly templates, step-by-step guides,
and weekly project ideas in your inbox.