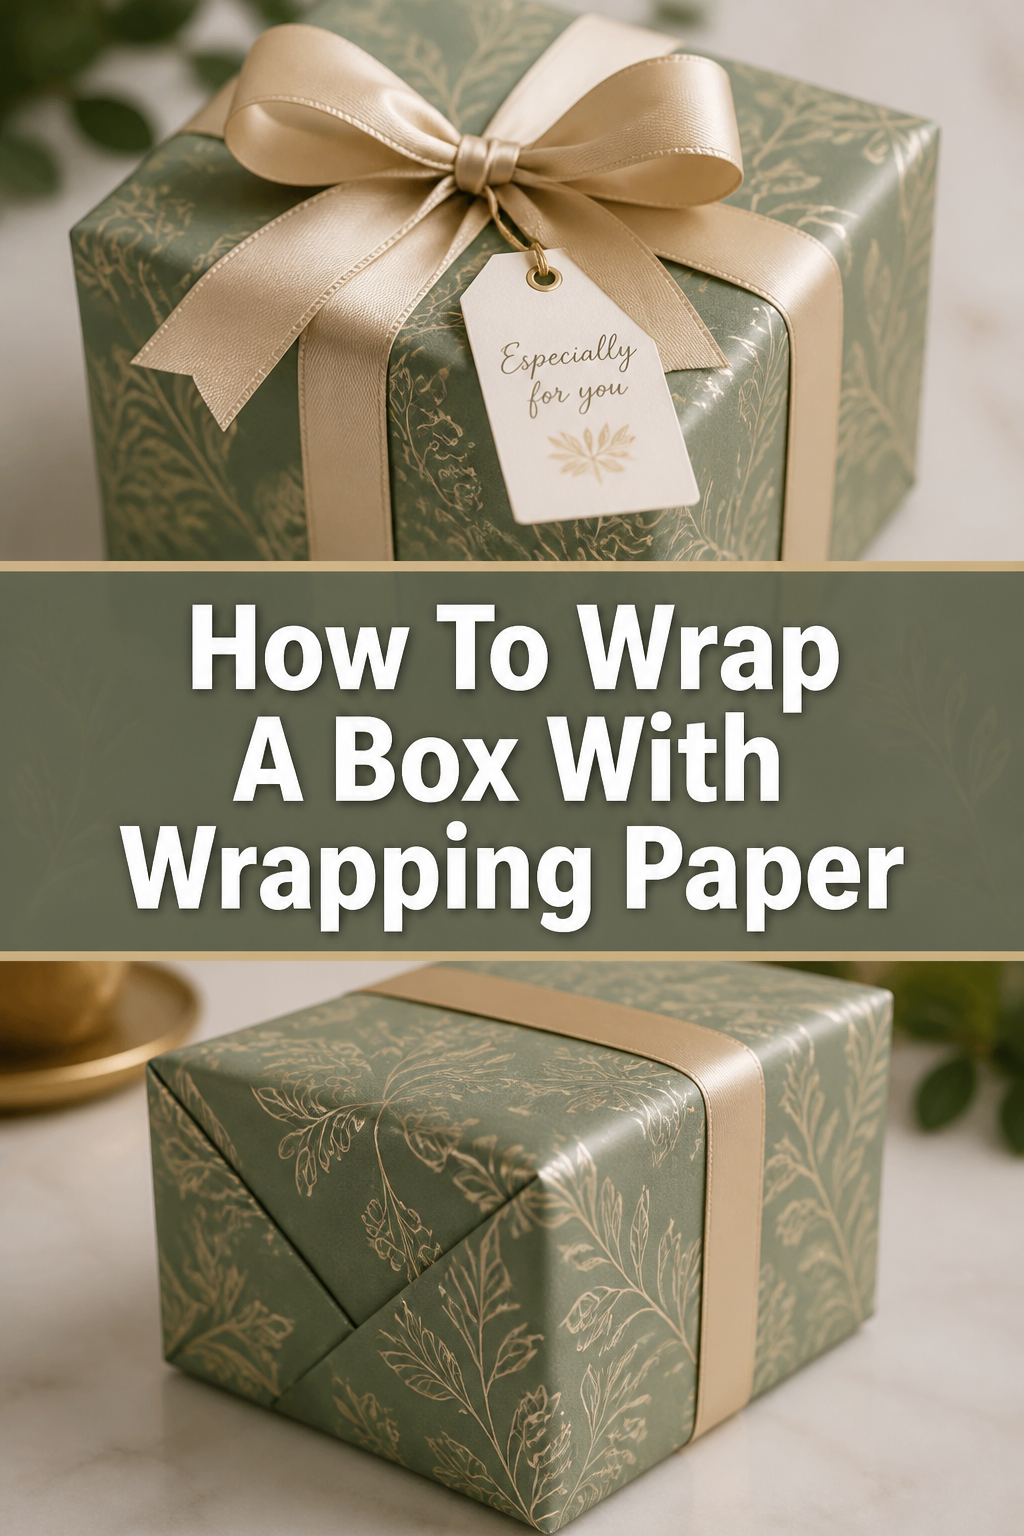
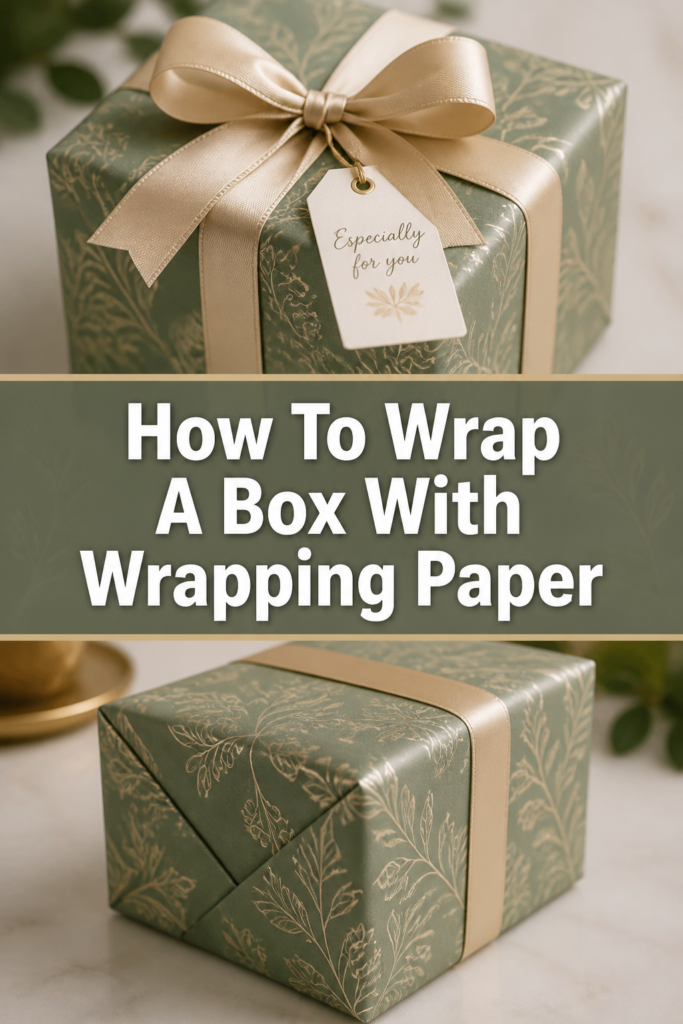
🎁 How To Wrap A Box With Wrapping Paper

Beginner-friendly templates, step-by-step guides,
and weekly project ideas in your inbox.
There’s a unique satisfaction in presenting a gift that looks as good on the outside as it feels on the inside. A perfectly wrapped box speaks volumes before the ribbon is even untied.
I’ve spent countless hours perfecting my wrapping technique, from holiday seasons to birthday celebrations, often learning the hard way with crumpled corners and exposed edges. This guide distills years of practice into simple, clear steps. You’ll soon wrap gifts that impress everyone.
Quick Overview
Wrapping a box beautifully is an accessible skill that adds a personal touch to any present. This guide will walk you through each stage, ensuring a neat and professional finish. You’ll learn the techniques to make every gift look special.
- Time needed: 10-20 minutes (depending on box size and experience)
- Difficulty: Beginner
- What you’ll need: Wrapping paper, scissors, tape, box, optional ribbon/decorations
Step-by-Step Instructions
Step 1: Gather Your Tools
Before you begin, make sure all your supplies are within reach. This prevents interruptions and keeps your workspace tidy. Having everything ready saves time and reduces stress.
You will need your chosen roll of wrapping paper, a sharp pair of scissors, and clear adhesive tape. Consider using double-sided tape for a cleaner look, especially for the final seams.
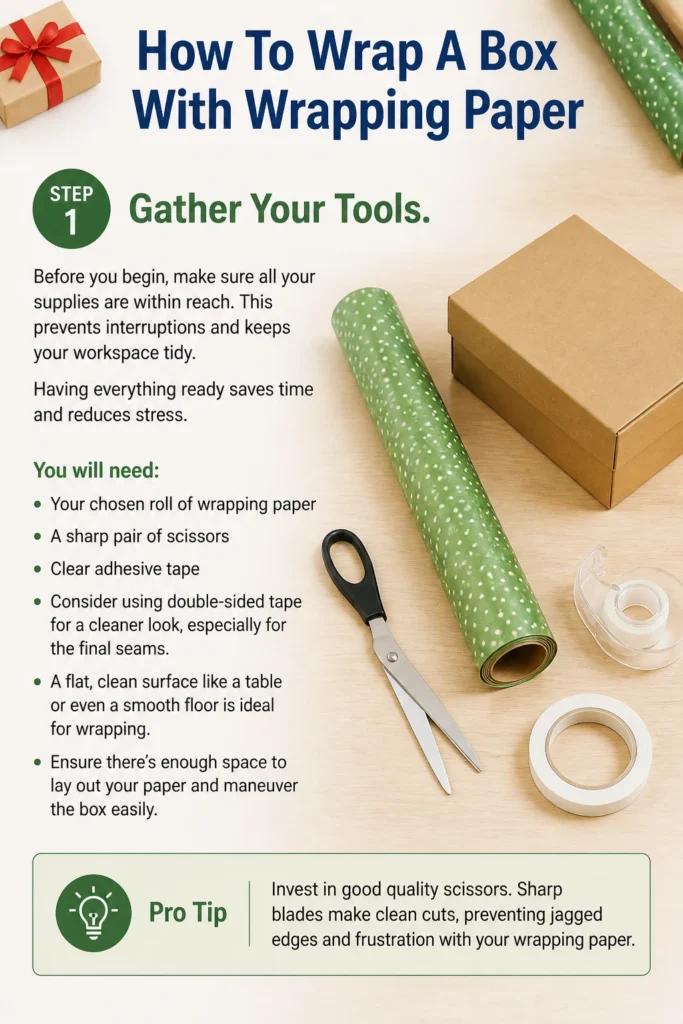
A flat, clean surface like a table or even a smooth floor is ideal for wrapping. Ensure there’s enough space to lay out your paper and maneuver the box easily.
Pro Tip: Invest in good quality scissors. Sharp blades make clean cuts, preventing jagged edges and frustration with your wrapping paper.
Step 2: Measure Your Paper Length
Unroll your wrapping paper, pattern side down, on your flat surface. Place the box in the center of the paper. You need enough paper to cover the entire box with a slight overlap.
Bring one long edge of the paper up and over the top of the box. Hold it in place. Then, bring the other long edge of the paper up to meet it, ensuring there’s about a 1-2 inch overlap.
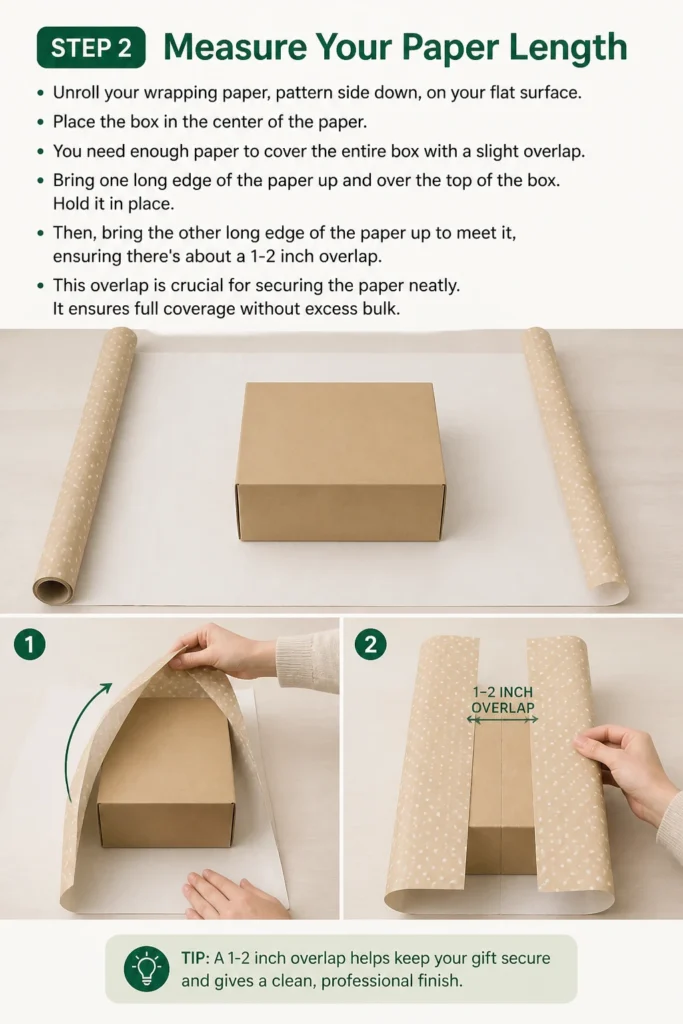
This overlap is crucial for securing the paper neatly. It ensures full coverage without excess bulk.
Step 3: Measure Your Paper Width
Now, it’s time to determine the correct width of paper needed for the ends of the box. This measurement is equally important for a tidy finish.
Turn the box on its side, so one of the shorter ends faces up. Bring the paper up against this end of the box.
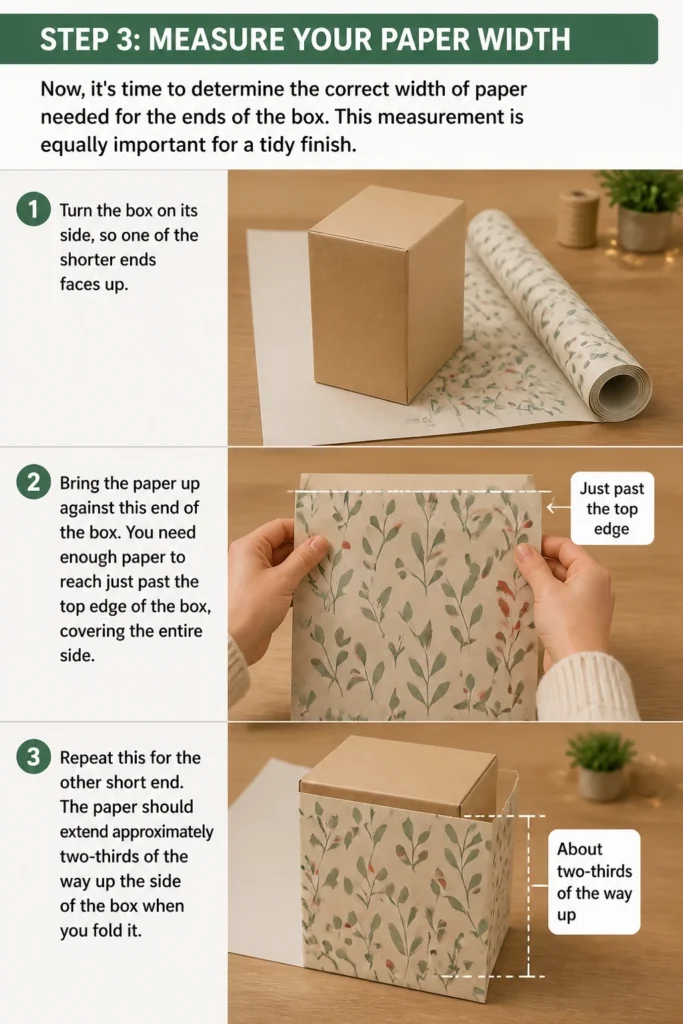
You need enough paper to reach just past the top edge of the box, covering the entire side. Repeat this for the other short end. The paper should extend approximately two-thirds of the way up the side of the box when you fold it.
Step 4: Cut the Paper
With your measurements confirmed, carefully cut the wrapping paper from the roll. Use a straight edge or the grid lines on the back of the paper, if available, for a precise cut.
A straight cut is essential for crisp, professional-looking edges. Take your time to ensure accuracy.
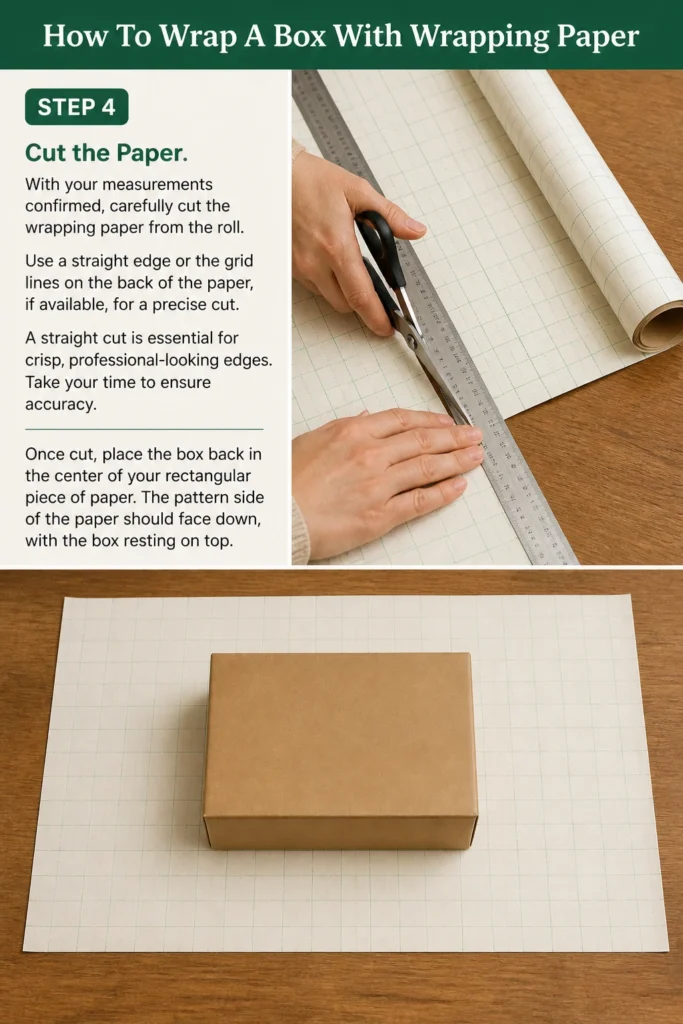
Once cut, place the box back in the center of your rectangular piece of paper. The pattern side of the paper should face down, with the box resting on top.
Step 5: Secure the First Long Side
Position your box so one long edge of the paper can be brought up and over the top. Pull this edge taut, but not so tight that it tears.
Apply a piece of tape to the center of this edge, securing it to the top of the box. This initial piece of tape holds the paper in place while you work on the other side.
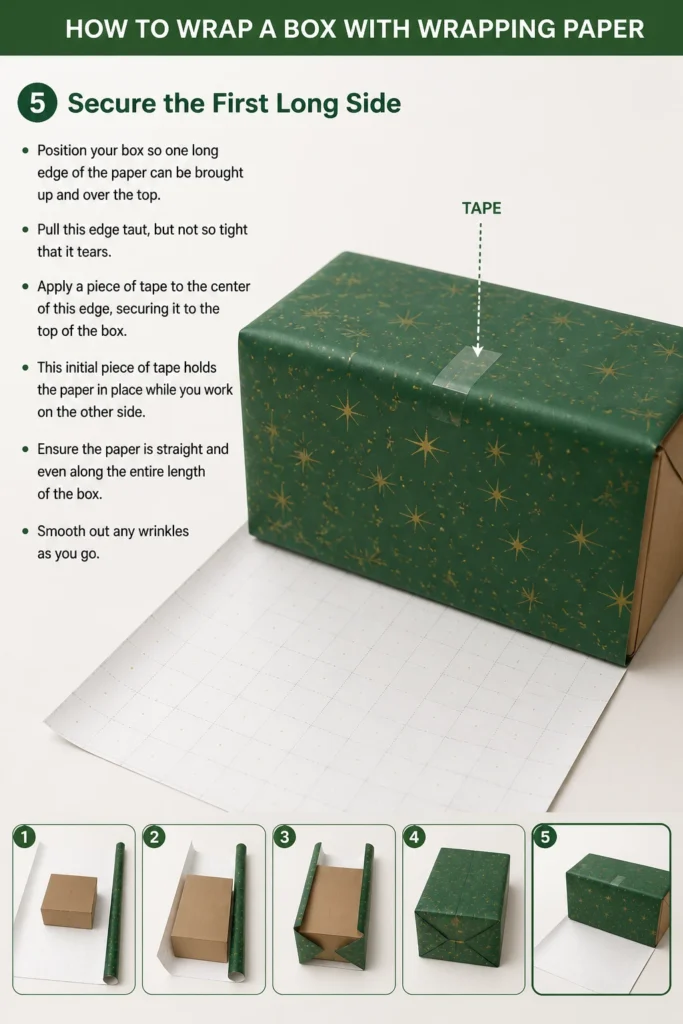
Ensure the paper is straight and even along the entire length of the box. Smooth out any wrinkles as you go.
Step 6: Bring Over the Second Long Side
Now, take the opposite long edge of the paper. Bring it up and over the top of the box, creating your overlap.
Fold under about a half-inch of this edge. This creates a clean, finished seam, hiding the raw edge of the paper.
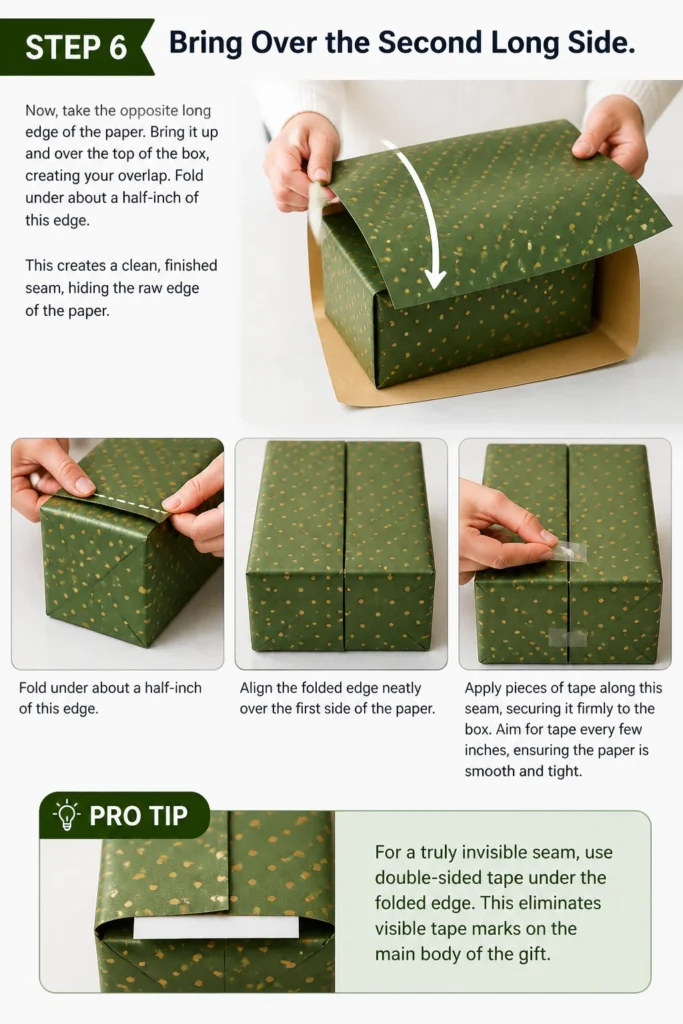
Align the folded edge neatly over the first side of the paper. Apply pieces of tape along this seam, securing it firmly to the box. Aim for tape every few inches, ensuring the paper is smooth and tight.
Pro Tip: For a truly invisible seam, use double-sided tape under the folded edge. This eliminates visible tape marks on the main body of the gift.
Step 7: Fold the Ends – The Basic Tuck
This is often the trickiest part, but with practice, it becomes second nature. Turn the box so one of the short ends faces you.
First, push the paper inwards on the two sides of the box’s short end. This creates two triangular flaps and a central flap.
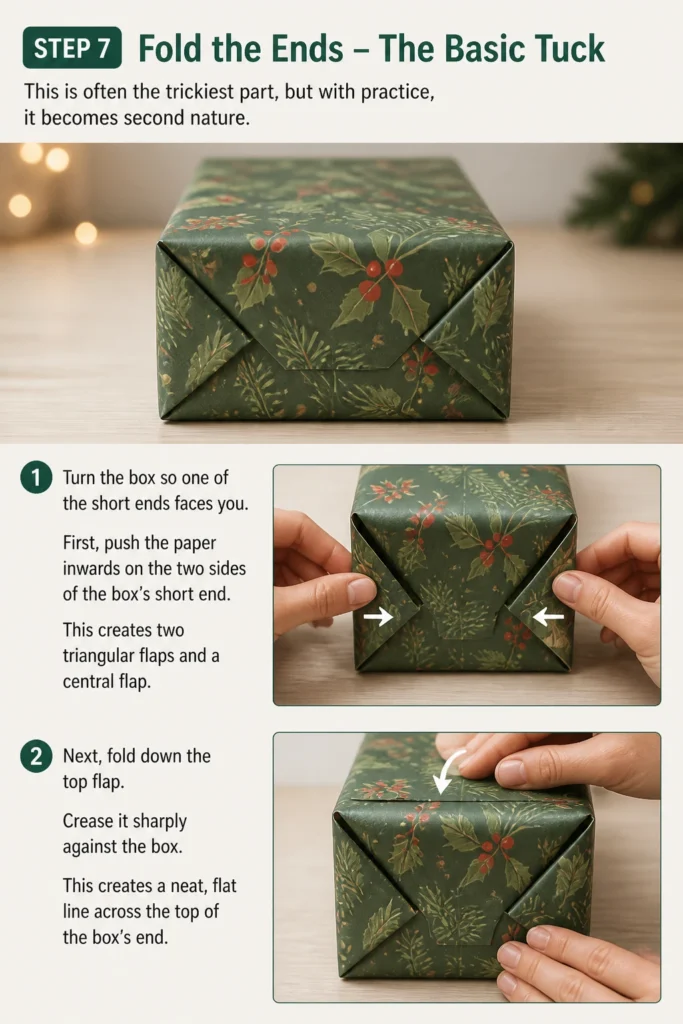
Next, fold down the top flap. Crease it sharply against the box. This creates a neat, flat line across the top of the box’s end.
Step 8: Complete the End Folds
After folding down the top flap, you’ll have two side flaps remaining. Fold these side flaps inwards, creasing them sharply against the sides of the box.
Finally, bring the bottom flap up. Ensure it covers the raw edges of the side flaps and aligns neatly with the top edge of the box.
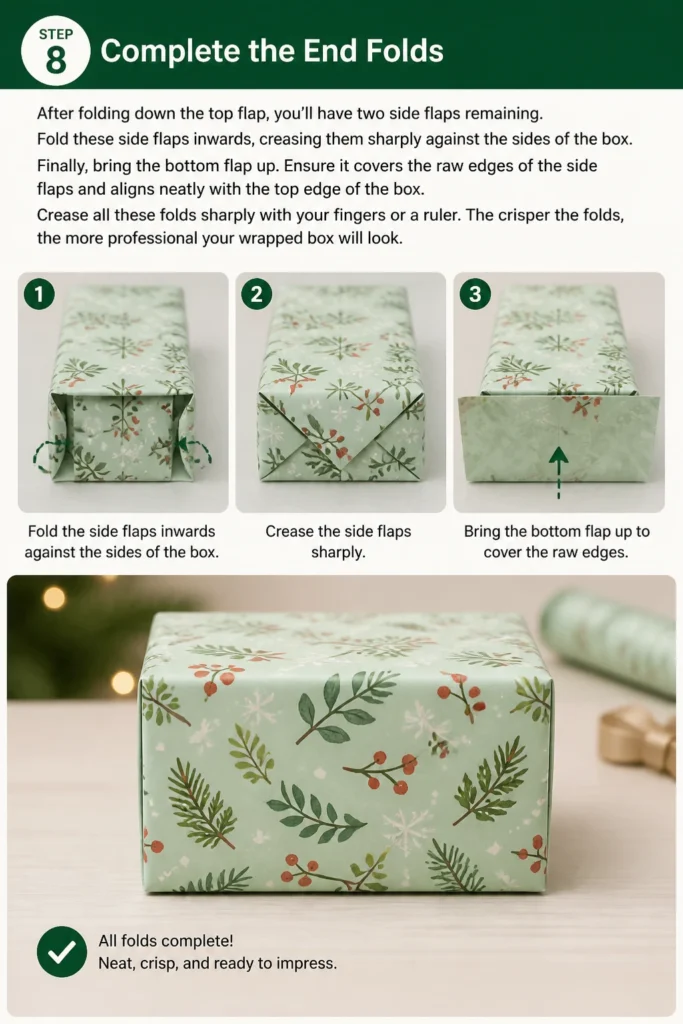
Crease all these folds sharply with your fingers or a ruler. The crisper the folds, the more professional your wrapped box will look.
Step 9: Tape the Ends Securely
Once all the end flaps are folded, secure them with tape. Place a piece of tape in the center of the bottom flap, attaching it to the box.
Add additional pieces of tape along the edges of the bottom flap if needed, especially if the paper is thick or stiff. This ensures everything stays put.
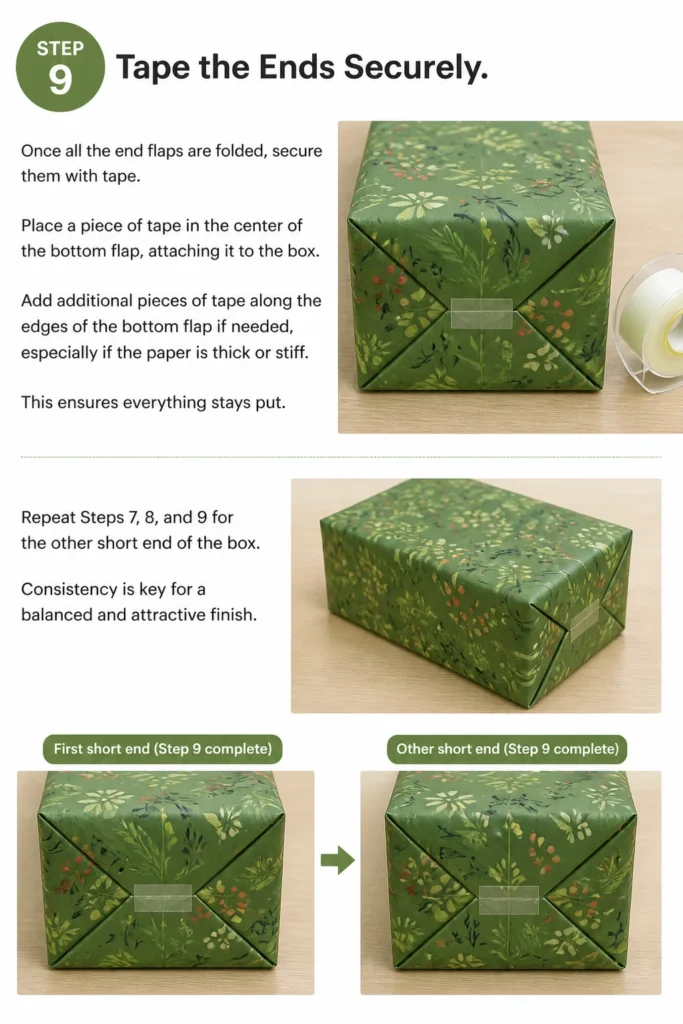
Repeat Steps 7, 8, and 9 for the other short end of the box. Consistency is key for a balanced and attractive finish.
Step 10: Crease for Crispness and Add Finishing Touches
Take a moment to run your fingers or a ruler along all the edges of the wrapped box. This sharpens the creases and gives the gift a polished appearance.
Sharp edges elevate a simple wrap to something truly special. They show attention to detail and care.
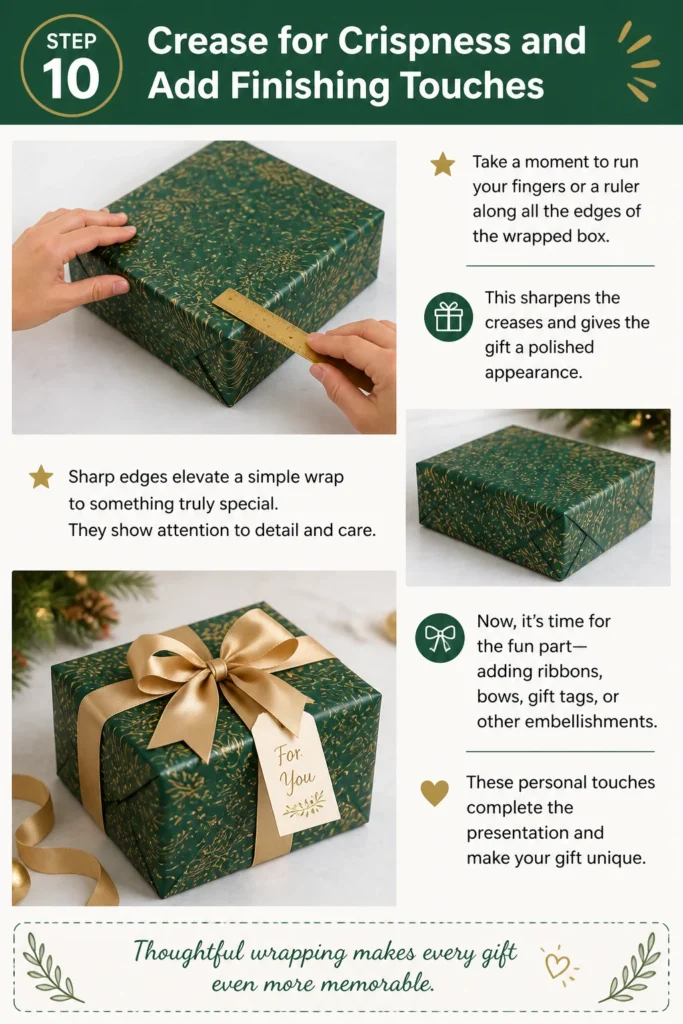
Now, it’s time for the fun part: adding ribbons, bows, gift tags, or other embellishments. These personal touches complete the presentation and make your gift unique.
Common Mistakes to Avoid
Using Too Much Paper
A common pitfall is cutting far too much paper for your box. This leads to bulky, lumpy folds, especially on the ends, making the gift look messy and unprofessional. It also wastes valuable wrapping paper.
Always measure carefully, ensuring just enough overlap on the long side and sufficient coverage for the ends without excess. A little extra is fine, but a lot is problematic.
Incorrect Paper Alignment
Starting with the box placed crookedly on the paper can lead to a domino effect of issues. Your main seam will be off-center, and the folds on the ends will be uneven, resulting in a skewed appearance.
Take a moment to perfectly center your box on the paper before making any cuts or tape applications. This foundational step ensures symmetry throughout the wrapping process.
Not Creasing Edges
Failing to make sharp creases on all folds is a sure way to end up with a soft, rounded, and unfinished-looking gift. The absence of defined lines detracts from the overall neatness.
Always use your fingers, a ruler, or even the blunt side of your scissors to press down firmly and create crisp, clean folds. This simple action dramatically improves the final look.
Rushing the Process
Attempting to wrap a gift quickly often results in tears, uneven folds, and a generally sloppy outcome. Wrapping is a craft that benefits from patience and precision.
Give yourself enough time to complete each step carefully. Slowing down allows for adjustments and ensures each fold and tape application is done correctly, leading to a much better result.
Troubleshooting
Paper Tears Mid-Wrap
If your wrapping paper tears while you are in the middle of wrapping, don’t panic. Small tears can often be discreetly patched up.
Cut a small, neat piece of wrapping paper that matches the design. Carefully tape it over the tear, aligning the pattern as best as you can. For larger tears, you might need to unwrap and restart with a fresh piece of paper, or consider adding a decorative band of ribbon to cover the flaw.
Uneven Folds on Ends
Sometimes, despite your best efforts, the end folds don’t quite line up perfectly. This can happen if the initial paper width was slightly off or if the side folds weren’t symmetrical.
If the unevenness is minor, you can often gently adjust the folds by re-creasing them. For more significant issues, it might be better to carefully undo the end folds, trim any excess paper if necessary, and re-fold them with more precision. Practice improves your eye for symmetry.
Tape Not Holding
If your tape isn’t sticking well, it could be due to a few reasons: the paper might be textured, the room could be too humid, or the tape quality might be poor. Loose tape leads to unraveling paper.
Try using a different brand of tape, or switch to a stronger adhesive like packing tape (if it’s not visible). For textured papers, double-sided tape can provide a stronger, more discreet hold. Applying more pieces of tape, especially along seams, can also help secure the wrap.
Key Takeaways
- Measure precisely: Always ensure you have just enough paper to cover the box with a small overlap, avoiding unnecessary bulk.
- Center your box: Proper initial placement on the paper sets the foundation for neat, symmetrical wrapping.
- Crease sharply: Use your fingers or a tool to create crisp, defined edges for a professional finish.
- Use quality tools: Sharp scissors and good adhesive tape make the entire process smoother and more effective.
- Take your time: Patience in each step prevents mistakes and leads to a much more polished and attractive result.
- Add personal touches: Ribbons, bows, and tags elevate a simple wrap into a thoughtful presentation.
Frequently Asked Questions
How do I wrap an oddly shaped item?
Wrapping oddly shaped items can be challenging with traditional paper. For irregular shapes, consider placing the item in a simple box first. If a box isn’t feasible, a gift bag is an excellent alternative. You can also use fabric wrapping (furoshiki) or cello wrap for softer, less defined items.
What kind of tape is best for wrapping?
Clear, strong adhesive tape is generally best. Double-sided tape is fantastic for creating seamless finishes, as it hides the tape underneath the paper. For very heavy or thick paper, a stronger, wider clear tape might be necessary to ensure a secure hold.
Can I wrap a gift without a tape dispenser?
Absolutely. While a tape dispenser offers convenience, you can easily wrap without one. Simply unroll a short length of tape, tear or cut off small pieces, and have them ready on the edge of your table or even stuck to your clothing for easy access.
How can I make my gift look more luxurious?
To add a touch of luxury, focus on high-quality paper with a rich texture or subtle sheen. Incorporate satin or velvet ribbons, and consider adding small embellishments like a sprig of greenery or a wax seal. Sharp, clean creases and a perfect bow are also hallmarks of a luxurious wrap.
Our Top Recommended Finds
- Precision Craft Scissors: A sharp, comfortable pair of scissors makes all the difference for clean, straight cuts, preventing jagged edges.
- Double-Sided Tape Dispenser: This tool is a game-changer for creating invisible seams, giving your gifts a truly professional and clean finish.
- Wrapping Paper Cutter Slider: A simple device that slides along the paper roll, providing a perfectly straight cut every time without the need for scissors.
The Art of Giving, Beautifully Wrapped
Mastering the art of wrapping a box transforms a simple present into a memorable experience. It’s a small gesture that communicates care and thoughtfulness, enhancing the joy of giving and receiving. Every crease, every fold, and every piece of tape contributes to a presentation that truly celebrates the gift inside.
Now that you have these practical steps, gather your supplies and begin practicing. Start with a simple box, and soon you’ll be wrapping with confidence and flair. Your next gift is ready to be presented beautifully.
Beginner-friendly templates, step-by-step guides,
and weekly project ideas in your inbox.