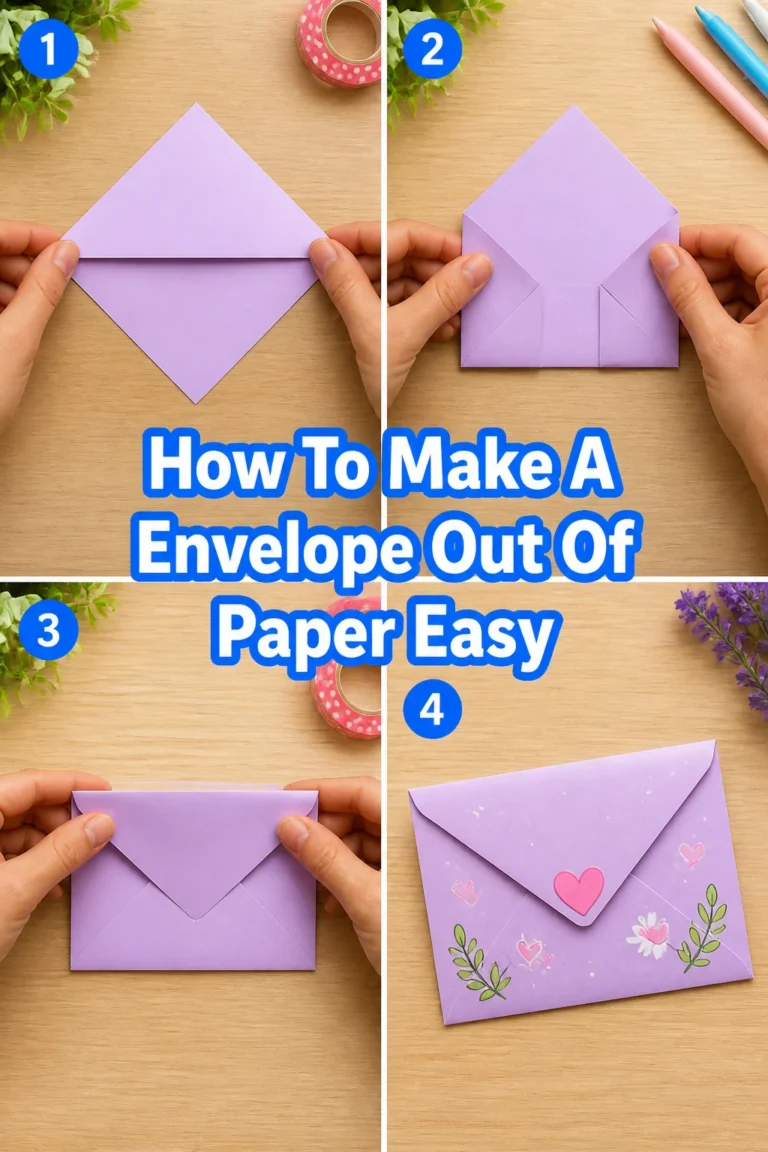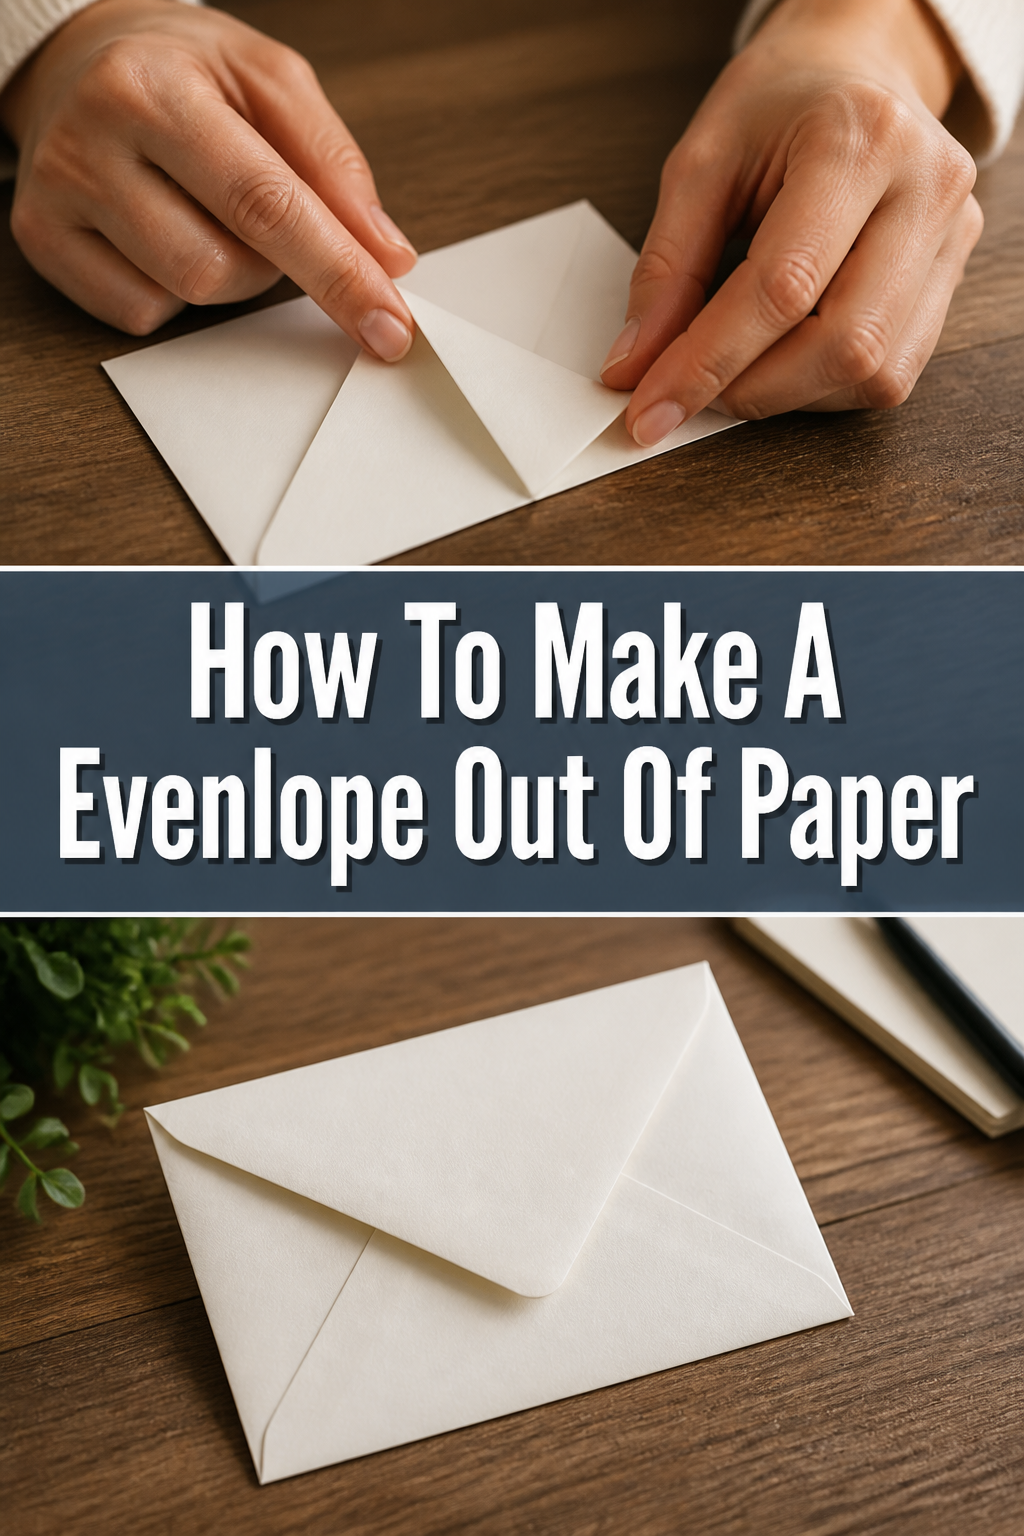
✉️ How To Make A Evenlope Out Of Paper

Beginner-friendly templates, step-by-step guides,
and weekly project ideas in your inbox.
Making your own evenlope from paper is a truly satisfying craft.
It adds a personal touch to any letter, card, or small gift.
I’ve crafted countless evenlopes for everything from birthday cards to secret notes, and I can assure you that this guide makes the process simple and enjoyable, even if you’re just starting out.
Quick Overview
You’re about to create a custom evenlope, perfect for any occasion.
This guide breaks down the process into easy, manageable steps.
- Time needed: 15-30 minutes (depending on your pace and decorative additions)
- Difficulty: Beginner
- What you’ll need: Paper, ruler, pencil, scissors, glue stick or tape
Step-by-Step Instructions
Step 1: Gather Your Materials
Before you begin, make sure you have everything laid out.
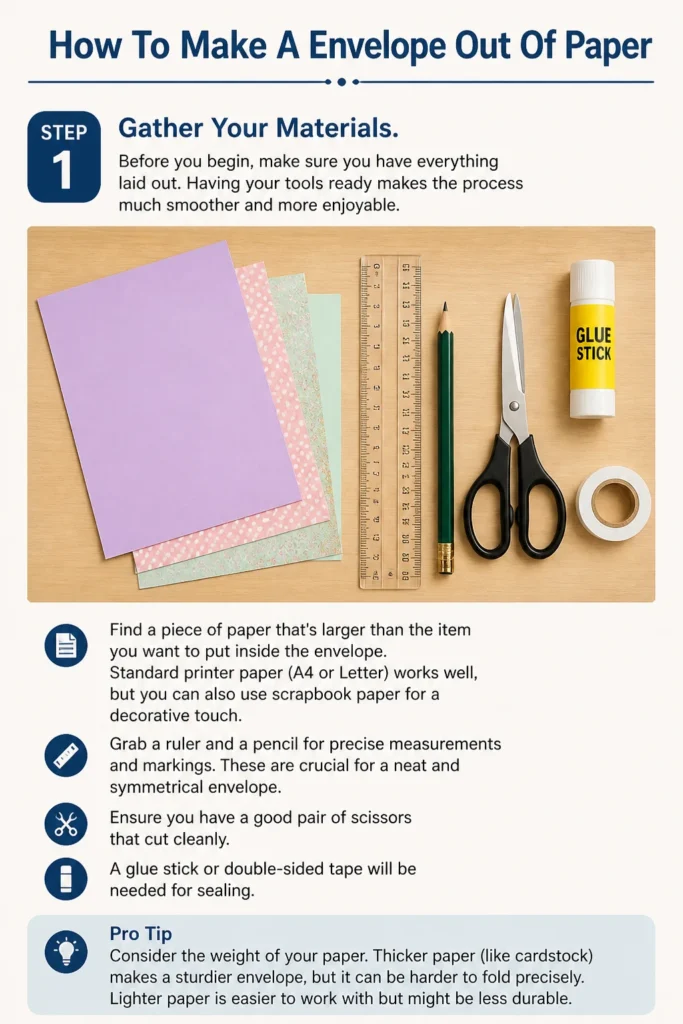
Having your tools ready makes the process much smoother and more enjoyable.
Find a piece of paper that’s larger than the item you want to put inside the evenlope.
Standard printer paper (A4 or Letter) works well, but you can also use scrapbook paper for a decorative touch.
Grab a ruler and a pencil for precise measurements and markings.
These are crucial for a neat and symmetrical evenlope.
Ensure you have a good pair of scissors that cut cleanly.
A glue stick or double-sided tape will be needed for sealing.
Pro Tip: Consider the weight of your paper. Thicker paper (like cardstock) makes a sturdier evenlope, but it can be harder to fold precisely. Lighter paper is easier to work with but might be less durable.
Step 2: Measure and Mark Your Paper
Accuracy here ensures your evenlope will fit your contents perfectly.
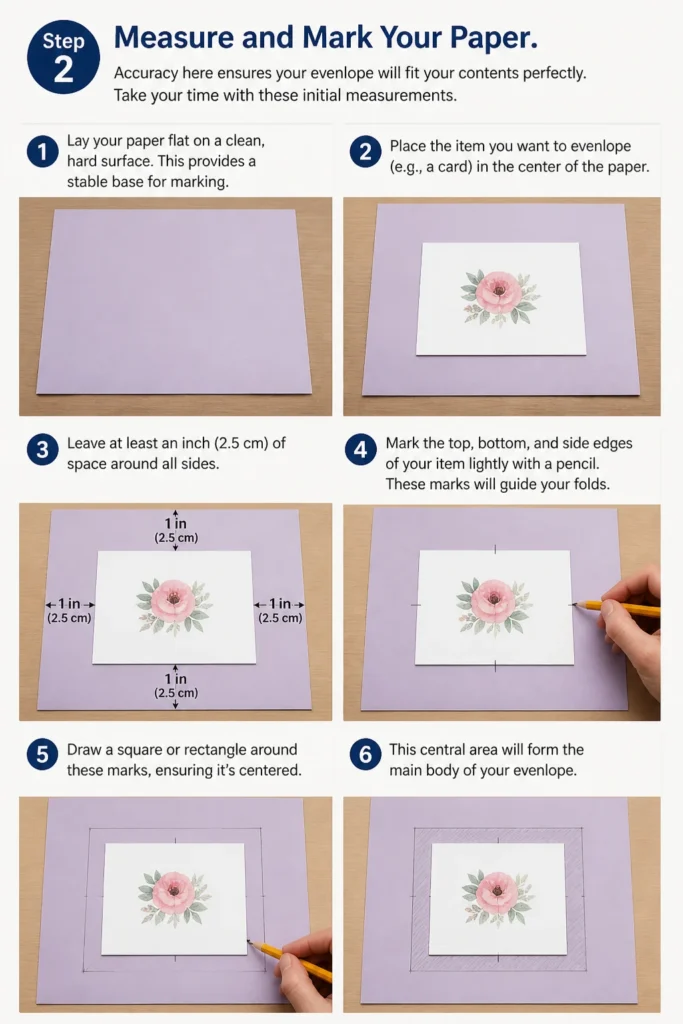
Take your time with these initial measurements.
Lay your paper flat on a clean, hard surface.
This provides a stable base for marking.
Place the item you want to evenlope (e.g., a card) in the center of the paper.
Leave at least an inch (2.5 cm) of space around all sides.
Mark the top, bottom, and side edges of your item lightly with a pencil.
These marks will guide your folds.
Draw a square or rectangle around these marks, ensuring it’s centered.
This central area will form the main body of your evenlope.
Step 3: Create the Bottom Flap
The bottom flap is the first major fold that begins to form the evenlope’s structure.
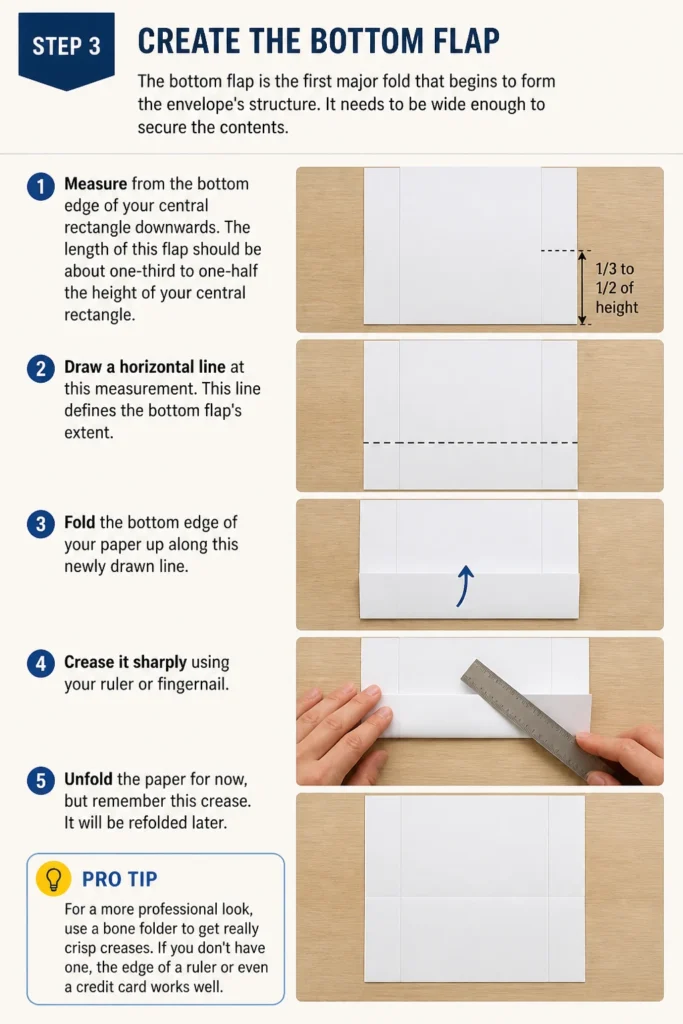
It needs to be wide enough to secure the contents.
Measure from the bottom edge of your central rectangle downwards.
The length of this flap should be about one-third to one-half the height of your central rectangle.
Draw a horizontal line at this measurement.
This line defines the bottom flap’s extent.
Fold the bottom edge of your paper up along this newly drawn line.
Crease it sharply using your ruler or fingernail.
Unfold the paper for now, but remember this crease.
It will be refolded later.
Pro Tip: For a more professional look, use a bone folder to get really crisp creases. If you don’t have one, the edge of a ruler or even a credit card works well.
Step 4: Form the Side Flaps
The side flaps secure the contents laterally and provide the evenlope’s width.
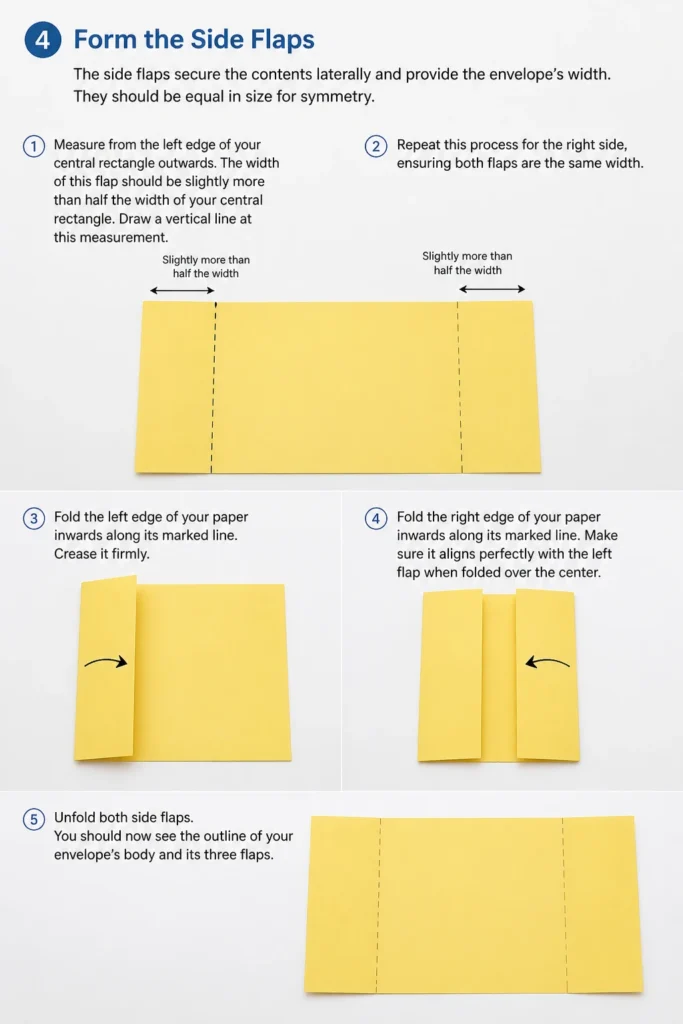
They should be equal in size for symmetry.
Measure from the left edge of your central rectangle outwards.
The width of this flap should be slightly more than half the width of your central rectangle.
Draw a vertical line at this measurement.
Repeat this process for the right side, ensuring both flaps are the same width.
Fold the left edge of your paper inwards along its marked line.
Crease it firmly.
Fold the right edge of your paper inwards along its marked line.
Make sure it aligns perfectly with the left flap when folded over the center.
Unfold both side flaps.
You should now see the outline of your evenlope’s body and its three flaps.
Step 5: Trim and Taper the Flaps
Trimming excess paper and tapering the flaps makes the evenlope look cleaner and fold better.
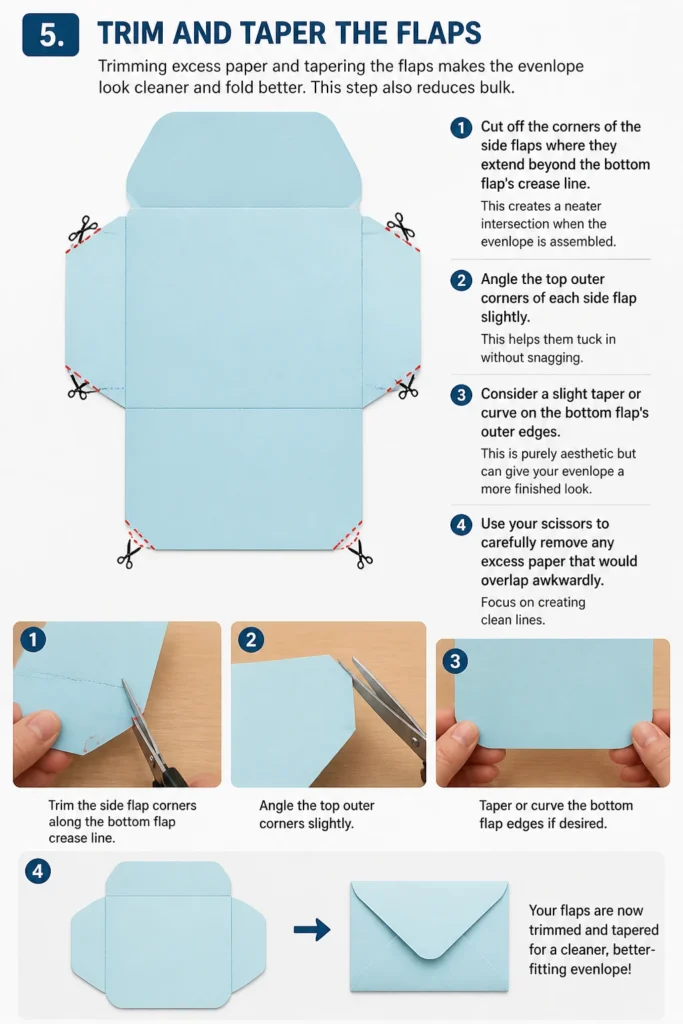
This step also reduces bulk.
Cut off the corners of the side flaps where they extend beyond the bottom flap’s crease line.
This creates a neater intersection when the evenlope is assembled.
Angle the top outer corners of each side flap slightly.
This helps them tuck in without snagging.
Consider a slight taper or curve on the bottom flap’s outer edges.
This is purely aesthetic but can give your evenlope a more finished look.
Use your scissors to carefully remove any excess paper that would overlap awkwardly.
Focus on creating clean lines.
Step 6: Create the Top Flap
The top flap is what seals your evenlope and often provides the most visible design element.
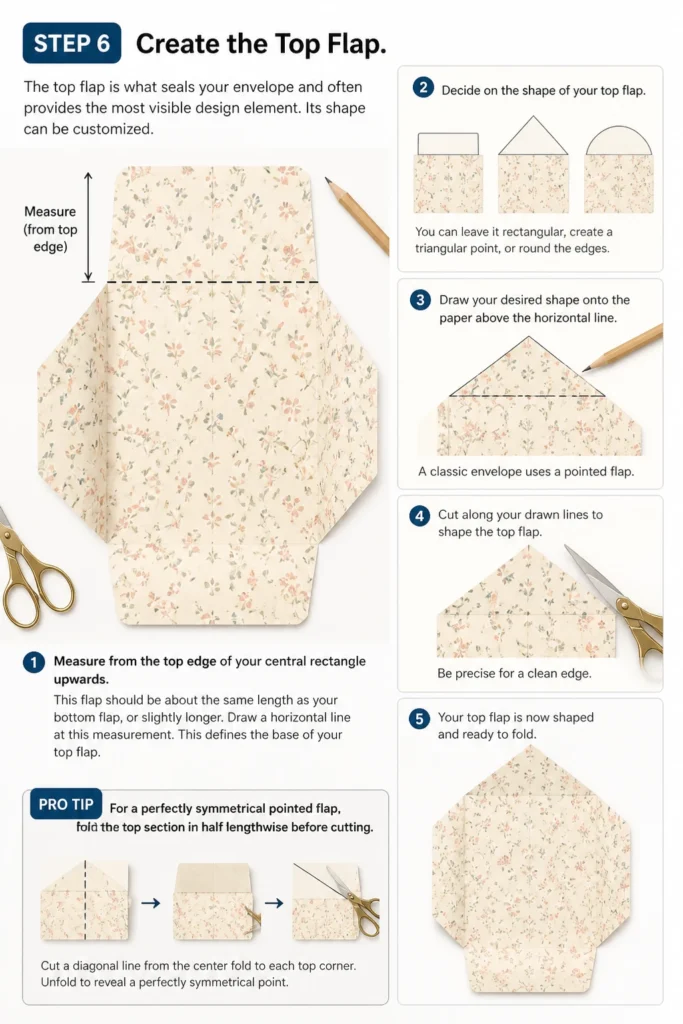
Its shape can be customized.
Measure from the top edge of your central rectangle upwards.
This flap should be about the same length as your bottom flap, or slightly longer.
Draw a horizontal line at this measurement.
This defines the base of your top flap.
Decide on the shape of your top flap.
You can leave it rectangular, create a triangular point, or round the edges.
Draw your desired shape onto the paper above the horizontal line.
A classic evenlope uses a pointed flap.
Cut along your drawn lines to shape the top flap.
Be precise for a clean edge.
Pro Tip: For a perfectly symmetrical pointed flap, fold the top section in half lengthwise before cutting. Cut a diagonal line from the center fold to the outer edge at your desired angle, then unfold.
Step 7: Assemble and Glue
Now it’s time to bring all your folds together to form the evenlope.
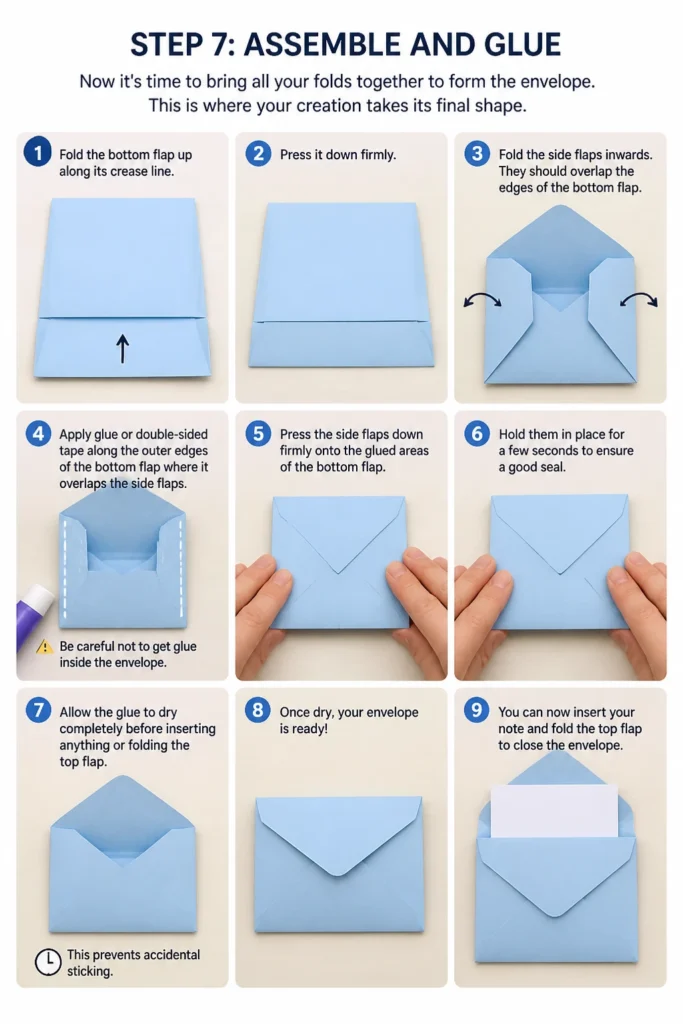
This is where your creation takes its final shape.
Fold the bottom flap up along its crease line.
Press it down firmly.
Fold the side flaps inwards.
They should overlap the edges of the bottom flap.
Apply glue or double-sided tape along the outer edges of the bottom flap where it overlaps the side flaps.
Be careful not to get glue inside the evenlope.
Press the side flaps down firmly onto the glued areas of the bottom flap.
Hold them in place for a few seconds to ensure a good seal.
Allow the glue to dry completely before inserting anything or folding the top flap.
This prevents accidental sticking.
Step 8: Decorate Your Evenlope
This final step allows you to personalize your evenlope and make it truly unique.
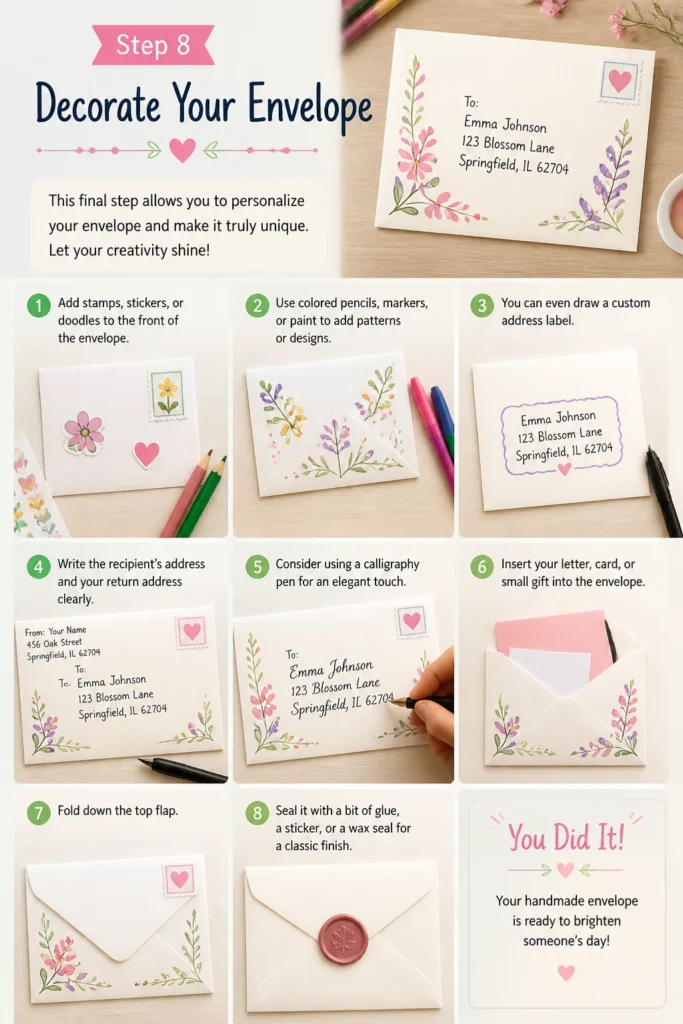
Let your creativity shine!
Add stamps, stickers, or doodles to the front of the evenlope.
Consider the occasion when choosing your decorations.
Use colored pencils, markers, or paint to add patterns or designs.
You can even draw a custom address label.
Write the recipient’s address and your return address clearly.
Consider using a calligraphy pen for an elegant touch.
Insert your letter, card, or small gift into the evenlope.
Fold down the top flap and seal it with a bit of glue, a sticker, or a wax seal for a classic finish.
Common Mistakes to Avoid
Incorrect Measurements
One of the most frequent errors is inaccurate measuring. If your initial measurements are off, your evenlope might not fit its contents, or the flaps won’t align properly. Always double-check your dimensions with a ruler and use light pencil marks that can be erased if needed, ensuring precision from the start.
Uneven Folds
Crooked folds can lead to a lopsided or poorly sealed evenlope. When folding, ensure your paper edges align perfectly before creasing. Use a ruler or a bone folder to get crisp, straight lines, which makes the entire evenlope look much more professional and well-made.
Too Much Glue
Applying too much glue is a common pitfall. Excess glue can seep out, stick to the inside of the evenlope, or wrinkle the paper, making it look messy. Use a thin, even layer of glue stick or a small amount of liquid glue, focusing only on the edges that need to be adhered. Less is often more.
Cutting Before Folding
Some beginners might be tempted to cut out the entire evenlope shape before making any folds. This often leads to misaligned flaps and difficulty in assembly. Always make your major folds first, then trim and shape the flaps as needed. This method ensures all parts fit together correctly.
Troubleshooting
Evenlope is Too Small for Contents
If you find your evenlope is too snug or won’t fit your item, it means your initial central rectangle was not large enough. The best solution is to start over with a larger piece of paper. When placing your item in Step 2, ensure you leave ample space, at least 1.5 to 2 inches (3-5 cm) around all sides, to account for paper thickness and folding.
Flaps Don’t Align Properly
Misaligned flaps usually stem from uneven measurements or crooked folds. Go back to Step 3 and 4, carefully reviewing your pencil marks and ensuring all folds are straight and symmetrical. Sometimes, a slight trim with scissors on one flap can correct minor misalignments, but for significant issues, re-measuring and refolding from the beginning is often the most effective fix.
Glue Won’t Hold/Paper Wrinkles
If your evenlope isn’t sealing well or the paper is wrinkling, the issue is likely with the glue. Ensure you are using a fresh glue stick or appropriate paper adhesive. If wrinkling occurs, you might be using too much liquid glue or the paper is too thin for the amount of moisture. Switch to a glue stick for less moisture, or use double-sided tape for a completely dry bond.
Key Takeaways
- Precision in measuring and marking is crucial for a well-made evenlope.
- Use a ruler or bone folder for crisp, clean folds to ensure a professional finish.
- Always test the fit of your contents before permanently gluing the evenlope.
- Apply glue sparingly to avoid mess and paper wrinkling.
- Personalize your evenlope with decorations to make it uniquely yours.
- Don’t be afraid to restart if initial folds or cuts are significantly off; practice makes perfect.
Frequently Asked Questions
Can I make an evenlope without a ruler?
While a ruler is highly recommended for precision, you can certainly try making an evenlope without one. You’ll rely more on visual estimation and folding edges against each other. For example, you can fold the paper around your card directly to approximate the central area and flap sizes. However, expect less symmetrical results.
What type of paper is best for making evenlopes?
Standard printer paper (70-90 gsm) is a good starting point for practice, as it’s easy to fold. For a more durable or decorative evenlope, opt for slightly thicker paper like scrapbook paper, craft paper, or light cardstock (120-180 gsm). Avoid very thick cardstock unless you have a scoring tool, as it can be difficult to fold cleanly.
How can I make my evenlope waterproof?
To make your paper evenlope somewhat water-resistant, you can coat the finished evenlope with a clear acrylic spray sealant or Mod Podge after all the glue has dried. This will provide a protective layer against light moisture. However, a paper evenlope will never be truly waterproof, so always use plastic bags for items that absolutely must stay dry.
Can I use this method for different sized evenlopes?
Absolutely! The principles outlined in this guide are scalable. Simply adjust your initial paper size and the measurements for your central rectangle and flaps to accommodate the item you want to evenlope. Always ensure your starting paper is significantly larger than your desired final evenlope size.
Our Top Recommended Finds
- Craft Paper Pack: A variety of colors and patterns to add flair to your evenlopes.
- Precision Scissors: Sharp, comfortable scissors for clean cuts and detailed work.
- Glue Stick Multi-Pack: Essential for mess-free, secure sealing of your evenlopes.
Craft Your Connection Today
You’ve now mastered the art of creating a personalized evenlope.
This skill goes beyond just folding paper; it’s about adding a piece of yourself to every message you send.
Whether for a special occasion or just to brighten someone’s day, a handmade evenlope carries a unique charm.
Why not try making a set of matching evenlopes and cards, or experiment with different paper textures?
The possibilities are endless once you have this foundational skill.
Go ahead, pick up some paper, and start crafting your next thoughtful connection right now!
Beginner-friendly templates, step-by-step guides,
and weekly project ideas in your inbox.