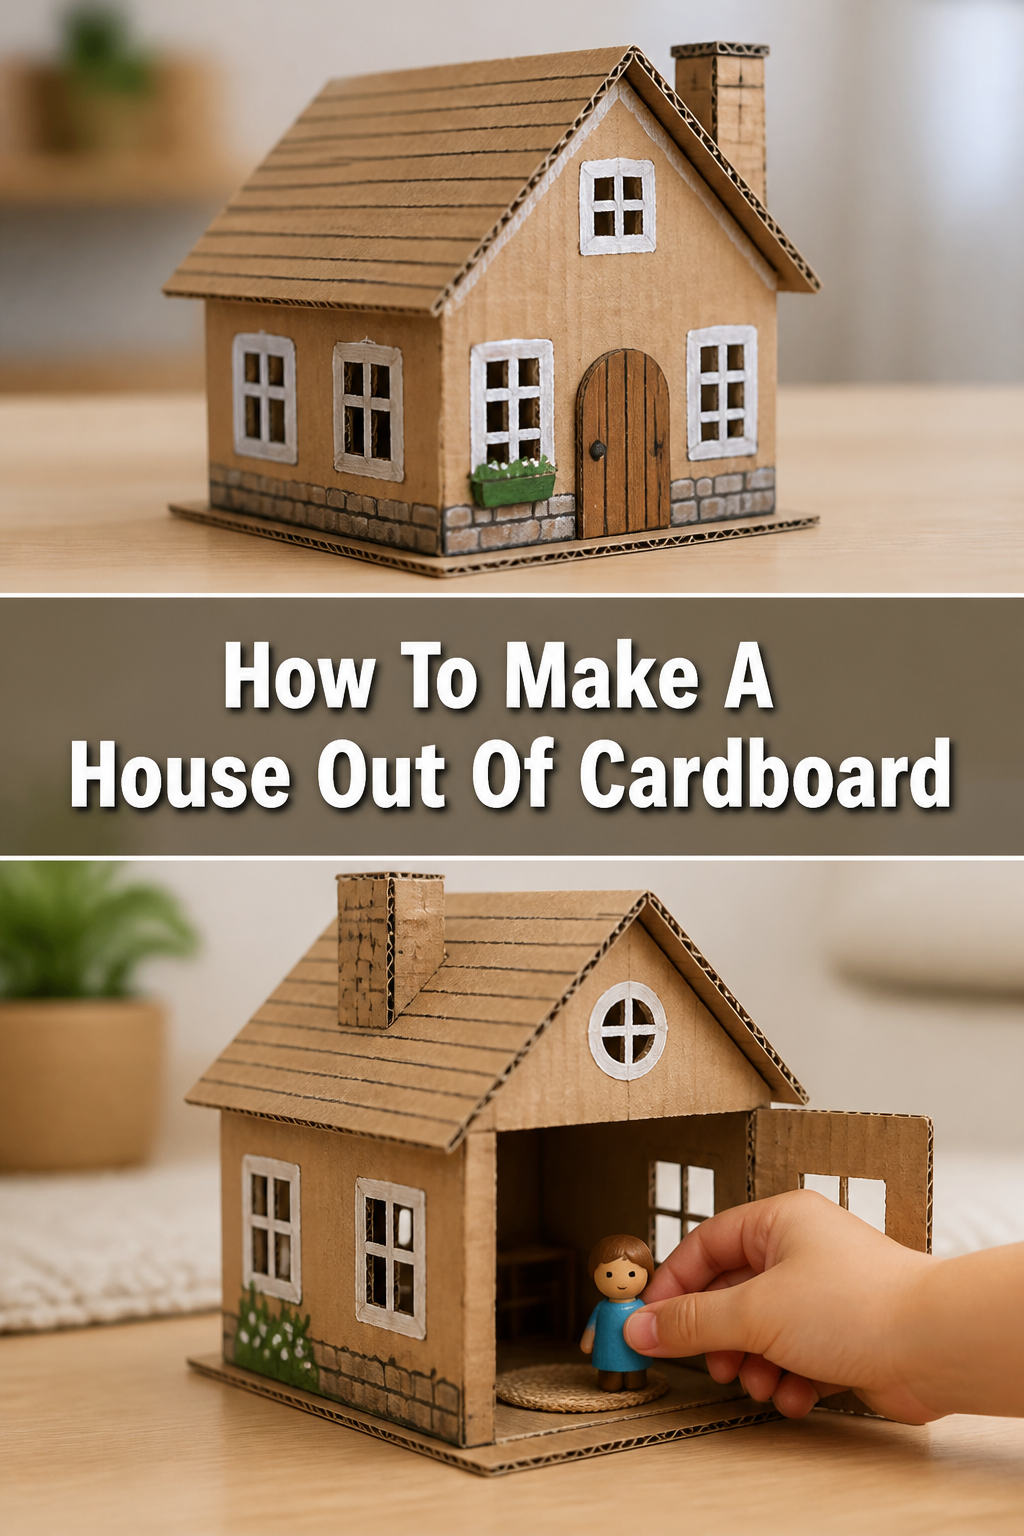
✨ How To Make A House Out Of Cardboard

Beginner-friendly templates, step-by-step guides,
and weekly project ideas in your inbox.
Building a cardboard house is a fantastic project, sparking creativity and providing hours of fun. I remember constructing elaborate forts as a child, learning the basics of structure and design with every taped-together panel. This guide will help you build a sturdy and imaginative cardboard dwelling, sharing the practical tips I’ve learned along the way.
You’ll soon discover the satisfaction of turning simple cardboard into something truly special. Let’s get started on your architectural adventure.
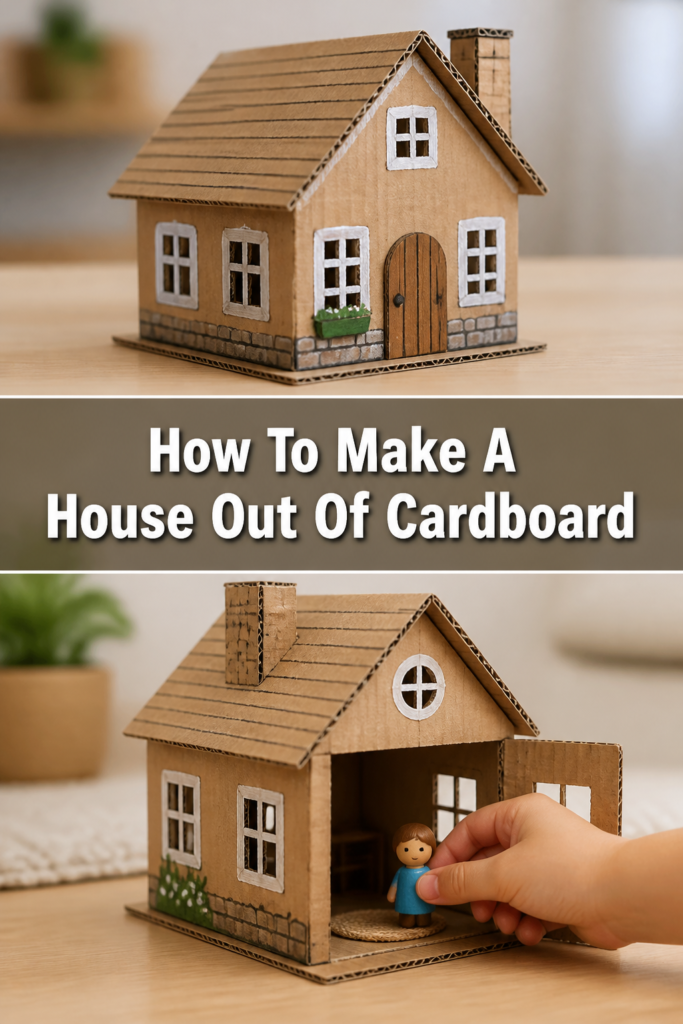
Quick Overview
You’re about to embark on a fun, hands-on project that will transform ordinary cardboard into an extraordinary playhouse or model. This guide will walk you through planning, cutting, assembling, and decorating your very own cardboard creation.
- Time needed: 4-8 hours (spread over a few days for drying time)
- Difficulty: Beginner to Intermediate
- What you’ll need: Cardboard, cutting tools, adhesive, measuring tools, decorating supplies
Step-by-Step Instructions
Step 1: Gather Your Materials and Workspace
Before you begin, collect all the necessary tools and materials. Having everything ready saves time and makes the process smoother. Choose a large, flat, and well-lit workspace that can get a little messy.
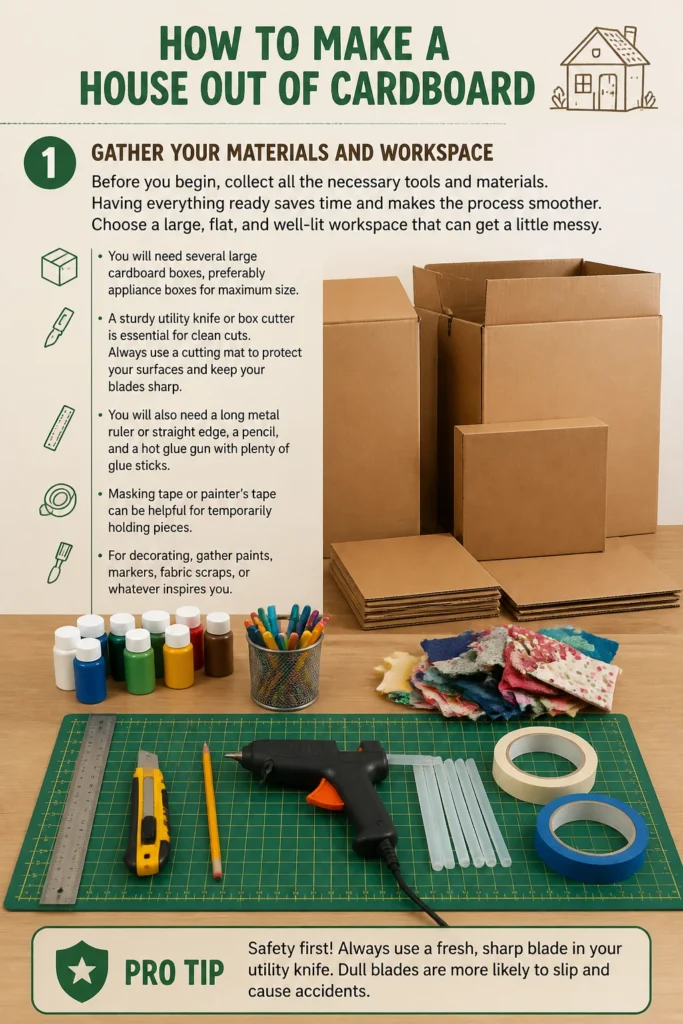
You will need several large cardboard boxes, preferably appliance boxes for maximum size. A sturdy utility knife or box cutter is essential for clean cuts. Always use a cutting mat to protect your surfaces and keep your blades sharp.
You will also need a long metal ruler or straight edge, a pencil, and a hot glue gun with plenty of glue sticks. Masking tape or painter’s tape can be helpful for temporarily holding pieces. For decorating, gather paints, markers, fabric scraps, or whatever inspires you.
Pro Tip: Safety first! Always use a fresh, sharp blade in your utility knife. Dull blades are more likely to slip. Cut away from your body, and never cut freehand without a guide. Consider wearing protective gloves.
Step 2: Plan Your Design and Dimensions
This is where your imagination comes to life on paper. Before cutting any cardboard, sketch out your house design. Decide on the overall shape, whether it will be a simple square, a multi-room dwelling, or even a castle.
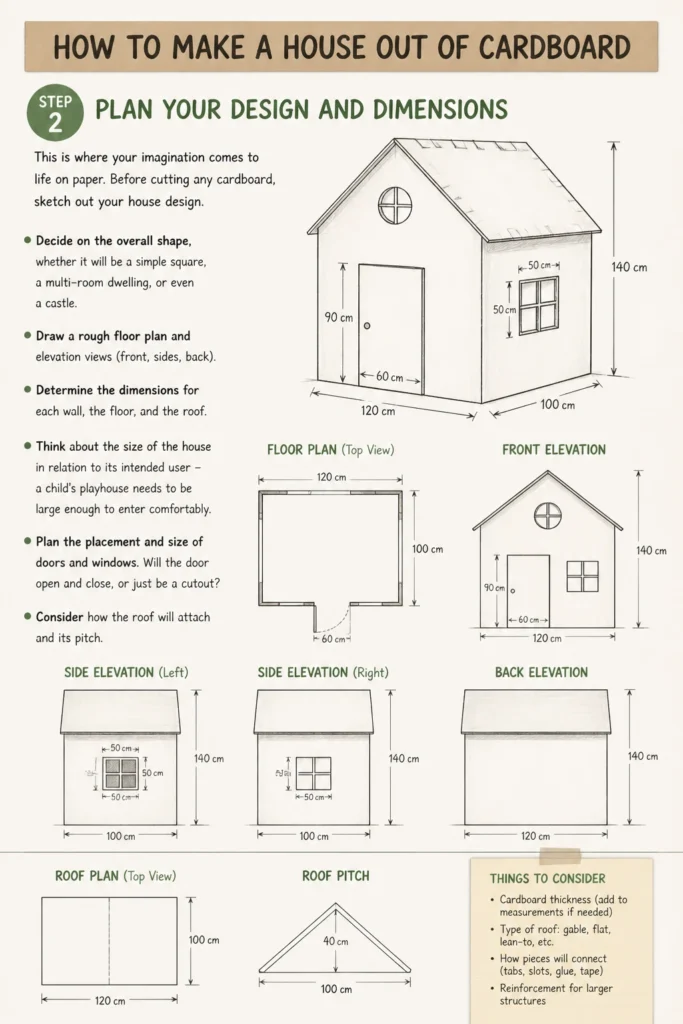
Draw a rough floor plan and elevation views (front, sides, back). Determine the dimensions for each wall, the floor, and the roof. Think about the size of the house in relation to its intended user – a child’s playhouse needs to be large enough to enter comfortably.
Plan the placement and size of doors and windows. Will the door open and close, or just be a cutout? Consider how the roof will attach and its pitch. This planning stage is crucial for a successful build.
Step 3: Prepare Your Cardboard Panels
Carefully unfold your cardboard boxes to lay them flat. If needed, gently score along existing folds to flatten them without tearing. Remove any tape or labels.
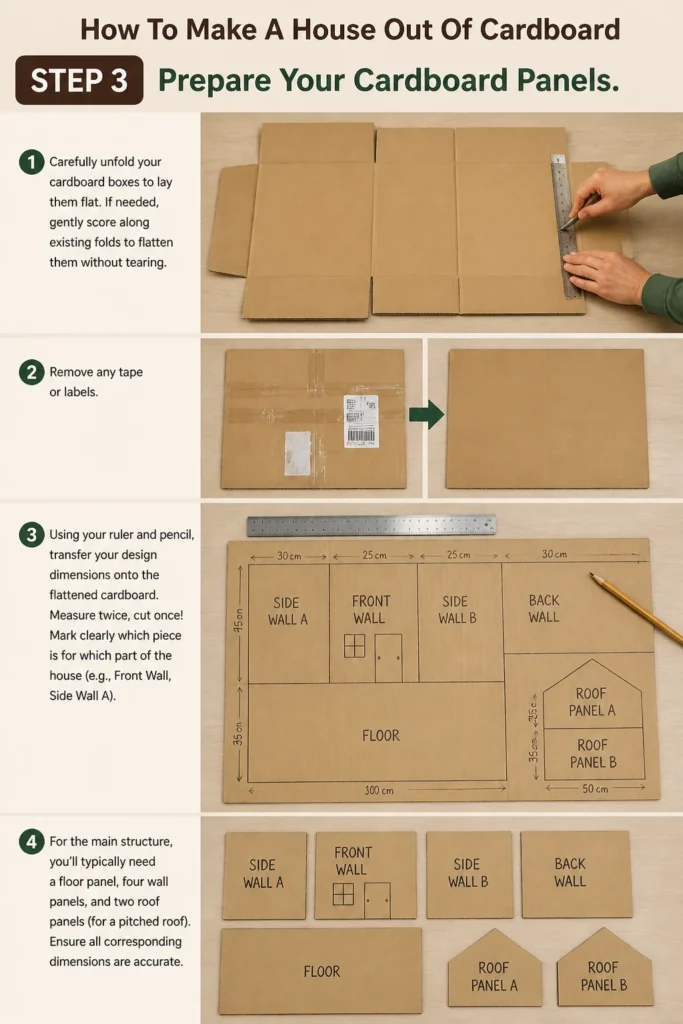
Using your ruler and pencil, transfer your design dimensions onto the flattened cardboard. Measure twice, cut once! Mark clearly which piece is for which part of the house (e.g., “Front Wall,” “Side Wall A”).
For the main structure, you’ll typically need a floor panel, four wall panels, and two roof panels (for a pitched roof). Ensure all corresponding dimensions are accurate.
Step 4: Cut Your Main Structural Pieces
With your measurements clearly marked, it’s time to cut. Place your cardboard on the cutting mat. Align your metal ruler precisely with your pencil lines.
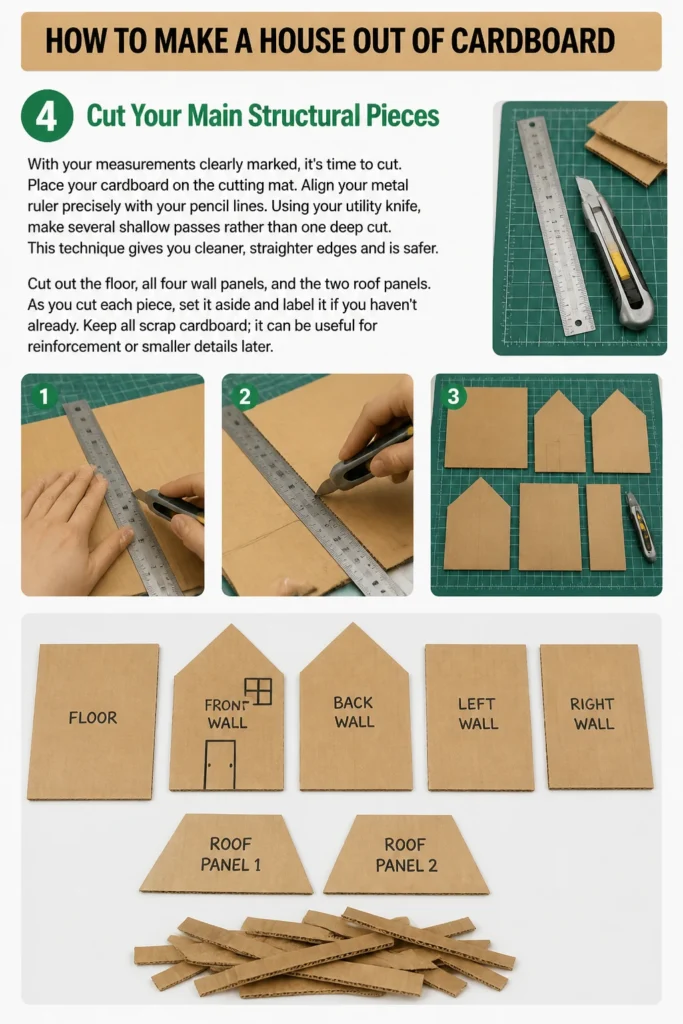
Using your utility knife, make several shallow passes rather than one deep cut. This technique gives you cleaner, straighter edges and is safer. Cut out the floor, all four wall panels, and the two roof panels.
As you cut each piece, set it aside and label it if you haven’t already. Keep all scrap cardboard; it can be useful for reinforcement or smaller details later.
Step 5: Assemble the Walls
Now, let’s bring the walls together. Decide which wall will be the front and which the back. Lay the floor panel flat on your workspace.
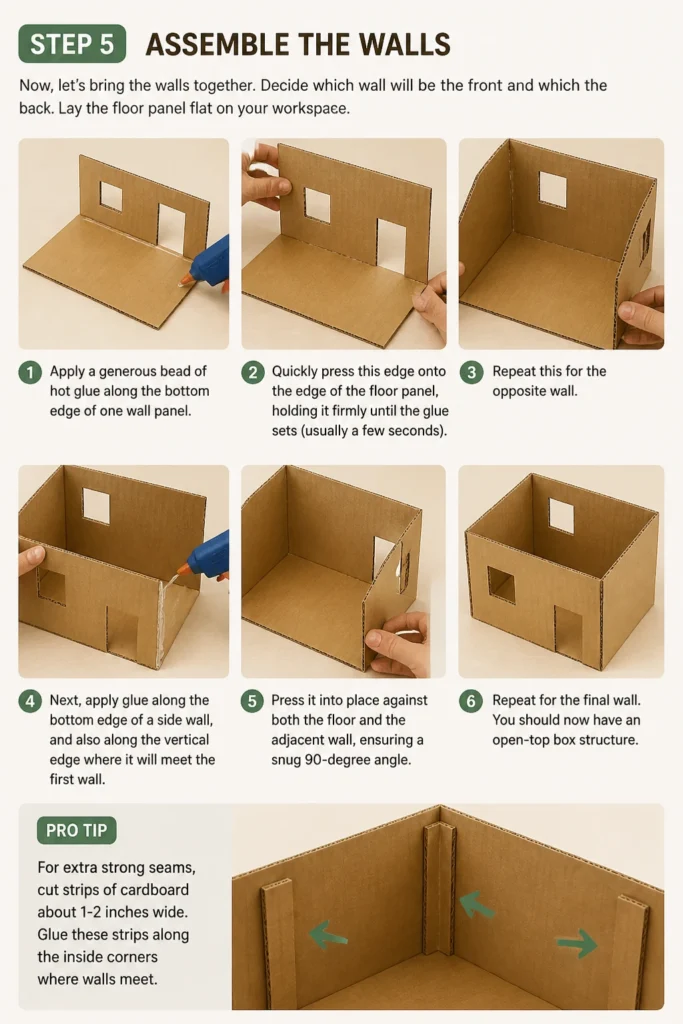
Apply a generous bead of hot glue along the bottom edge of one wall panel. Quickly press this edge onto the edge of the floor panel, holding it firmly until the glue sets (usually a few seconds). Repeat this for the opposite wall.
Next, apply glue along the bottom edge of a side wall, and also along the vertical edge where it will meet the first wall. Press it into place against both the floor and the adjacent wall, ensuring a snug 90-degree angle. Repeat for the final wall. You should now have an open-top box structure.
Pro Tip: For extra strong seams, cut strips of cardboard about 1-2 inches wide. Glue these strips along the inside corners where walls meet, creating a reinforced brace. This dramatically improves stability.
Step 6: Attach the Roof
For a standard pitched roof, you’ll have two rectangular roof panels. Determine the desired pitch. You might need to trim the top edges of your front and back walls at an angle to support the roof panels properly.
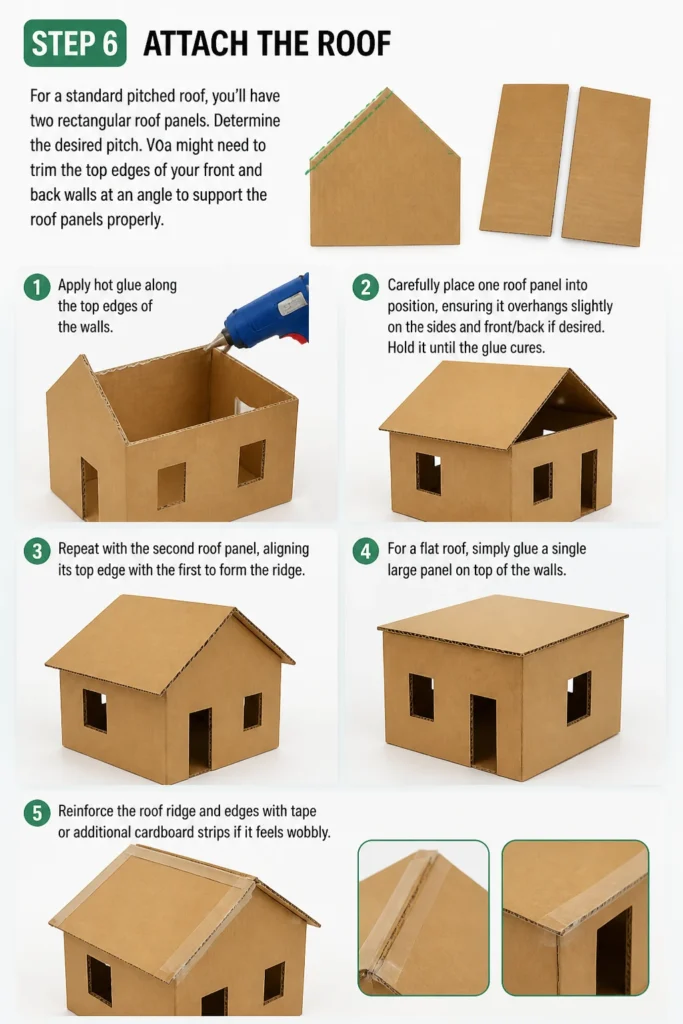
Apply hot glue along the top edges of the walls. Carefully place one roof panel into position, ensuring it overhangs slightly on the sides and front/back if desired. Hold it until the glue cures.
Repeat with the second roof panel, aligning its top edge with the first to form the ridge. For a flat roof, simply glue a single large panel on top of the walls. Reinforce the roof ridge and edges with tape or additional cardboard strips if it feels wobbly.
Step 7: Cut Out and Install Doors and Windows
With the main structure standing, it’s time for the openings. Using your pencil, draw the outlines of your doors and windows on the assembled walls. Consider drawing frames around them for a more finished look.
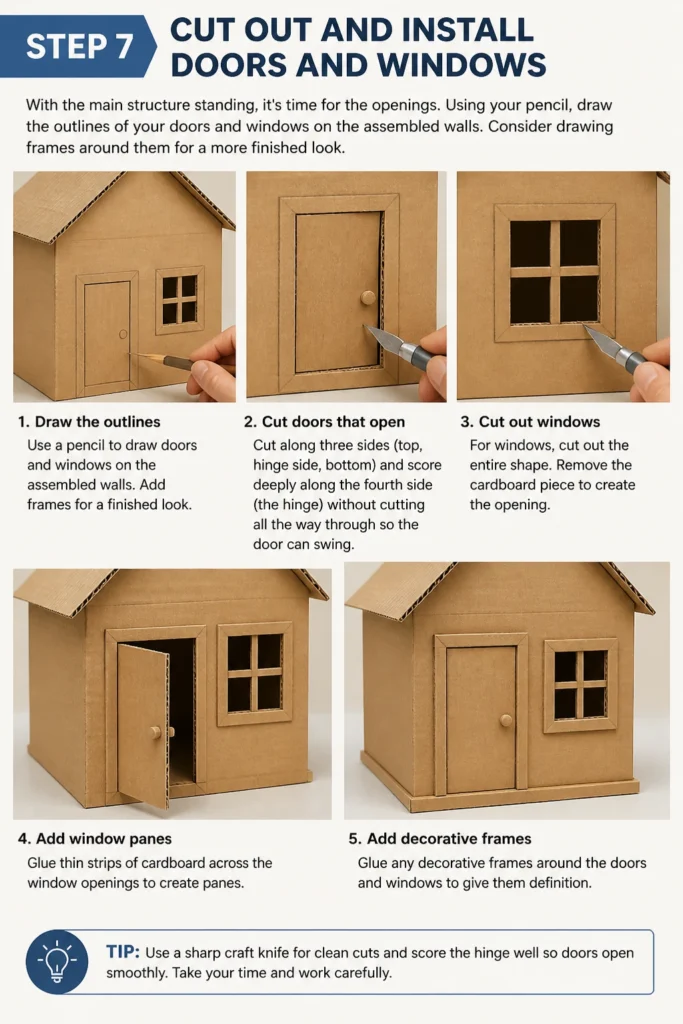
For doors that open, cut along three sides (top, hinge side, bottom) and score deeply along the fourth side (the hinge) without cutting all the way through. This allows the door to swing. For simple cutouts, remove the entire section.
For windows, cut out the entire shape. You can add cardboard “panes” by gluing thin strips across the opening. Glue any decorative frames around the doors and windows to give them definition.
Step 8: Reinforce and Stabilize Your House
A cardboard house needs to be sturdy, especially if it’s for play. Go back over all the seams, both inside and out. Apply extra hot glue where needed.
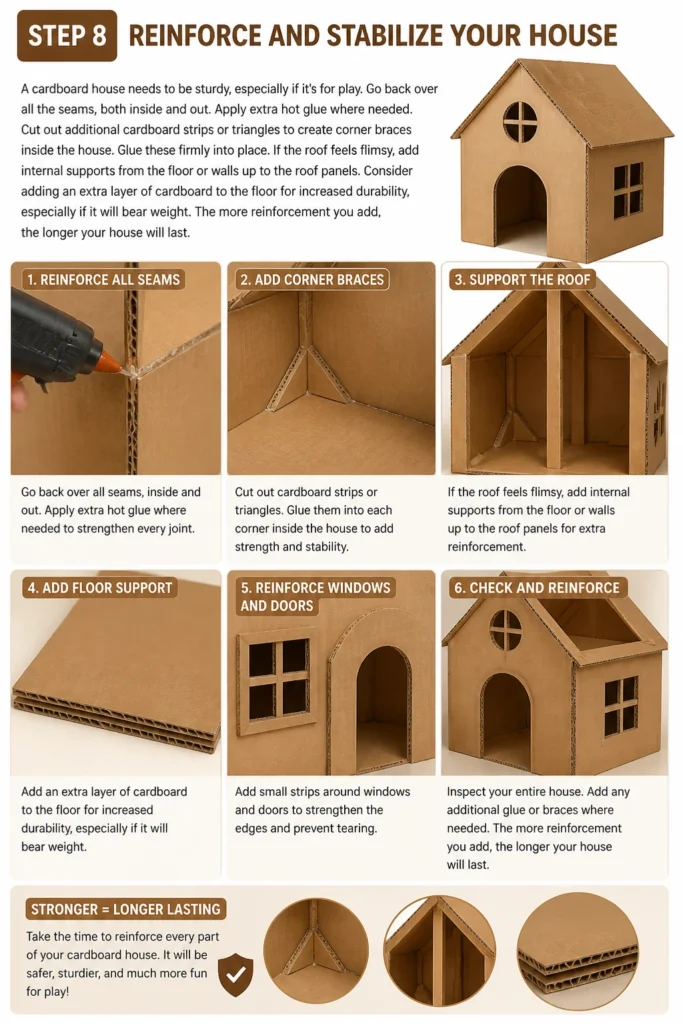
Cut out additional cardboard strips or triangles to create corner braces inside the house. Glue these firmly into place. If the roof feels flimsy, add internal supports from the floor or walls up to the roof panels.
Consider adding an extra layer of cardboard to the floor for increased durability, especially if it will bear weight. The more reinforcement you add, the longer your house will last.
Step 9: Decorate Your Cardboard Home
This is the most fun part for many! Let your creativity shine. Paint the exterior and interior with acrylic or tempera paints. You can create brick patterns, siding, or simply a solid color.
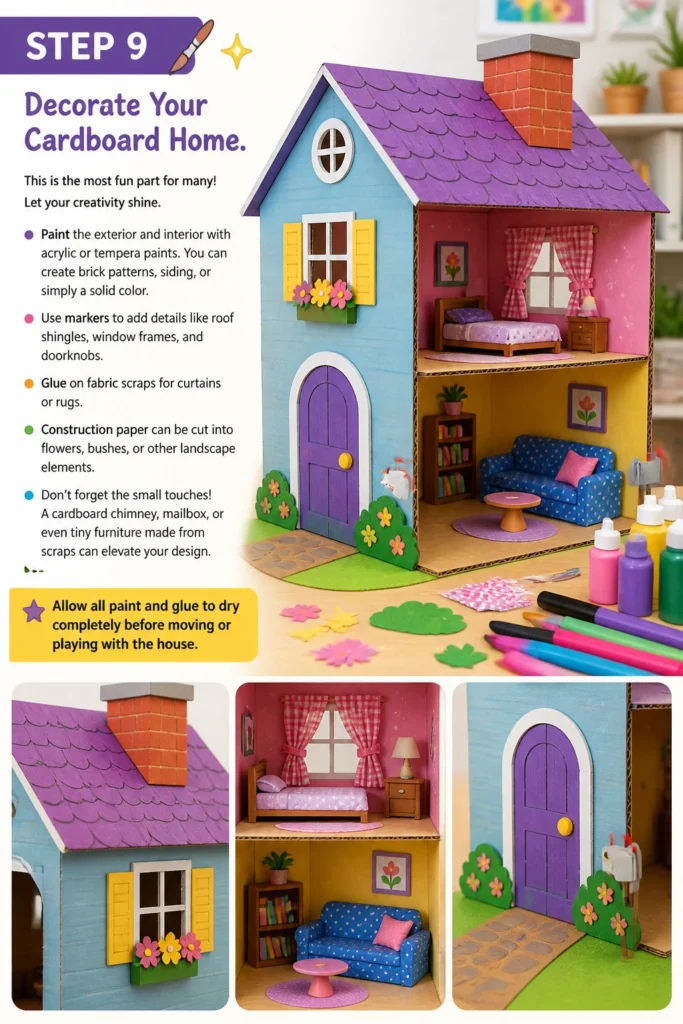
Use markers to add details like roof shingles, window frames, and doorknobs. Glue on fabric scraps for curtains or rugs. Construction paper can be cut into flowers, bushes, or other landscape elements.
Don’t forget the small touches! A cardboard chimney, mailbox, or even tiny furniture made from scraps can elevate your design. Allow all paint and glue to dry completely before moving or playing with the house.
Common Mistakes to Avoid
Not Planning Ahead
Many people jump straight into cutting without a clear plan. This often leads to wasted cardboard, uneven pieces, and a wobbly final structure. Always sketch your design, measure twice, and mark all cuts before you pick up the knife. A little planning saves a lot of frustration.
Using Weak Adhesive
Regular school glue or tape alone won’t hold a large cardboard structure together effectively. These can lead to seams coming apart, especially under stress. Invest in a good quality hot glue gun and strong glue sticks, or a robust craft adhesive specifically designed for cardboard. Hot glue provides quick, strong bonds.
Imprecise Cuts
Wavy or inaccurate cuts create unsightly gaps and compromise the structural integrity of your house. These gaps weaken the connections and make the house less stable. Always use a metal ruler as a guide for your utility knife, and make multiple shallow passes for cleaner, straighter edges. Precision is key for a professional finish.
Forgetting Reinforcement
Cardboard, while versatile, can be surprisingly flimsy on its own. Building a house without internal supports or corner braces often results in a short-lived, wobbly structure. Always add cardboard strips or triangles to reinforce corners and seams, and consider layering cardboard in high-stress areas like the floor or roof. This makes the house much more durable.
Troubleshooting
The House Feels Wobbly or Unstable
If your house is swaying or feels like it might collapse, it likely needs more reinforcement. Go back and add internal corner braces where walls meet, and where walls meet the floor. Cut strips of cardboard and glue them along these seams. You can also add vertical supports inside the walls, or horizontal beams across the ceiling/roof. Ensure all glue joints are fully cured and strong.
There Are Gaps Between Panels
Gaps usually result from imprecise cuts or panels not being held firmly while the glue dried. You can fill small gaps by applying extra hot glue directly into them and smoothing it out. For larger gaps, cut thin strips of cardboard and glue them over the gaps, both inside and outside the house. This also adds a bit of reinforcement.
The Roof Sags in the Middle
A sagging roof indicates insufficient support. If you have a pitched roof, ensure the ridge where the two panels meet is strongly glued and possibly reinforced with a cardboard strip underneath. For any roof, add internal supports running from the walls or floor up to the underside of the roof panel. These can be simple cardboard columns or cross-beams.
Key Takeaways
- Always begin with a detailed plan and sketch your design before cutting.
- Use a sharp utility knife and a metal ruler for precise, safe cuts.
- Hot glue is generally the most effective adhesive for cardboard house construction.
- Reinforce all corners and seams with additional cardboard strips for stability.
- Allow adequate drying time for all paint and glue to ensure durability.
- Don’t be afraid to get creative with decorations to personalize your house.
Frequently Asked Questions
What kind of cardboard is best for making a house?
The best cardboard is thick, corrugated cardboard from large appliance boxes, like refrigerator or washing machine boxes. This type of cardboard offers excellent structural integrity and is easy to work with. Smaller, thinner boxes can be used for details or smaller projects, but won’t provide the same sturdiness for a large house.
How can I make the house waterproof for outdoor use?
Cardboard is not naturally waterproof. To make it more resistant to the elements, you can paint the entire exterior with several coats of exterior-grade acrylic paint. For better protection, consider applying a clear sealant or varnish designed for outdoor use over the paint. However, even with these measures, prolonged exposure to rain will likely still damage the cardboard. It’s best kept indoors or under cover.
Can children help with this project?
Absolutely! Children can be involved in many aspects, especially the planning and decorating stages. For cutting, it’s best for an adult to handle the utility knife due to safety concerns. Children can help with measuring, marking, holding pieces while gluing (with supervision for hot glue), and certainly with all the painting and embellishing. It’s a fantastic collaborative project.
How long will a cardboard house typically last?
The lifespan of a cardboard house varies greatly depending on its construction quality, reinforcement, and how it’s used. A well-built, reinforced house used indoors for gentle play can last for months, even years. One that is flimsily constructed or subjected to rough play will likely have a much shorter life. Proper storage away from moisture also extends its duration.
Our Top Recommended Finds
- Heavy-Duty Utility Knife: Essential for clean, precise cuts through thick cardboard. Look for one with a comfortable grip and easy blade changes.
- Large Self-Healing Cutting Mat: Protects your work surface and prolongs the life of your blades. A large size allows you to maneuver big cardboard panels easily.
- Hot Glue Gun with High-Temp Settings: Provides strong, fast bonds crucial for cardboard construction. Ensure you have plenty of glue sticks on hand.
Your Cardboard Masterpiece Awaits
You now have all the knowledge and practical steps needed to construct an impressive cardboard house. This project is more than just cutting and gluing; it’s about bringing an idea to life, learning basic construction principles, and enjoying the creative process.
Imagine the joy of seeing your finished house, ready for play or display. Perhaps your next project could be furnishing the interior, building a cardboard car, or even an entire cardboard city! Don’t delay—gather your materials today and start building the cardboard house of your dreams.
Beginner-friendly templates, step-by-step guides,
and weekly project ideas in your inbox.