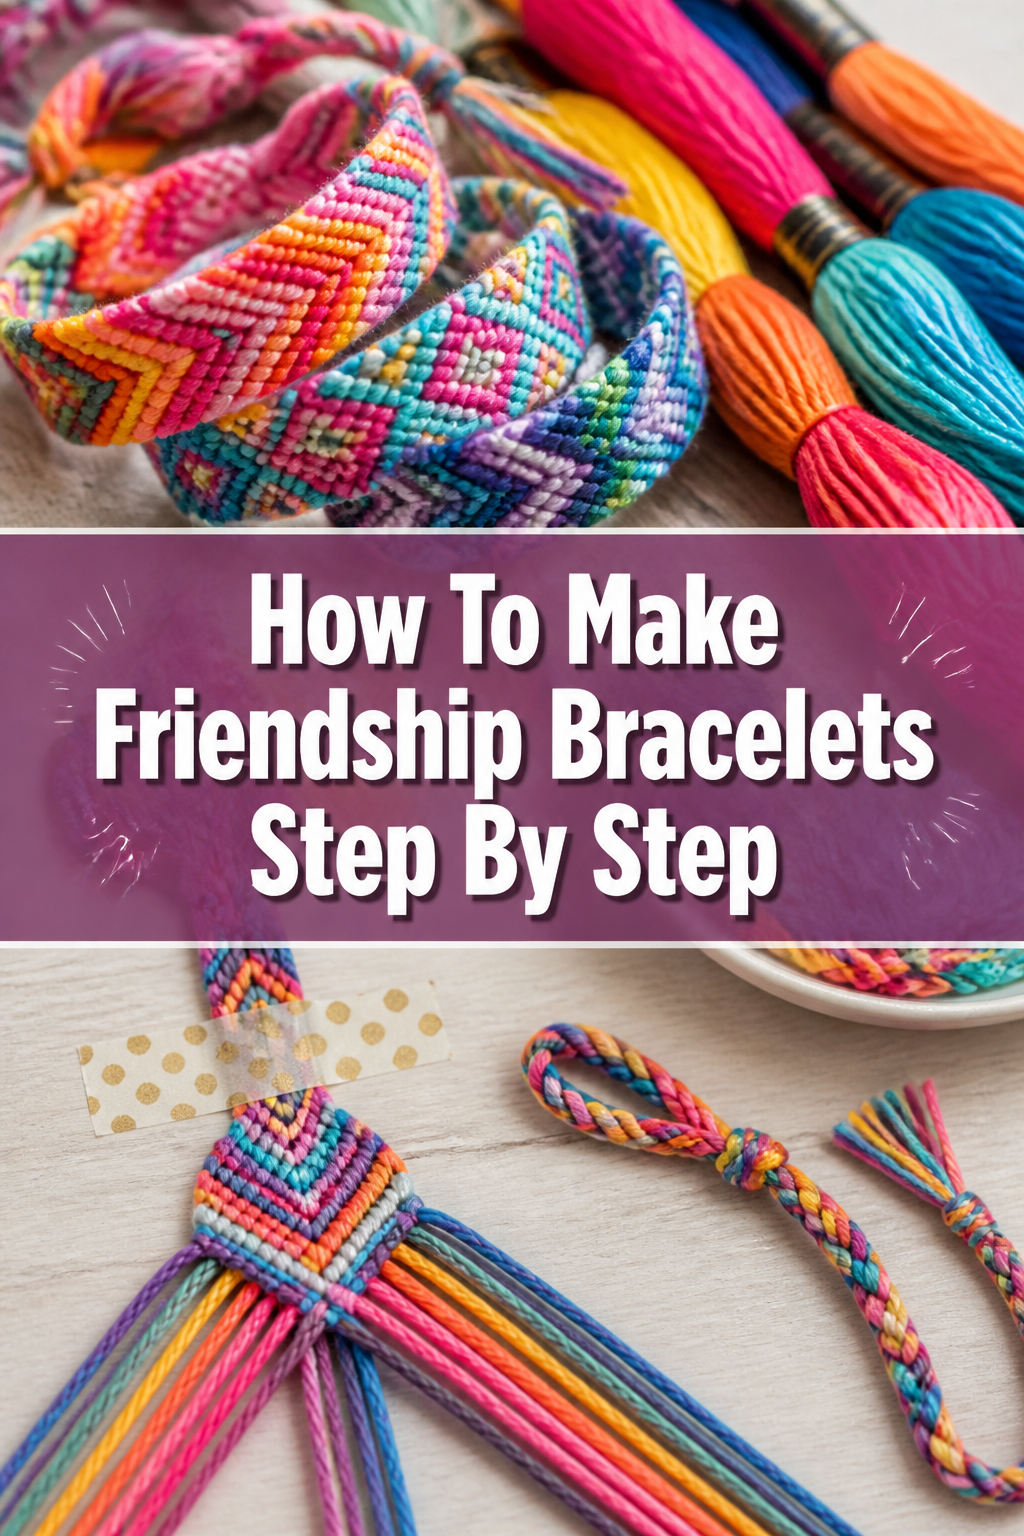
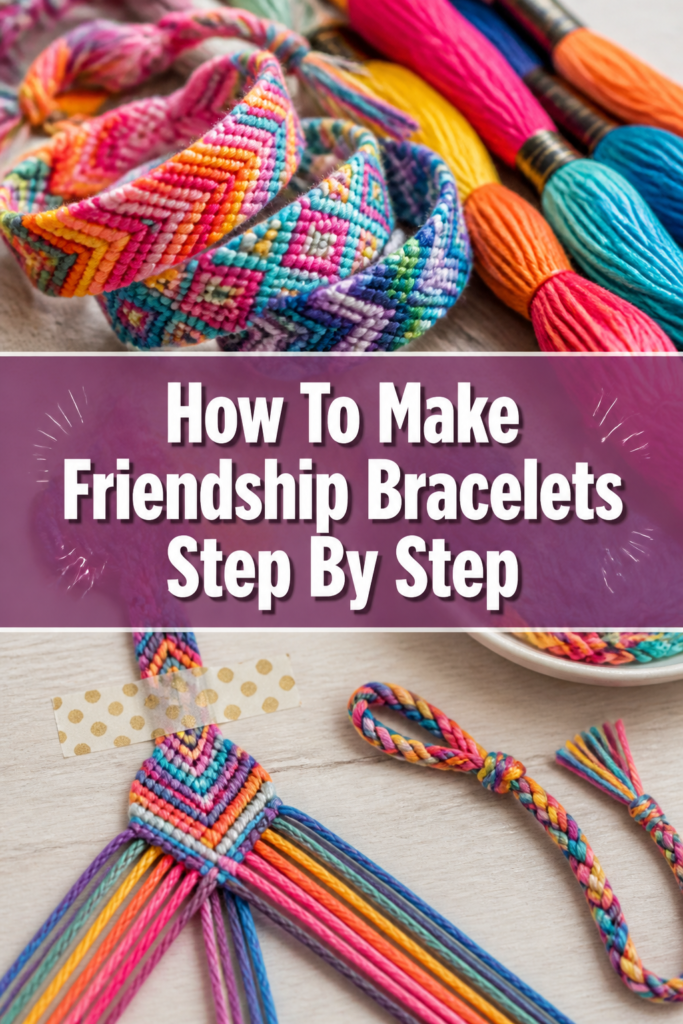
🧵 How To Make Friendship Bracelets Step By Step

Beginner-friendly templates, step-by-step guides,
and weekly project ideas in your inbox.
Making friendship bracelets is a cherished craft. It’s a wonderful way to express affection and creativity. I remember spending countless summer afternoons braiding colorful threads with my friends. This guide shares all the simple techniques I learned, ensuring you can create beautiful bracelets too.
Quick Overview
This guide will walk you through creating a classic friendship bracelet, perfect for sharing with someone special. You will learn the essential knotting techniques to make a colorful, lasting accessory.
- Time needed: 30 minutes to 2 hours (depending on design complexity and practice)
- Difficulty: Beginner
- What you’ll need: Embroidery floss, scissors, a measuring tape, and a clip or tape.
Step-by-Step Instructions
Step 1: Gather Your Materials
Collect all the necessary items before you begin. This helps keep your creative flow uninterrupted.
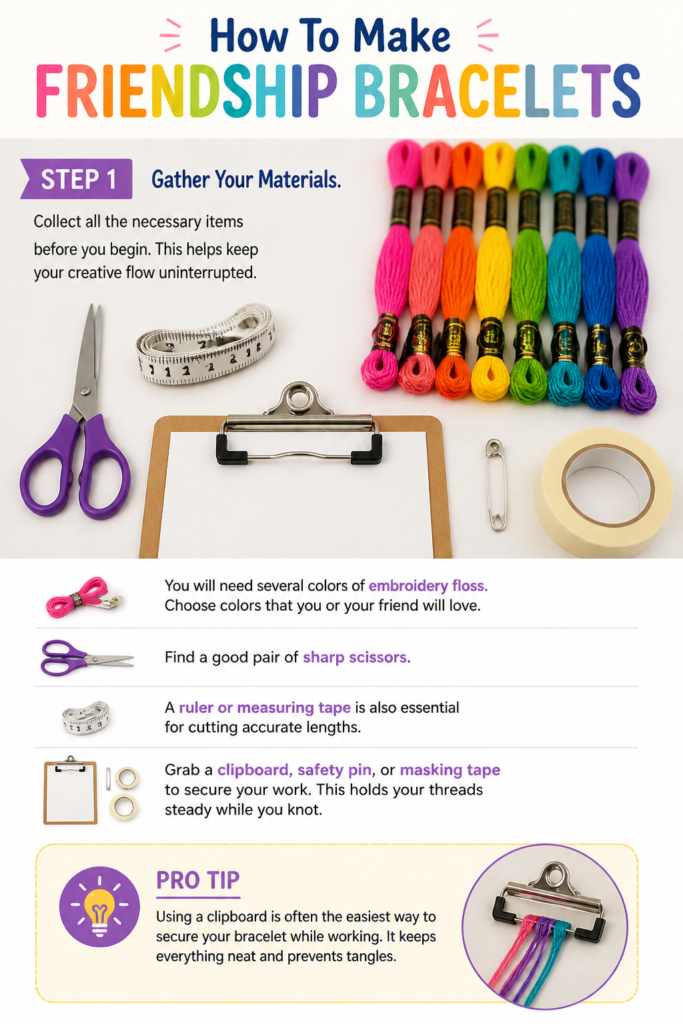
You will need several colors of embroidery floss. Choose colors that you or your friend will love.
Find a good pair of sharp scissors. A ruler or measuring tape is also essential for cutting accurate lengths.
Grab a clipboard, safety pin, or masking tape to secure your work. This holds your threads steady while you knot.
Pro Tip: Using a clipboard is often the easiest way to secure your bracelet while working. It keeps everything neat and prevents tangles.
Step 2: Measure and Cut Your Floss
Decide on the number of strands you want for your bracelet. A common number for beginners is 6-8 strands.
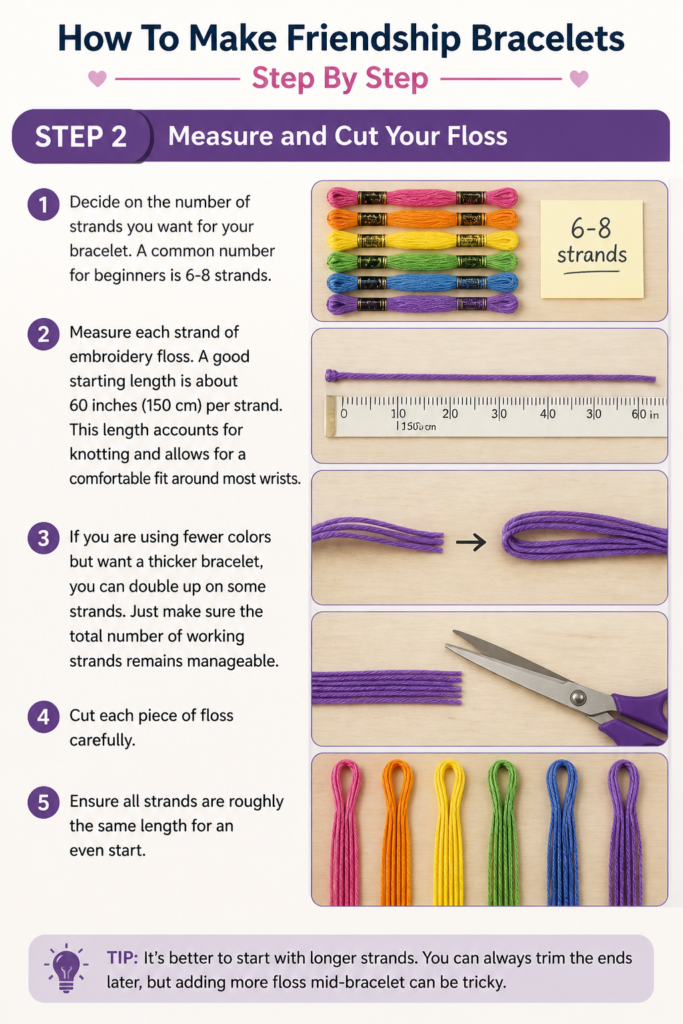
Measure each strand of embroidery floss. A good starting length is about 60 inches (150 cm) per strand. This length accounts for knotting and allows for a comfortable fit around most wrists.
If you are using fewer colors but want a thicker bracelet, you can double up on some strands. Just make sure the total number of working strands remains manageable.
Cut each piece of floss carefully. Ensure all strands are roughly the same length for an even start.
Step 3: Prepare Your Strands
Align all your cut strands together. Make sure the ends are even.
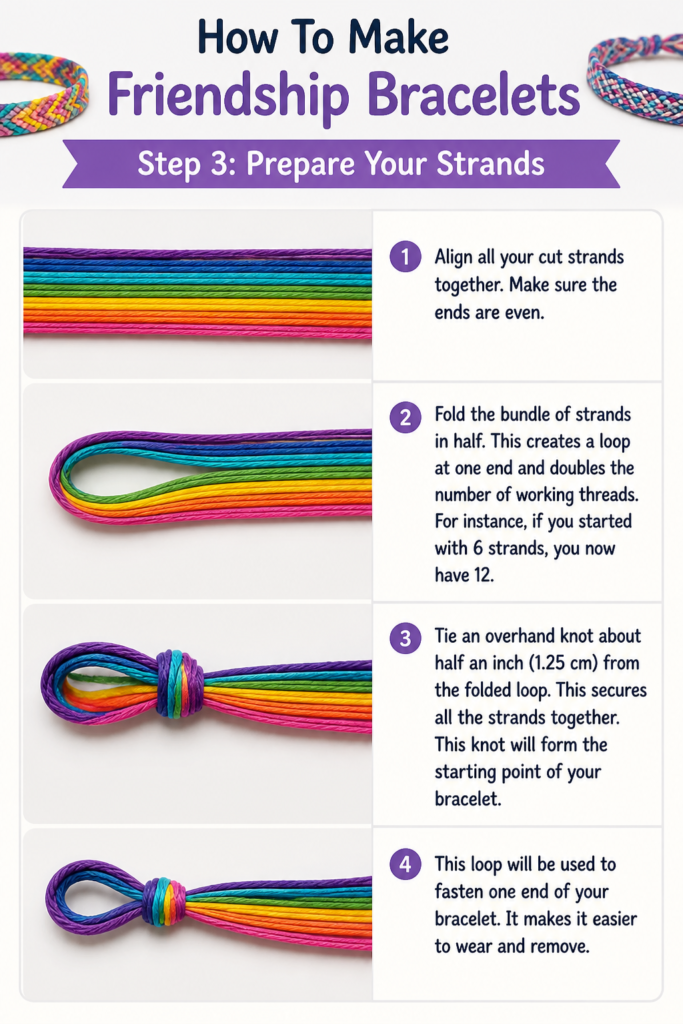
Fold the bundle of strands in half. This creates a loop at one end and doubles the number of working threads. For instance, if you started with 6 strands, you now have 12.
Tie an overhand knot about half an inch (1.25 cm) from the folded loop. This secures all the strands together. This knot will form the starting point of your bracelet.
This loop will be used to fasten one end of your bracelet. It makes it easier to wear and remove.
Step 4: Secure Your Workstation
Attach the knotted loop to your chosen workstation. If using a clipboard, clip the loop securely at the top.
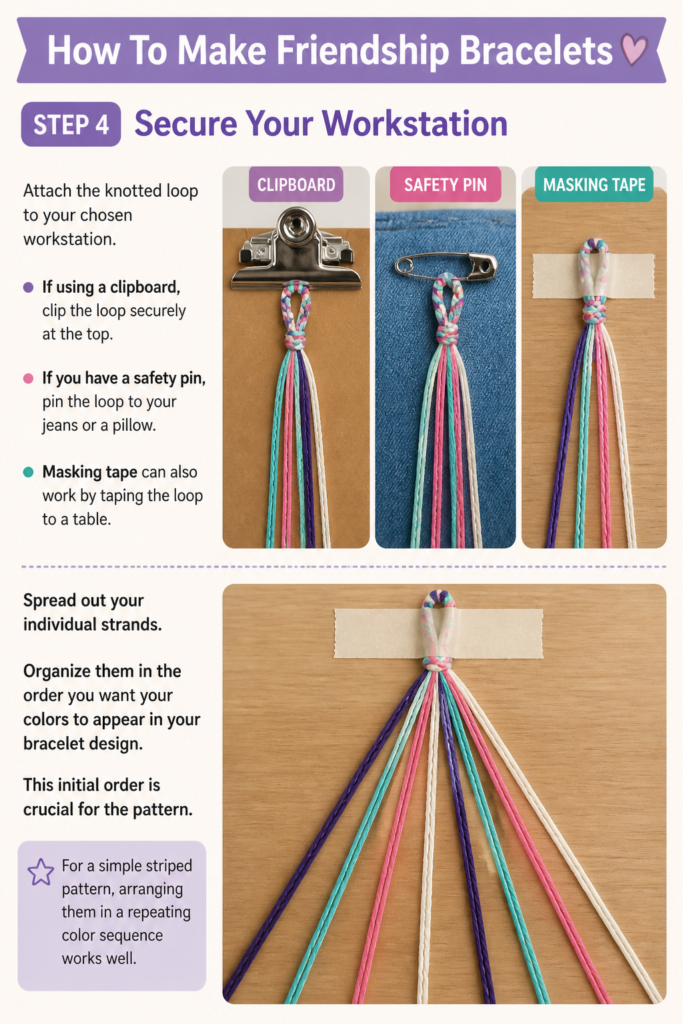
If you have a safety pin, pin the loop to your jeans or a pillow. Masking tape can also work by taping the loop to a table.
Spread out your individual strands. Organize them in the order you want your colors to appear in your bracelet design. This initial order is crucial for the pattern.
For a simple striped pattern, arranging them in a repeating color sequence works well.
Step 5: Learn the Forward Knot (FK)
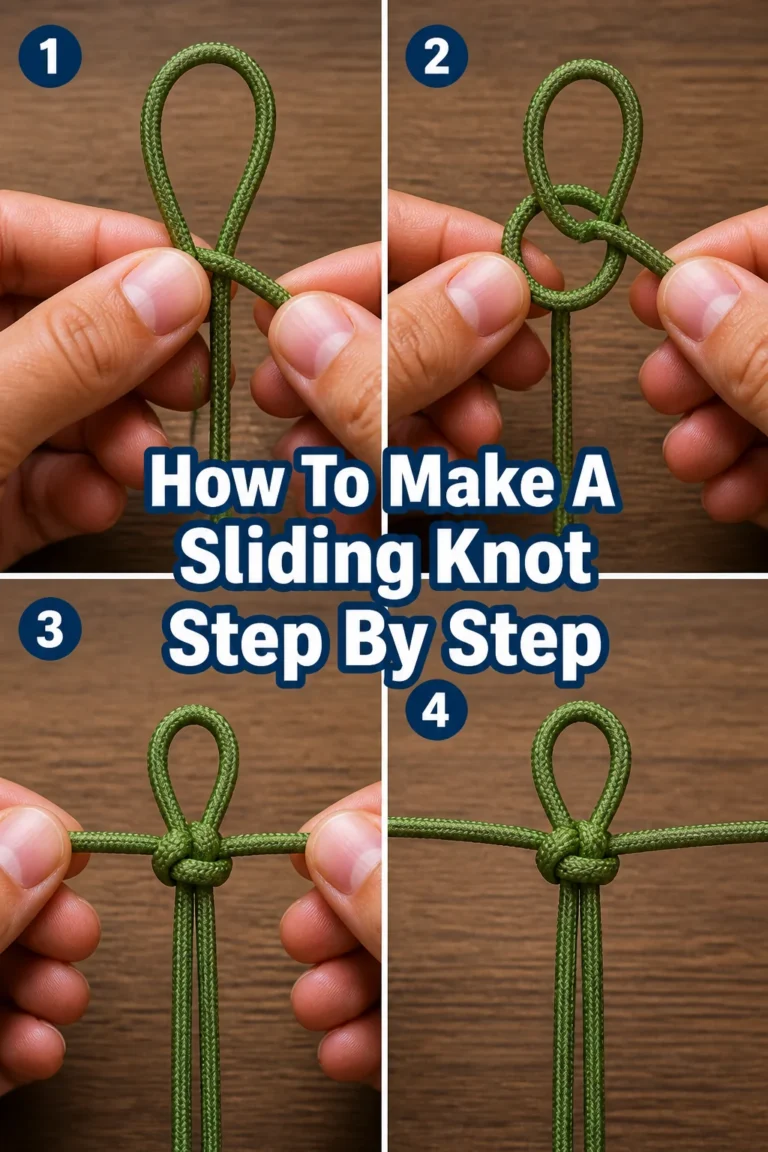
The forward knot is the basic building block for many patterns. It’s often called a “half-hitch” or “forward-backward knot” depending on the design.
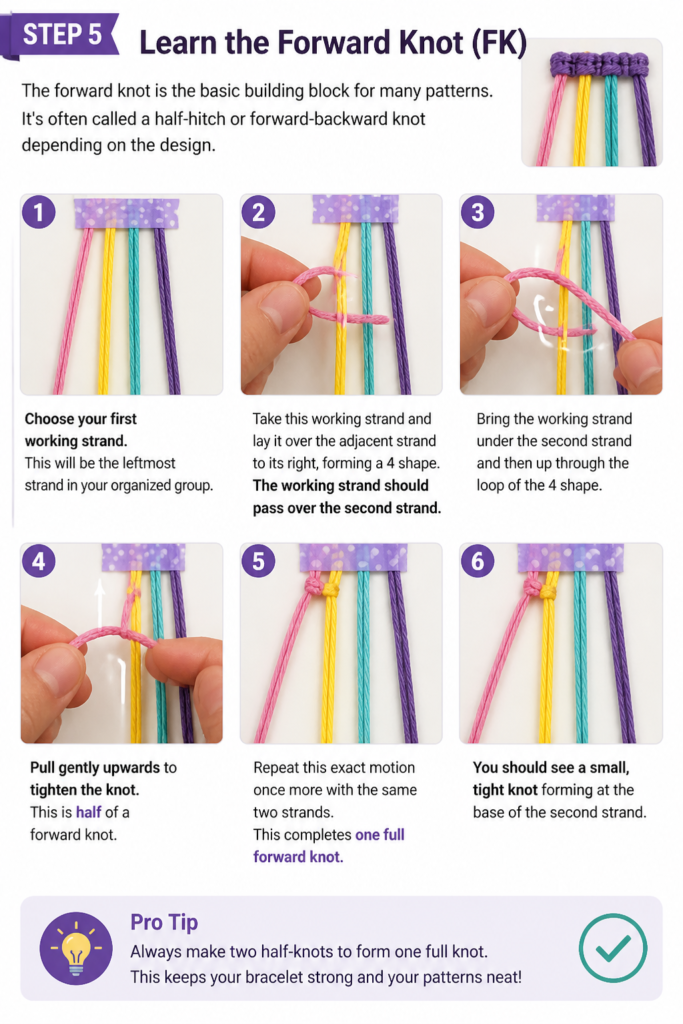
Choose your first working strand. This will be the leftmost strand in your organized group.
Take this working strand and lay it over the adjacent strand to its right, forming a “4” shape. The working strand should pass over the second strand.
Bring the working strand under the second strand and then up through the loop of the “4” shape. Pull gently upwards to tighten the knot. This is half of a forward knot.
Repeat this exact motion once more with the same two strands. This completes one full forward knot. You should see a small, tight knot forming at the base of the second strand.
Pro Tip: Always make two half-knots to form one full knot. This ensures the knot is secure and consistent. Practice this motion until it feels natural.
Step 6: Knot Across Your Strands
Continue making forward knots with your first working strand. Move from left to right.
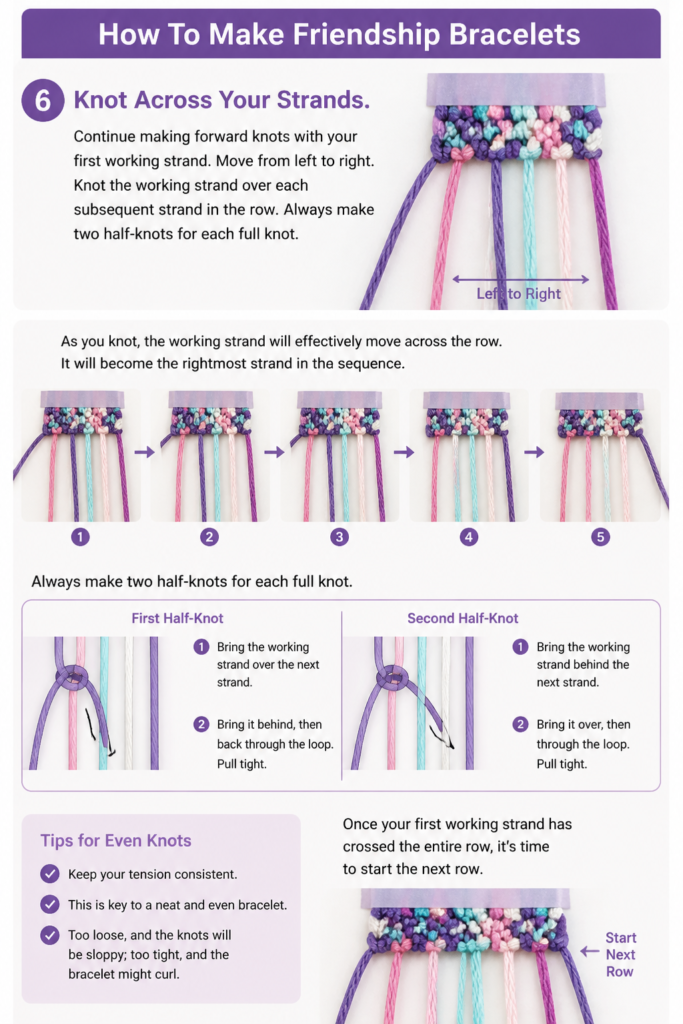
Knot the working strand over each subsequent strand in the row. Always make two half-knots for each full knot.
As you knot, the working strand will effectively move across the row. It will become the rightmost strand in the sequence.
Keep your tension consistent. This is key to a neat and even bracelet. Too loose, and the knots will be sloppy; too tight, and the bracelet might curl.
Once your first working strand has crossed the entire row, it’s time to start the next row.
Step 7: Start the Next Row
Select the new leftmost strand. This will be the color that was originally second from the left.
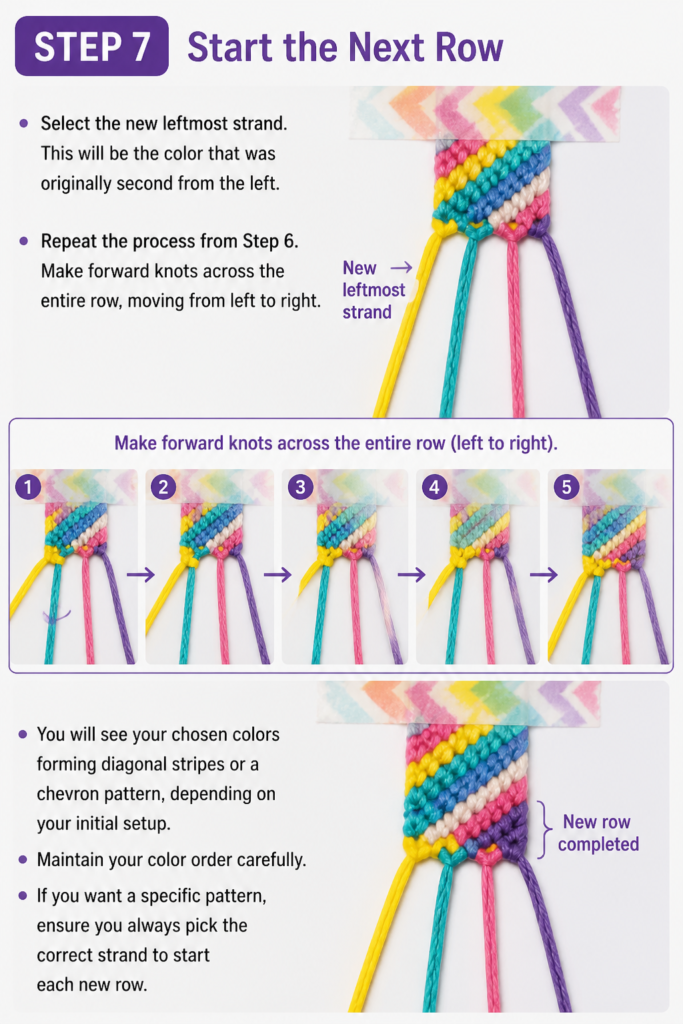
Repeat the process from Step 6. Make forward knots across the entire row, moving from left to right.
You will see your chosen colors forming diagonal stripes or a chevron pattern, depending on your initial setup.
Maintain your color order carefully. If you want a specific pattern, ensure you always pick the correct strand to start each new row.
Step 8: Continue Knotting Until Desired Length
Keep repeating Step 7. Continue knotting row after row.
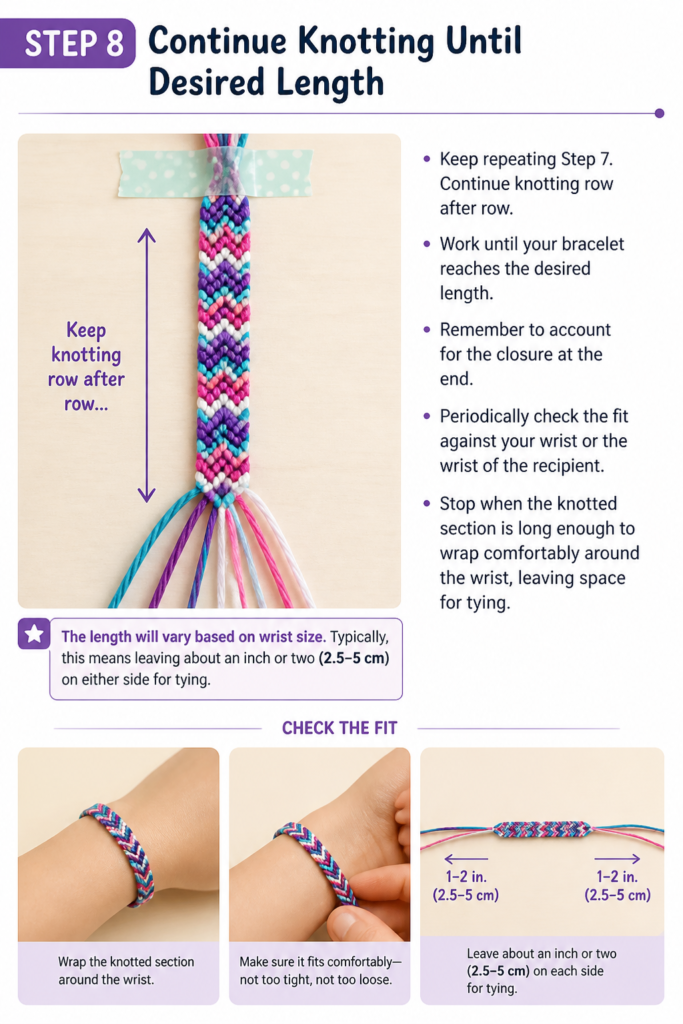
Work until your bracelet reaches the desired length. Remember to account for the closure at the end.
Periodically check the fit against your wrist or the wrist of the recipient. Stop when the knotted section is long enough to wrap comfortably around the wrist, leaving space for tying.
The length will vary based on wrist size. Typically, this means leaving about an inch or two (2.5-5 cm) on either side for tying.
Step 9: Finish Your Bracelet
Once the knotted section is complete, gather all your remaining loose strands together.
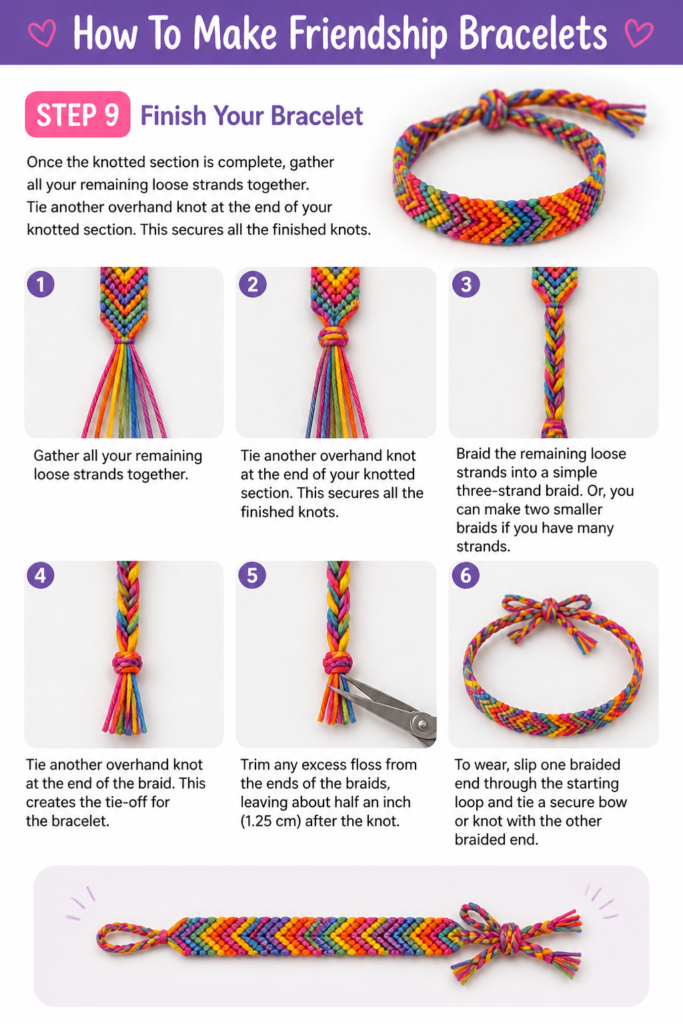
Tie another overhand knot at the end of your knotted section. This secures all the finished knots.
Braid the remaining loose strands into a simple three-strand braid. Or, you can make two smaller braids if you have many strands.
Tie another overhand knot at the end of the braid. This creates the tie-off for the bracelet.
Trim any excess floss from the ends of the braids, leaving about half an inch (1.25 cm) after the knot.
To wear, slip one braided end through the starting loop and tie a secure bow or knot with the other braided end.
Common Mistakes to Avoid
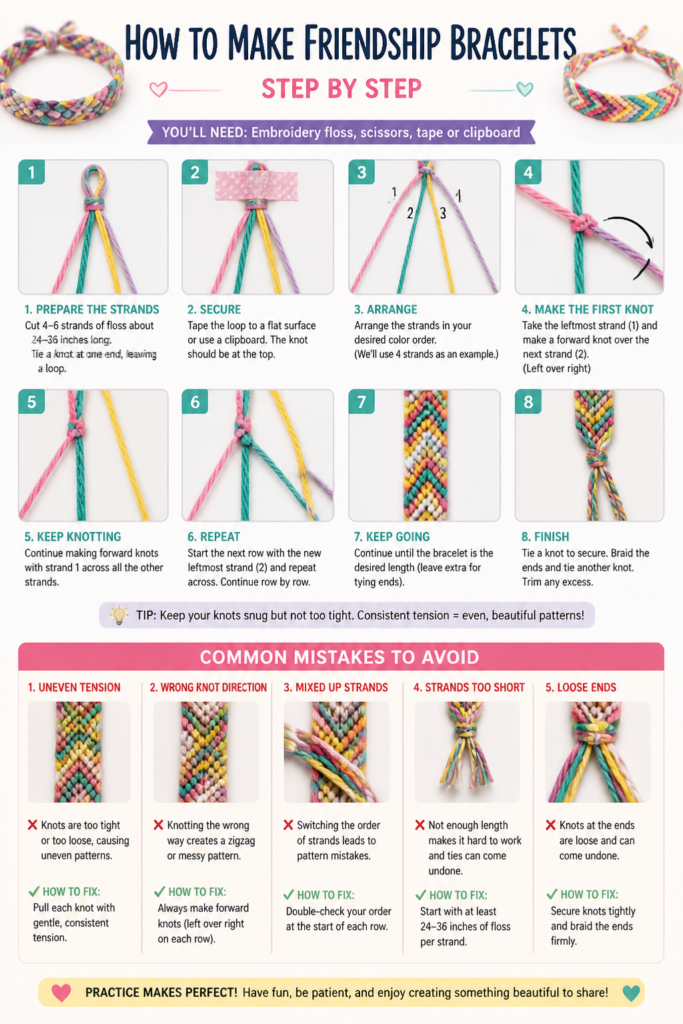
Inconsistent Tension
Many beginners struggle with keeping their knots even. If your tension is too loose, the knots will look sloppy and gappy. If it’s too tight, the bracelet might pucker or become rigid. Always aim for a firm but gentle pull on your working strand to create uniform knots. Practice helps develop a consistent hand.
Incorrect Knotting Sequence
Forgetting to make two half-knots for each full knot is a common error. This results in unstable knots that can unravel or look uneven. Each full knot requires two identical motions with the same two strands. Ensure you complete both parts before moving to the next strand.
Running Out of Floss
Cutting your floss too short is a frustrating mistake. It’s better to have too much floss than too little. When a strand runs out mid-bracelet, it’s difficult to seamlessly add a new one without a visible join. Err on the side of generosity with your initial measurements.
Mixed-Up Strand Order
Losing track of your strand order can quickly ruin a pattern. If you accidentally pick up the wrong strand to knot, your design will become distorted. Always return the working strand to its correct position after knotting and clearly identify the next strand in the sequence before beginning a new knot.
Troubleshooting
My Bracelet is Curling
If your bracelet starts to curl, it usually means your tension is too tight. Try to relax your grip slightly on the working thread. Ensure you are not pulling the knots too forcefully against the core strands. You can also try gently stretching the bracelet flat as you go to counteract the curling effect.
My Knots Look Uneven
Uneven knots often stem from inconsistent tension or not completing both parts of a full knot. Go back to basics and focus on making two distinct half-knots for each full knot. Practice pulling with the same amount of force each time. It might also help to re-secure your bracelet more firmly to prevent shifting.
My Colors Are Not Showing Up Correctly
This usually indicates an issue with your initial strand setup or knotting direction. Double-check the order of your strands at the start of each row. Ensure you are consistently using the leftmost strand as your working strand and knotting it across to the right. If you accidentally use a different strand or knot in the wrong direction, the pattern will change.
Key Takeaways
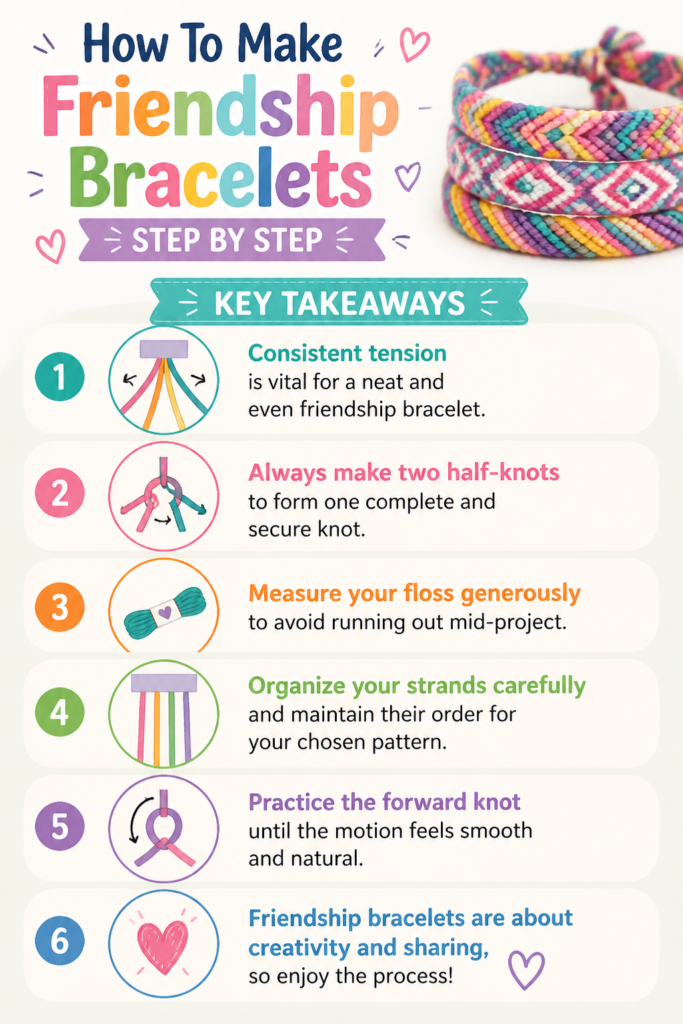
- Consistent tension is vital for a neat and even friendship bracelet.
- Always make two half-knots to form one complete and secure knot.
- Measure your floss generously to avoid running out mid-project.
- Organize your strands carefully and maintain their order for your chosen pattern.
- Practice the forward knot until the motion feels smooth and natural.
- Friendship bracelets are about creativity and sharing, so enjoy the process!
Frequently Asked Questions
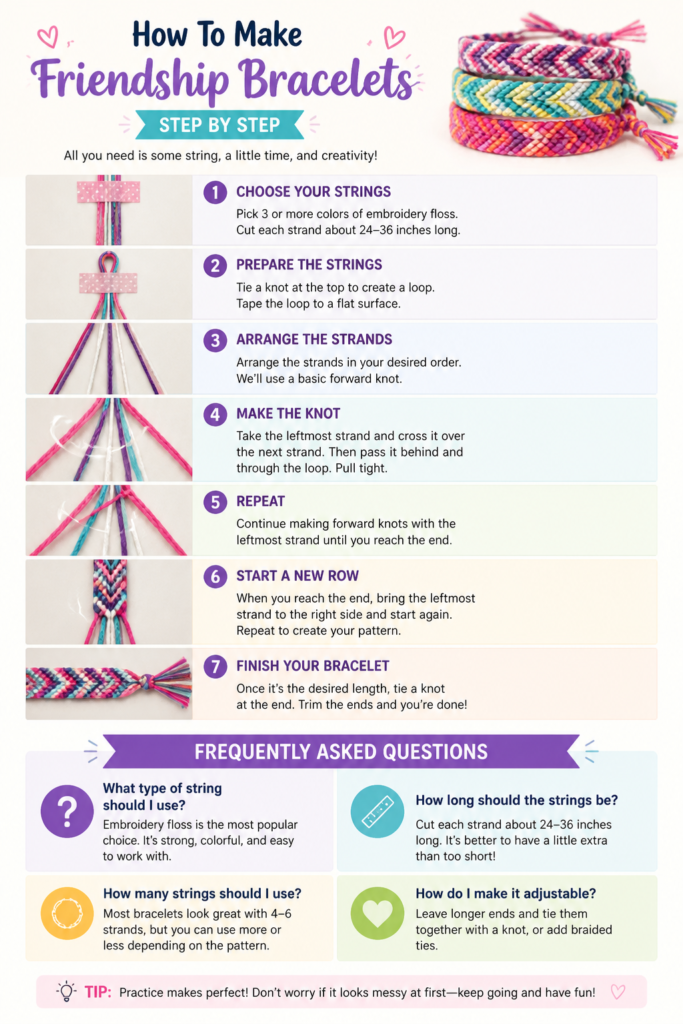
Can I use different types of string?
Yes, you can experiment with different string types. Embroidery floss is ideal for its vibrant colors and smooth texture. However, you can use thin yarn, crochet thread, or even thin hemp cord. Just be aware that the texture and thickness will change the final look and feel of the bracelet.
How do I make a chevron pattern instead of stripes?
To make a chevron pattern, you’ll need to use both forward knots and backward knots. Start by arranging your strands symmetrically (e.g., ABCCBA). Work from the left to the center using forward knots, and from the right to the center using backward knots. Then, join the two center strands with a final knot.
What if my bracelet is too short or too long?
If your bracelet is too short, you might have to start over with longer strands. If it’s too long, you can simply unknot some of the finished section or trim the braided ties shorter. Always measure against the wearer’s wrist periodically to ensure the correct length.
How do I add beads to a friendship bracelet?
To add beads, simply thread a bead onto one of your working strands before making a knot with that strand. Position the bead where you want it to sit, then complete your knot around it. Ensure the bead’s hole is large enough for your floss.
Our Top Recommended Finds
- Embroidery Floss Kit: A multi-color pack provides a wide range of options for creative designs. It’s perfect for beginners.
- Small Sharp Scissors: Precision is key when trimming floss ends for a clean finish. Craft scissors work wonderfully.
- Clipboard with a Strong Clip: This provides an excellent, stable surface to secure your bracelet while you knot, preventing tangles and frustration.
Start Your Knotting Journey Today!
Now that you have the steps, it’s time to pick out your favorite colors and begin. Creating friendship bracelets is a relaxing and rewarding hobby. It allows you to make personalized gifts that carry special meaning.
Don’t be afraid to experiment with different color combinations. Try various knotting techniques once you master the basics. You could explore diagonal stripe patterns, chevron designs, or even more intricate woven styles.
This simple craft opens up a world of creative possibilities. Grab your floss and start making those beautiful, heartfelt gifts today. Share your creations and the joy of handmade friendship.
Beginner-friendly templates, step-by-step guides,
and weekly project ideas in your inbox.