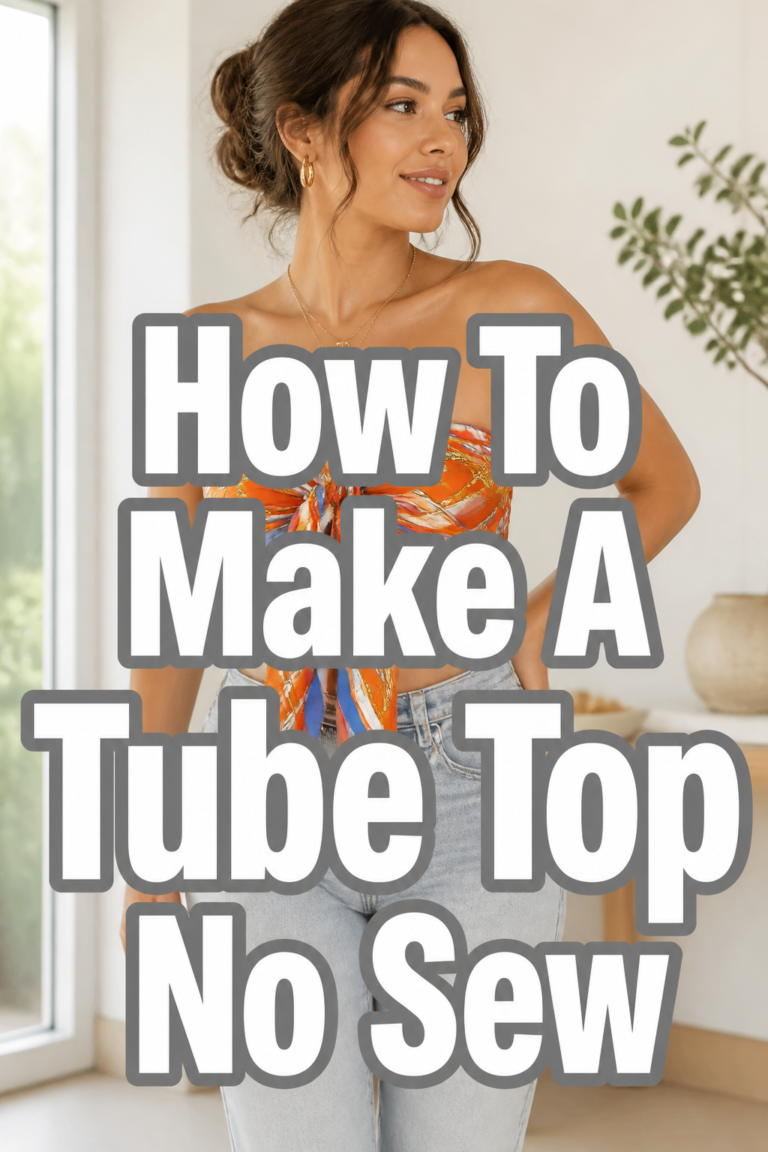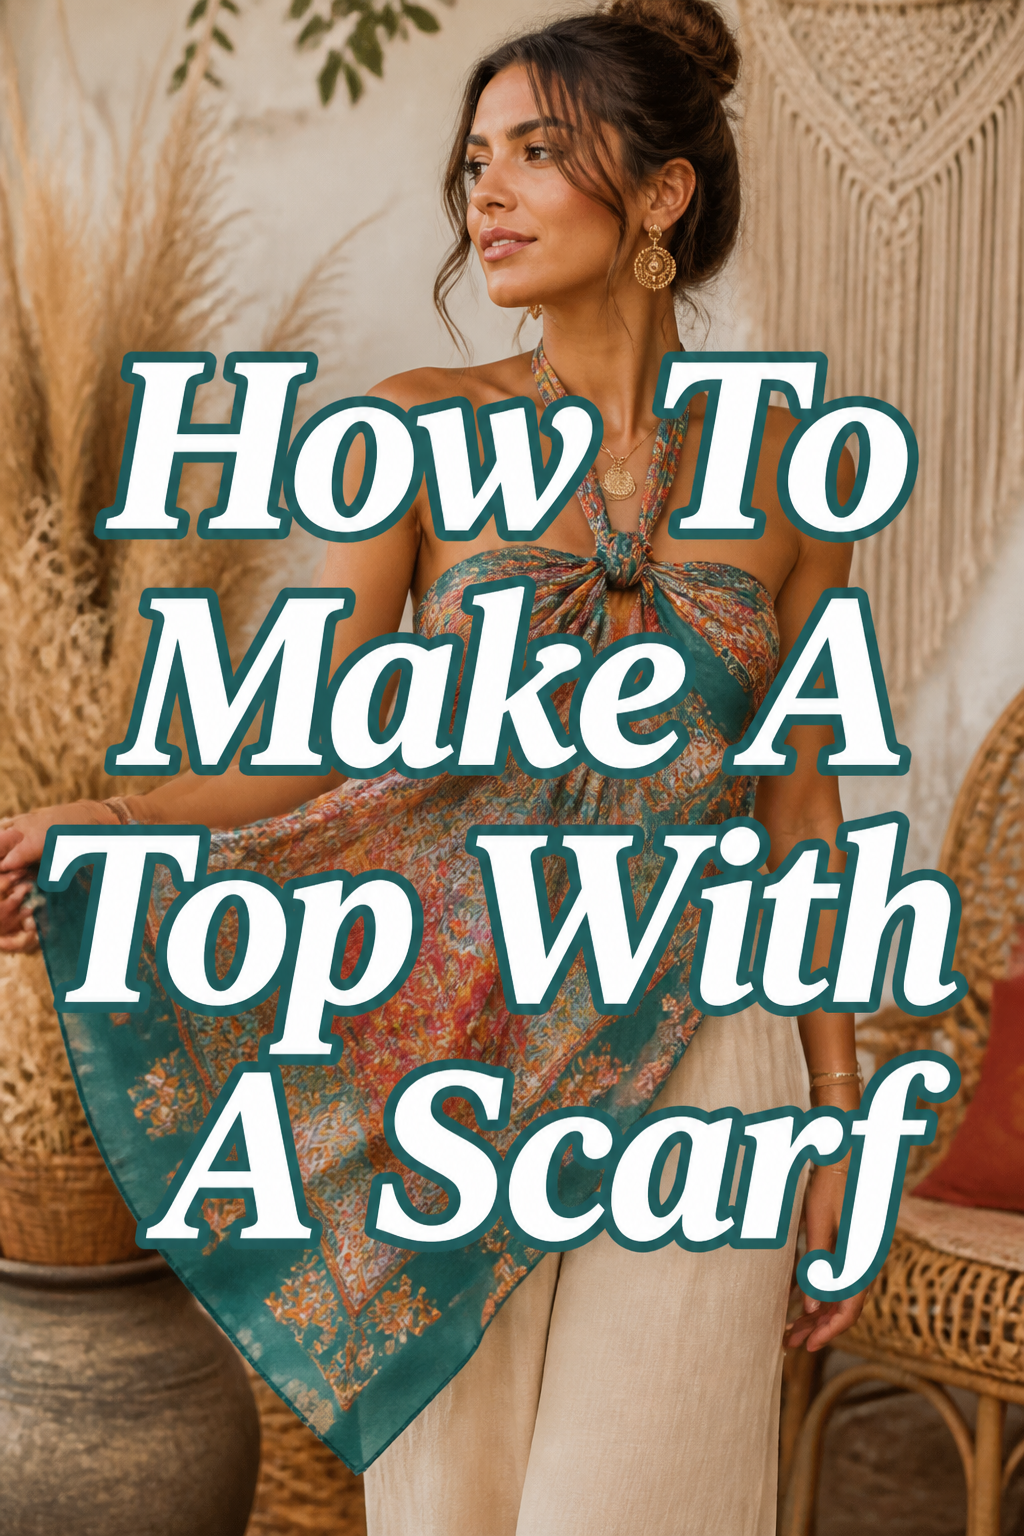
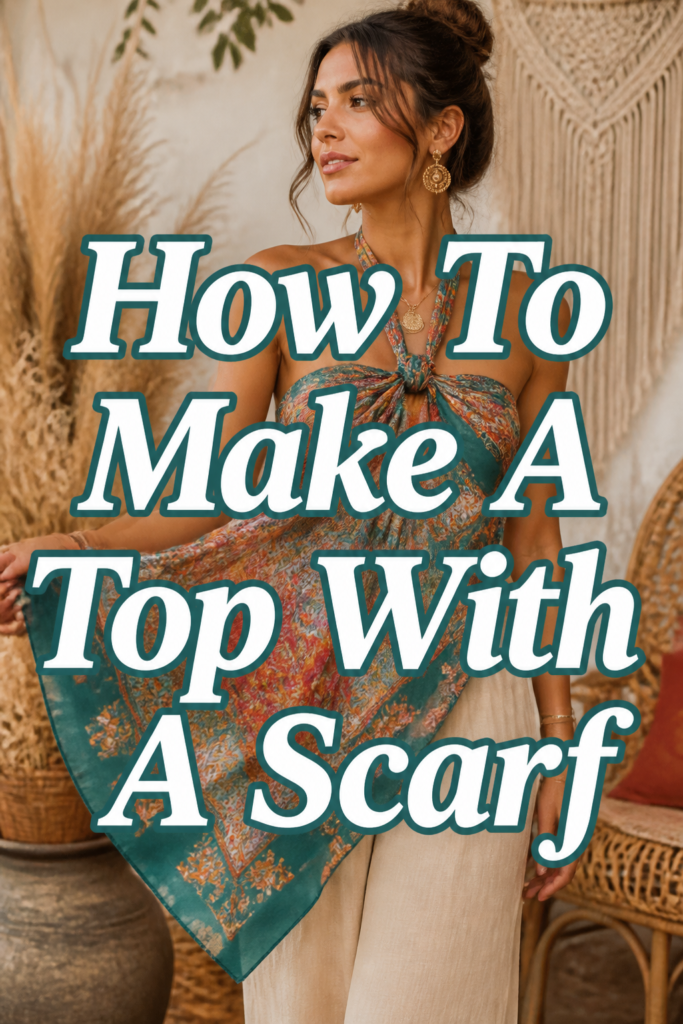
👚 How To Make A Top With A Scarf

Beginner-friendly templates, step-by-step guides,
and weekly project ideas in your inbox.
Making a stylish top from a simple scarf is a fantastic way to refresh your wardrobe without spending a fortune. I remember my first attempt, nervously trying to get the knots just right before a last-minute beach trip. It felt incredibly liberating to create something unique with my own hands.
This guide will walk you through every step, ensuring you achieve a chic and secure scarf top that you’ll love to wear. You’ll gain the confidence to transform any beautiful scarf into a statement piece.
Quick Overview
This guide will empower you to craft a fashionable and secure top using just a scarf, perfect for various occasions. You’ll learn the essential techniques for knotting, styling, and ensuring a comfortable fit. By the end, you’ll have a versatile garment and a new skill.
- Time needed: 10-20 minutes (plus practice)
- Difficulty: Beginner
- What you’ll need: One large square scarf (preferably silk, satin, or lightweight cotton), optional safety pins.
Step-by-Step Instructions
Step 1: Choose Your Scarf Wisely
Select a scarf that complements your personal style and desired look. The material and size are crucial for a successful outcome. A large square scarf, roughly 36×36 inches (90×90 cm) or larger, offers the most versatility.
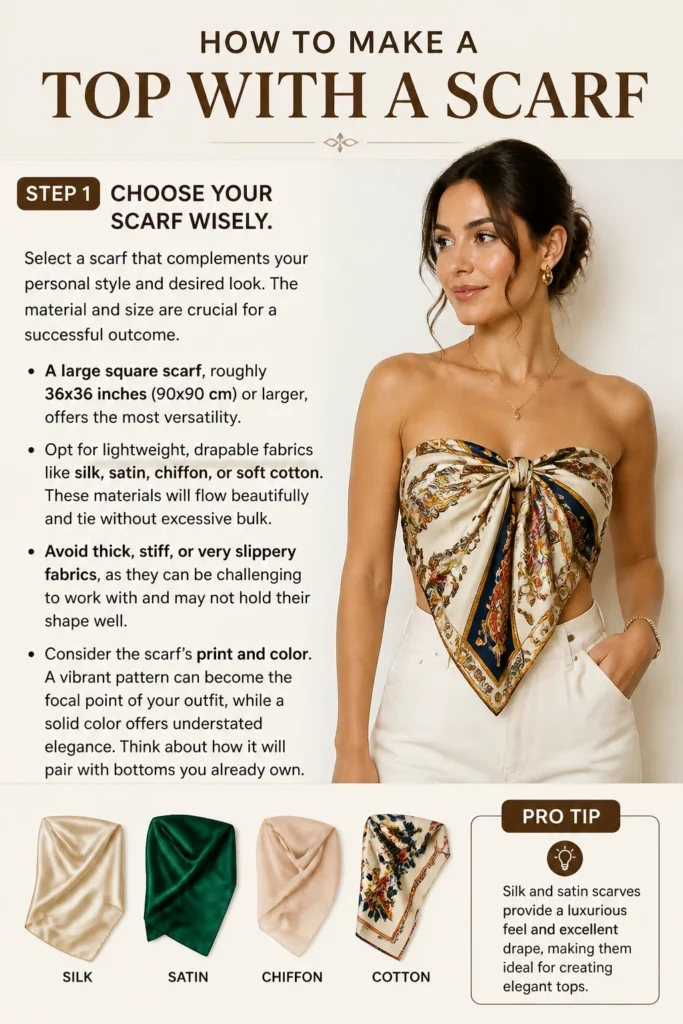
Opt for lightweight, drapable fabrics like silk, satin, chiffon, or soft cotton. These materials will flow beautifully and tie without excessive bulk. Avoid thick, stiff, or very slippery fabrics, as they can be challenging to work with and may not hold their shape well.
Consider the scarf’s print and color. A vibrant pattern can become the focal point of your outfit, while a solid color offers understated elegance. Think about how it will pair with bottoms you already own.
Pro Tip: Silk and satin scarves provide a luxurious feel and excellent drape, making them ideal for a chic, flowing top. They also tend to hold knots securely when tied correctly.
Step 2: Prepare Your Canvas
Lay your chosen scarf flat on a clean, smooth surface. This could be a bed, a table, or even the floor. Ensure there are no wrinkles or creases, as these can affect the final look and fit of your top.
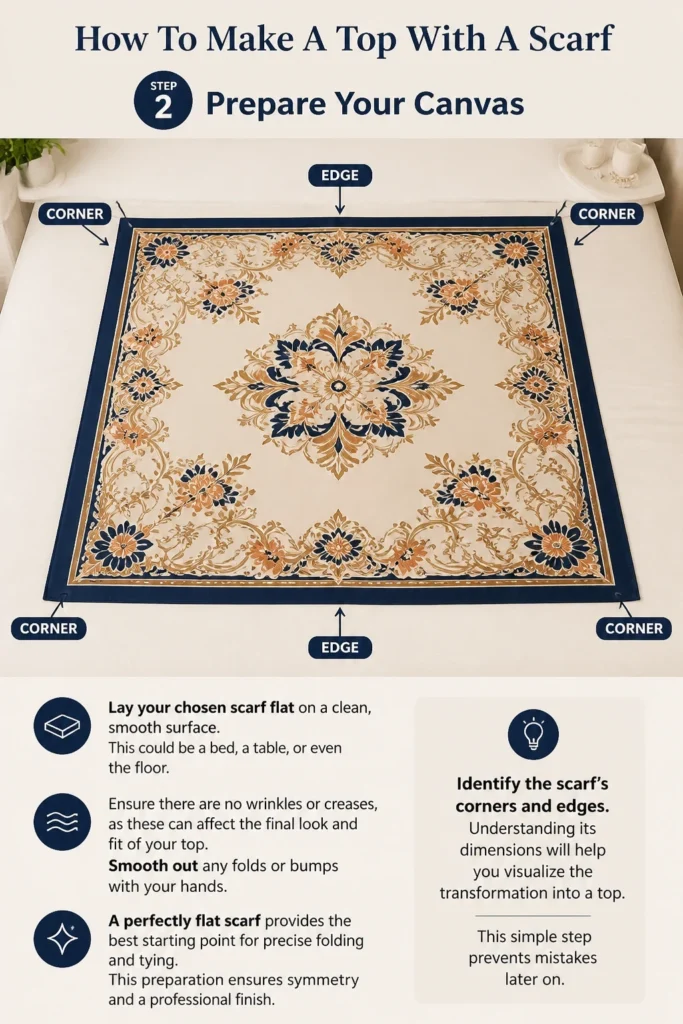
Smooth out any folds or bumps with your hands. A perfectly flat scarf provides the best starting point for precise folding and tying. This preparation ensures symmetry and a professional finish.
Identify the scarf’s corners and edges. Understanding its dimensions will help you visualize the transformation into a top. This simple step prevents mistakes later on.
Step 3: Fold for the Foundation
Fold the large square scarf diagonally in half to form a triangle. Bring one corner directly across to meet the opposite corner, creating a perfect triangle shape. This is the most common starting point for many scarf top styles.
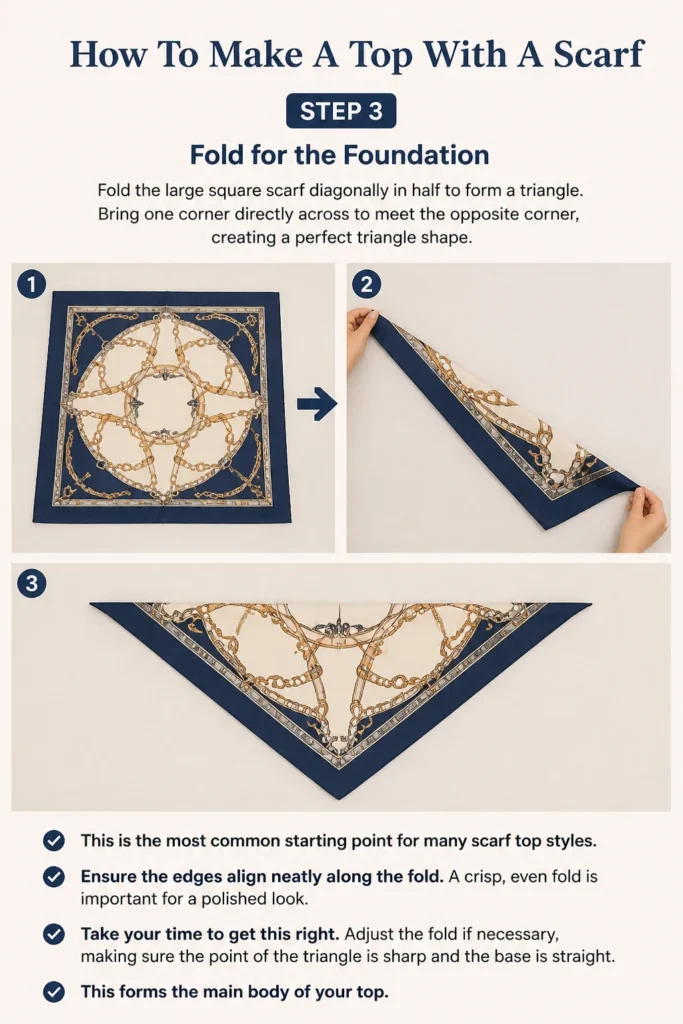
Ensure the edges align neatly along the fold. A crisp, even fold is important for a polished look. Take your time to get this right.
Adjust the fold if necessary, making sure the point of the triangle is sharp and the base is straight. This forms the main body of your top.
Step 4: Position for Perfection
Hold the folded scarf by its longest edge (the base of the triangle). Position this edge across your chest, just under your armpits. The point of the triangle should be facing downwards, centered on your torso.
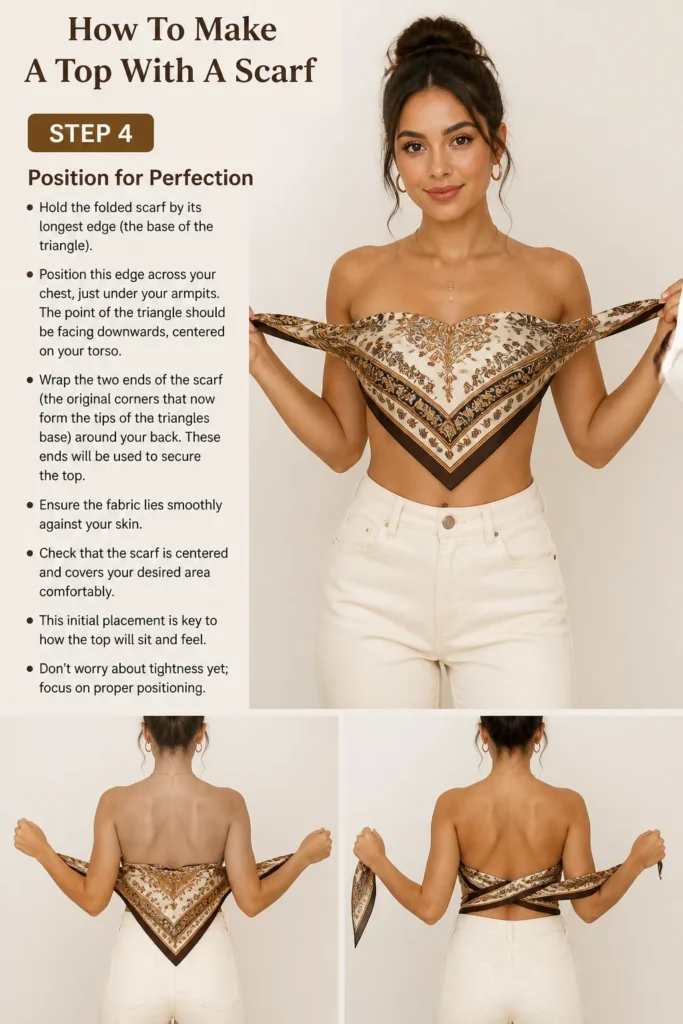
Wrap the two ends of the scarf (the original corners that now form the tips of the triangle’s base) around your back. These ends will be used to secure the top. Ensure the fabric lies smoothly against your skin.
Check that the scarf is centered and covers your desired area comfortably. This initial placement is key to how the top will sit and feel. Don’t worry about tightness yet; focus on proper positioning.
Step 5: Secure the Back Knot
Bring the two ends of the scarf that you wrapped around your back to meet in the middle of your back. You should have one end coming from your left side and one from your right.
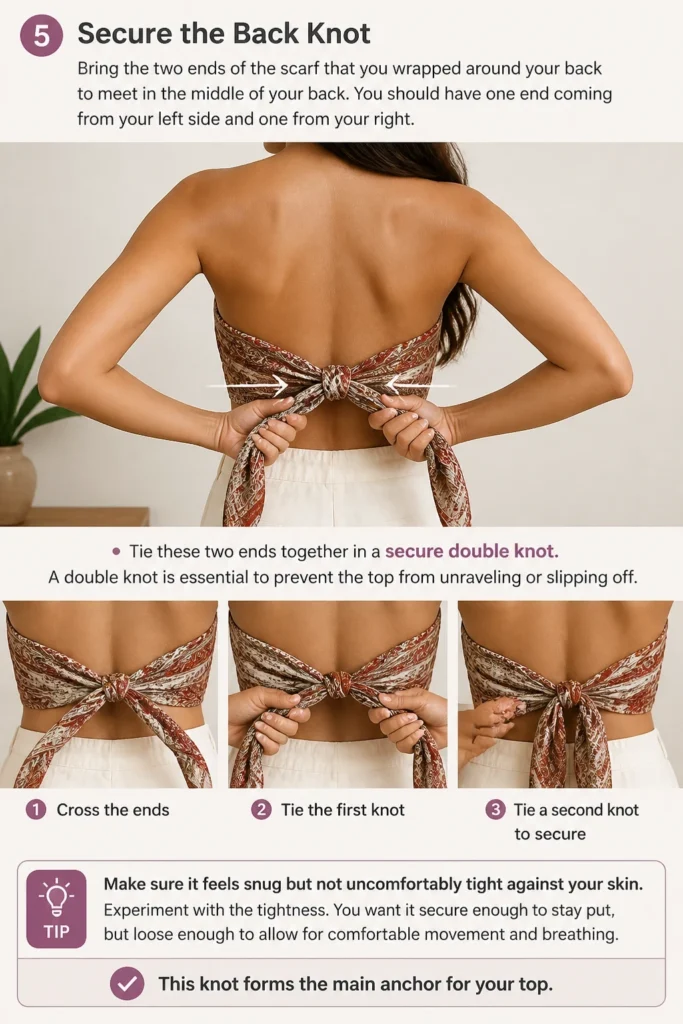
Tie these two ends together in a secure double knot. A double knot is essential to prevent the top from unraveling or slipping off. Make sure it feels snug but not uncomfortably tight against your skin.
Experiment with the tightness. You want it secure enough to stay put, but loose enough to allow for comfortable movement and breathing. This knot forms the main anchor for your top.
Step 6: Create the Neck Ties
Take the top two corners of the original square scarf (which are now the uppermost points of the triangle on your chest). These are the pieces that will form the neck straps.
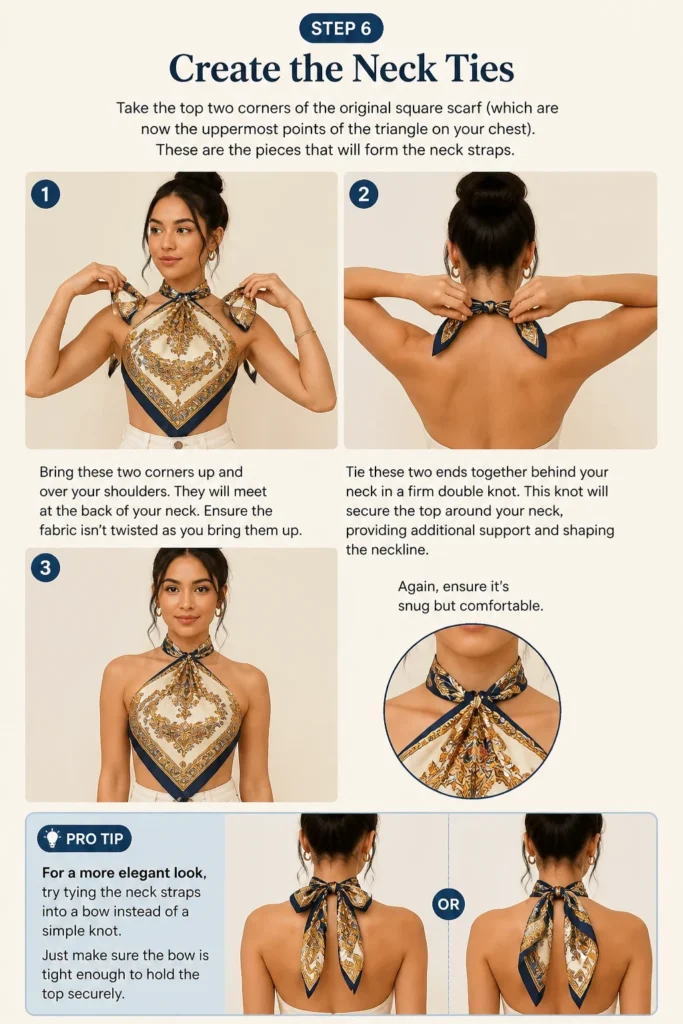
Bring these two corners up and over your shoulders. They will meet at the back of your neck. Ensure the fabric isn’t twisted as you bring them up.
Tie these two ends together behind your neck in a firm double knot. This knot will secure the top around your neck, providing additional support and shaping the neckline. Again, ensure it’s snug but comfortable.
Pro Tip: For a more elegant look, try tying the neck straps into a bow instead of a simple knot. Just make sure the bow is tight enough to hold the top securely.
Step 7: Adjust and Refine
Gently pull and smooth the fabric of the scarf top to ensure it drapes nicely over your chest and torso. Adjust any wrinkles or bunches for a clean, streamlined appearance.
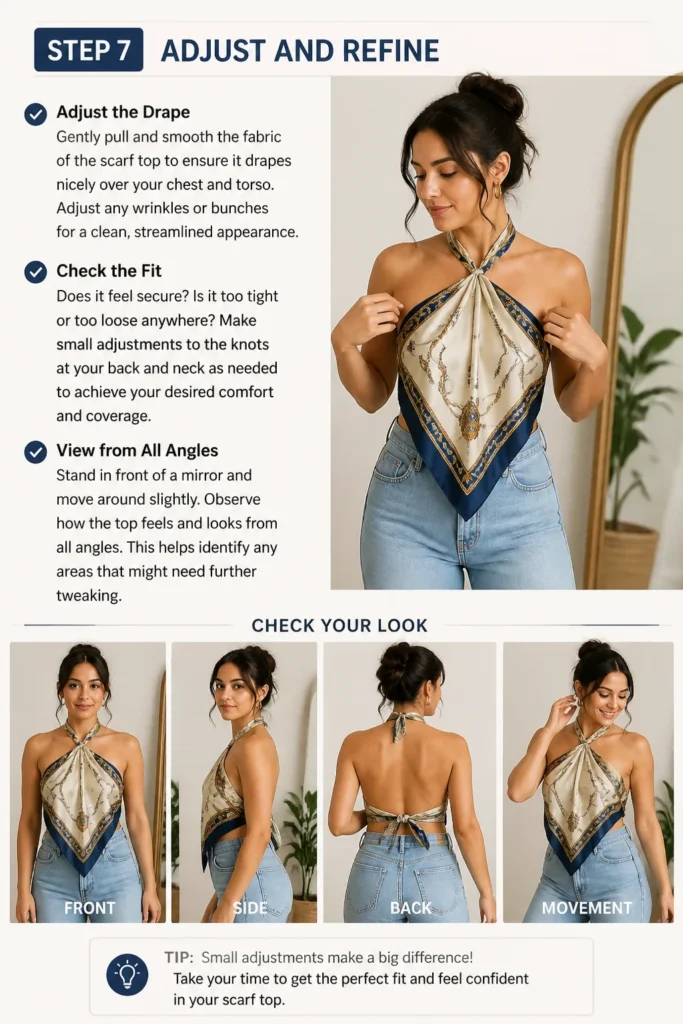
Check the overall fit. Does it feel secure? Is it too tight or too loose anywhere? Make small adjustments to the knots at your back and neck as needed to achieve your desired comfort and coverage.
Stand in front of a mirror and move around slightly. Observe how the top feels and looks from all angles. This helps identify any areas that might need further tweaking.
Step 8: Add Optional Security
Consider using small safety pins for extra security, especially if you plan on being very active or want added peace of mind. Place pins discreetly where fabric overlaps or where you feel the top might shift.
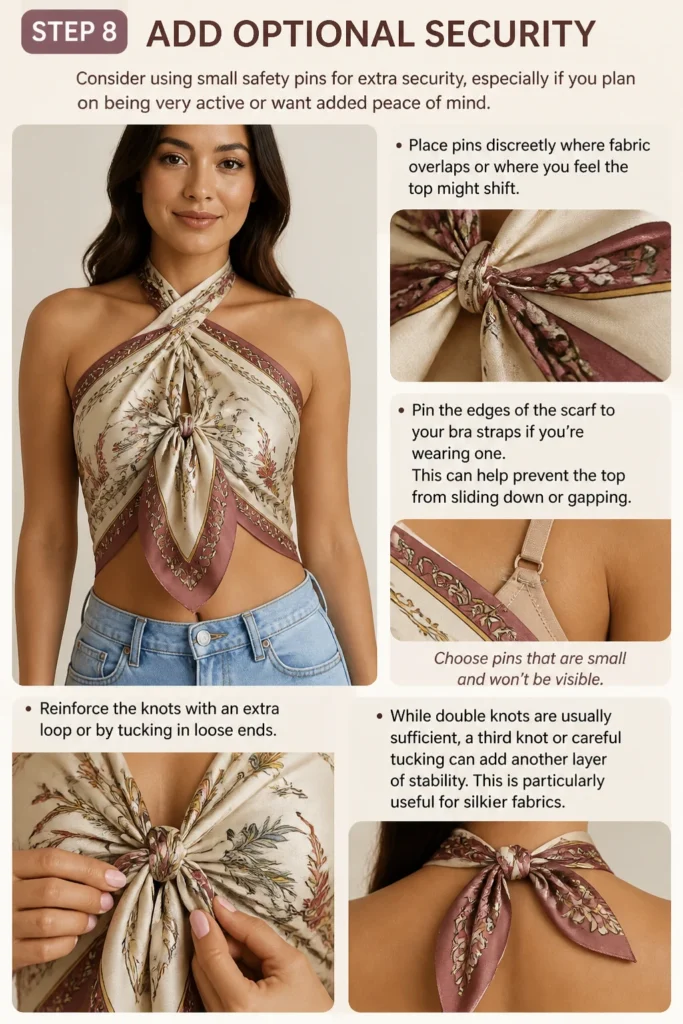
Pin the edges of the scarf to your bra straps if you’re wearing one. This can help prevent the top from sliding down or gapping. Choose pins that are small and won’t be visible.
Reinforce the knots with an extra loop or by tucking in loose ends. While double knots are usually sufficient, a third knot or careful tucking can add another layer of stability. This is particularly useful for silkier fabrics.
Step 9: Style Your New Look
Pair your new scarf top with high-waisted shorts, skirts, or jeans for a balanced silhouette. The top often works best with bottoms that sit at or above the natural waistline.
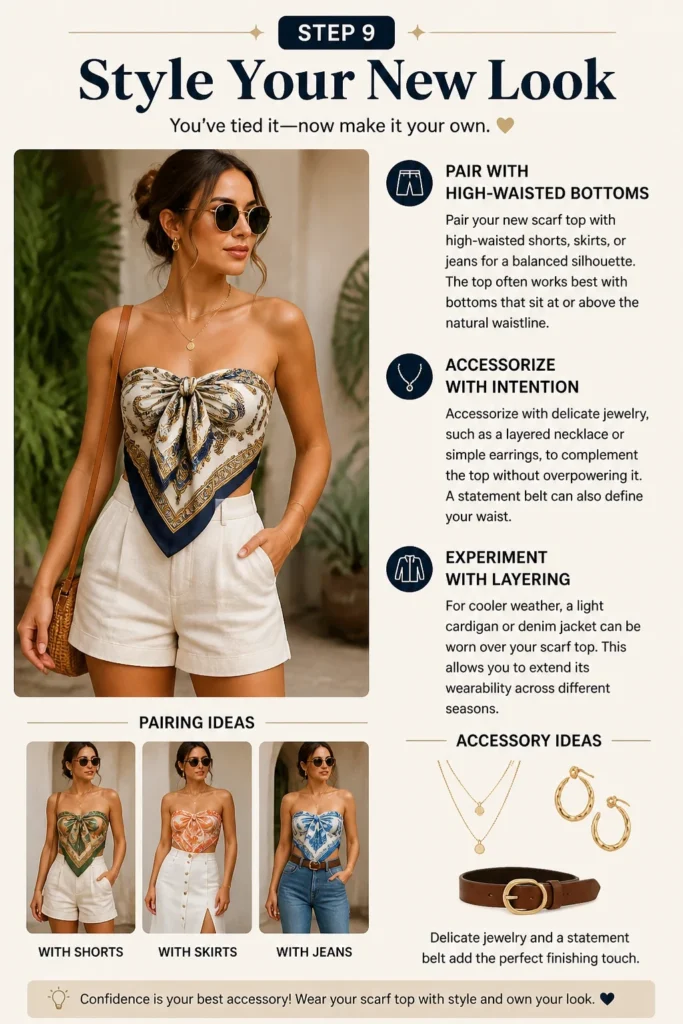
Accessorize with delicate jewelry, such as a layered necklace or simple earrings, to complement the top without overpowering it. A statement belt can also define your waist.
Experiment with layering. For cooler weather, a light cardigan or denim jacket can be worn over your scarf top. This allows you to extend its wearability across different seasons.
Common Mistakes to Avoid
Choosing the Wrong Scarf Size
Using a scarf that is too small will result in insufficient coverage and a top that feels insecure. It might pull uncomfortably or expose more than you intend. Always opt for a large square scarf to give yourself ample fabric to work with for both coverage and secure knotting. A larger scarf allows for more styling options and a more comfortable fit, ensuring the top doesn’t feel restrictive.
Tying Knots Too Loosely
Loose knots are the primary reason a scarf top might slip or fall off. If your knots aren’t firm, the fabric will gradually loosen with movement, leading to wardrobe malfunctions. Always tie double knots and give them a gentle tug to ensure they are secure. Practice makes perfect in achieving the right tension without making them uncomfortably tight.
Ignoring Body Shape
While scarf tops are versatile, not all styles suit every body type or desired level of coverage. Trying to force a style that doesn’t flatter your figure or provide enough support can lead to discomfort or dissatisfaction. Experiment with different scarf sizes and folding techniques to find what works best for your individual shape and comfort preferences. Consider how the fabric drapes and where the knots sit.
Forgetting to Secure Edges
When wearing a scarf top, the edges can sometimes gape open or shift, especially under the arms or at the bust. This can feel exposed or simply look untidy. Discreetly using small safety pins to secure overlapping fabric or the top’s edges to your bra can prevent these issues. This small step significantly enhances both the look and security of your handmade top.
Troubleshooting
Top Feels Too Loose/Slides Down
If your scarf top feels like it’s not staying put, the most common culprit is loose knots. Re-tie both the back and neck knots, ensuring they are firm double knots. Gently pull on the fabric after tying to test their security.
Another issue might be the scarf material itself. Very slippery fabrics like pure silk can sometimes be harder to secure. In these cases, using small safety pins discreetly placed at key points, such as under the arms or where the fabric meets your bra, can provide extra grip and confidence.
Knots Are Bulky or Uncomfortable
Bulky knots can be caused by using a scarf that is too thick or by tying the knots inefficiently. Try to smooth the fabric as much as possible before tying, ensuring the knot is flat against your skin. You can also experiment with different knotting techniques, perhaps a flatter square knot instead of a simple overhand knot.
If the fabric is the issue, consider using a thinner scarf for your next attempt. For immediate relief, try shifting the knots slightly to a less pressure-sensitive area on your back or neck. Loosening them just a tiny bit might also help, provided they still feel secure.
Scarf Edges Fraying/Unraveling
This issue is usually a sign of a scarf with unfinished or poorly finished edges. Unfortunately, if a scarf is already prone to fraying, it will continue to do so with wear and washing. For immediate use, you can try to carefully trim any loose threads.
For a more permanent solution, you might consider hand-stitching or using a fabric glue specifically designed for hems to secure the edges. When purchasing scarves for top-making, always check the quality of the hemming to avoid this problem in the future.
Key Takeaways
- Scarf Choice Matters: Select a large, lightweight square scarf for optimal drape and security.
- Secure Knots are Crucial: Always use double knots at both the back and neck to prevent slipping.
- Practice for Perfection: Don’t be afraid to adjust and refine the fit until it feels comfortable and looks great.
- Safety First: Discreet safety pins offer valuable extra security, especially for active wear.
- Personalize Your Style: Experiment with different scarf patterns and accessories to make the top uniquely yours.
- Versatility is Key: A scarf top can be adapted for various occasions, from casual outings to chic evenings.
Frequently Asked Questions
What scarf sizes work best for making a top?
For most styles, a large square scarf measuring at least 36×36 inches (90×90 cm) is ideal. This size provides ample fabric for coverage and secure knotting, allowing for more versatile styling options. Smaller scarves might not offer enough coverage or feel as secure.
Can I make a top with a rectangular scarf?
Yes, you absolutely can make tops with rectangular scarves, though the styling options will differ from square scarves. Rectangular scarves are excellent for creating bandeau-style tops, one-shoulder looks, or halter tops with more draped fronts. The methods will involve more wrapping and tucking.
Is this suitable for all body types?
Scarf tops are incredibly versatile and can be adapted to flatter many body types. The key is to choose the right scarf size and style the top to your comfort. Experiment with how you fold and tie the scarf to achieve the desired coverage and silhouette that makes you feel confident and comfortable.
How do I wash a scarf top?
You should wash your scarf top according to the care instructions of the scarf’s fabric. Most delicate fabrics like silk or satin require hand washing in cool water with a mild detergent, then air drying flat. Cotton scarves might be machine washable on a gentle cycle. Always check the label on your specific scarf to prevent damage.
Our Top Recommended Finds
- Large Silk Square Scarf: Offers luxurious drape and holds knots well, perfect for an elegant top.
- Set of Assorted Safety Pins: Essential for discreetly securing your scarf top for extra peace of mind.
- Fabric Measuring Tape: Useful for checking scarf dimensions and planning your folding for precision.
Transform Your Wardrobe Today
You now have all the knowledge to create a stunning, unique top from a simple scarf. This isn’t just about making a garment; it’s about embracing creativity and sustainable fashion. Imagine the possibilities as you look at your scarf collection with new eyes.
Why not pick out your favorite scarf right now and give it a try? Experiment with different ties and see how many fresh looks you can create. You might be surprised by the stylish versatility hiding in your closet. Embrace this fun, fashionable DIY journey and let your personal style shine through.
Beginner-friendly templates, step-by-step guides,
and weekly project ideas in your inbox.