📌 How To Draw A Star On A Nail

Beginner-friendly templates, step-by-step guides,
and weekly project ideas in your inbox.
Creating intricate nail art might seem daunting at first glance.
I remember my own early attempts, often ending with smudged designs and a bit of frustration.
But with the right approach, drawing a charming star on your nails is not only achievable but incredibly rewarding, and this guide will show you exactly how.
Quick Overview
This guide will walk you through transforming your nails with a beautiful star design.
You’ll learn the essential steps from preparation to sealing, ensuring a lasting and professional-looking result.
- Time needed: 45-75 minutes (including drying time)
- Difficulty: Beginner
- What you’ll need: Base coat, main nail polish color, star design polish colors, dotting tool, striping brush, top coat, nail polish remover, cotton swabs.
Step-by-Step Instructions
Step 1: Prepare Your Canvas
Before any artistic endeavor, a clean and ready surface is crucial.
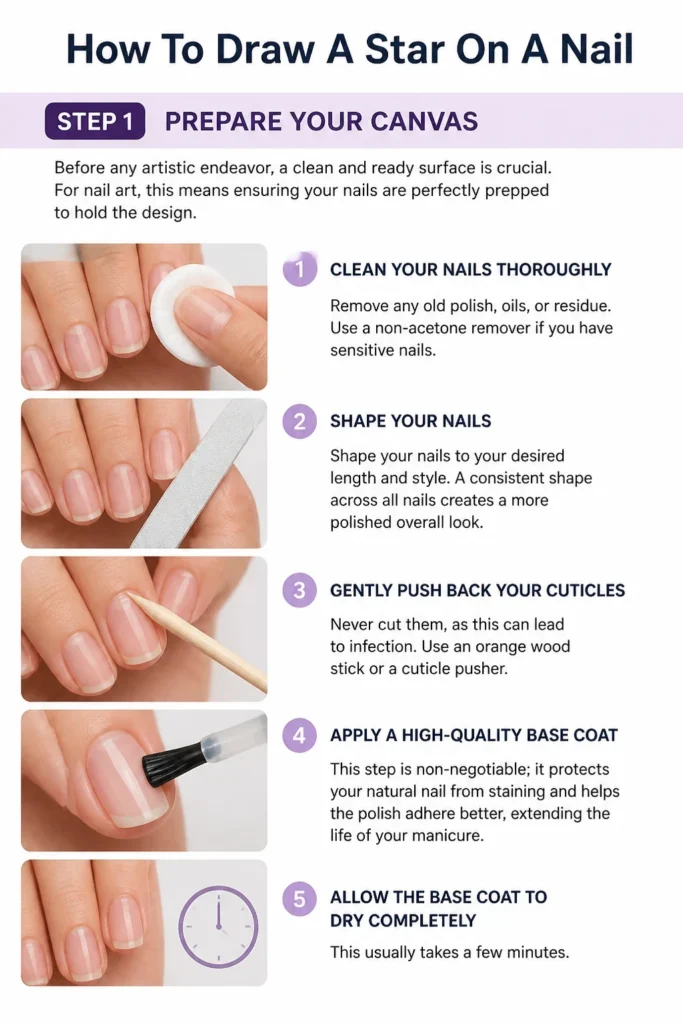
For nail art, this means ensuring your nails are perfectly prepped to hold the design.
- Clean your nails thoroughly, removing any old polish, oils, or residue. Use a non-acetone remover if you have sensitive nails.
- Shape your nails to your desired length and style. A consistent shape across all nails creates a more polished overall look.
- Gently push back your cuticles. Never cut them, as this can lead to infection. Use an orange wood stick or a cuticle pusher.
- Apply a high-quality base coat. This step is non-negotiable; it protects your natural nail from staining and helps the polish adhere better, extending the life of your manicure.
- Allow the base coat to dry completely before moving on. This usually takes a few minutes.
Pro Tip: A clean nail surface also helps prevent air bubbles and ensures a smooth application of your base color. Take your time with this initial stage.
Step 2: Lay Down Your Base Color
The base color serves as the backdrop for your star design.
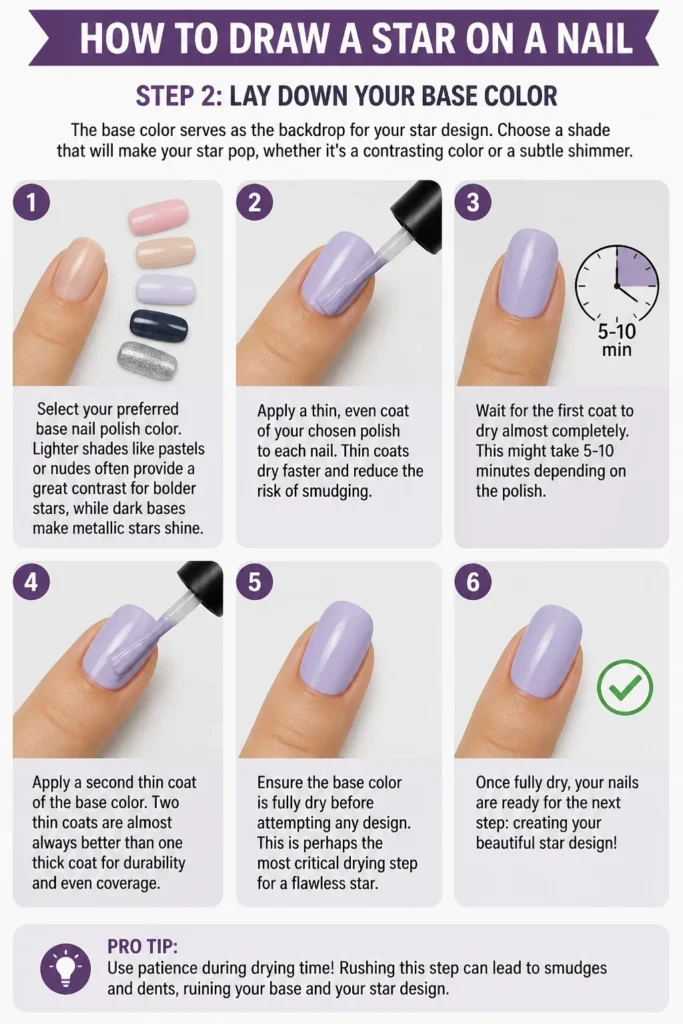
Choose a shade that will make your star pop, whether it’s a contrasting color or a subtle shimmer.
- Select your preferred base nail polish color. Lighter shades like pastels or nudes often provide a great contrast for bolder stars, while dark bases make metallic stars shine.
- Apply a thin, even coat of your chosen polish to each nail. Thin coats dry faster and reduce the risk of smudging.
- Wait for the first coat to dry almost completely. This might take 5-10 minutes depending on the polish.
- Apply a second thin coat of the base color. Two thin coats are almost always better than one thick coat for durability and even coverage.
- Ensure the base color is fully dry before attempting any design. This is perhaps the most critical drying stage; impatience here leads to smudges.
Step 3: Gather Your Star-Making Tools and Polishes
Having all your materials within reach prevents interruptions and potential mishaps.
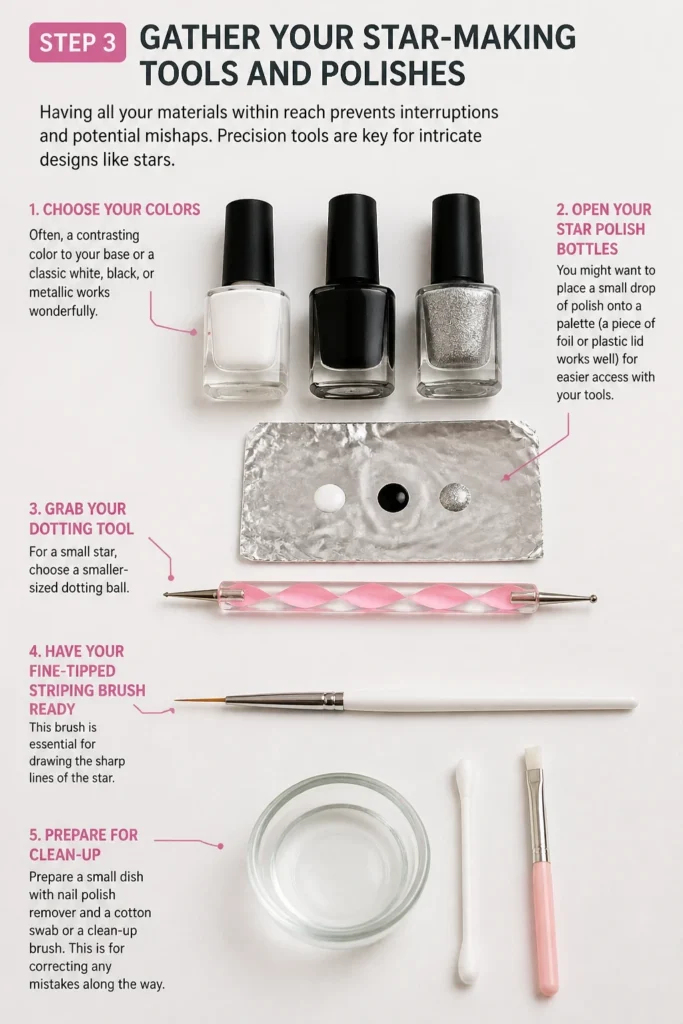
Precision tools are key for intricate designs like stars.
- Choose the colors for your star design. Often, a contrasting color to your base or a classic white, black, or metallic works wonderfully.
- Open your chosen star polish bottles. You might want to place a small drop of polish onto a palette (a piece of foil or plastic lid works well) for easier access with your tools.
- Grab your dotting tool. For a small star, choose a smaller-sized dotting ball.
- Have your fine-tipped striping brush ready. This brush is essential for drawing the sharp lines of the star.
- Prepare a small dish with nail polish remover and a cotton swab or a clean-up brush. This is for correcting any mistakes along the way.
Step 4: Mark the Star’s Center Point
Starting with a central dot helps you visualize the star’s placement and ensures symmetry.
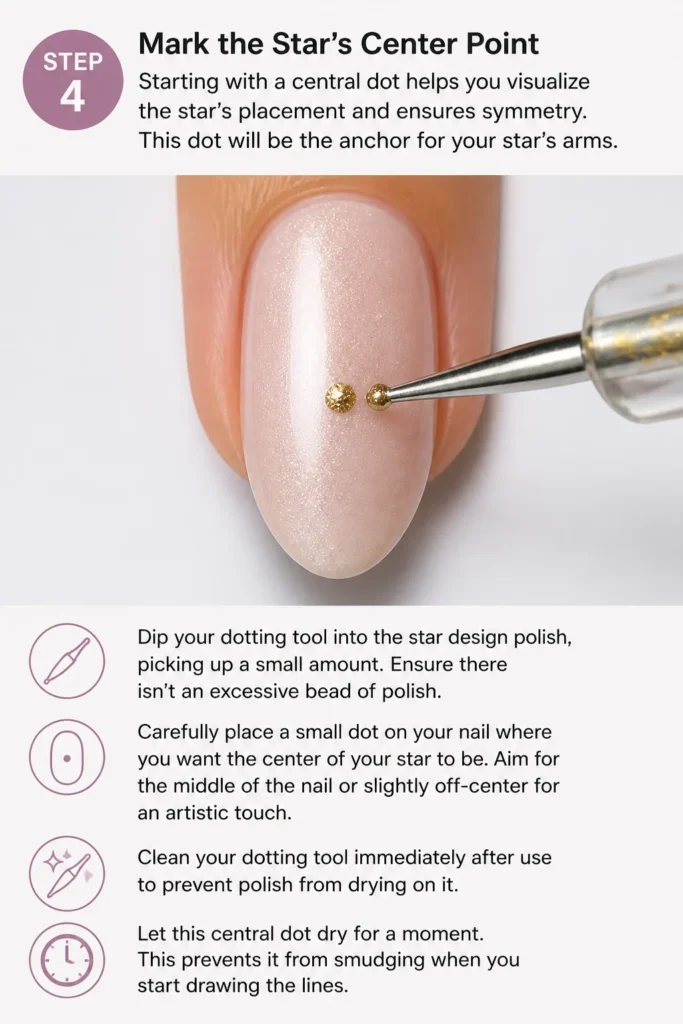
This dot will be the anchor for your star’s arms.
- Dip your dotting tool into the star design polish, picking up a small amount. Ensure there isn’t an excessive bead of polish.
- Carefully place a small dot on your nail where you want the center of your star to be. Aim for the middle of the nail or slightly off-center for an artistic touch.
- Clean your dotting tool immediately after use to prevent polish from drying on it.
- Let this central dot dry for a moment. This prevents it from smudging when you start drawing the lines.
Step 5: Draw the Star’s Arms
This is where your star truly takes shape.
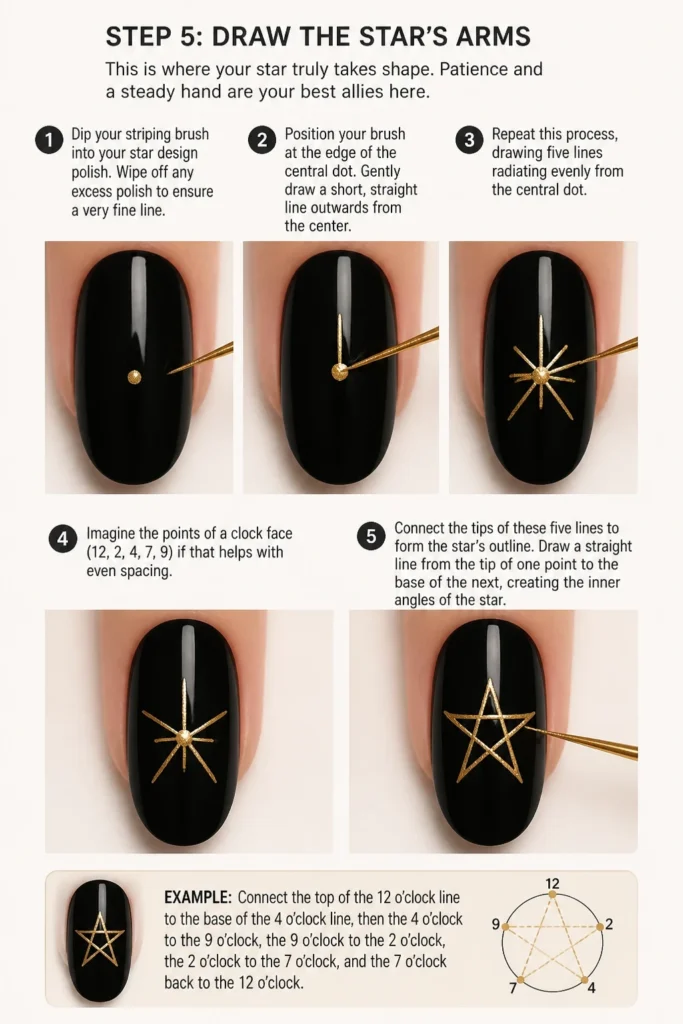
Patience and a steady hand are your best allies here.
- Dip your striping brush into your star design polish. Wipe off any excess polish to ensure a very fine line.
- Position your brush at the edge of the central dot.
- Gently draw a short, straight line outwards from the center. This will be one point of your star.
- Repeat this process, drawing five lines radiating evenly from the central dot. Imagine the points of a clock face (12, 2, 4, 7, 9) if that helps with even spacing.
- Connect the tips of these five lines to form the star’s outline. Draw a straight line from the tip of one point to the base of the next, creating the inner angles of the star. For example, connect the top of the “12 o’clock” line to the base of the “4 o’clock” line, and so on.
- Use minimal pressure and short, controlled strokes. It’s better to build up the line than to apply too much polish at once.
Pro Tip: If drawing freehand is too tricky, you can initially place five small dots around the central dot, then use your striping brush to connect them to the center and to each other to form the star shape. This provides a guide.
Step 6: Refine and Fill In
Once the basic outline is there, you can perfect the shape and add vibrancy.
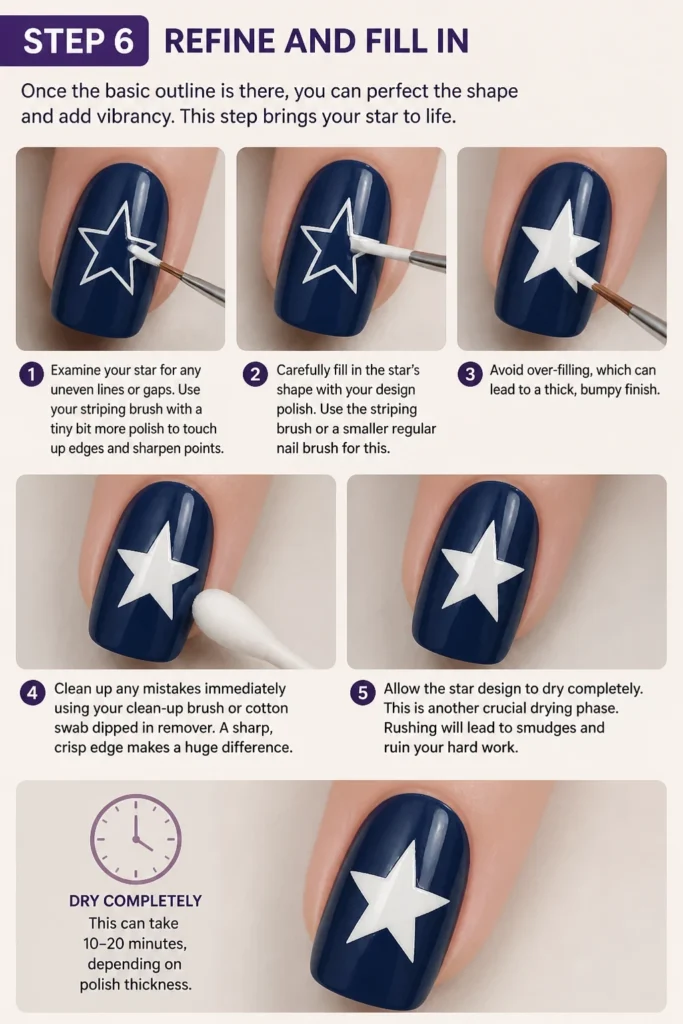
This step brings your star to life.
- Examine your star for any uneven lines or gaps. Use your striping brush with a tiny bit more polish to touch up edges and sharpen points.
- Carefully fill in the star’s shape with your design polish. Use the striping brush or a smaller regular nail brush for this. Avoid over-filling, which can lead to a thick, bumpy finish.
- Clean up any mistakes immediately using your clean-up brush or cotton swab dipped in remover. A sharp, crisp edge makes a huge difference.
- Allow the star design to dry completely. This is another crucial drying phase. Rushing will lead to smudges and ruin your hard work. This can take 10-20 minutes, depending on polish thickness.
Step 7: Seal Your Masterpiece with a Top Coat
A good top coat is the protector and enhancer of your nail art.
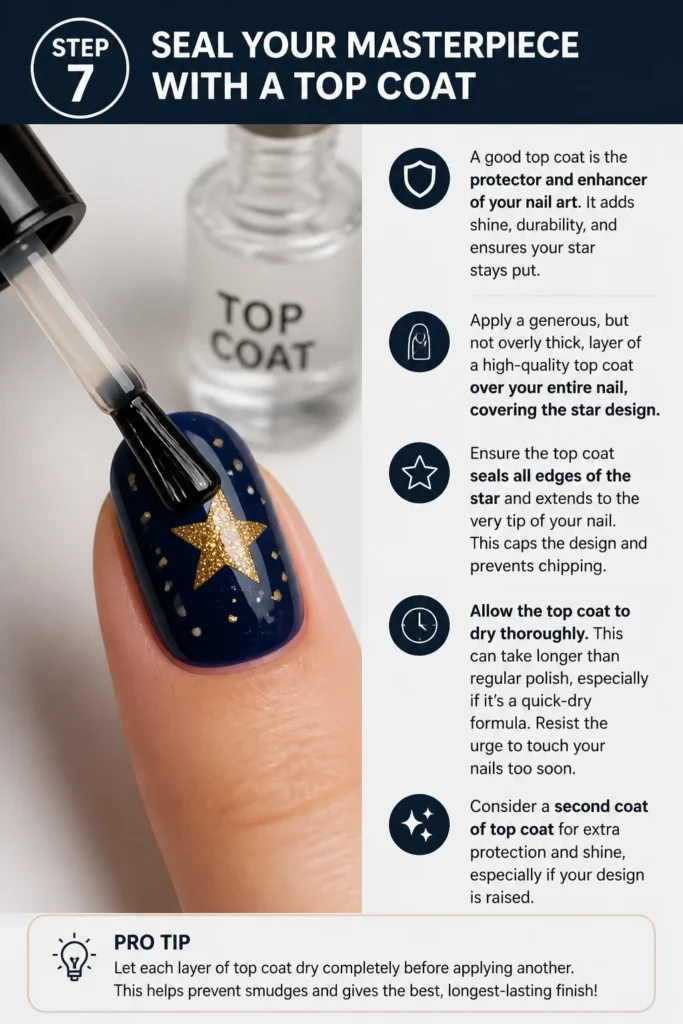
It adds shine, durability, and ensures your star stays put.
- Apply a generous, but not overly thick, layer of a high-quality top coat over your entire nail, covering the star design.
- Ensure the top coat seals all edges of the star and extends to the very tip of your nail. This “caps” the design and prevents chipping.
- Allow the top coat to dry thoroughly. This can take longer than regular polish, especially if it’s a quick-dry formula. Resist the urge to touch your nails too soon.
- Consider a second coat of top coat for extra protection and shine, especially if your design is raised.
Step 8: Final Touches and Admiration
Your beautiful star is almost ready for its grand debut!
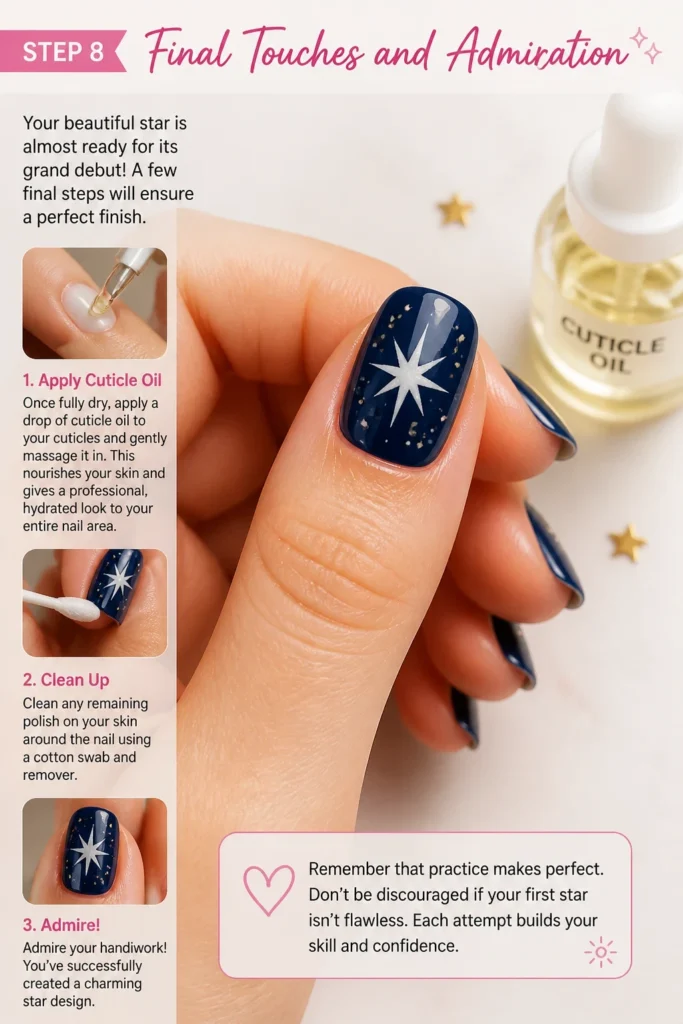
A few final steps will ensure a perfect finish.
- Once fully dry, apply a drop of cuticle oil to your cuticles and gently massage it in. This nourishes your skin and gives a professional, hydrated look to your entire nail area.
- Clean any remaining polish on your skin around the nail using a cotton swab and remover.
- Admire your handiwork! You’ve successfully created a charming star design.
- Remember that practice makes perfect. Don’t be discouraged if your first star isn’t flawless. Each attempt builds your skill and confidence.
Common Mistakes to Avoid
Applying Too Much Polish
A common pitfall is overloading your brush or dotting tool with polish. This leads to thick, clumpy lines and a raised, uneven star that takes forever to dry and is prone to smudging. Always wipe off excess polish on the neck of the bottle or on your palette before applying it to your nail. Thin, controlled layers are always better.
Impatience with Drying Times
Rushing through the drying stages is the quickest way to ruin your nail art. Each layer – base coat, base color, design, and top coat – needs adequate time to dry. If layers are not dry, they will smudge, blend unintentionally, or lift. Invest in a good quick-dry top coat, but even then, allow ample time between steps, especially for the base color and the star design itself.
Skipping Base and Top Coats
Some might think these steps are optional, but they are crucial for a long-lasting and healthy manicure. The base coat protects your nail from staining and helps the polish adhere. The top coat seals your design, adds shine, and prevents chipping and fading. Without them, your beautiful star design will be short-lived and your nails might suffer.
Using the Wrong Tools
Trying to draw a star with a regular nail polish brush is like trying to paint a portrait with a broom. While possible, it’s incredibly difficult and frustrating. Investing in a fine-tipped striping brush and a dotting tool makes all the difference for precision and ease. The right tools truly empower your artistry.
Troubleshooting
Star Looks Uneven or Wonky
If your star doesn’t look as symmetrical as you’d hoped, it’s often due to inconsistent line length or uneven spacing. To fix this, you can try to thicken certain lines slightly to balance the shape. For future attempts, start by placing five small, equally spaced dots around your central point as guides for your star’s tips before drawing the lines. Practice on a nail art mat or paper first to get a feel for the brush.
Polish Smudges During Application
Smudging usually happens when the underlying polish layer isn’t completely dry, or you’ve applied too much pressure. Ensure each layer is thoroughly dry before adding the next. Use a very light touch with your tools. If a smudge occurs, gently clean it up with a small brush dipped in remover, then reapply that small section of the design once the surrounding area is dry.
Design Chips Quickly
Rapid chipping can be attributed to several factors. First, ensure you’re using a base coat to help adhesion and a quality top coat that wraps around the tip of your nail. Applying too thick layers of polish can also lead to chipping. Make sure your nails are clean and free of oils before applying any polish. Also, avoid using your nails as tools, as this can cause premature wear.
Key Takeaways
- Proper nail preparation, including cleaning and applying a base coat, is essential for a lasting manicure.
- Applying thin, even coats of polish and allowing ample drying time between each step is crucial for preventing smudges.
- Using specialized tools like a dotting tool and a fine-tipped striping brush significantly improves precision and results.
- Starting with a central dot and then radiating lines outwards helps in creating a symmetrical star shape.
- A high-quality top coat is vital for sealing your design, adding shine, and protecting against chips.
- Patience and practice are your best friends in nail art; don’t be afraid to experiment and refine your technique.
Frequently Asked Questions
What if I don’t have a dotting tool?
No dotting tool? No problem! You can improvise with household items. A bobby pin with a rounded end, the tip of a toothpick, or even a dull pencil tip can work as a substitute for creating dots. Just ensure the tip is clean and has a smooth, non-absorbent surface.
Can I use gel polish for this design?
Absolutely! The steps remain largely the same, but with gel polish, you’ll cure each layer under a UV/LED lamp instead of air drying. This means your drying time between steps is significantly reduced, but you’ll still need to be precise with your application as gel doesn’t dry until cured.
How long does nail art typically last?
The longevity of your nail art depends on several factors: the quality of your polishes, your application technique, and how you treat your nails. With proper preparation, good quality polishes, and a durable top coat, a star design can last anywhere from 5-10 days before showing significant wear, especially if you apply a fresh top coat every few days.
Is it easier to draw stars on natural or acrylic nails?
Both natural and artificial nails can be great canvases for nail art. Acrylic or gel extensions often provide a larger, smoother, and more rigid surface, which some find easier to work on. However, natural nails are perfectly suitable, and the techniques remain the same. It’s more about the artist’s comfort and preference.
Our Top Recommended Finds
- Nail Art Brush and Dotting Tool Set: A comprehensive set usually includes various sizes of dotting tools and fine brushes, essential for detailed work. They offer versatility for different design complexities.
- Quick-Dry Top Coat: This product dramatically reduces the waiting time for your manicure to fully set, minimizing the risk of smudges and dents. It’s a game-changer for intricate designs.
- Nail Art Practice Mat: A silicone mat allows you to practice your designs, create decals, and experiment with colors without using your actual nails. It’s an excellent tool for honing your skills before committing to a full manicure.
Your Starry Nail Art Journey Begins Now
You now have all the practical steps and insights needed to create stunning star designs on your nails.
This guide empowers you to transform your fingertips into tiny canvases, reflecting your unique style.
Don’t just read about it; grab your tools and start painting your first star today.
Once you’ve mastered the star, consider trying other simple geometric shapes or adding glitter accents to your next designs.
Beginner-friendly templates, step-by-step guides,
and weekly project ideas in your inbox.