🥥 How To Make Coconut Oil At Home

Beginner-friendly templates, step-by-step guides,
and weekly project ideas in your inbox.
I remember the first time I tried making my own coconut oil in my small kitchen.
The smell of fresh coconut filled the entire house, and the result was a jar of pure, snowy-white oil that put store-bought versions to shame.
After years of refining this process, I have learned exactly what works and what leads to a rancid mess.
This guide shares those hard-won secrets so you can create high-quality oil on your very first try.
You do not need fancy industrial equipment to achieve professional results.
With a few brown coconuts and some patience, you will have a versatile staple for your kitchen and your skin-care routine.
Quick Overview
Making coconut oil at home is a rewarding project that requires more time than effort.
While the active work is minimal, the waiting periods are essential for a high yield.
- Time needed: 24 to 48 hours (mostly inactive waiting time)
- Difficulty: Beginner
- What you’ll need: 3-4 mature brown coconuts, a heavy-duty blender, a cheesecloth or nut milk bag, and a glass storage jar.
Step-by-Step Instructions
Step 1: Choose Mature Coconuts
Select brown, hairy coconuts rather than the smooth green ones.
Mature coconuts have thick, white meat that contains the highest concentration of oil.
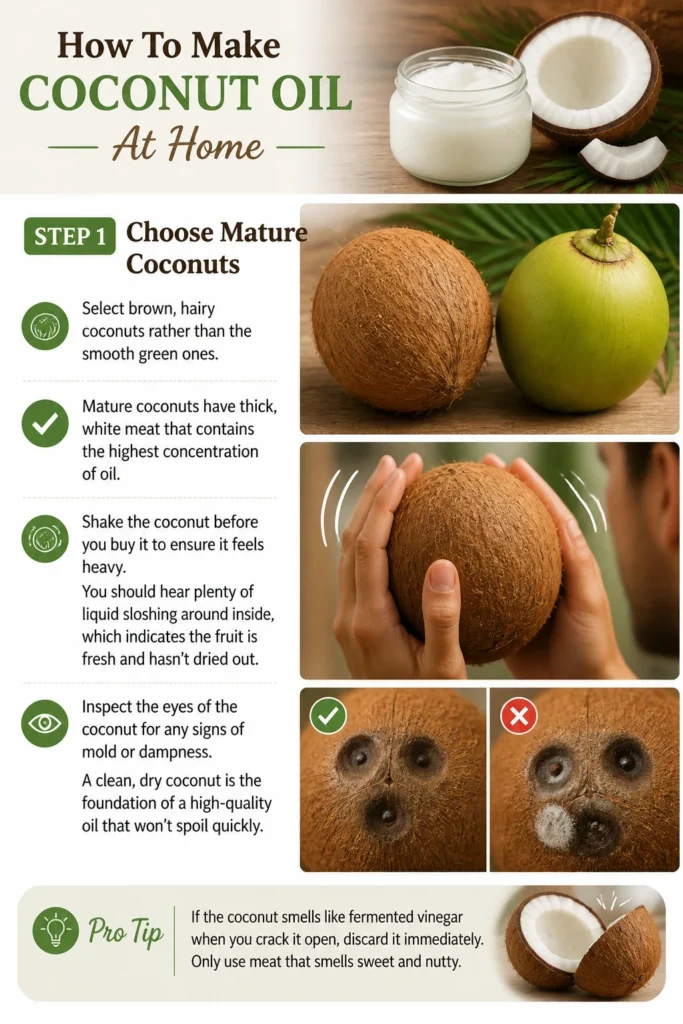
Shake the coconut before you buy it to ensure it feels heavy.
You should hear plenty of liquid sloshing around inside, which indicates the fruit is fresh and hasn’t dried out.
Inspect the “eyes” of the coconut for any signs of mold or dampness.
A clean, dry coconut is the foundation of a high-quality oil that won’t spoil quickly.
Pro Tip: If the coconut smells like fermented vinegar when you crack it open, discard it immediately. Only use meat that smells sweet and nutty.
Step 2: Extract the Coconut Water
Locate the three indentations at the top of the coconut, often called the eyes.
One of these eyes is usually softer than the others and can be easily pierced.
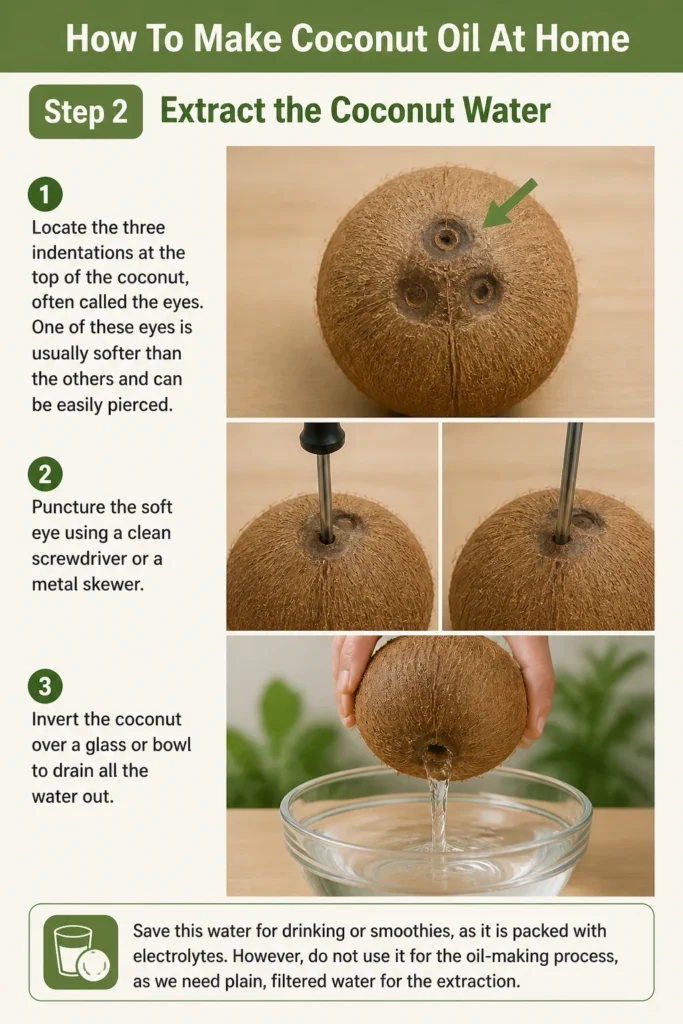
Puncture the soft eye using a clean screwdriver or a metal skewer.
Invert the coconut over a glass or bowl to drain all the water out.
Save this water for drinking or smoothies, as it is packed with electrolytes.
However, do not use it for the oil-making process, as we need plain, filtered water for the extraction.
Step 3: Crack the Shell
Wrap the drained coconut in a clean kitchen towel to prevent shards from flying.
Place it on a hard surface, like a concrete floor or a sturdy workbench.
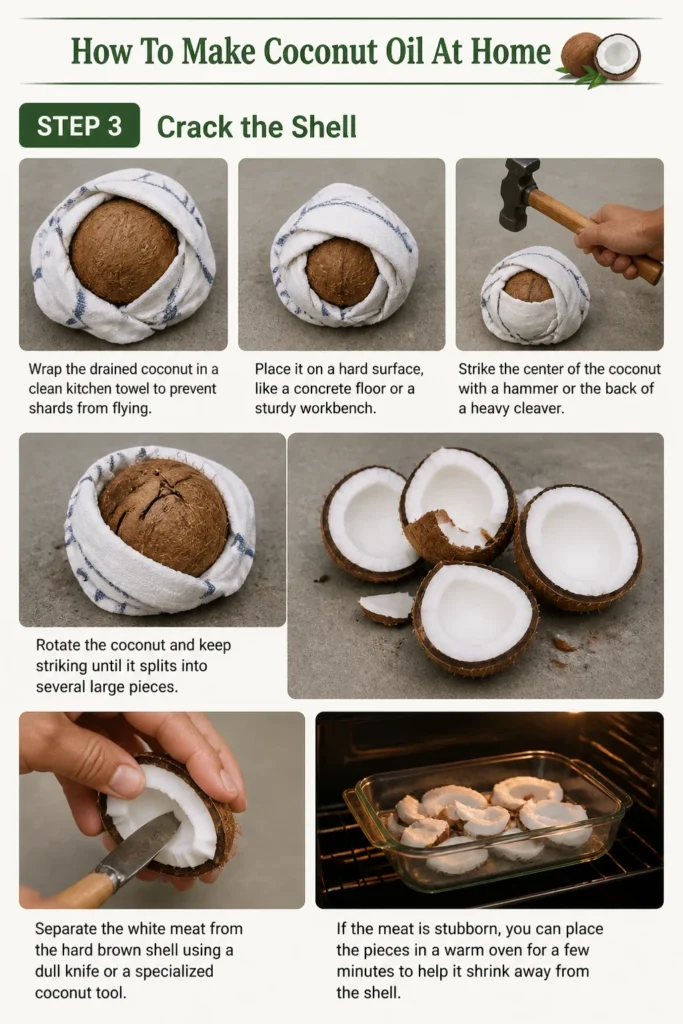
Strike the center of the coconut with a hammer or the back of a heavy cleaver.
Rotate the coconut and keep striking until it splits into several large pieces.
Separate the white meat from the hard brown shell using a dull knife or a specialized coconut tool.
If the meat is stubborn, you can place the pieces in a warm oven for a few minutes to help it shrink away from the shell.
Step 4: Prepare the Meat
Peel the thin brown skin off the back of the white meat using a vegetable peeler.
While this step is optional, removing the brown skin results in a much whiter and purer oil.
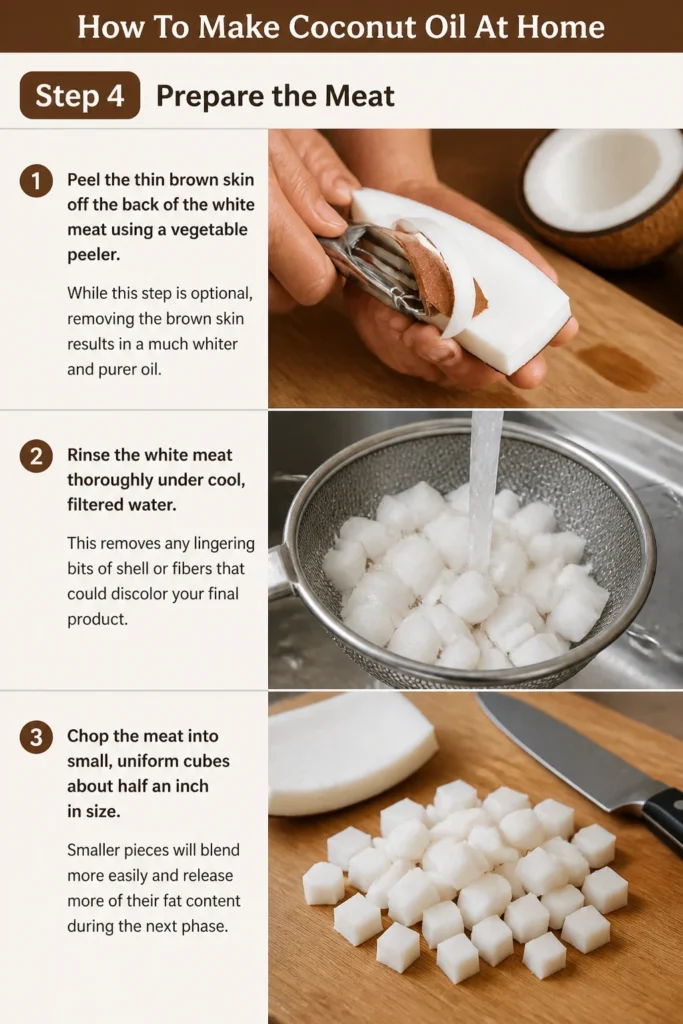
Rinse the white meat thoroughly under cool, filtered water.
This removes any lingering bits of shell or fibers that could discolor your final product.
Chop the meat into small, uniform cubes about half an inch in size.
Smaller pieces will blend more easily and release more of their fat content during the next phase.
Step 5: Blend into a Puree
Place the chopped coconut meat into a high-speed blender.
Do not fill the blender more than halfway to ensure everything moves freely.
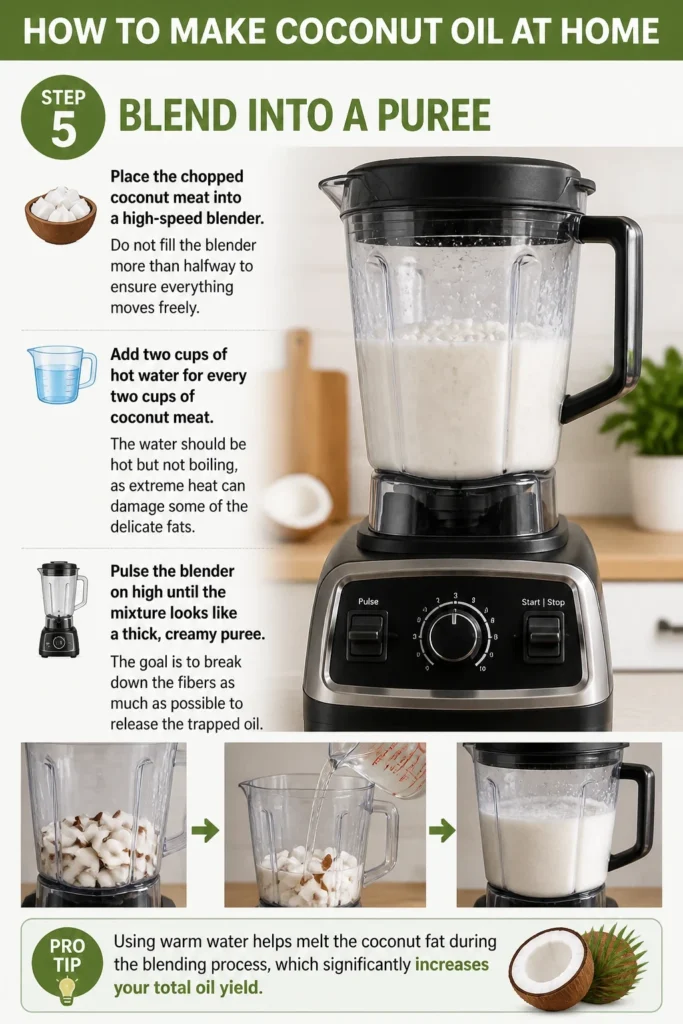
Add two cups of hot water for every two cups of coconut meat.
The water should be hot but not boiling, as extreme heat can damage some of the delicate fats.
Pulse the blender on high until the mixture looks like a thick, creamy puree.
The goal is to break down the fibers as much as possible to release the trapped oil.
Pro Tip: Using warm water helps melt the coconut fat during the blending process, which significantly increases your total oil yield.
Step 6: Strain the Coconut Milk
Position a large bowl underneath a fine-mesh strainer lined with several layers of cheesecloth.
Slowly pour the blended mixture into the cloth.
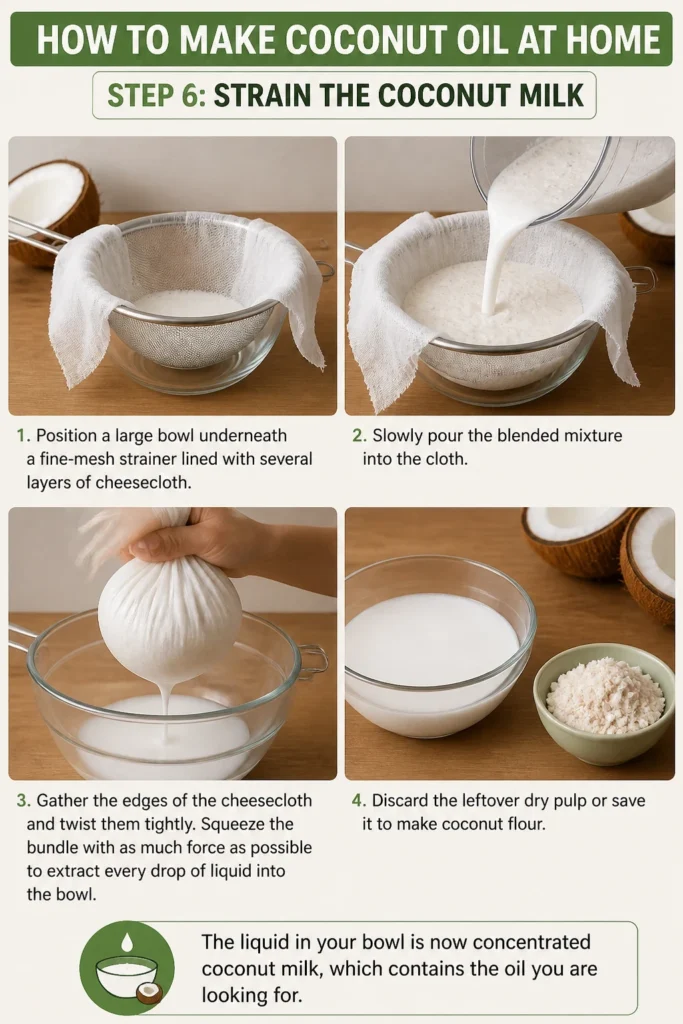
Gather the edges of the cheesecloth and twist them tightly.
Squeeze the bundle with as much force as possible to extract every drop of liquid into the bowl.
Discard the leftover dry pulp or save it to make coconut flour.
The liquid in your bowl is now concentrated coconut milk, which contains the oil you are looking for.
Step 7: Separate the Oil
Pour the coconut milk into a wide-mouth glass jar and cover it with a lid.
Let the jar sit undisturbed in a cool, dark place for at least 24 hours.
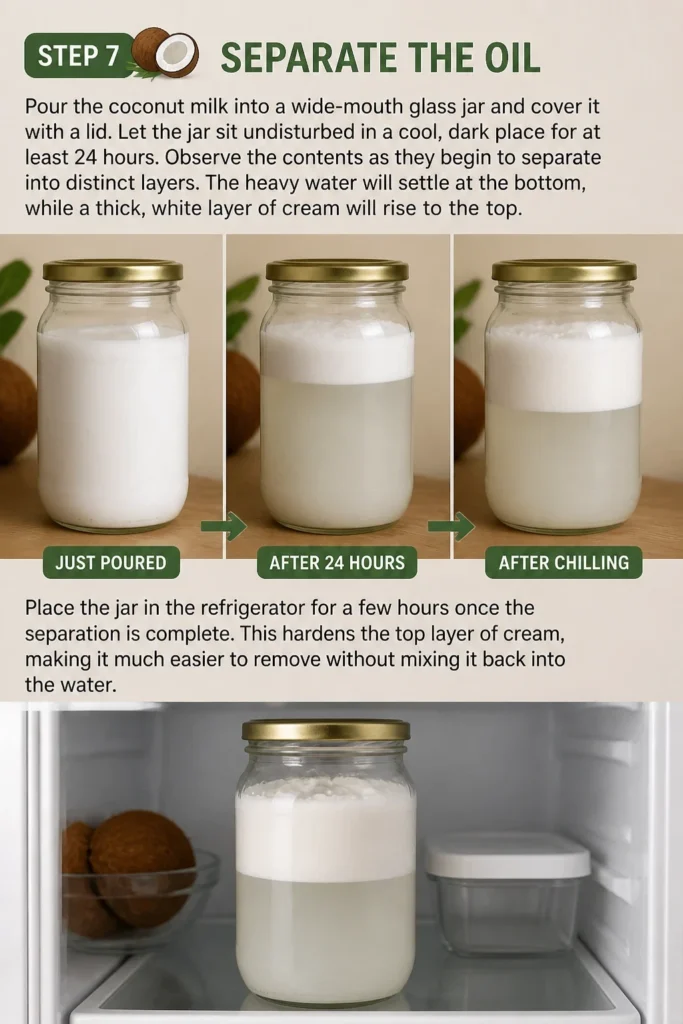
Observe the contents as they begin to separate into distinct layers.
The heavy water will settle at the bottom, while a thick, white layer of cream will rise to the top.
Place the jar in the refrigerator for a few hours once the separation is complete.
This hardens the top layer of cream, making it much easier to remove without mixing it back into the water.
Step 8: The Fermentation Method (Cold Press)
Scoop the hardened white cream off the top of the jar and place it into a clean bowl.
Cover the bowl with a light cloth and let it sit at room temperature for another 24 hours.
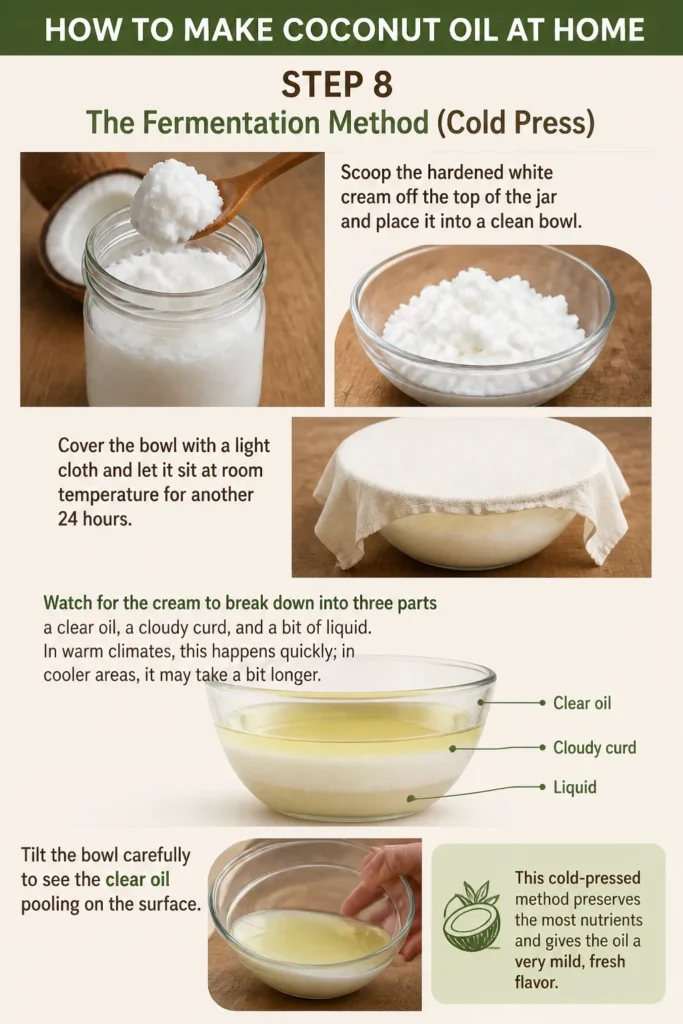
Watch for the cream to break down into three parts: a clear oil, a cloudy curd, and a bit of liquid.
In warm climates, this happens quickly; in cooler areas, it may take a bit longer.
Tilt the bowl carefully to see the clear oil pooling on the surface.
This “cold-pressed” method preserves the most nutrients and gives the oil a very mild, fresh flavor.
Step 9: The Heat Method (Quick Version)
Transfer the hardened cream to a small saucepan if you prefer a faster result.
Set the heat to the lowest possible setting on your stove.
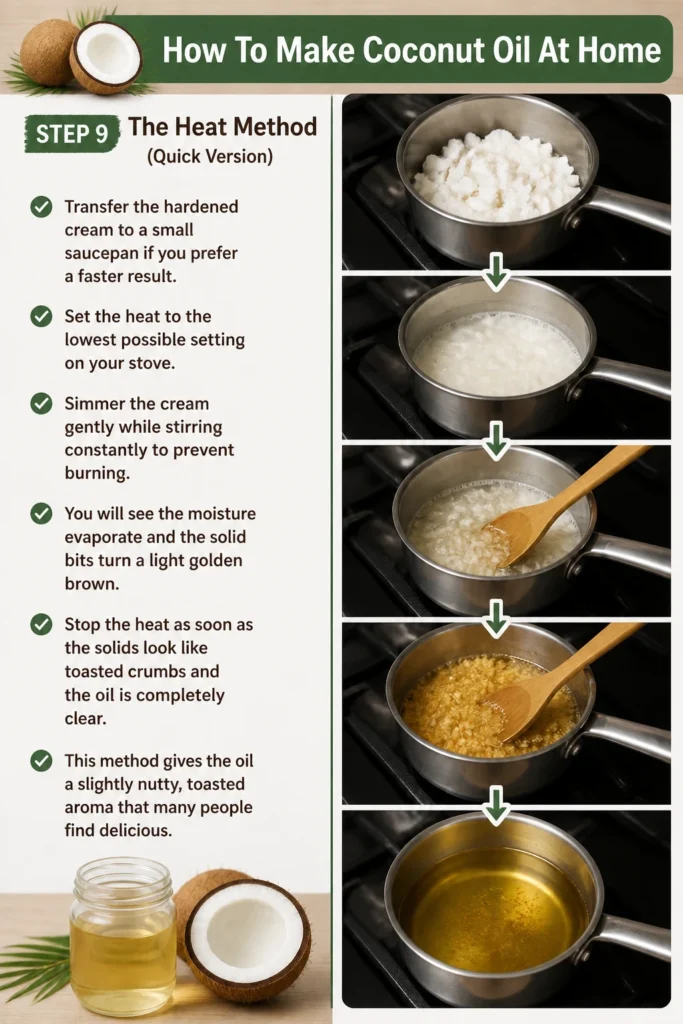
Simmer the cream gently while stirring constantly to prevent burning.
You will see the moisture evaporate and the solid bits turn a light golden brown.
Stop the heat as soon as the solids look like toasted crumbs and the oil is completely clear.
This method gives the oil a slightly nutty, toasted aroma that many people find delicious.
Step 10: Final Filtration and Storage
Strain the liquid oil through a fresh piece of cheesecloth or a coffee filter.
This ensures that even the smallest particles are removed, which prevents the oil from going rancid.
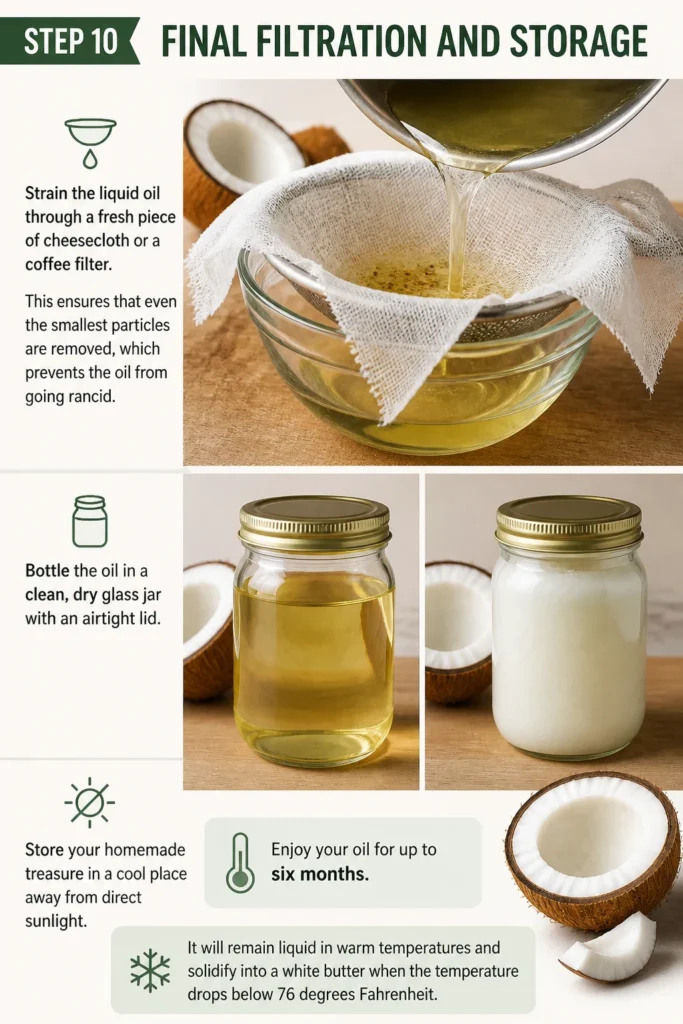
Bottle the oil in a clean, dry glass jar with an airtight lid.
Store your homemade treasure in a cool place away from direct sunlight.
Enjoy your oil for up to six months.
It will remain liquid in warm temperatures and solidify into a white butter when the temperature drops below 76 degrees Fahrenheit.
Common Mistakes to Avoid
Using Immature Coconuts
Green coconuts are wonderful for drinking water, but they have very little fat content.
If you try to make oil from a young coconut, you will end up with a lot of work and almost zero oil yield.
Always look for the brown, “hairy” shells that indicate the meat is fully developed and fatty.
Applying Too Much Heat
If you choose the heat method, it is tempting to turn up the flame to speed things up.
High heat can scorch the oil, giving it a burnt smell and a yellowish tint.
Patience is your best friend here, so keep the temperature low and slow to maintain a high-quality product.
Using Tap Water with Chlorine
Chlorine and other chemicals in tap water can interfere with the natural fermentation process.
These additives can also affect the final scent of your oil.
Always use filtered or distilled water to ensure the purest possible environment for the oil to separate.
Troubleshooting
The Oil Smells Sour
A sour or vinegary smell usually means the fermentation went on for too long or the room was too hot.
If this happens, you can still use the oil for hair treatments, but it might not be pleasant for cooking.
Next time, check the separation every few hours and move the jar to the fridge sooner.
The Oil Is Cloudy
Cloudiness is almost always caused by tiny amounts of water or coconut solids remaining in the oil.
You can fix this by gently reheating the oil to evaporate the water or by passing it through a high-quality coffee filter.
Clear oil is essential for a long shelf life, as moisture causes mold growth.
The Layers Won’t Separate
Sometimes the coconut milk remains a stubborn emulsion and refuses to split.
This often happens if the water used during blending was too cold.
Try placing the jar in a warm water bath for thirty minutes to encourage the fats to loosen and rise.
Key Takeaways
- Select mature coconuts that feel heavy and contain plenty of water for the best oil yield.
- Remove the brown skin from the coconut meat to ensure your oil is pure white and clean.
- Use hot water during the blending phase to help melt and release the coconut fats.
- Strain twice to remove all solids, which prevents the oil from spoiling prematurely.
- Choose your method based on preference: fermentation for raw oil or low heat for a toasted aroma.
- Store in glass containers to avoid any plastic chemicals leaching into your pure oil.
Frequently Asked Questions
How many coconuts does it take to make one cup of oil?
On average, you will need about three to four large, mature coconuts to produce one cup of pure oil.
The yield depends heavily on the thickness of the meat and how well you squeeze the milk out.
Don’t be discouraged if your first batch is small; efficiency improves with practice.
How long does homemade coconut oil last?
If you have filtered it well and removed all moisture, your oil should last for about six months at room temperature.
Keeping it in the refrigerator can extend its life even further.
Always use a clean spoon to scoop it out to avoid introducing bacteria into the jar.
Can I use the leftover pulp?
The leftover coconut pulp is a fantastic byproduct that should not go to waste.
You can spread it on a baking sheet and dry it in a low oven to create homemade coconut flour.
It can also be used as a natural, exfoliating body scrub right in the shower.
Why did my oil turn solid?
Coconut oil has a melting point of approximately 76 degrees Fahrenheit (24 degrees Celsius).
If your house is cooler than this, the oil will naturally turn into a solid white fat.
This is completely normal and does not mean the oil has gone bad; simply warm the jar in your hands to melt it.
Our Top Recommended Finds
- High-Speed Blender: A powerful motor is necessary to break down the tough fibers of mature coconut meat effectively.
- Nut Milk Bag: These are much easier to squeeze than standard cheesecloth and can be washed and reused for many batches.
- Wide-Mouth Mason Jars: These jars make it easy to scoop out the oil once it solidifies and provide an airtight seal for freshness.
Start Your First Batch Today
Making your own coconut oil is one of the most satisfying DIY projects you can undertake.
Once you experience the incredible aroma and smooth texture of truly fresh oil, it is hard to go back to the mass-produced versions found on store shelves.
You can use your fresh oil for sautéing vegetables, deep-conditioning your hair, or even as a natural moisturizer for your skin.
The possibilities are endless, and the quality is unmatched because you controlled every single ingredient that went into the jar.
If you enjoyed this process, you might also want to look into making your own almond milk or homemade shea butter creams.
Taking control of your pantry and your vanity is a journey that starts with a single coconut and a little bit of curiosity.
Beginner-friendly templates, step-by-step guides,
and weekly project ideas in your inbox.