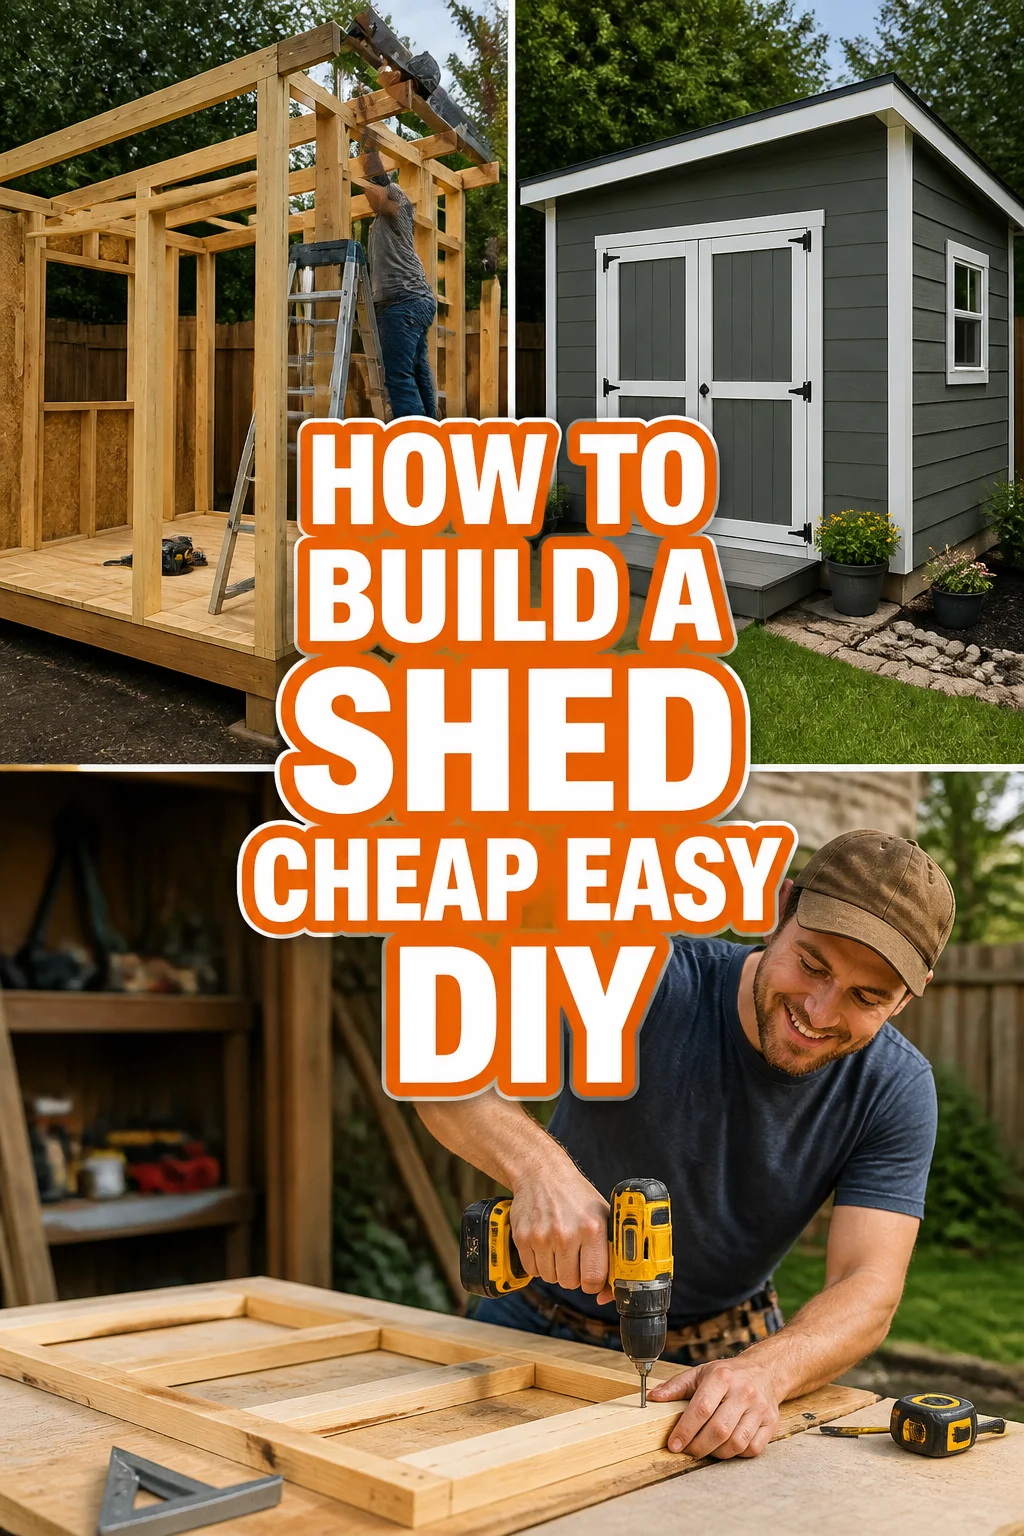
🛠️ How To Build A Shed Cheap Easy DIY

Beginner-friendly templates, step-by-step guides,
and weekly project ideas in your inbox.
I remember standing in my backyard three years ago, staring at a pile of lawn tools getting ruined by the rain.
The quotes I received for a pre-built shed were eye-watering, often exceeding three thousand dollars for basic plywood boxes.
I decided to build my own using basic materials from a local hardware store, and I managed to finish it for less than a third of that cost.
This guide is the result of that experience, designed to help you avoid my early mistakes and get a professional result on a shoestring budget.

Quick Overview
Building your own storage space is one of the most rewarding home improvement projects you can tackle.
It requires basic carpentry skills and a bit of patience, but the financial savings are massive.
- Time needed: 2 to 3 weekends (depending on weather and help)
- Difficulty: Beginner to Intermediate
- What you’ll need: Circular saw, power drill, level, hammer, tape measure, speed square, and pressure-treated lumber.
Step-by-Step Instructions
Step 1: Prepare the Foundation and Site
Clear the area of any grass, rocks, or debris where the shed will sit. Use a rake to level the dirt as much as possible before starting your base.
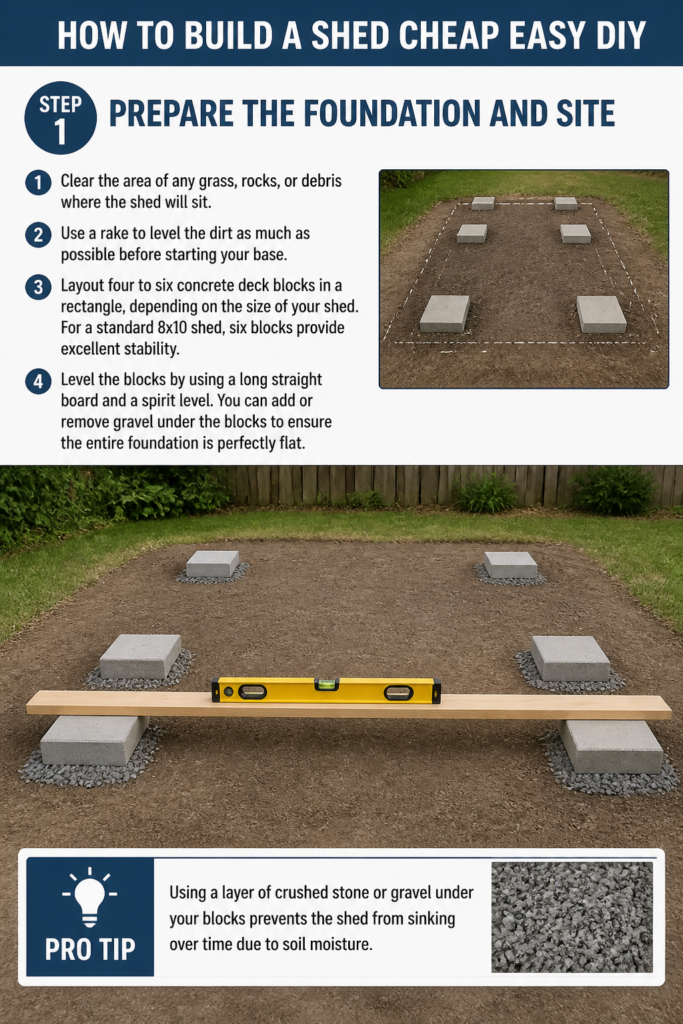
Layout four to six concrete deck blocks in a rectangle, depending on the size of your shed. For a standard 8×10 shed, six blocks provide excellent stability.
Level the blocks by using a long straight board and a spirit level. You can add or remove gravel under the blocks to ensure the entire foundation is perfectly flat.
Pro Tip: Using a layer of crushed stone or gravel under your blocks prevents the shed from sinking over time due to soil moisture.
Step 2: Build the Floor Frame
Cut your pressure-treated 2×4 or 2×6 boards to the desired length for your floor joists. Pressure-treated wood is mandatory here because it resists rot from ground contact.
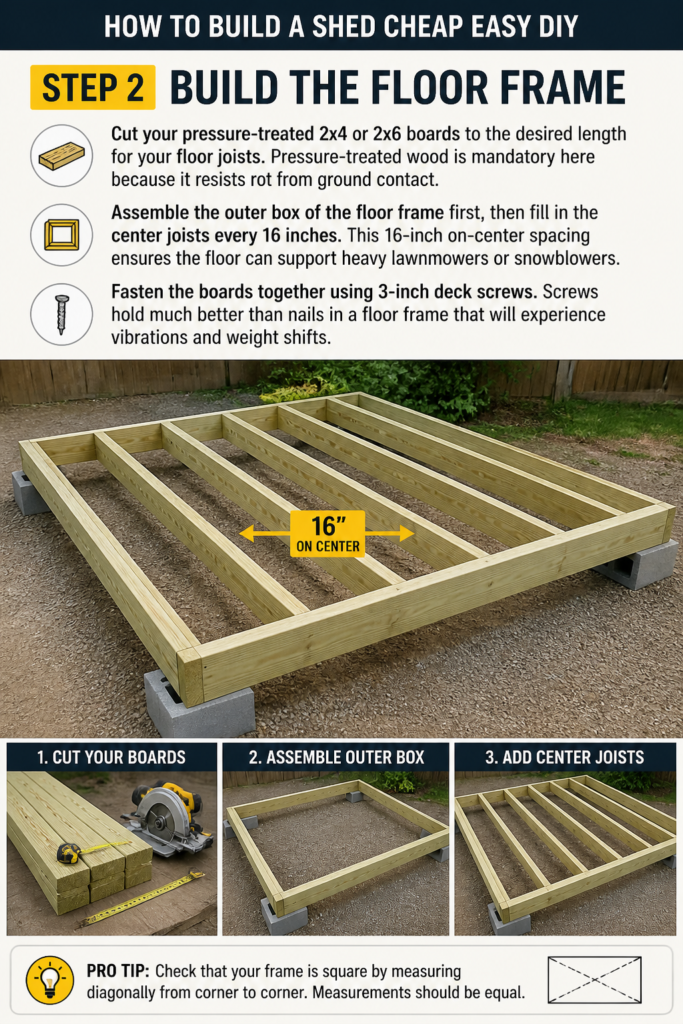
Assemble the outer box of the floor frame first, then fill in the center joists every 16 inches. This 16-inch “on-center” spacing ensures the floor can support heavy lawnmowers or snowblowers.
Fasten the boards together using 3-inch deck screws. Screws hold much better than nails in a floor frame that will experience vibrations and weight shifts.
Step 3: Install the Floor Sheathing
Lay sheets of 3/4-inch pressure-treated plywood over your frame. This thickness is vital to prevent the floor from feeling “bouncy” when you walk on it.
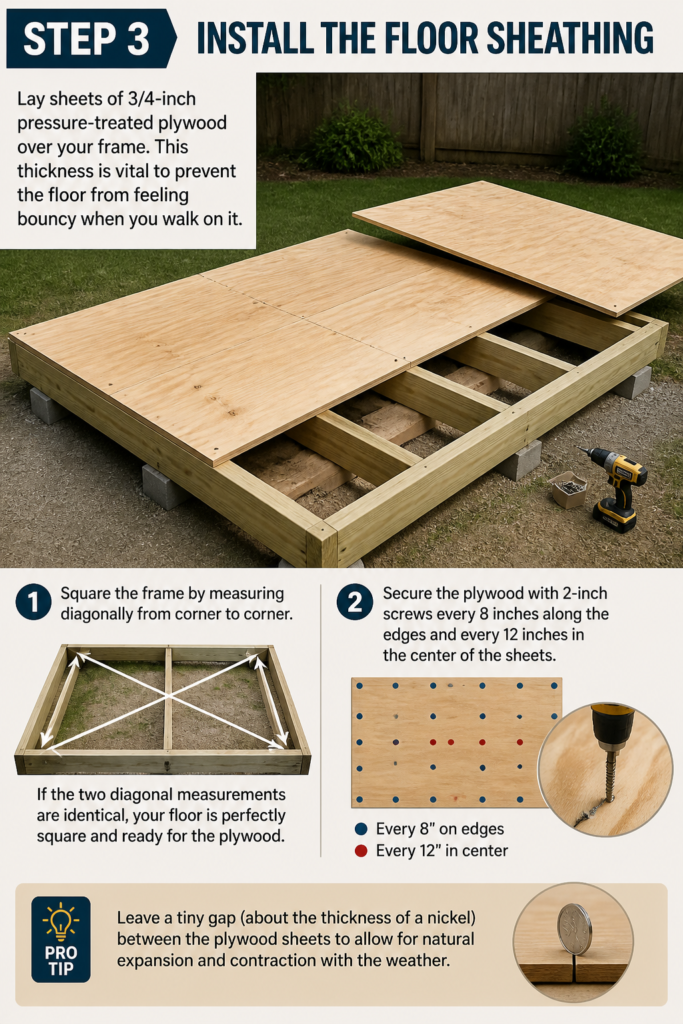
Square the frame by measuring diagonally from corner to corner. If the two diagonal measurements are identical, your floor is perfectly square and ready for the plywood.
Secure the plywood with 2-inch screws every 8 inches along the edges and every 12 inches in the center of the sheets.
Pro Tip: Leave a tiny gap (about the thickness of a nickel) between the plywood sheets to allow for natural expansion and contraction with the weather.
Step 4: Frame the Walls
Build your walls flat on the shed floor to save your back and ensure they are straight. Use standard 2×4 studs spaced 24 inches apart for a budget-friendly build.
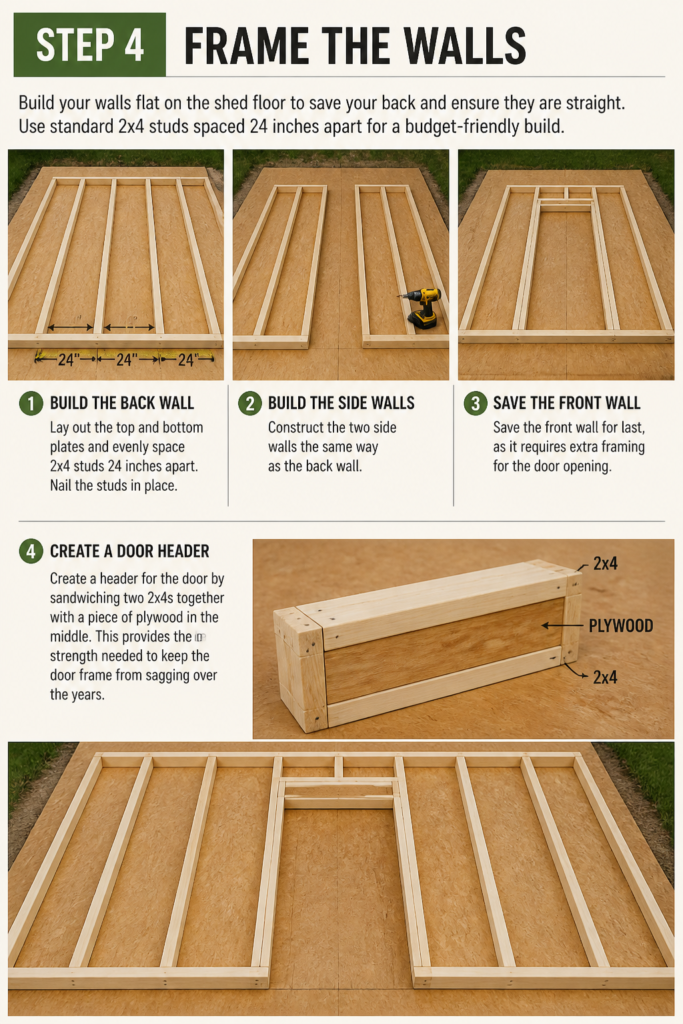
Construct the back wall first, then the two side walls. Save the front wall for last, as it requires extra framing for the door opening.
Create a header for the door by sandwiching two 2x4s together with a piece of plywood in the middle. This provides the strength needed to keep the door frame from sagging over the years.
Step 5: Raise and Secure the Walls
Lift the back wall into place and have a partner hold it while you check for level. Use a temporary 2×4 brace nailed to the side to keep it upright while you work.
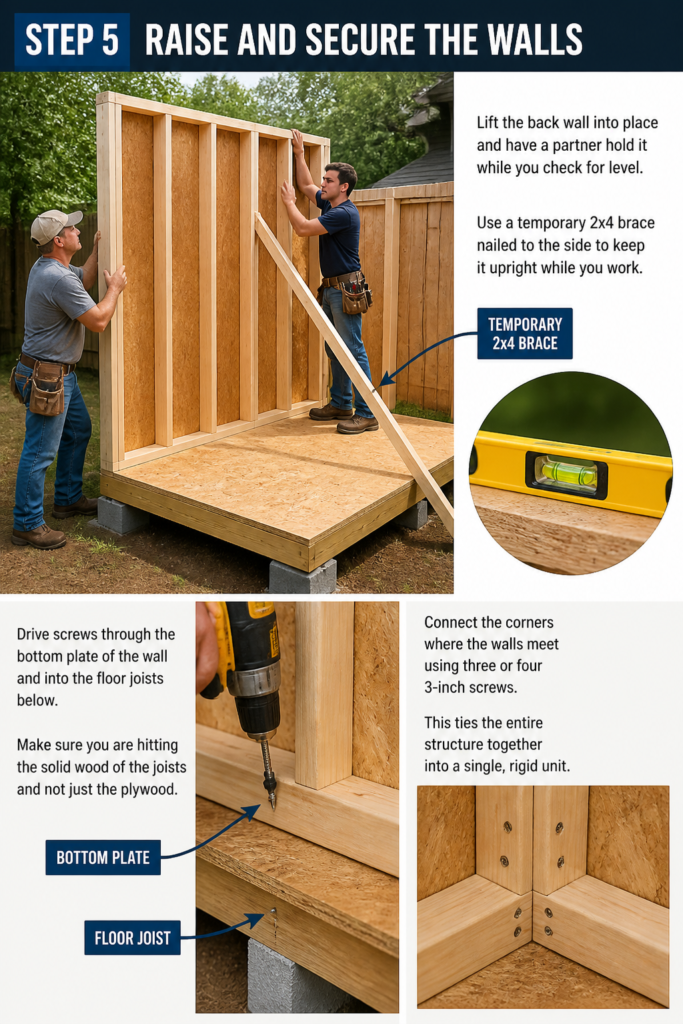
Drive screws through the bottom plate of the wall and into the floor joists below. Make sure you are hitting the solid wood of the joists and not just the plywood.
Connect the corners where the walls meet using three or four 3-inch screws. This ties the entire structure together into a single, rigid unit.
Step 6: Install the Roof Rafters
Cut a “birds-mouth” notch into your rafters so they sit flat on top of the wall plates. A simple lean-to roof (sloping in one direction) is the easiest and cheapest style for beginners.
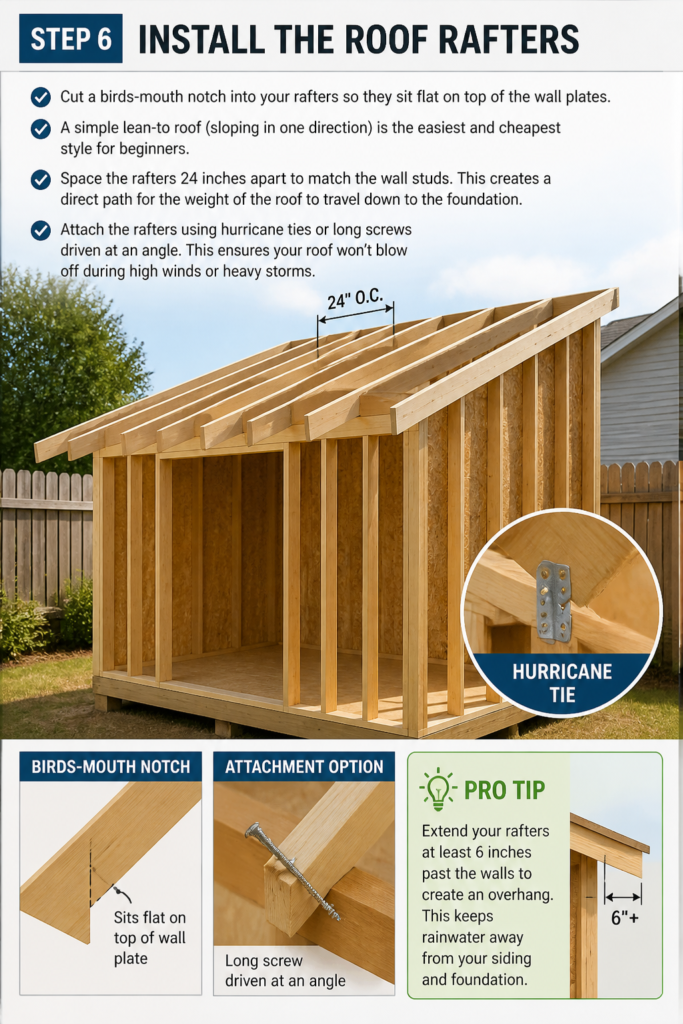
Space the rafters 24 inches apart to match the wall studs. This creates a direct path for the weight of the roof to travel down to the foundation.
Attach the rafters using hurricane ties or long screws driven at an angle. This ensures your roof won’t blow off during high winds or heavy storms.
Pro Tip: Extend your rafters at least 6 inches past the walls to create an overhang. This keeps rainwater away from your siding and foundation.
Step 7: Add Siding and Sheathing
Choose T1-11 siding or OSB panels for the most cost-effective exterior. T1-11 is a great choice because it acts as both the structural sheathing and the finished siding.
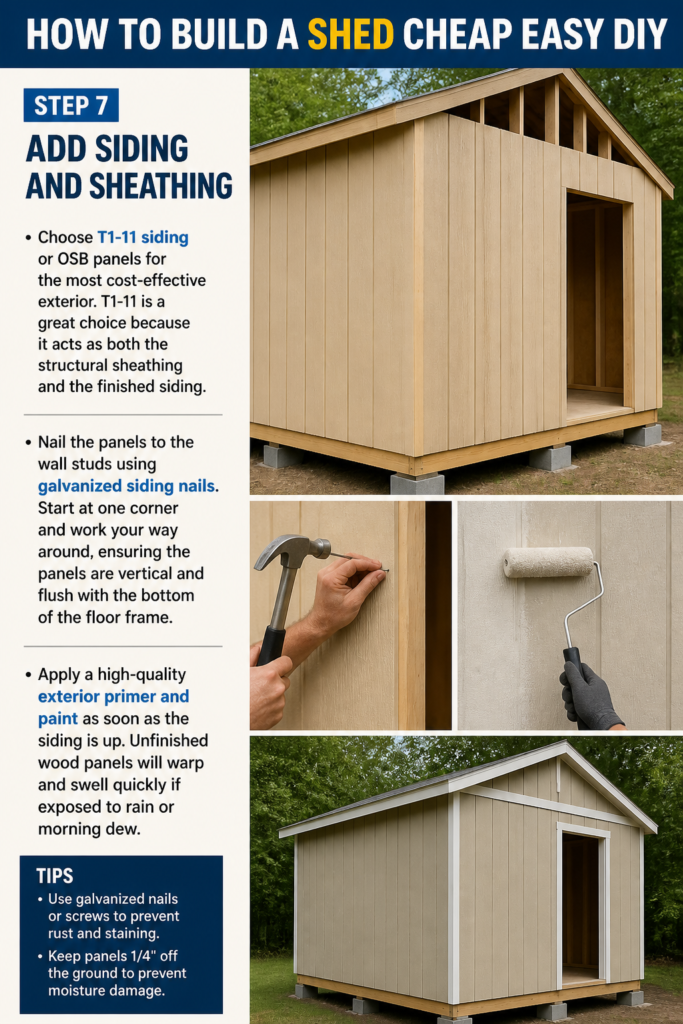
Nail the panels to the wall studs using galvanized siding nails. Start at one corner and work your way around, ensuring the panels are vertical and flush with the bottom of the floor frame.
Apply a high-quality exterior primer and paint as soon as the siding is up. Unfinished wood panels will warp and swell quickly if exposed to rain or morning dew.
Step 8: Install the Roofing Material
Fasten 1/2-inch OSB or plywood sheets over the rafters to create the roof deck. Always start at the lowest point of the roof and work your way up to the peak.
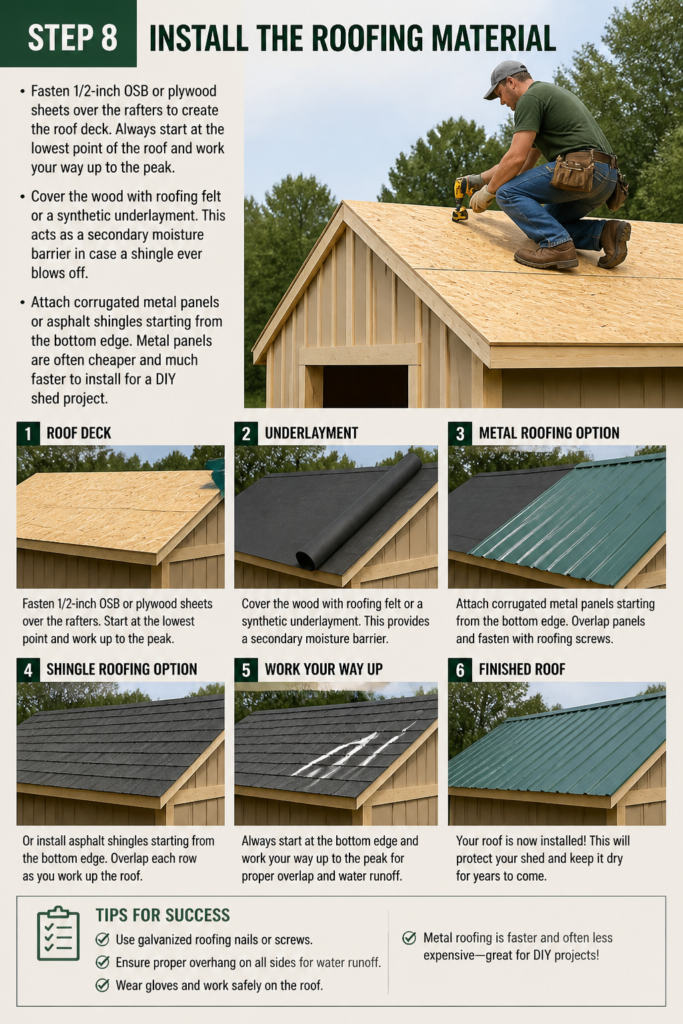
Cover the wood with roofing felt or a synthetic underlayment. This acts as a secondary moisture barrier in case a shingle ever blows off.
Attach corrugated metal panels or asphalt shingles starting from the bottom edge. Metal panels are often cheaper and much faster to install for a DIY shed project.
Step 9: Build and Hang the Door
Construct a simple “Z-frame” door using the leftover siding and 2×4 boards. The “Z” shape prevents the door from sagging over time by transferring the weight to the hinges.
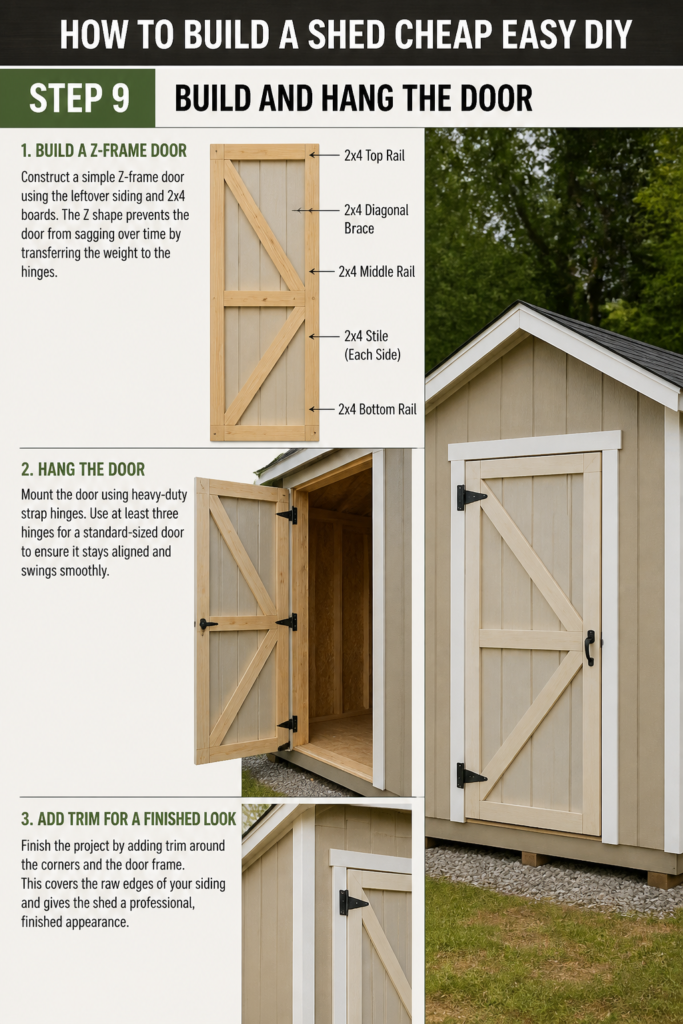
Mount the door using heavy-duty strap hinges. Use at least three hinges for a standard-sized door to ensure it stays aligned and swings smoothly.
Finish the project by adding trim around the corners and the door frame. This covers the raw edges of your siding and gives the shed a professional, finished appearance.
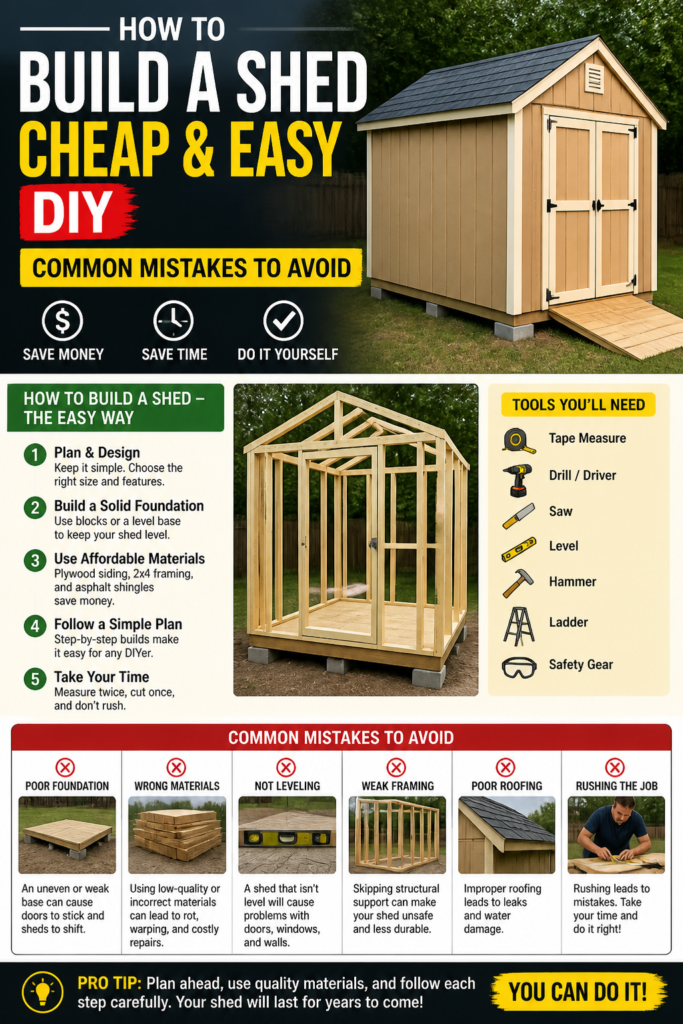
Common Mistakes to Avoid
Ignoring Local Building Codes
Many homeowners assume a small shed doesn’t require a permit, but local laws vary wildly. Some towns have strict rules about how close a shed can be to a property line or how tall it can be. Checking with your local building department first can save you from a forced teardown and expensive fines.
Building Directly on the Ground
Placing wood directly on dirt or grass is a recipe for disaster. Moisture from the soil will rot the floor joists within a few seasons, regardless of whether the wood is treated. Always use a foundation of gravel, concrete blocks, or a concrete pad to keep the wood away from the earth.
Using the Wrong Fasteners
Standard interior screws will rust and snap within months when exposed to the elements. Always use galvanized nails or coated exterior screws for every part of the shed exterior. This prevents “bleeding” rust stains on your paint and ensures the structure stays together during seasonal temperature changes.
Skipping the Drip Edge
A drip edge is a small piece of metal flashing that goes along the edge of the roof. Without it, water will wick back under your shingles or metal panels and rot the roof deck. It is an inexpensive component that adds years of life to your shed roof.
Troubleshooting
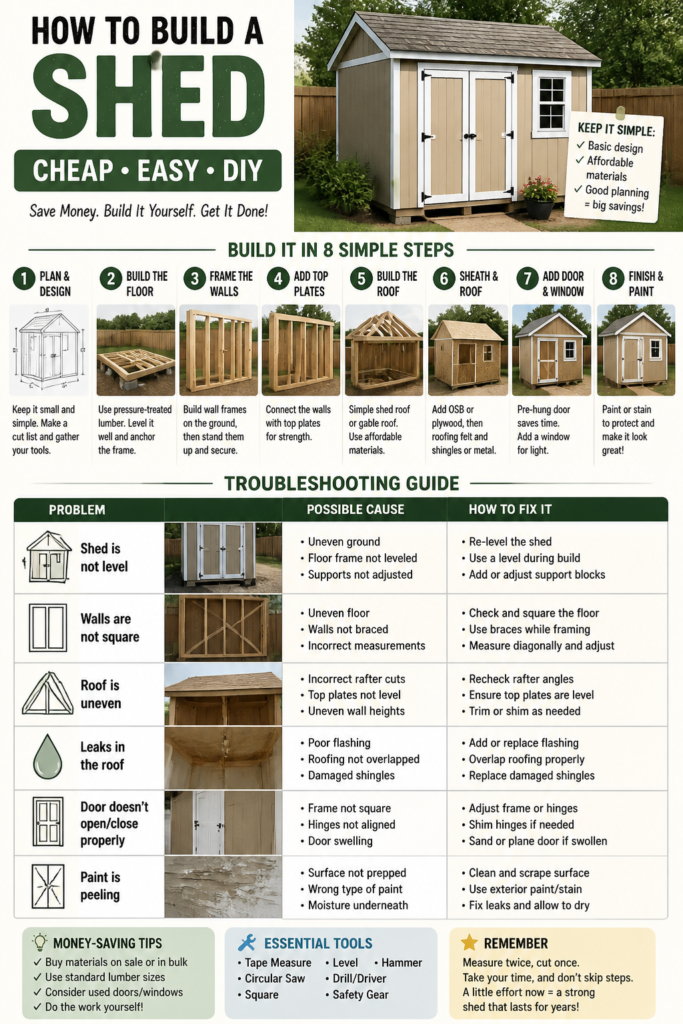
The Shed Floor is Wobbly
If the floor feels springy or moves when you walk, you likely have a gap between your foundation blocks and the floor frame. You can fix this by driving thin wooden shims into the gaps to create a solid connection. Also, check that your joist hangers or screws are tight and haven’t pulled away from the rim joist.
The Door Won’t Close Properly
This is usually caused by the shed settling or the frame being slightly out of square. Check the corners of the door opening with a large square tool. If the frame has shifted, you can often fix it by slightly adjusting the foundation blocks with a car jack and adding more gravel underneath.
Water is Leaking Inside
Look for damp spots on the ceiling or walls during a rainstorm to find the source. Most leaks occur around the roof fasteners or at the corners where the siding meets the roof. Apply a generous amount of exterior-grade silicone caulk to any suspicious gaps or exposed screw heads on the roof.
Key Takeaways
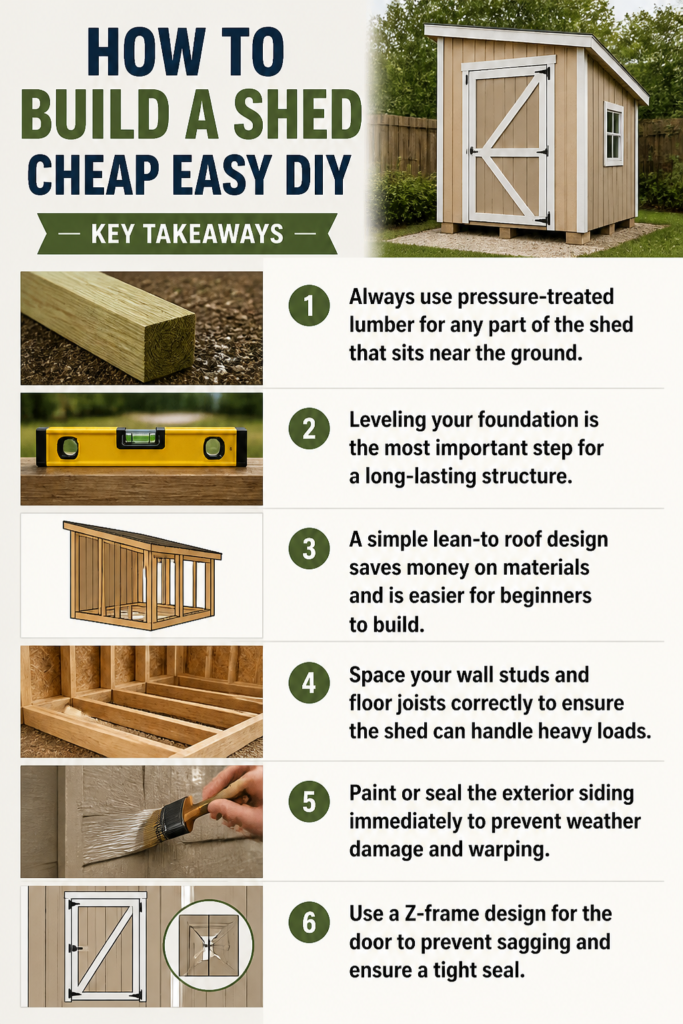
- Always use pressure-treated lumber for any part of the shed that sits near the ground.
- Leveling your foundation is the most important step for a long-lasting structure.
- A simple lean-to roof design saves money on materials and is easier for beginners to build.
- Space your wall studs and floor joists correctly to ensure the shed can handle heavy loads.
- Paint or seal the exterior siding immediately to prevent weather damage and warping.
- Use a Z-frame design for the door to prevent sagging and ensure a tight seal.
Frequently Asked Questions
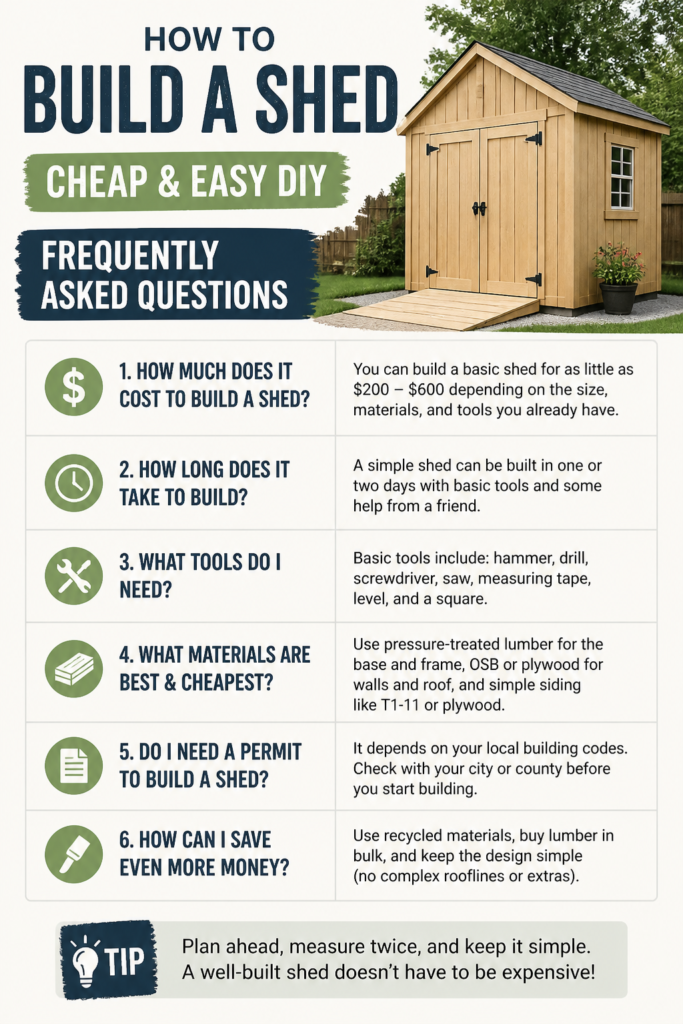
What is the cheapest material for shed siding?
OSB (Oriented Strand Board) is generally the most affordable option, but it requires thorough painting to prevent it from absorbing water. T1-11 is slightly more expensive but offers a more attractive “wood plank” look and provides better structural integrity for the walls. If you are on a very tight budget, look for “factory seconds” at lumber yards which often have minor cosmetic flaws but are structurally sound.
Do I need a concrete slab for a small shed?
No, a concrete slab is not necessary for most DIY sheds under 120 square feet. A gravel pad or concrete deck blocks are perfectly adequate and much cheaper to install. These options also provide better drainage than a solid slab, which can help keep the wooden base of your shed dry and rot-free for a longer period.
How long will a DIY wooden shed last?
A well-built wooden shed can easily last 15 to 20 years if it is maintained properly. This includes repainting every few years and ensuring that vegetation doesn’t grow directly against the siding. Keeping the roof in good repair is the single most important factor in determining the overall lifespan of the structure.
Can I build a shed by myself?
Most of the work can be done by one person, but you will almost certainly need a second set of hands when it comes time to raise the walls. Having a partner makes the process much safer and ensures that the walls stay plumb while they are being secured. If you are working alone, you can use temporary braces and clamps, but it will take significantly longer.
Our Top Recommended Finds
- Impact Driver: A cordless impact driver makes sinking long deck screws effortless compared to a standard drill.
- Speed Square: This tool is essential for marking perfectly 90-degree cuts on your 2×4 studs and rafters.
- Heavy-Duty T-Hinges: Choosing thick, galvanized hinges will prevent your door from sagging under its own weight over time.
Taking Your Backyard To The Next Level
Now that you have a plan for your shed, the best thing you can do is start clearing your site today.
Once the foundation is set, the rest of the project will naturally fall into place as you follow these steps.
After your storage is complete, you might consider adding solar lighting or built-in shelving to maximize the utility of your new space.
Don’t let the scale of the project intimidate you; just take it one board at a time and focus on keeping everything level and square.
Beginner-friendly templates, step-by-step guides,
and weekly project ideas in your inbox.