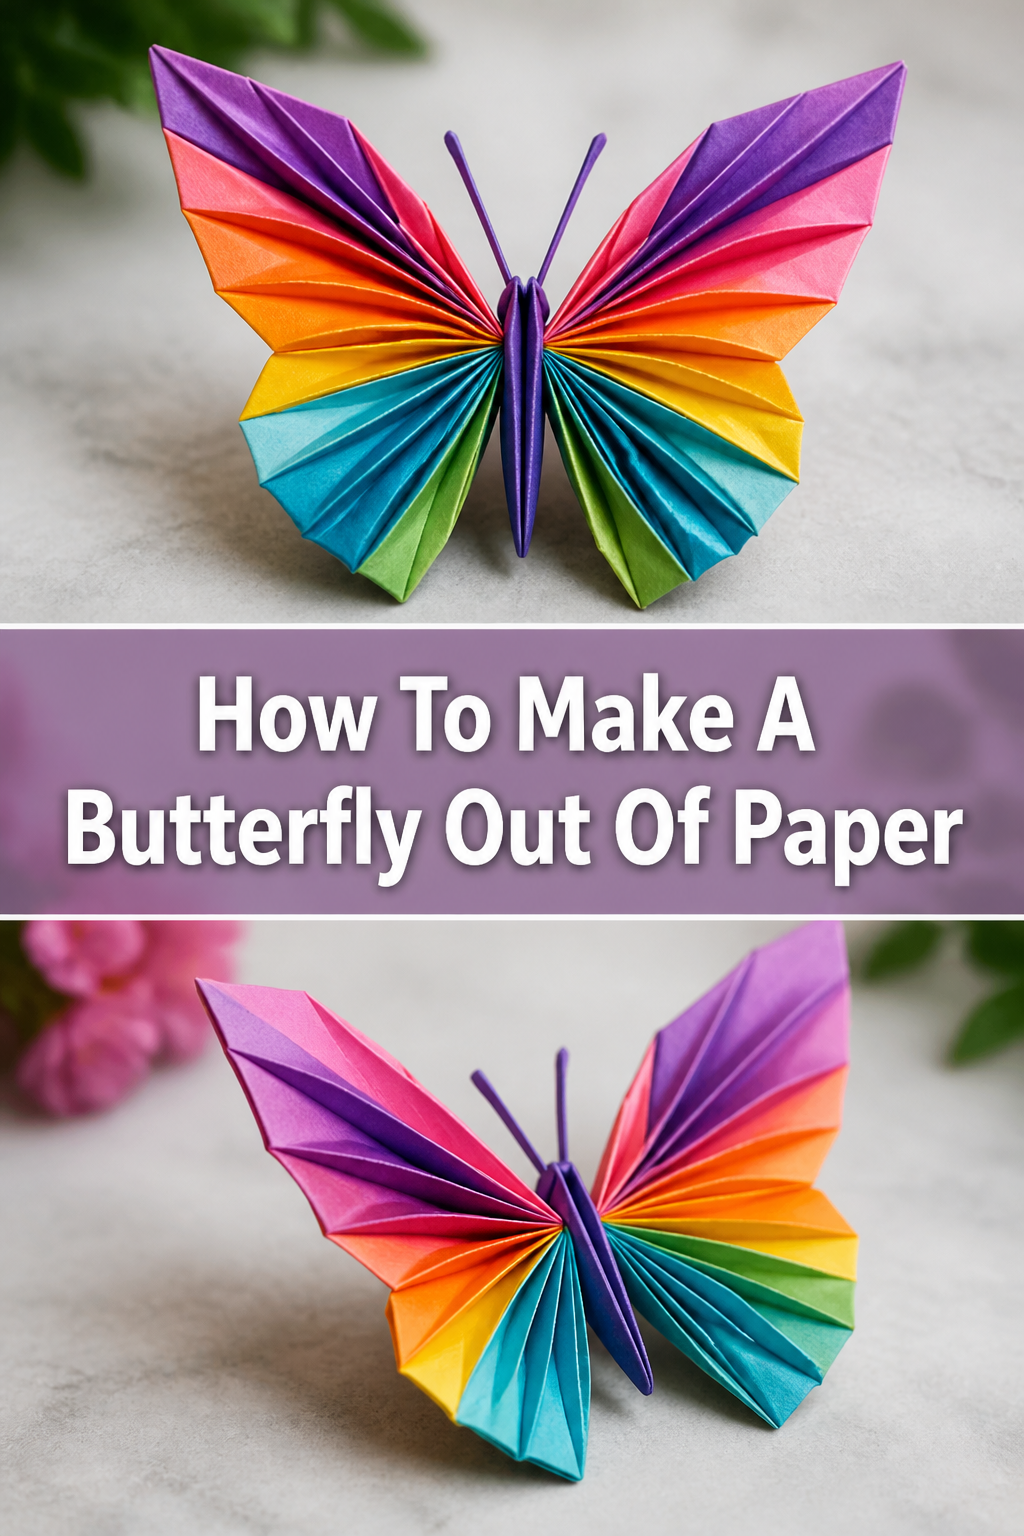
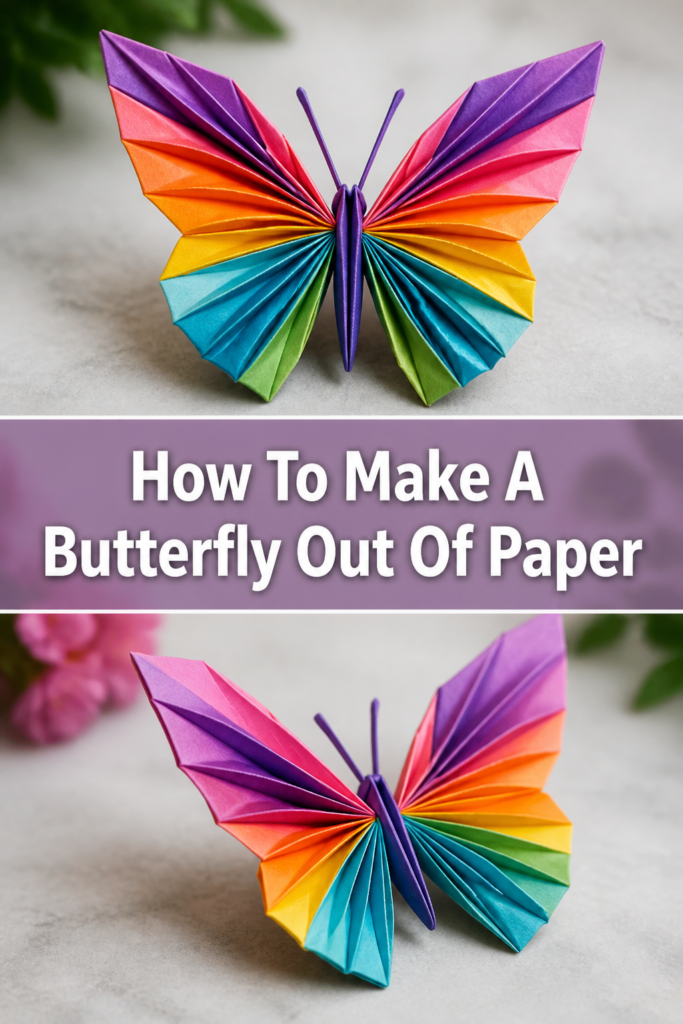
🦋 How To Make A Butterfly Out Of Paper

Beginner-friendly templates, step-by-step guides,
and weekly project ideas in your inbox.
There’s a special kind of magic in transforming a simple sheet of paper into something beautiful.
I remember the first time I successfully folded a paper butterfly, the delicate wings unfolding from a flat square felt like a small triumph.
This guide shares years of crafting insights, helping you create your own stunning paper butterflies with ease and joy.
Quick Overview
This project will guide you through creating a charming paper butterfly, perfect for decorations, gifts, or just a fun craft session.
You’ll learn fundamental folding techniques and how to add personal touches to your creation.
- Time needed: 45-75 minutes (including drying time for glue/decorations)
- Difficulty: Beginner
- What you’ll need: Paper, scissors, ruler, pencil, craft glue, optional decorative items
Step-by-Step Instructions
Step 1: Gather Your Materials
Before you begin any craft, lay out all your necessary tools and supplies.
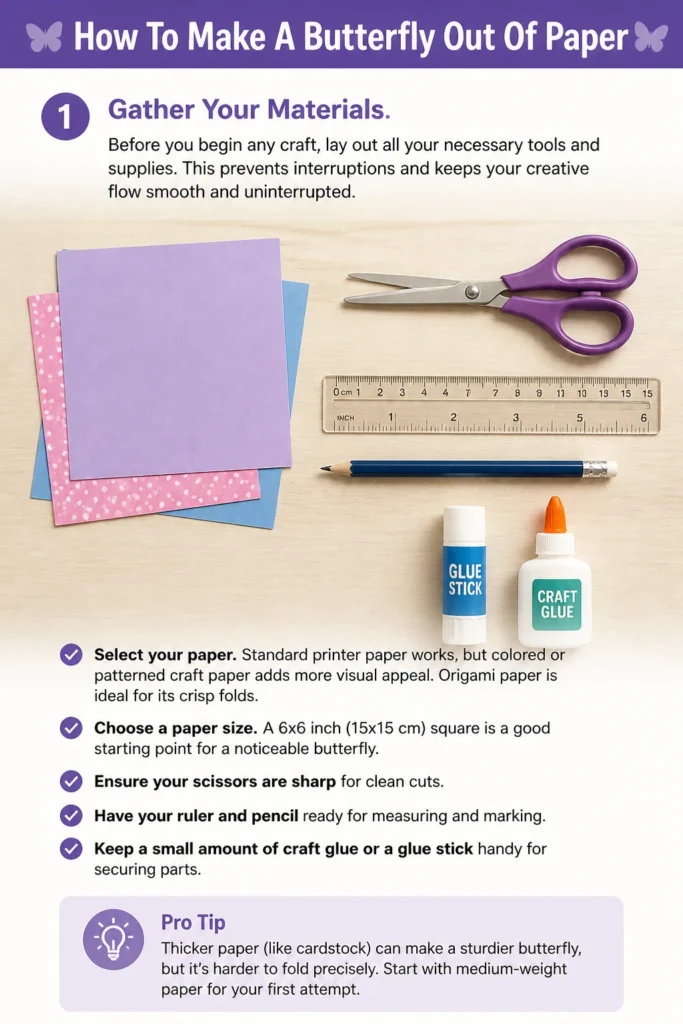
This prevents interruptions and keeps your creative flow smooth and uninterrupted.
- Select your paper. Standard printer paper works, but colored or patterned craft paper adds more visual appeal. Origami paper is ideal for its crisp folds.
- Choose a paper size. A 6×6 inch (15×15 cm) square is a good starting point for a noticeable butterfly.
- Ensure your scissors are sharp for clean cuts.
- Have your ruler and pencil ready for measuring and marking.
- Keep a small amount of craft glue or a glue stick handy for securing parts.
Pro Tip: Thicker paper (like cardstock) can make a sturdier butterfly, but it’s harder to fold precisely. Start with medium-weight paper for your first attempt.
Step 2: Prepare Your Paper Base
Most paper crafts, especially origami-inspired ones, start with a perfectly square piece of paper.
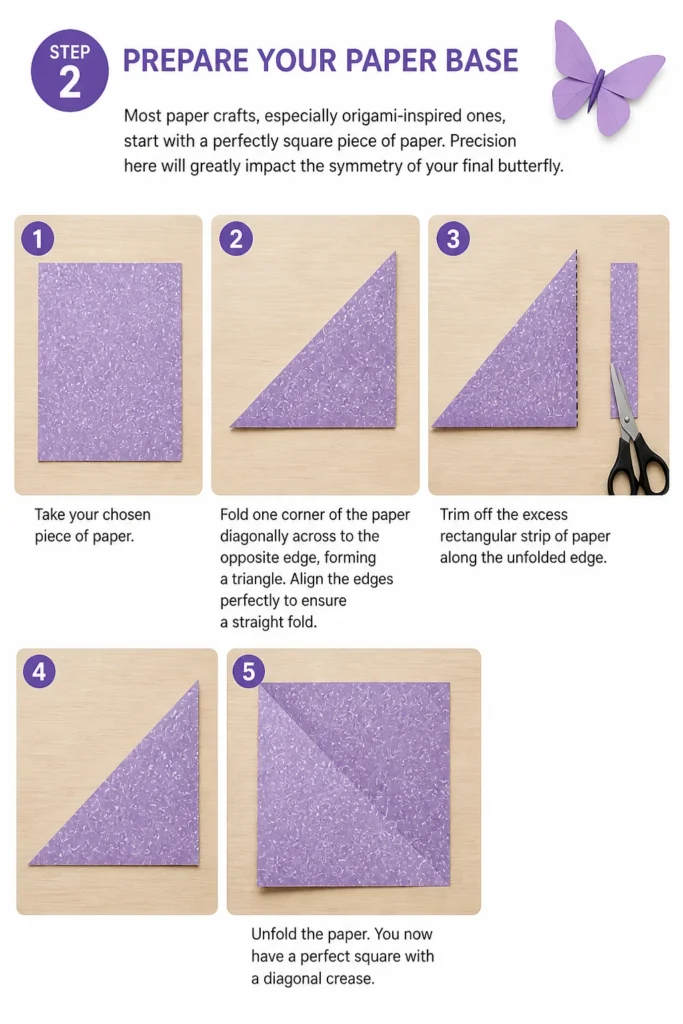
Precision here will greatly impact the symmetry of your final butterfly.
- Take your chosen piece of paper. If it’s not already a square, you’ll need to make it one.
- Fold one corner of the paper diagonally across to the opposite edge, forming a triangle.
- Align the edges perfectly to ensure a straight fold.
- Trim off the excess rectangular strip of paper along the unfolded edge.
- Unfold the paper. You now have a perfect square with a diagonal crease.
Step 3: Create the Basic Folds
These initial creases form the foundation of your butterfly’s structure.
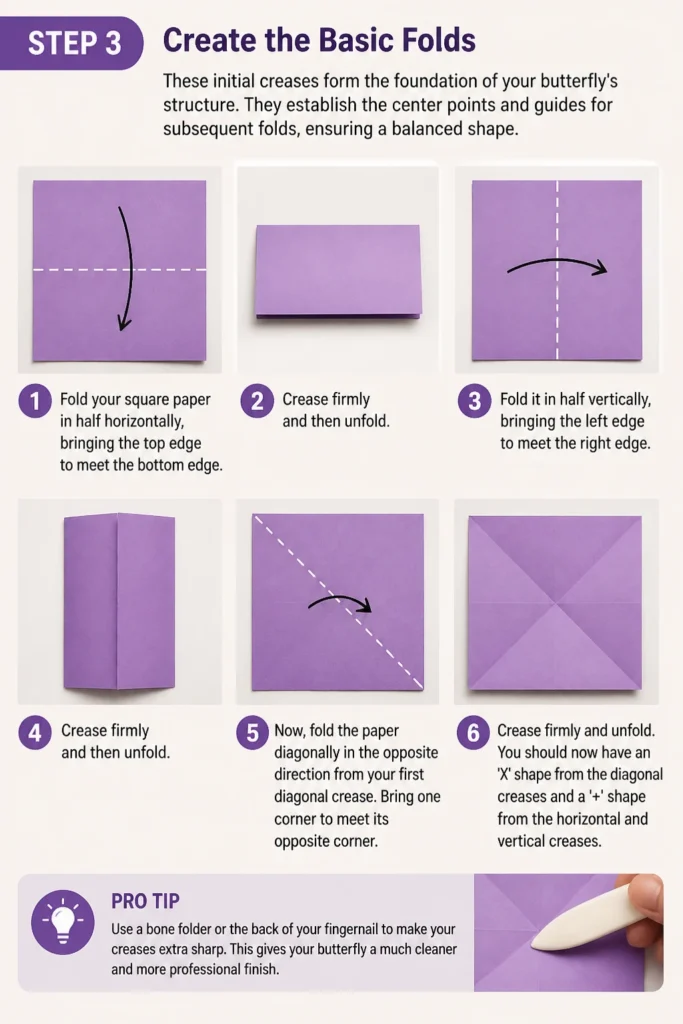
They establish the center points and guides for subsequent folds, ensuring a balanced shape.
- Fold your square paper in half horizontally, bringing the top edge to meet the bottom edge. Crease firmly and then unfold.
- Fold it in half vertically, bringing the left edge to meet the right edge. Crease firmly and then unfold.
- Now, fold the paper diagonally in the opposite direction from your first diagonal crease. Bring one corner to meet its opposite corner. Crease firmly and unfold.
- You should now have an ‘X’ shape from the diagonal creases and a ‘+’ shape from the horizontal and vertical creases.
Pro Tip: Use a bone folder or the back of your fingernail to make your creases extra sharp. This gives your butterfly a much crisper and more professional look.
Step 4: Form the Preliminary Base
This step transforms your flat square into a three-dimensional base, which is crucial for shaping the butterfly’s body.
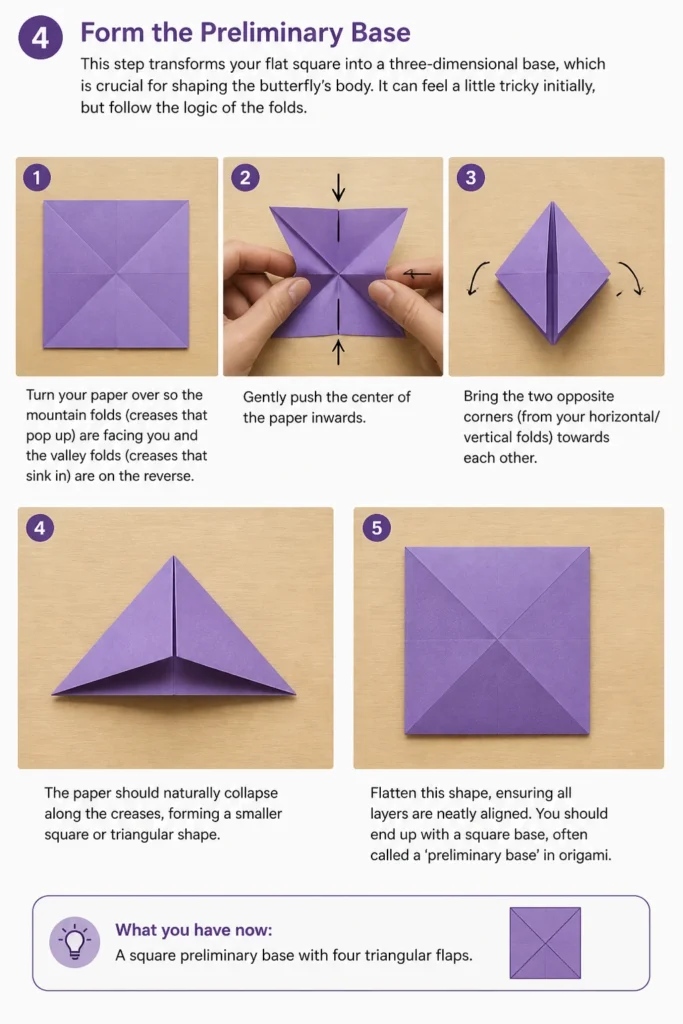
It can feel a little tricky initially, but follow the logic of the folds.
- Turn your paper over so the mountain folds (creases that pop up) are facing you and the valley folds (creases that sink in) are on the reverse.
- Gently push the center of the paper inwards.
- Bring the two opposite corners (from your horizontal/vertical folds) towards each other.
- The paper should naturally collapse along the creases, forming a smaller square or triangular shape.
- Flatten this shape, ensuring all layers are neatly aligned. You should end up with a square base, often called a ‘preliminary base’ in origami.
Step 5: Shape the Wings
This is where your butterfly starts to take on its iconic form.
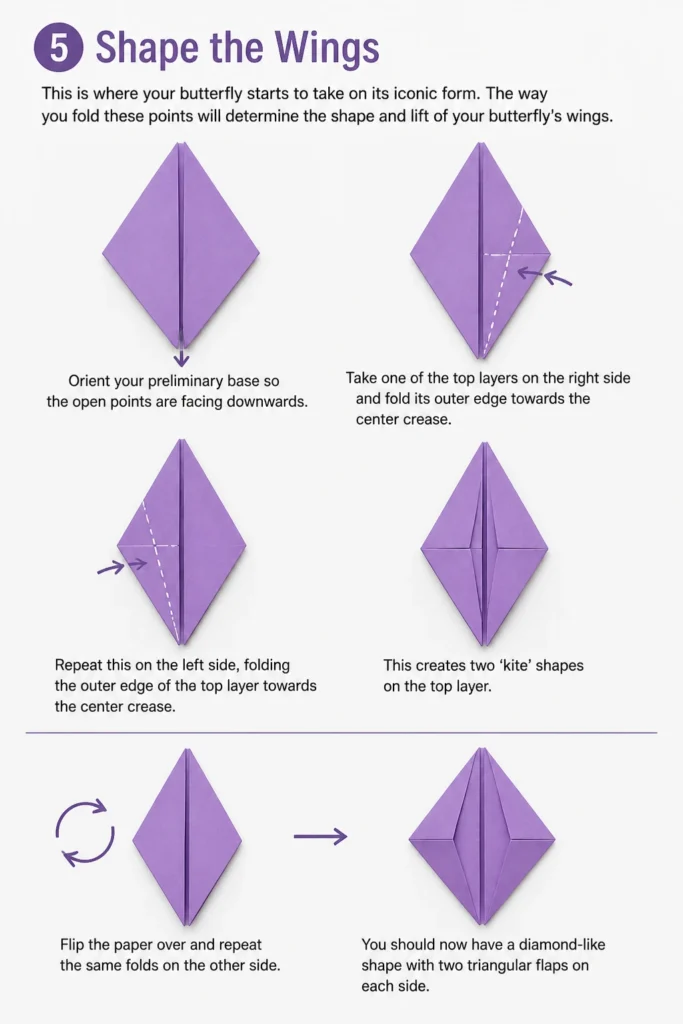
The way you fold these points will determine the shape and lift of your butterfly’s wings.
- Orient your preliminary base so the open points are facing downwards.
- Take one of the top layers on the right side and fold its outer edge towards the center crease.
- Repeat this on the left side, folding the outer edge of the top layer towards the center crease. This creates two ‘kite’ shapes on the top layer.
- Flip the paper over and repeat the same folds on the other side.
- You should now have a diamond-like shape with two triangular flaps on each side.
Step 6: Create the Body and Upper Wings
Now, we’ll refine the central body and give the upper wings their distinctive curve.
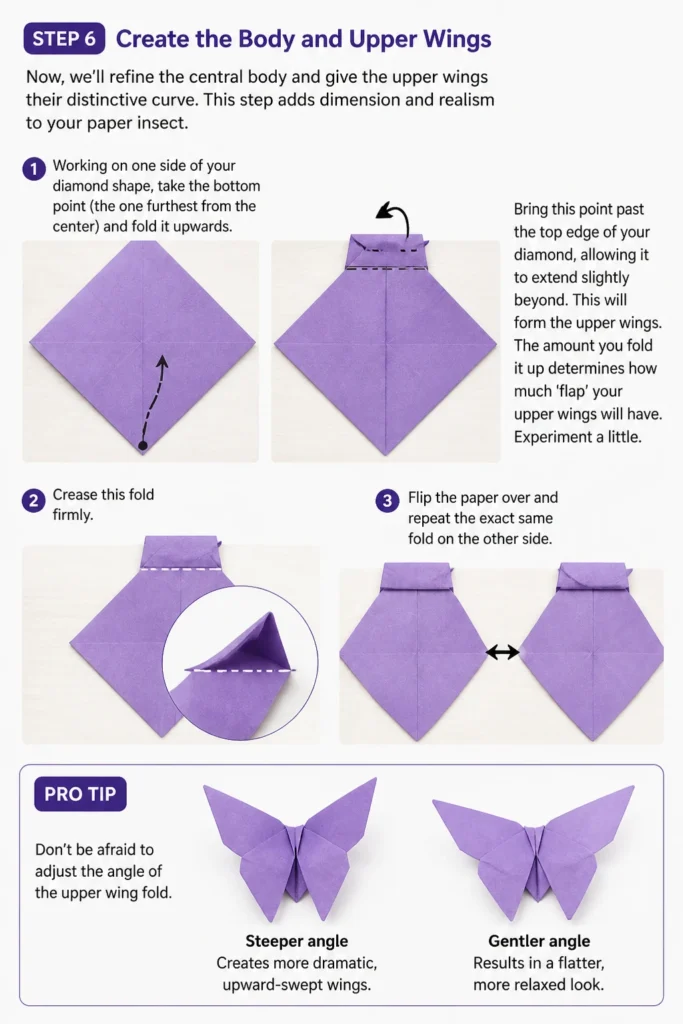
This step adds dimension and realism to your paper insect.
- Working on one side of your diamond shape, take the bottom point (the one furthest from the center) and fold it upwards.
- Bring this point past the top edge of your diamond, allowing it to extend slightly beyond. This will form the upper wings.
- The amount you fold it up determines how much ‘flap’ your upper wings will have. Experiment a little.
- Crease this fold firmly.
- Flip the paper over and repeat the exact same fold on the other side.
Pro Tip: Don’t be afraid to adjust the angle of the upper wing fold. A steeper angle creates more dramatic, upward-swept wings, while a gentler angle results in a flatter, more relaxed look.
Step 7: Refine the Wing Shape and Secure
The final folds here give the wings their natural curve and secure the structure.
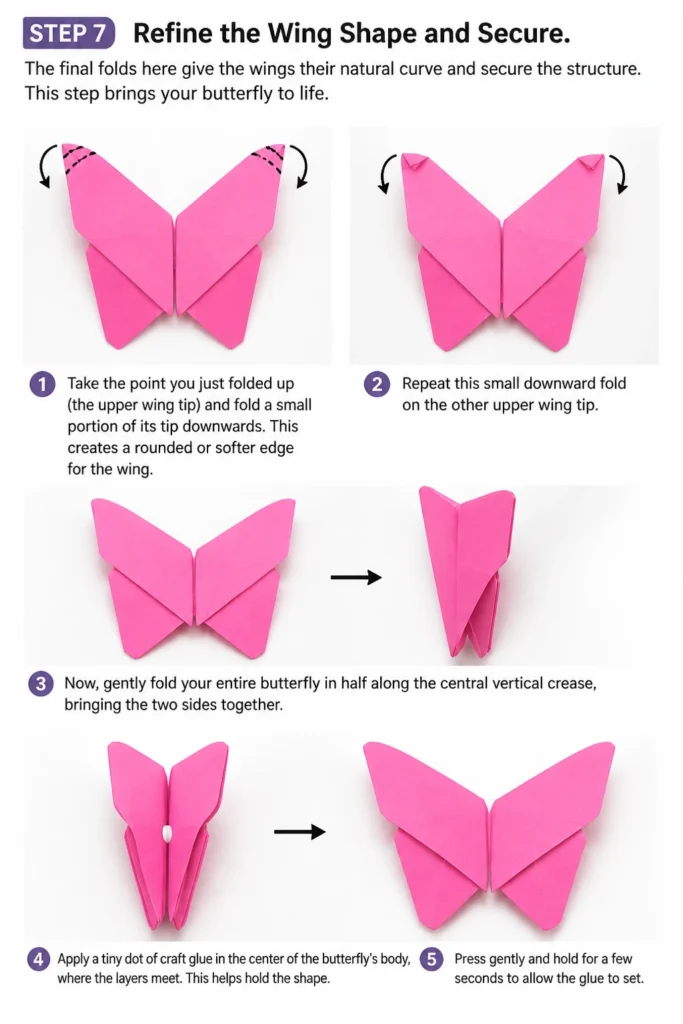
This step brings your butterfly to life.
- Take the point you just folded up (the upper wing tip) and fold a small portion of its tip downwards. This creates a rounded or softer edge for the wing.
- Repeat this small downward fold on the other upper wing tip.
- Now, gently fold your entire butterfly in half along the central vertical crease, bringing the two sides together.
- Apply a tiny dot of craft glue in the center of the butterfly’s body, where the layers meet. This helps hold the shape.
- Press gently and hold for a few seconds to allow the glue to set.
Step 8: Add Details and Decoration
This is where your butterfly truly becomes unique.
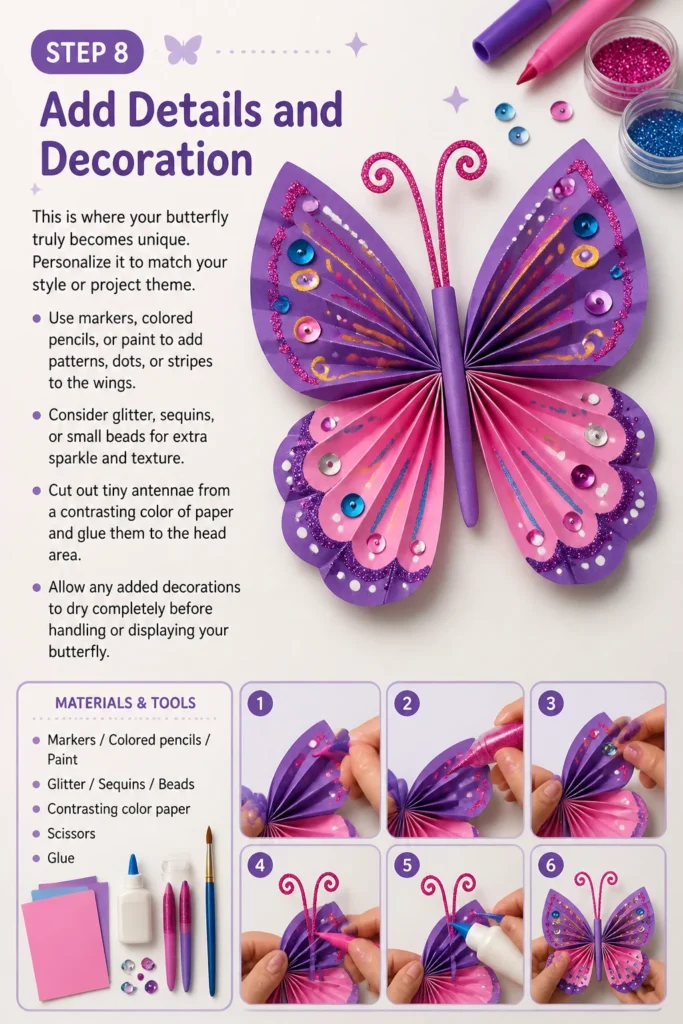
Personalize it to match your style or project theme.
- Use markers, colored pencils, or paint to add patterns, dots, or stripes to the wings.
- Consider glitter, sequins, or small beads for extra sparkle and texture.
- Cut out tiny antennae from a contrasting color of paper and glue them to the head area.
- Allow any added decorations to dry completely before handling or displaying your butterfly.
Common Mistakes to Avoid
Rushing the Folds
Trying to fold too quickly often leads to imprecise creases and misaligned edges. These small errors compound, resulting in a lopsided or uneven butterfly.
Take your time with each fold, ensuring edges meet perfectly and creases are sharp before moving on. Patience is key to a beautiful outcome.
Using the Wrong Paper Type
Very thin paper can tear easily, especially when making multiple layers or sharp creases. Conversely, very thick paper, like heavy cardstock, is difficult to fold precisely and often results in bulky, less delicate wings.
Opt for medium-weight craft paper or dedicated origami paper. These papers offer a good balance of durability and pliability, making the folding process much smoother.
Not Creasing Firmly Enough
Soft or weak creases don’t hold their shape, causing your butterfly to look saggy or less defined. The structure relies on crisp, well-defined folds to maintain its form.
Press down firmly on each fold, using your fingernail or a bone folder. This ensures the paper remembers its new shape and contributes to a sturdy, elegant final product.
Applying Too Much Glue
Excessive glue can seep through paper, creating unsightly wet spots, wrinkles, or even tearing the paper. It can also make the butterfly stiff and less delicate.
Use glue sparingly. A tiny dot or a thin line is often sufficient to secure layers without compromising the paper’s integrity or appearance.
Troubleshooting
My Butterfly’s Wings Aren’t Symmetrical
This is a common issue, usually stemming from uneven initial folds or slight misalignments when shaping the wings. Even a millimeter can make a difference.
Go back to the preliminary base and check if all layers are perfectly aligned. When folding the upper wings, measure or visually ensure both sides are folded at the exact same angle and height. Unfold and refold carefully if needed.
The Butterfly Won’t Hold its Shape
If your butterfly feels flimsy or collapses easily, it’s likely due to insufficiently firm creases. The paper needs to “remember” its folds to maintain structure.
Revisit each major crease, especially the diagonal and horizontal folds. Press them down firmly, using a ruler edge or a bone folder. A tiny dot of glue in the central body can also help secure the layers permanently.
My Paper is Tearing at the Folds
Paper tearing often happens with overly thin or aged paper, or when you press too hard on a sharp crease with a material that’s too rigid. It can also occur if the paper is dry or brittle.
Switch to a slightly thicker, fresh sheet of paper. When creasing, use your fingernail or a bone folder with controlled pressure. Avoid using sharp objects that might score the paper too deeply.
Key Takeaways
- Precision in initial folds creates a symmetrical and balanced butterfly.
- Using appropriate paper weight ensures both durability and ease of folding.
- Firm creases are essential for the butterfly to hold its delicate three-dimensional shape.
- Patience and attention to detail elevate your craft from good to truly beautiful.
- Personalizing your butterfly with decorations makes each creation uniquely yours.
- Don’t be afraid to experiment with different paper sizes and colors to explore variations.
Frequently Asked Questions
Can I use any type of paper for this project?
While technically you can use any paper, the results vary. Standard printer paper works for practice, but craft paper, origami paper, or even decorative scrapbook paper will yield better, more vibrant results. Avoid very thick cardstock or very thin tissue paper for your first attempt.
How can I make my paper butterfly stand up?
To make it stand, ensure the central body fold is very firm. You can also slightly curve the lower wings outwards by gently bending them at their base. For a more stable display, glue a small paper clip or a thin strip of cardstock to the back as a subtle stand.
What if I want to make a larger or smaller butterfly?
The beauty of this craft is its scalability. Simply adjust the size of your starting square paper. The folding steps remain exactly the same, whether you’re starting with a tiny 2×2 inch square or a large 12×12 inch sheet. Just ensure your tools are appropriate for the size.
How can I hang my paper butterflies for decoration?
You can attach a small loop of fishing line or thread to the top of the butterfly’s body with a tiny dot of glue. Alternatively, use a small piece of double-sided tape or a removable adhesive putty to stick them directly to walls, windows, or mobiles.
Our Top Recommended Finds
- Origami Paper Pack: Offers a wide variety of colors and patterns, perfectly sized and weighted for folding, ensuring crisp results.
- Precision Craft Scissors: Essential for clean, accurate cuts, especially when trimming the initial square or adding small details.
- Craft Glue Stick: Provides a neat, mess-free way to secure layers without oversaturating the paper, preventing wrinkles.
Your Next Creative Flight Awaits
You’ve just completed a wonderful journey, transforming a flat sheet into a graceful paper butterfly.
This skill opens up a world of creative possibilities, from decorating your home to crafting personalized gifts.
Why not try making a whole swarm of butterflies in different colors and sizes? Or explore other paper-folding projects like flowers or birds.
Don’t let your creativity stop here. Pick up another sheet of paper today and see what beautiful creations you can bring to life.
Beginner-friendly templates, step-by-step guides,
and weekly project ideas in your inbox.