🧶 How To Fix A Hole In A Sweater

Beginner-friendly templates, step-by-step guides,
and weekly project ideas in your inbox.
Discovering a hole in your favorite sweater can feel like a small tragedy, threatening to sideline a cherished garment.
I’ve personally salvaged countless sweaters, transforming them from worn-out to wonderful, and I’m here to show you exactly how.
This guide offers practical, step-by-step instructions to mend those pesky holes, extending the life of your cozy companions.

Quick Overview
This guide will equip you with the skills to confidently repair common holes in your sweaters, making them wearable again.
You’ll learn a durable mending technique that blends seamlessly with the fabric, restoring both function and aesthetics.
- Time needed: 30-60 minutes, depending on hole size and your experience
- Difficulty: Beginner to Intermediate
- What you’ll need: Yarn, darning needle, small scissors, darning mushroom or ball (optional)
Step-by-Step Instructions
Step 1: Gather Your Supplies
Collect all necessary tools before you begin. Having everything at hand prevents interruptions and ensures a smoother mending process.
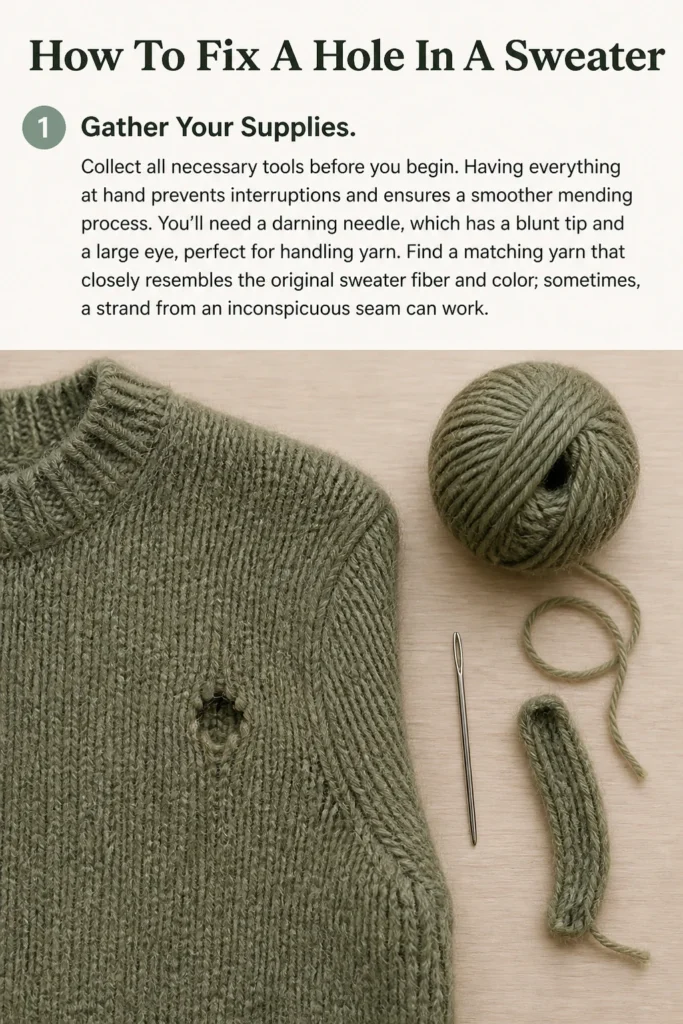
You’ll need a darning needle, which has a blunt tip and a large eye, perfect for handling yarn.
Find a matching yarn that closely resembles the original sweater fiber and color; sometimes, a strand from an inconspicuous seam can work.
Step 2: Prepare the Sweater
Lay your sweater flat on a clean, well-lit surface. Gently stretch the fabric around the hole to identify its true size and any loose threads.
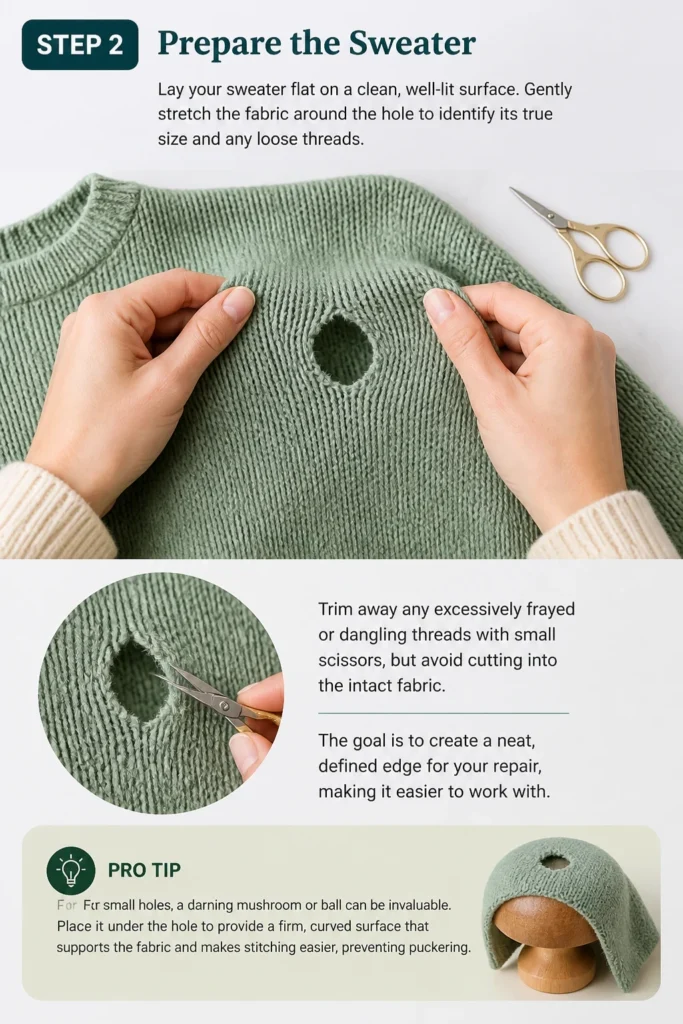
Trim away any excessively frayed or dangling threads with small scissors, but avoid cutting into the intact fabric.
The goal is to create a neat, defined edge for your repair, making it easier to work with.
Pro Tip: For small holes, a darning mushroom or ball can be invaluable. Place it under the hole to provide a firm, curved surface that supports the fabric and makes stitching easier, preventing puckering.
Step 3: Stabilize the Hole Edges
Thread your darning needle with a length of matching yarn, about 18-24 inches long. A single strand is usually sufficient for most repairs.
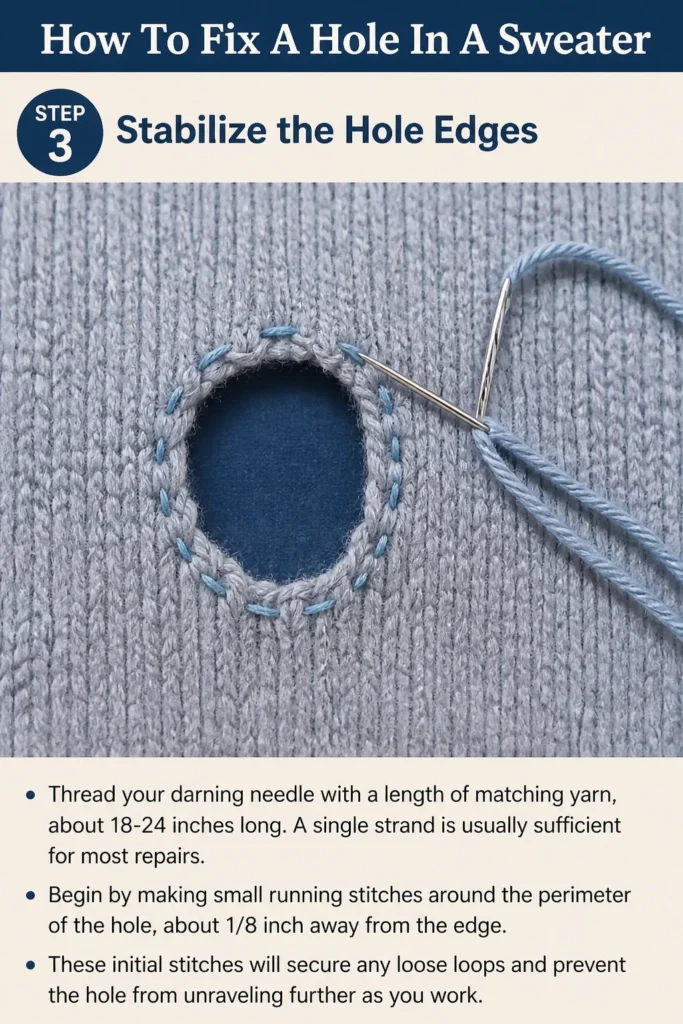
Begin by making small running stitches around the perimeter of the hole, about 1/8 inch away from the edge.
These initial stitches will secure any loose loops and prevent the hole from unraveling further as you work.
Step 4: Create a Grid of Horizontal Weft Threads
Start your darning by creating a series of horizontal stitches that span across the hole. Begin about 1/4 inch outside one edge of the hole.
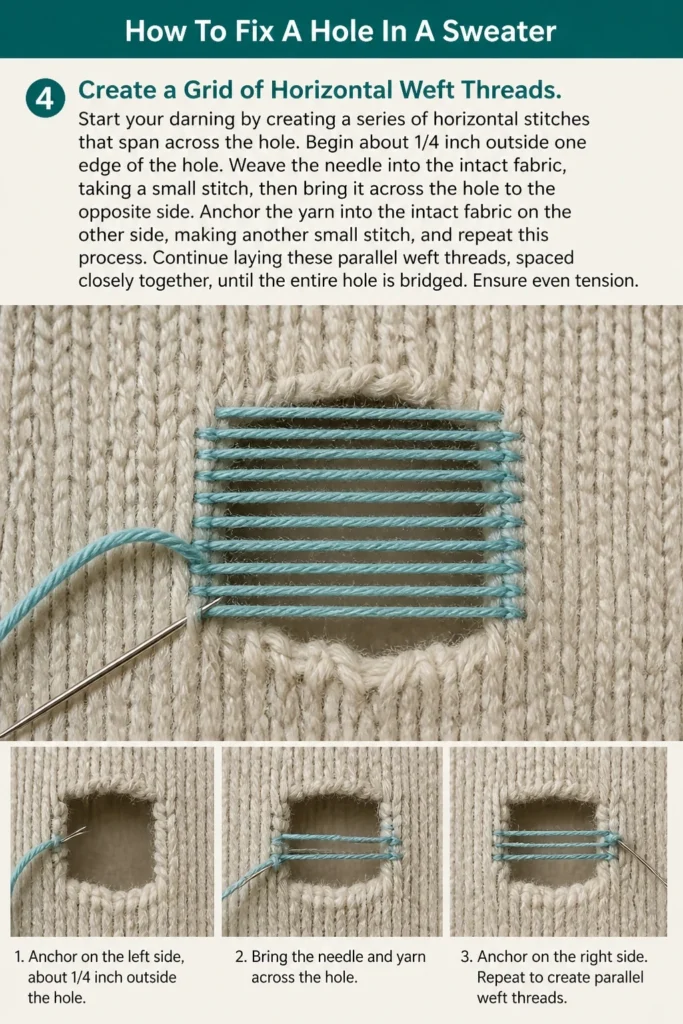
Weave the needle into the intact fabric, taking a small stitch, then bring it across the hole to the opposite side.
Anchor the yarn into the intact fabric on the other side, making another small stitch, and repeat this process.
Continue laying these parallel “weft” threads, spaced closely together, until the entire hole is bridged. Ensure even tension.
Step 5: Weave the Vertical Warp Threads
Now, rotate your sweater 90 degrees or simply start working perpendicular to your first set of threads. You will begin weaving the “warp” threads.
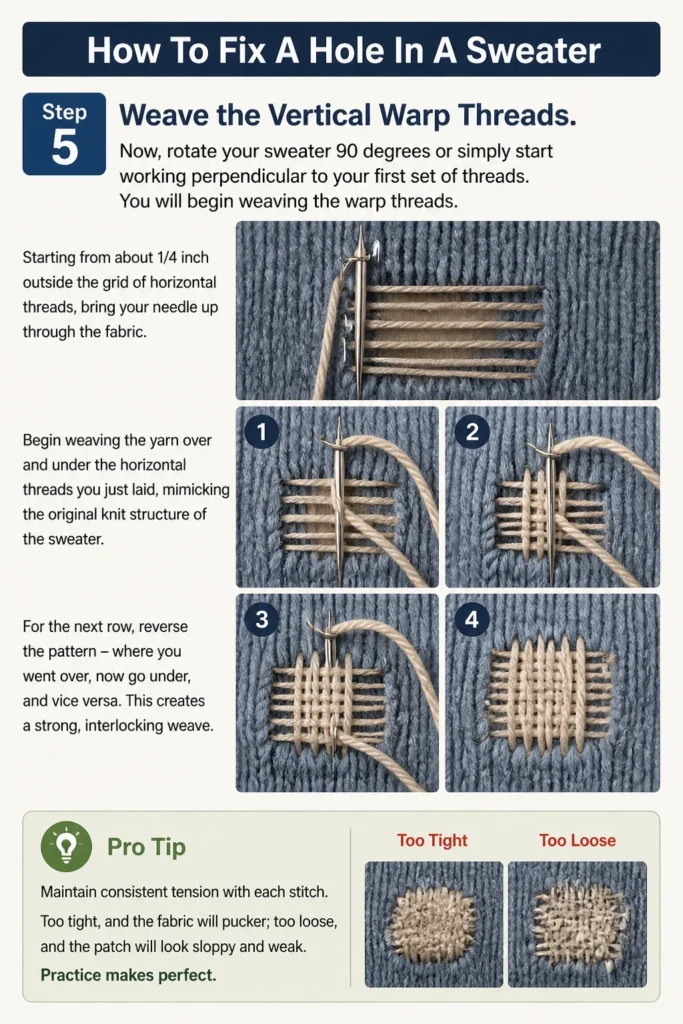
Starting from about 1/4 inch outside the grid of horizontal threads, bring your needle up through the fabric.
Begin weaving the yarn over and under the horizontal threads you just laid, mimicking the original knit structure of the sweater.
For the next row, reverse the pattern – where you went over, now go under, and vice versa. This creates a strong, interlocking weave.
Pro Tip: Maintain consistent tension with each stitch. Too tight, and the fabric will pucker; too loose, and the patch will look sloppy and weak. Practice makes perfect.
Step 6: Fill the Entire Area
Continue weaving the vertical threads, alternating the over-and-under pattern with each pass.
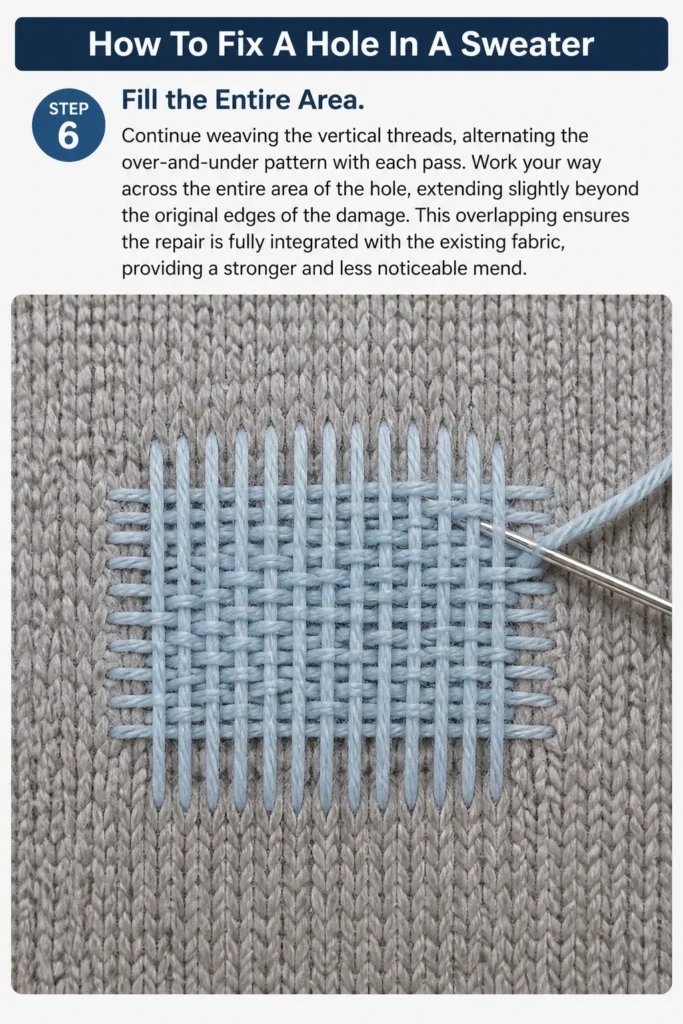
Work your way across the entire area of the hole, extending slightly beyond the original edges of the damage.
This overlapping ensures the repair is fully integrated with the existing fabric, providing a stronger and less noticeable mend.
Step 7: Secure and Finish
Once the hole is completely filled and the weave extends slightly into the original fabric, secure your working yarn.
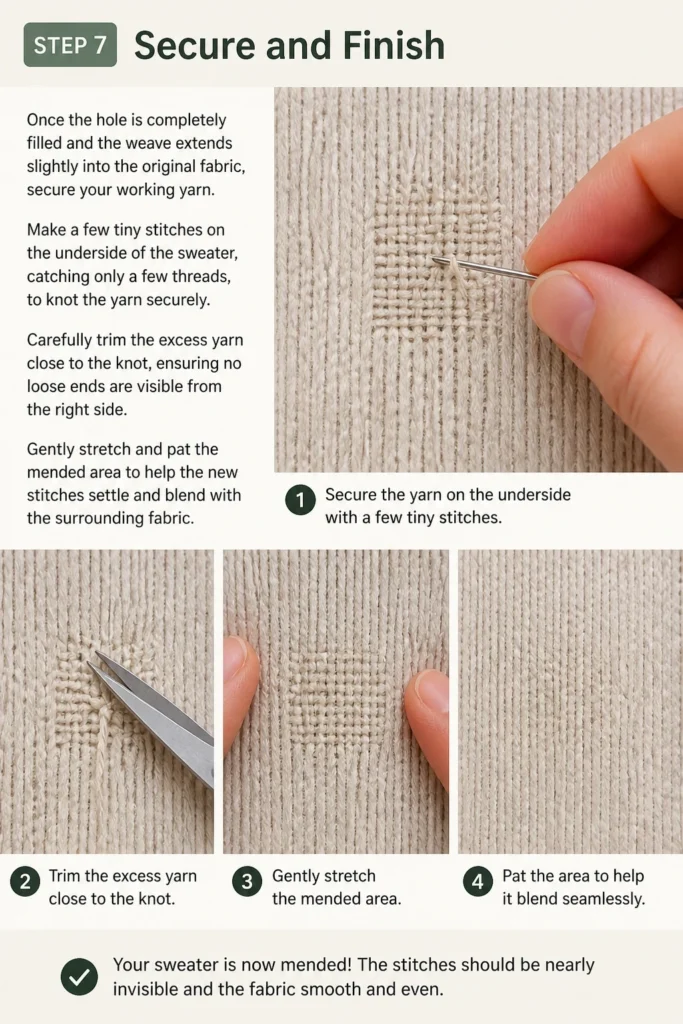
Make a few tiny stitches on the underside of the sweater, catching only a few threads, to knot the yarn securely.
Carefully trim the excess yarn close to the knot, ensuring no loose ends are visible from the right side.
Gently stretch and pat the mended area to help the new stitches settle and blend with the surrounding fabric.
Common Mistakes to Avoid
Using the Wrong Needle
Attempting to darn with a sharp sewing needle can damage the sweater’s delicate knit fibers. A sharp tip will pierce and break individual strands, weakening the fabric around the repair.
Always opt for a blunt-tipped darning needle. Its rounded tip slips between the existing yarn loops without splitting them, preserving the integrity of your sweater.
Pulling Stitches Too Tight
Over-tightening your stitches is a common pitfall that leads to puckering and distortion in the fabric. This creates an obvious, stiff patch that doesn’t drape naturally with the rest of the sweater.
Aim for a relaxed, consistent tension that mimics the stretch and give of the original knit. The mended area should feel pliable, not rigid.
Not Extending the Repair Beyond the Hole
Stopping your darning precisely at the edge of the hole leaves the surrounding, weakened fabric vulnerable to future unraveling. This often results in the hole reappearing or expanding.
Always extend your woven patch slightly beyond the original damaged area, anchoring it firmly into the healthy, intact fabric. This reinforces the edges and provides a more durable mend.
Using Non-Matching Yarn
Choosing yarn that differs significantly in fiber content, weight, or color from the original sweater will make the repair stand out. The patch will have a different texture and appearance, detracting from the sweater’s overall look.
Strive for the closest possible match in all aspects. If an exact match is unavailable, choose a slightly darker shade or a complementary color for a deliberate, visible mend, rather than an ill-matched attempt at invisibility.
Troubleshooting
Patch Feels Stiff or Puckered
If your mended area feels rigid or causes the fabric to gather, it’s likely due to overly tight stitching. This is a common issue for beginners.
Gently try to loosen some of the stitches by carefully working them with your darning needle. If the puckering is severe, you might need to carefully unpick a few rows and re-stitch them with looser tension.
Hole Reappears or Expands
A recurring hole suggests the original repair wasn’t robust enough or didn’t extend far enough into the stable fabric. The surrounding weakened areas might have given way.
Unpick the previous repair completely and start over, ensuring you extend your new woven patch at least 1/4 to 1/2 inch beyond the original hole’s perimeter, anchoring it firmly into strong, undamaged fabric.
Yarn Keeps Tangling
Long lengths of yarn are prone to tangling, causing frustration and delays. This often happens when working with fuzzy or multi-ply yarns.
Use shorter lengths of yarn, around 18-24 inches, to minimize tangles. If a tangle forms, stop immediately and gently untangle it before continuing, rather than pulling through forcefully.
Key Takeaways
- Always use a blunt-tipped darning needle to protect sweater fibers.
- Select yarn that closely matches the sweater’s fiber, weight, and color for the best result.
- Stabilize the hole’s edges with small running stitches before darning to prevent further unraveling.
- Create a sturdy woven patch by first laying horizontal threads, then weaving vertical threads over and under.
- Maintain consistent, relaxed tension throughout the darning process to avoid puckering.
- Extend the mended area slightly beyond the original hole into the intact fabric for durability.
Frequently Asked Questions
Can I fix a hole in any type of sweater?
Most sweater types can be mended using the darning technique, from wool and cashmere to cotton and acrylic. The key is to use a matching yarn that complements the original fiber for the best outcome.
How do I choose the right color yarn?
For an invisible mend, aim for an exact color match. If you can’t find one, a slightly darker shade or a variegated yarn that includes the sweater’s color can blend surprisingly well. You can also embrace a contrasting color for a visible, decorative repair.
What if the hole is very large?
Very large holes (over an inch or two) can still be darned, but they require more patience and skill. You might consider reinforcing the area with an iron-on patch or a fabric backing before darning, or even converting it into a decorative patch rather than an invisible mend.
Can I wash the sweater after darning?
Yes, once the mend is complete and the yarn is securely fastened, you can wash the sweater according to its usual care instructions. The darning technique creates a durable repair that withstands normal wear and washing.
Our Top Recommended Finds
- Darning Needle Set: A multi-pack with various sizes ensures you have the right needle for any yarn weight.
- Darning Mushroom/Egg: This simple tool provides a stable surface, making darning much easier and neater.
- Assorted Yarn Scraps Kit: Ideal for mending, offering a variety of colors and fiber types to match most sweaters.
Give Your Beloved Sweaters a New Lease on Life
Don’t let a small hole be the end of a cherished sweater. With a little patience and the right technique, you can easily restore it to its former glory.
Embrace the satisfaction of repairing rather than replacing, adding a personal touch to your wardrobe.
Gather your supplies today and begin your first sweater mending project – your favorite cozy garments will thank you.
Beginner-friendly templates, step-by-step guides,
and weekly project ideas in your inbox.