🔑 How To Make A Keychain With Beads

Beginner-friendly templates, step-by-step guides,
and weekly project ideas in your inbox.
Creating your own beaded keychain is a wonderfully rewarding craft. It’s a fantastic way to express your style or make a personalized gift for someone special.
I’ve made countless keychains over the years, from simple designs to intricate patterns, and I’m excited to share all my practical tips to help you succeed.
This guide will walk you through each part of the process, ensuring you craft a beautiful and durable keychain that you’ll love.
Quick Overview
You’re about to embark on a fun crafting journey, culminating in a unique, handmade keychain. You’ll learn essential beading techniques and finish with a personalized accessory.
- Time needed: 30-60 minutes (depending on complexity)
- Difficulty: Beginner
- What you’ll need: Beads, stringing material, keychain ring, basic tools
Step-by-Step Instructions
Step 1: Gather Your Supplies
Preparation is key for any crafting project. Having all your materials organized before you start makes the entire process much smoother and more enjoyable.
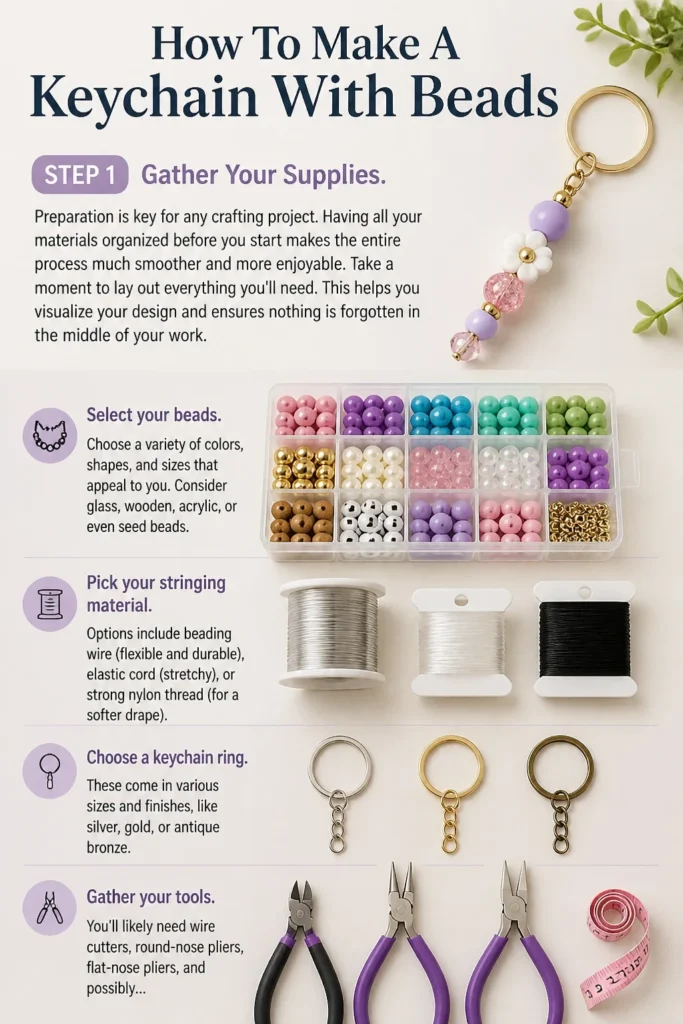
Take a moment to lay out everything you’ll need. This helps you visualize your design and ensures nothing is forgotten in the middle of your work.
- Select your beads. Choose a variety of colors, shapes, and sizes that appeal to you. Consider glass, wooden, acrylic, or even seed beads.
- Pick your stringing material. Options include beading wire (flexible and durable), elastic cord (stretchy), or strong nylon thread (for a softer drape).
- Choose a keychain ring. These come in various sizes and finishes, like silver, gold, or antique bronze.
- Gather your tools. You’ll likely need wire cutters, round-nose pliers, flat-nose pliers, and possibly crimping pliers if using beading wire.
- Decide if you want extra embellishments like charms or tassels.
Pro Tip: Lay out your chosen beads in the order you plan to string them. This helps you visualize the final design and make adjustments before committing.
Step 2: Plan Your Design
Before stringing, it’s helpful to have a clear vision for your keychain. A well-planned design saves time and ensures a cohesive, attractive end product.
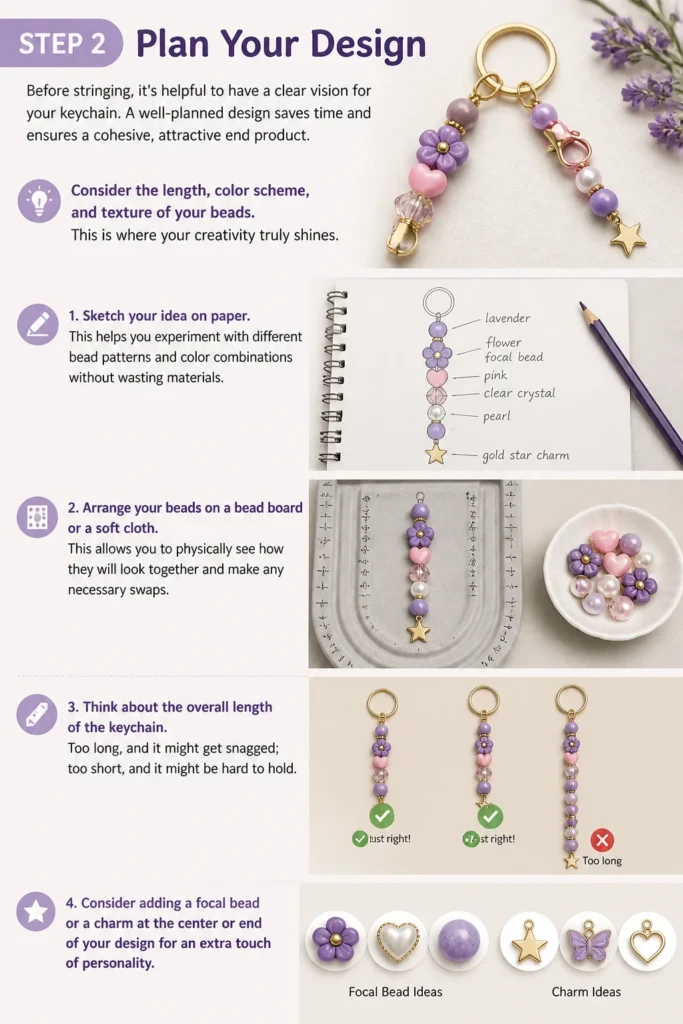
Consider the length, color scheme, and texture of your beads. This is where your creativity truly shines.
- Sketch your idea on paper. This helps you experiment with different bead patterns and color combinations without wasting materials.
- Arrange your beads on a bead board or a soft cloth. This allows you to physically see how they will look together and make any necessary swaps.
- Think about the overall length of the keychain. Too long, and it might get snagged; too short, and it might be hard to hold.
- Consider adding a focal bead or a charm at the center or end of your design for an extra touch of personality.
Step 3: Cut Your Stringing Material
The right length of stringing material is crucial. Too short, and you won’t have enough to finish; too long, and it can become tangled and difficult to manage.
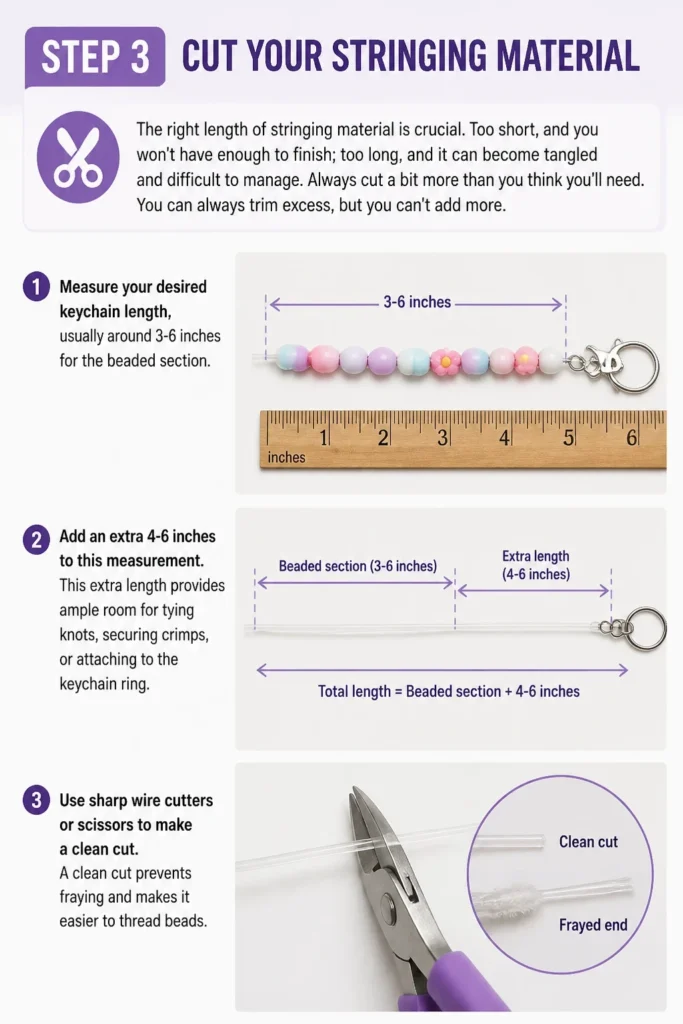
Always cut a bit more than you think you’ll need. You can always trim excess, but you can’t add more.
- Measure your desired keychain length, usually around 3-6 inches for the beaded section.
- Add an extra 4-6 inches to this measurement. This extra length provides ample room for tying knots, securing crimps, or attaching to the keychain ring.
- Use sharp wire cutters or scissors to make a clean cut. A clean cut prevents fraying and makes it easier to thread beads.
Step 4: Start Stringing Your Beads
Now comes the fun part: bringing your design to life! Threading beads onto your chosen material requires a steady hand and a little patience.
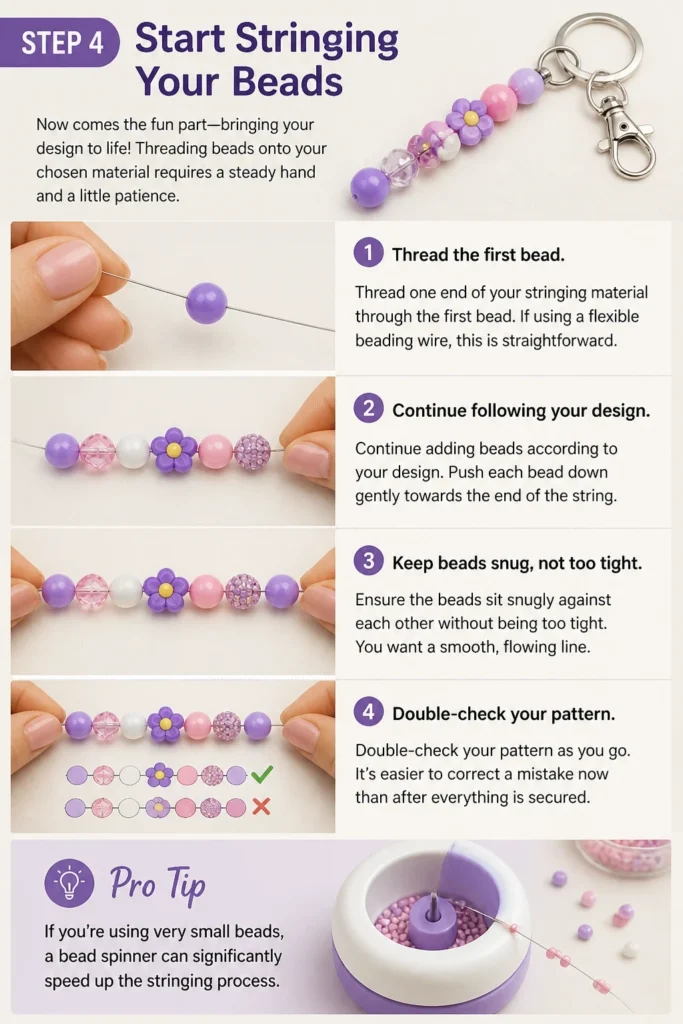
Follow your pre-planned pattern carefully. This ensures your keychain looks exactly as you envisioned it.
- Thread one end of your stringing material through the first bead. If using a flexible beading wire, this is straightforward.
- Continue adding beads according to your design. Push each bead down gently towards the end of the string.
- Ensure the beads sit snugly against each other without being too tight. You want a smooth, flowing line.
- Double-check your pattern as you go. It’s easier to correct a mistake now than after everything is secured.
Pro Tip: If you’re using very small beads, a bead spinner can significantly speed up the stringing process. For delicate work, a pair of tweezers can help position beads.
Step 5: Attach to the Keychain Ring (Method 1: Loop and Crimp)
This method is ideal for beading wire, offering a very secure and professional finish. It ensures your beads stay firmly in place.
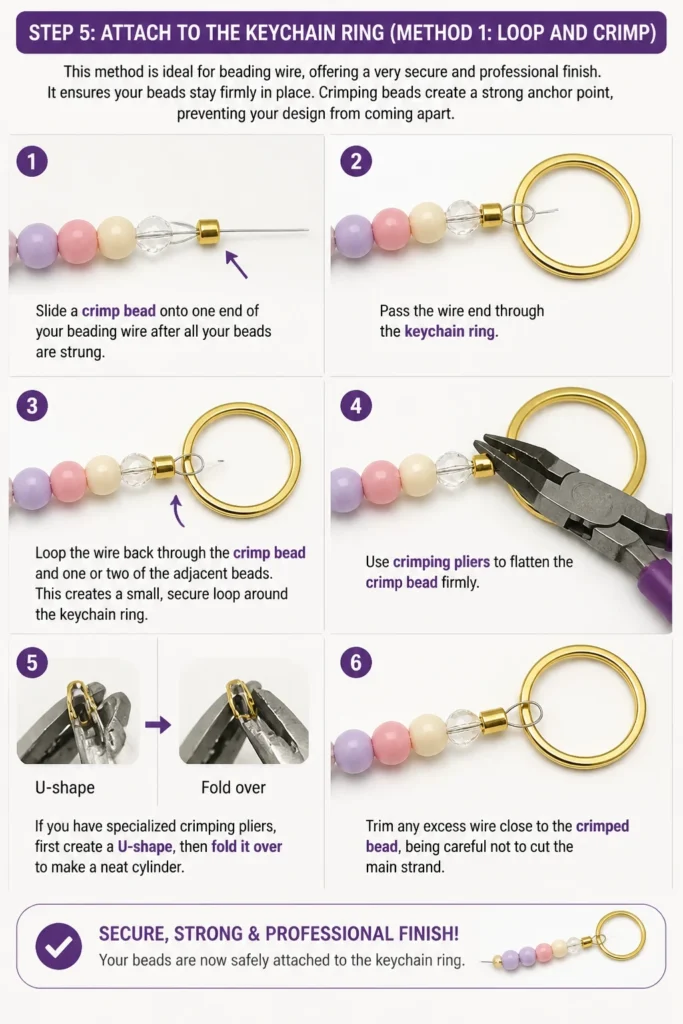
Crimping beads create a strong anchor point, preventing your design from coming apart.
- Slide a crimp bead onto one end of your beading wire after all your beads are strung.
- Pass the wire end through the keychain ring.
- Loop the wire back through the crimp bead and one or two of the adjacent beads. This creates a small, secure loop around the keychain ring.
- Use crimping pliers to flatten the crimp bead firmly. If you have specialized crimping pliers, first create a U-shape, then fold it over to make a neat cylinder.
- Trim any excess wire close to the crimped bead, being careful not to cut the main strand.
Step 6: Finish the Other End (Method 1: Loop and Crimp)
Securing the second end is just as important as the first. This completes the loop and locks all your beads onto the keychain.
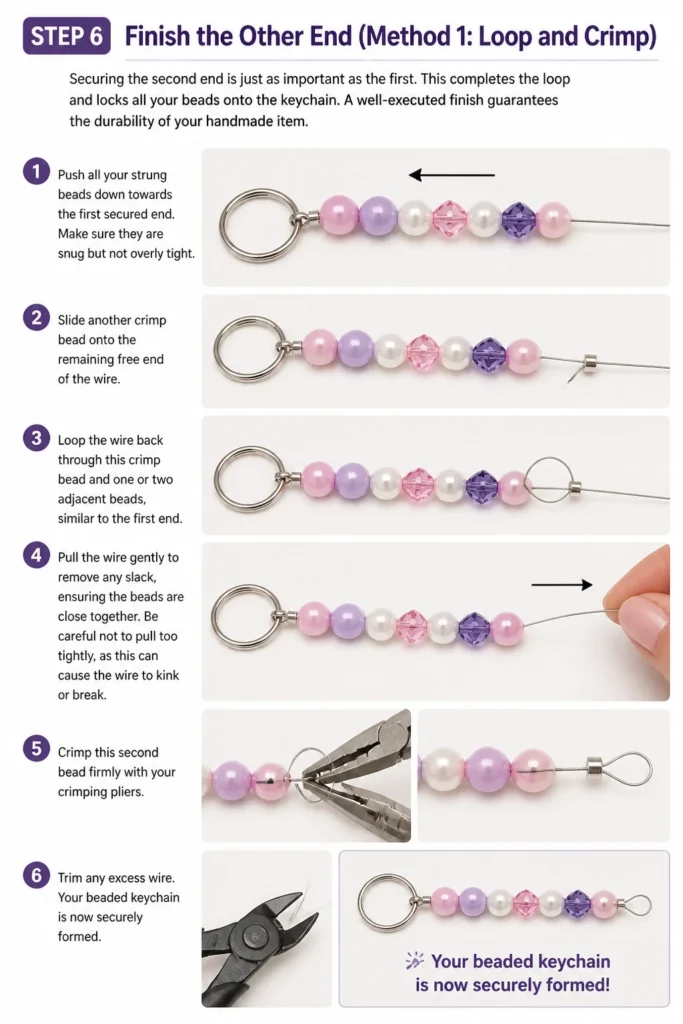
A well-executed finish guarantees the durability of your handmade item.
- Push all your strung beads down towards the first secured end. Make sure they are snug but not overly tight.
- Slide another crimp bead onto the remaining free end of the wire.
- Loop the wire back through this crimp bead and one or two adjacent beads, similar to the first end.
- Pull the wire gently to remove any slack, ensuring the beads are close together. Be careful not to pull too tightly, as this can cause the wire to kink or break.
- Crimp this second bead firmly with your crimping pliers.
- Trim any excess wire. Your beaded keychain is now securely formed.
Step 7: Attach to the Keychain Ring (Method 2: Knotting for Cord/Thread)
If you’re using elastic cord or strong nylon thread, knotting is the primary method to secure your keychain. This provides flexibility and a softer feel.
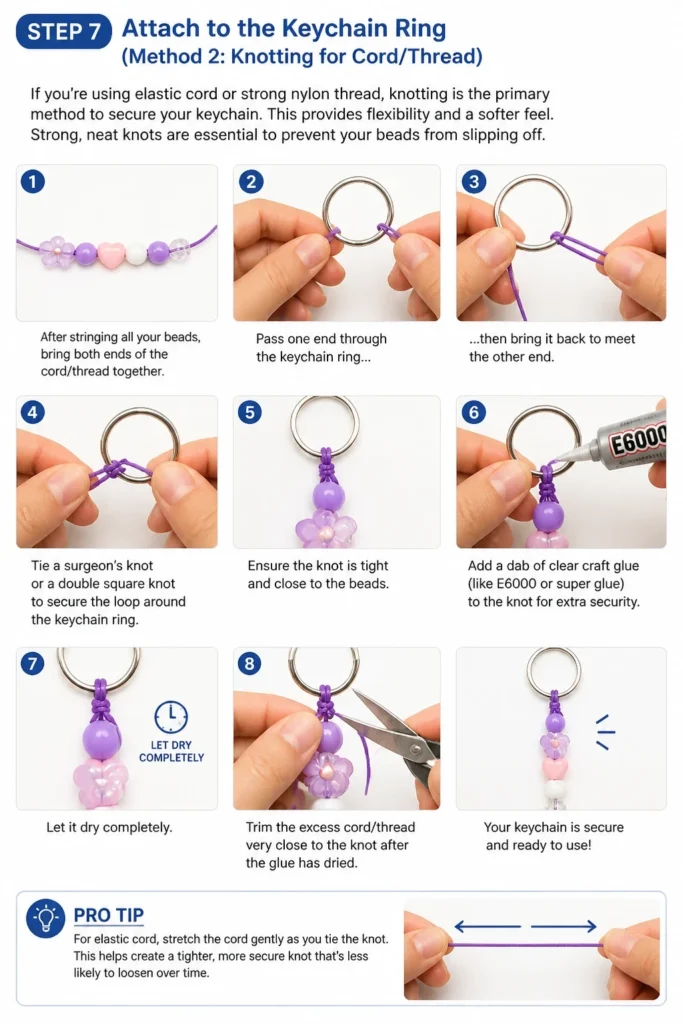
Strong, neat knots are essential to prevent your beads from slipping off.
- After stringing all your beads, bring both ends of the cord/thread together.
- Pass one end through the keychain ring, then bring it back to meet the other end.
- Tie a surgeon’s knot or a double square knot to secure the loop around the keychain ring. Ensure the knot is tight and close to the beads.
- Add a dab of clear craft glue (like E6000 or super glue) to the knot for extra security. Let it dry completely.
- Trim the excess cord/thread very close to the knot after the glue has dried.
Pro Tip: For elastic cord, stretch the cord gently as you tie the knot. This helps create a tighter, more secure knot that won’t loosen over time.
Common Mistakes to Avoid
Using Weak Stringing Material
Choosing the wrong stringing material is a frequent oversight. Flimsy thread or thin fishing line might seem convenient, but it won’t stand up to daily use.
Your keychain will likely break, scattering beads and causing frustration. Always invest in quality beading wire, strong nylon thread, or durable elastic cord designed for jewelry making.
Over-Tightening or Under-Tightening
Finding the right tension is crucial. If you pull your stringing material too tightly, the beads won’t lie properly, and the wire or cord can kink or break under stress.
If it’s too loose, there will be gaps between your beads, and the keychain will look messy and less durable. Aim for snugness where beads touch but can still move slightly.
Poorly Secured Crimps or Knots
The weakest point of any beaded item is often where it’s secured. Rushed crimping or loose knots are an open invitation for your keychain to fall apart.
Take your time with crimps, ensuring they are flattened or folded correctly. For knots, pull them as tightly as possible and consider adding a drop of glue for extra peace of mind.
Ignoring Bead Hole Sizes
Not all beads have the same size hole. Trying to force a thick wire through a tiny seed bead, or using thin thread with large-holed beads, can lead to problems.
The wire might fray, or the thread might slip out. Always match your stringing material thickness to your bead hole size for a smooth, secure fit.
Troubleshooting
Beads Are Not Lying Flat/Evenly
This often happens when the tension of your stringing material is inconsistent. If some sections are too tight and others too loose, the beads will look uneven.
Carefully go back through your beads, gently pushing them together to redistribute the tension. If using crimps, you might need to re-crimp to achieve even spacing. For knotted designs, gently pull the cord from both ends to even out the slack before tying the final knot.
Keychain Feels Flimsy or Weak
A flimsy keychain usually points to either using too thin a stringing material or not securing the ends properly. The material might not be strong enough for the weight of your beads.
Consider using a thicker gauge beading wire or a stronger cord. Reinforce your crimps by double-checking their tightness or add a second crimp bead for extra security. For knots, ensure they are tightly pulled and consider adding a small amount of clear craft glue to prevent loosening.
Difficulty Threading Small Beads
Tiny bead holes can be a challenge, especially with flexible wire or fraying thread. This can be frustrating and slow down your progress significantly.
Use a bead needle, which is a very fine, flexible needle designed for small beads. Alternatively, stiffen the end of your thread with a tiny bit of clear nail polish or super glue, allowing it to dry before threading. For wire, ensure your wire cutters make a very clean, sharp cut to avoid flattened ends.
Key Takeaways
- Preparation is paramount: Gather all supplies and plan your design before you start stringing beads.
- Choose quality materials: Durable stringing material and secure findings are essential for a long-lasting keychain.
- Master tension: String beads snugly but not too tightly to ensure a smooth, flexible result.
- Secure ends properly: Take extra care with crimps or knots, as these are critical for the keychain’s integrity.
- Personalize your creation: Don’t be afraid to experiment with different bead types, colors, and charms to make it uniquely yours.
- Double-check your work: Review your design and security points throughout the process to catch mistakes early.
Frequently Asked Questions
Can I use any type of bead for a keychain?
Generally, yes, but consider durability. Glass, wooden, and acrylic beads are excellent choices. Avoid very fragile beads like hollow glass or delicate pearls if the keychain will see heavy daily use, as they might break or chip easily.
How do I make sure the knots don’t come undone?
For cord or thread, use strong knots like a surgeon’s knot or a double square knot. After tying, add a small drop of clear craft glue (like E6000) directly onto the knot. Allow it to dry completely before trimming any excess material.
What’s the best stringing material for beginners?
For beginners, flexible beading wire (like beading wire with multiple strands) is often easiest to work with as it’s less prone to tangling than thread and less stretchy than elastic cord. It also holds its shape well, making it simple to string beads.
Can I add charms or tassels to my beaded keychain?
Absolutely! Charms and tassels add wonderful personality. You can attach them to the keychain ring itself using a jump ring, or you can incorporate them directly into your beaded design by attaching them to a loop created with your stringing material before securing the end.
Our Top Recommended Finds
- Assorted Bead Kit: A starter kit with various beads, colors, and sometimes even tools is perfect for getting started and experimenting.
- Flexible Beading Wire Spool: Investing in a good quality, multi-strand beading wire ensures durability and ease of use for many projects.
- Jewelry Pliers Set: A basic set including round-nose, flat-nose, and wire cutters will cover most of your crafting needs for keychains and other small jewelry items.
Your Next Creative Adventure Awaits!
You’ve now learned how to craft a beautiful, personalized keychain with beads. This simple project is more than just a craft; it’s a stepping stone into the wonderful world of beading and jewelry making.
Why stop at one? Experiment with new colors, different bead shapes, or even try incorporating letter beads to spell out names or inspiring words.
Consider making these keychains as thoughtful, handmade gifts for friends and family. Each one will carry a piece of your creativity.
Grab your supplies today and transform ordinary beads into extraordinary, functional art!
Beginner-friendly templates, step-by-step guides,
and weekly project ideas in your inbox.