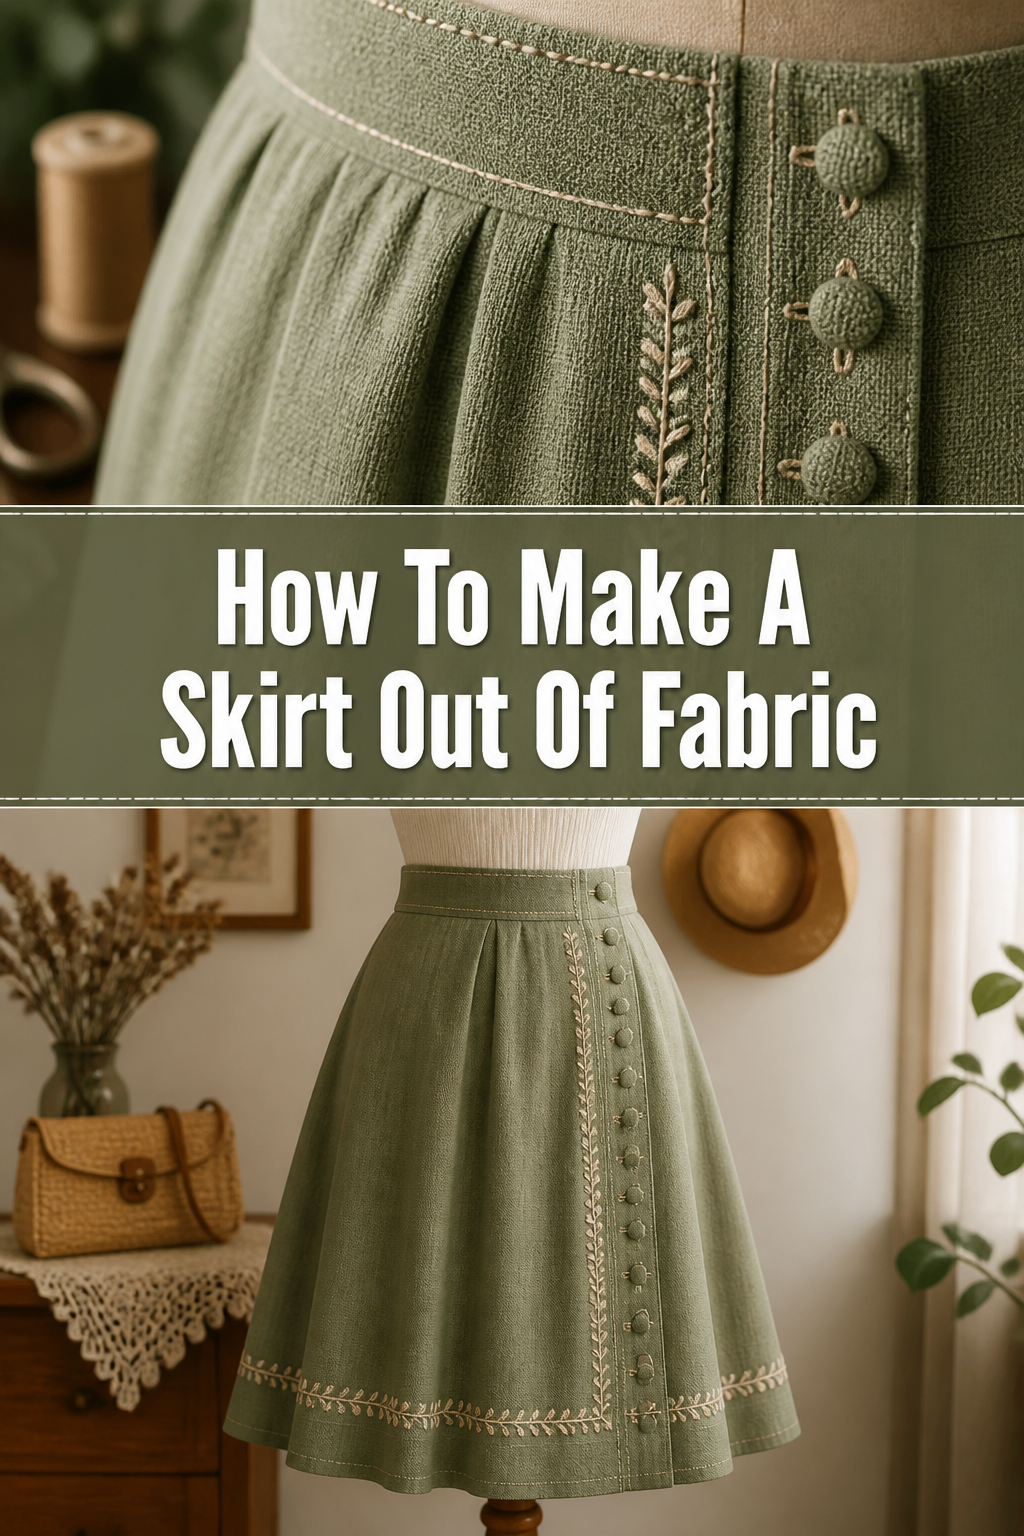
🧵 How To Make A Skirt Out Of Fabric

Beginner-friendly templates, step-by-step guides,
and weekly project ideas in your inbox.
There’s a unique satisfaction that comes from wearing something you’ve created with your own hands.
I still remember the joy of sewing my very first skirt, transforming a simple piece of fabric into a wearable garment.
This guide draws from years of practical sewing experience, offering clear, actionable steps to help you achieve that same rewarding feeling.
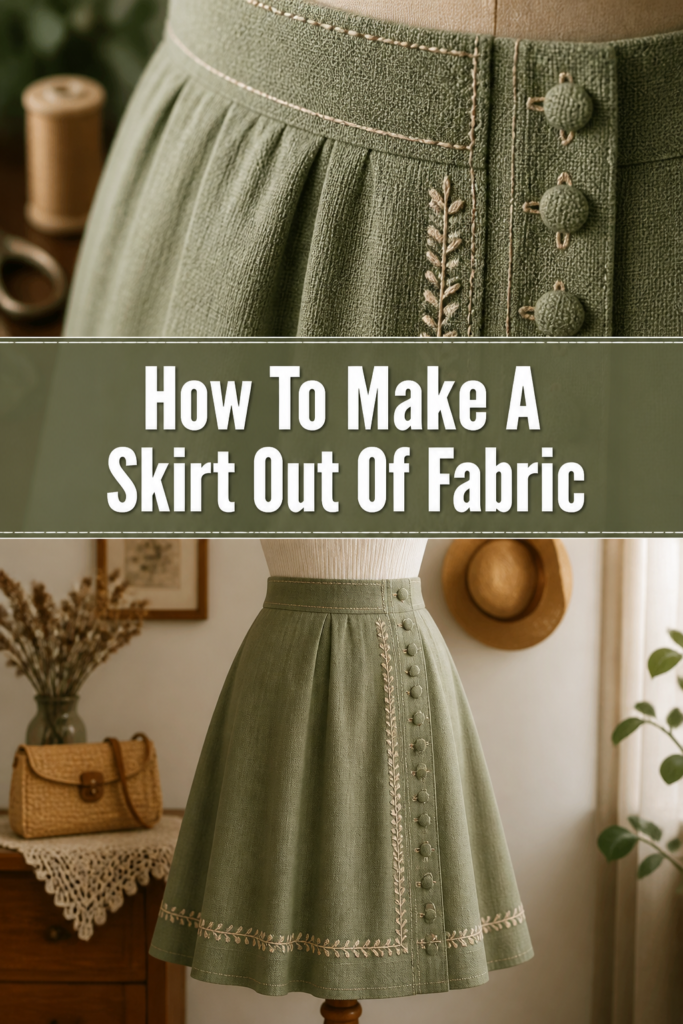
Quick Overview
This guide will walk you through the entire process of crafting a simple, custom-fit skirt from scratch.
You’ll learn essential techniques from measuring and cutting to sewing seams and finishing details, resulting in a beautiful, handmade garment.
- Time needed: 4-7 hours (depending on experience and skirt style)
- Difficulty: Beginner
- What you’ll need: Fabric, sewing machine, thread, measuring tape, scissors, pins, iron, elastic or zipper.
Step-by-Step Instructions
Step 1: Gather Your Tools and Fabric
Before you begin, ensure you have all your necessary supplies neatly organized.
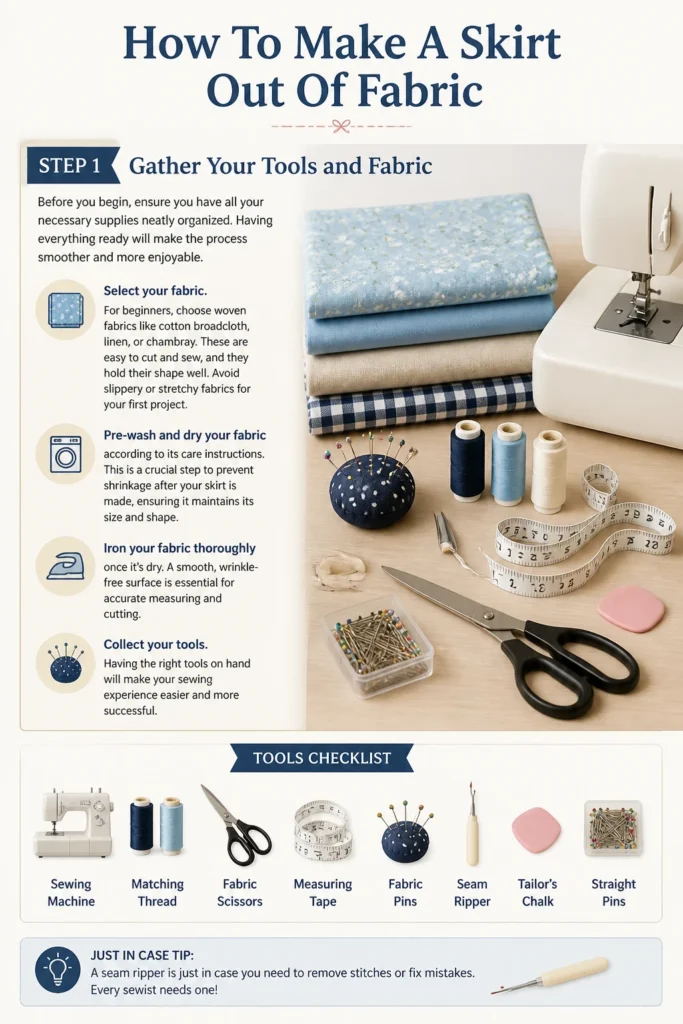
Having everything ready will make the process smoother and more enjoyable.
- Select your fabric. For beginners, choose woven fabrics like cotton broadcloth, linen, or chambray. These are easy to cut and sew, and they hold their shape well. Avoid slippery or stretchy fabrics for your first project.
- Pre-wash and dry your fabric according to its care instructions. This is a crucial step to prevent shrinkage after your skirt is made, ensuring it maintains its size and shape.
- Iron your fabric thoroughly once it’s dry. A smooth, wrinkle-free surface is essential for accurate measuring and cutting.
- Collect your sewing machine, matching thread, sharp fabric scissors, a measuring tape, fabric pins, a seam ripper (just in case!), and an iron and ironing board.
- Choose your waistband closure: elastic for a pull-on style, or a zipper and button for a fitted waistband.
Pro Tip: Invest in a good pair of fabric shears. They make a huge difference in cutting accuracy and overall sewing enjoyment. Keep them exclusively for fabric to maintain their sharpness.
Step 2: Take Accurate Measurements
Precise measurements are the foundation of a well-fitting skirt.
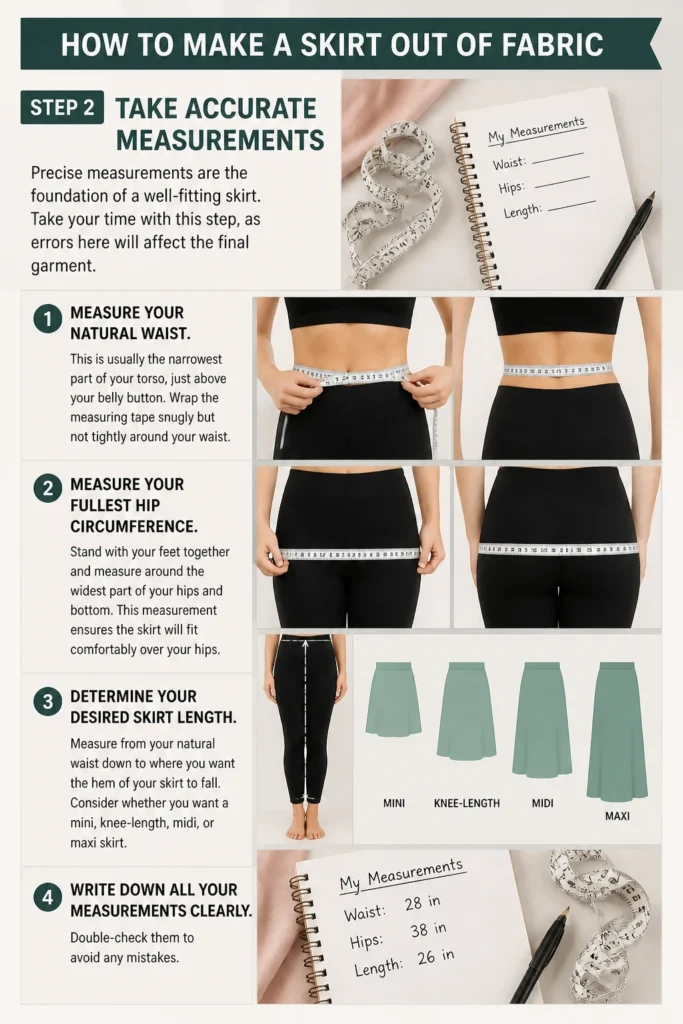
Take your time with this step, as errors here will affect the final garment.
- Measure your natural waist. This is usually the narrowest part of your torso, just above your belly button. Wrap the measuring tape snugly but not tightly around your waist.
- Measure your fullest hip circumference. Stand with your feet together and measure around the widest part of your hips and bottom. This measurement ensures the skirt will fit comfortably over your hips.
- Determine your desired skirt length. Measure from your natural waist down to where you want the hem of your skirt to fall. Consider whether you want a mini, knee-length, midi, or maxi skirt.
- Write down all your measurements clearly. Double-check them to avoid any mistakes.
Step 3: Draft Your Pattern Pieces
For a simple gathered or A-line skirt, you don’t need a complex commercial pattern.
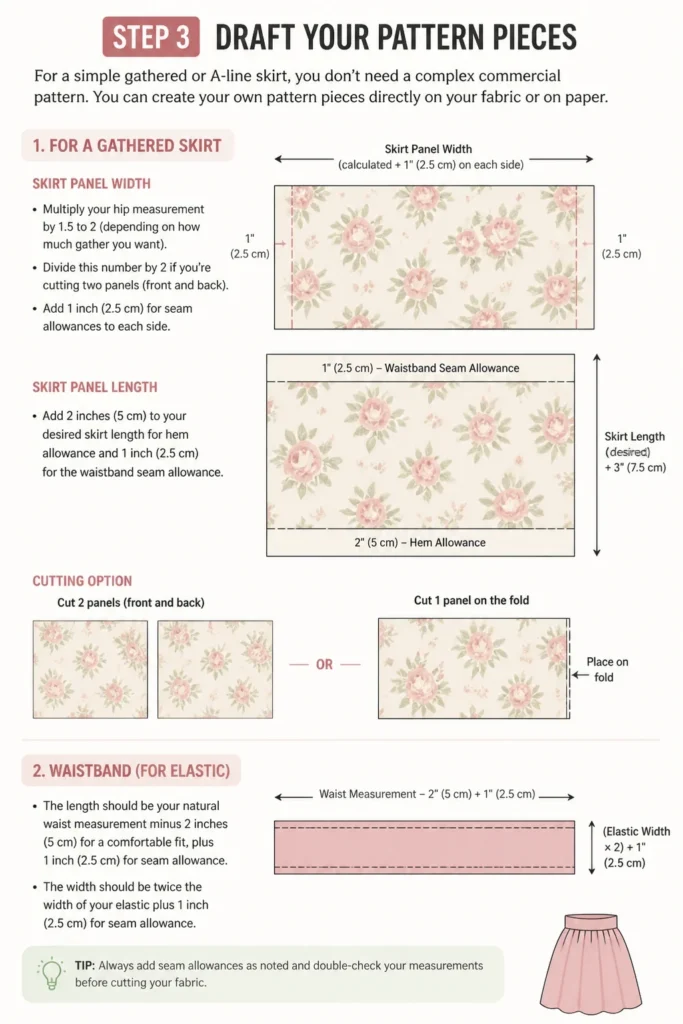
You can create your own pattern pieces directly on your fabric or on paper.
- For a gathered skirt:
- Skirt Panel Width: Multiply your hip measurement by 1.5 to 2 (depending on how much gather you want). Divide this number by 2 if you’re cutting two panels (front and back). Add 1 inch (2.5 cm) for seam allowances to each side.
- Skirt Panel Length: Add 2 inches (5 cm) to your desired skirt length for hem allowance and 1 inch (2.5 cm) for the waistband seam allowance.
- Waistband (for elastic): The length should be your natural waist measurement minus 2 inches (5 cm) for a comfortable fit, plus 1 inch (2.5 cm) for seam allowance. The width should be twice the width of your elastic plus 1 inch (2.5 cm) for seam allowances.
- For a simple A-line skirt:
- This style is slightly more structured. You’ll typically cut two identical trapezoid shapes, wider at the bottom than the top.
- Top Width (Waist): Take your natural waist measurement, divide by 2, and add 1 inch (2.5 cm) for seam allowances.
- Bottom Width (Hem): This can be your hip measurement divided by 2, plus 4-6 inches (10-15 cm) for flare, plus 1 inch (2.5 cm) for seam allowances.
- Length: Same as gathered skirt: desired length + 2 inches (5 cm) for hem + 1 inch (2.5 cm) for waistband seam.
- Waistband (fitted with zipper): Your natural waist measurement plus 1 inch (2.5 cm) for seam allowances. Width is 2 inches (5 cm) plus 1 inch (2.5 cm) for seam allowances.
Pro Tip: If you’re unsure about the pattern, use an old sheet or inexpensive muslin fabric to create a “wearable muslin.” This allows you to test the fit and make adjustments before cutting into your good fabric.
Step 4: Cut Your Fabric
Accuracy in cutting is just as important as accuracy in measuring.
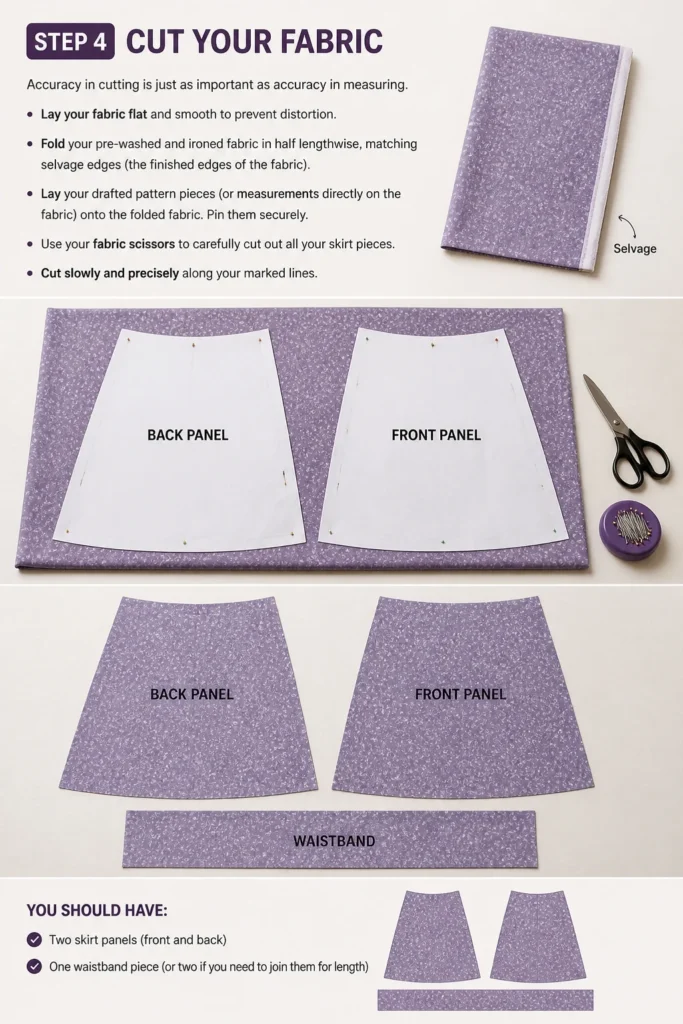
Lay your fabric flat and smooth to prevent distortion.
- Fold your pre-washed and ironed fabric in half lengthwise, matching selvage edges (the finished edges of the fabric).
- Lay your drafted pattern pieces (or measurements directly on the fabric) onto the folded fabric. Pin them securely.
- Use your fabric scissors to carefully cut out all your skirt pieces. Cut slowly and precisely along your marked lines.
- You should have:
- Two skirt panels (front and back)
- One waistband piece (or two if you need to join them for length)
Step 5: Prepare the Skirt Panels
Now it’s time to bring your skirt panels together.
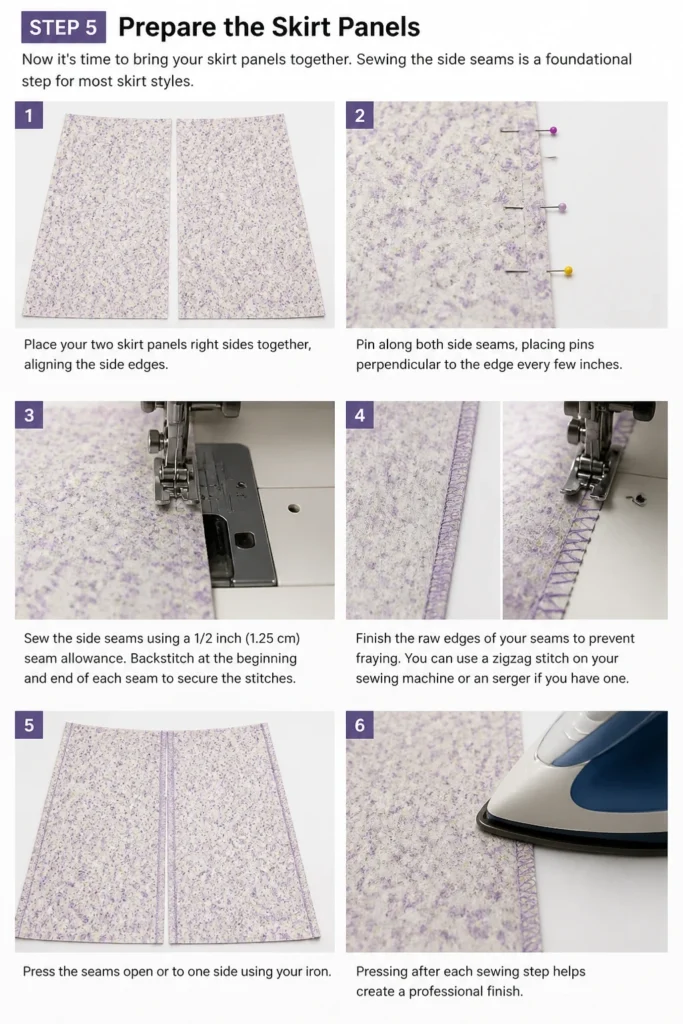
Sewing the side seams is a foundational step for most skirt styles.
- Place your two skirt panels right sides together, aligning the side edges.
- Pin along both side seams, placing pins perpendicular to the edge every few inches.
- Sew the side seams using a 1/2 inch (1.25 cm) seam allowance. Backstitch at the beginning and end of each seam to secure the stitches.
- Finish the raw edges of your seams to prevent fraying. You can use a zigzag stitch on your sewing machine or an serger if you have one.
- Press the seams open or to one side using your iron. Pressing after each sewing step helps create a professional finish.
Step 6: Create the Waistband
The waistband is crucial for both fit and comfort.
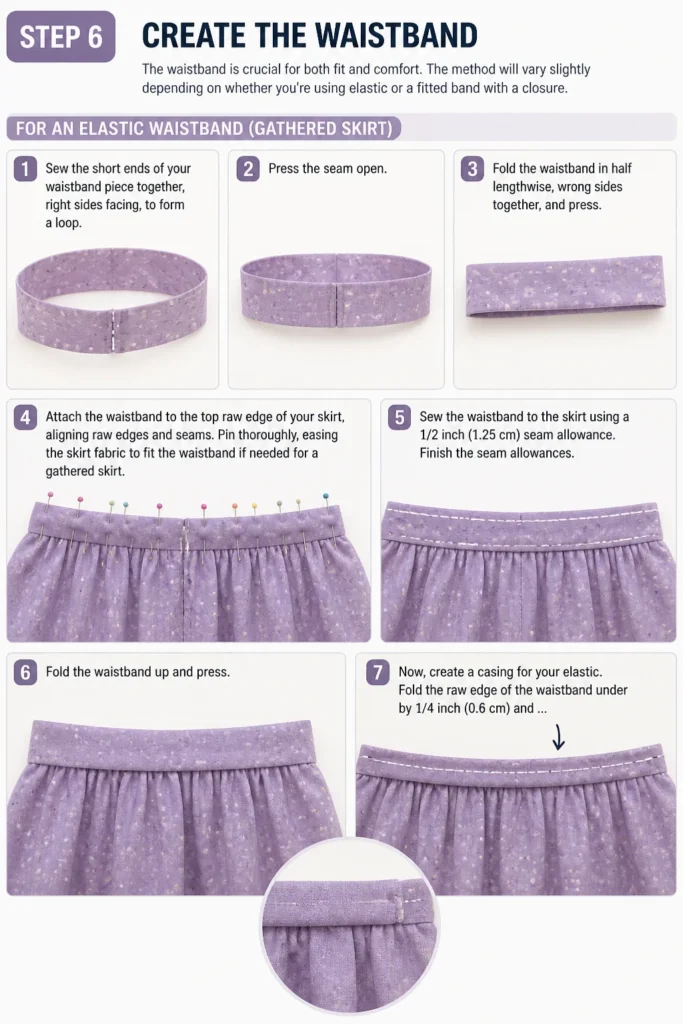
The method will vary slightly depending on whether you’re using elastic or a fitted band with a closure.
- For an elastic waistband (gathered skirt):
- Sew the short ends of your waistband piece together, right sides facing, to form a loop. Press the seam open.
- Fold the waistband in half lengthwise, wrong sides together, and press.
- Attach the waistband to the top raw edge of your skirt, aligning raw edges and seams. Pin thoroughly, easing the skirt fabric to fit the waistband if needed for a gathered skirt.
- Sew the waistband to the skirt using a 1/2 inch (1.25 cm) seam allowance. Finish the seam allowances.
- Fold the waistband up and press. Now, create a casing for your elastic. Fold the raw edge of the waistband under by 1/4 inch (0.6 cm) and press. Then fold it again so that the folded edge just covers your previous stitching line on the inside of the skirt.
- Pin in place and stitch close to the folded edge, leaving a 2-inch (5 cm) opening.
- Insert your elastic: Attach a safety pin to one end of your elastic and thread it through the casing. Be careful not to twist the elastic.
- Overlap the elastic ends by 1 inch (2.5 cm) and stitch them together securely.
- Stitch the opening in the casing closed.
- For a fitted waistband (A-line skirt with closure):
- Prepare the skirt opening: If using a zipper, you’ll need to leave one side seam partially unsewn where the zipper will go.
- Sew the waistband piece into a loop (if it’s a continuous band) or prepare it as a flat band that will attach to the skirt, leaving ends free for a closure.
- Attach the waistband to the top edge of the skirt, right sides together, aligning raw edges. Stitch, then press the seam allowances up into the waistband.
- Fold the waistband over the raw edge to the inside of the skirt. Press and stitch in place, either by hand or by machine “in the ditch” of the previous seam.
- Insert your zipper or other chosen closure into the designated opening.
Pro Tip: When inserting elastic, use a safety pin on both ends of the elastic. This prevents one end from accidentally disappearing into the casing while you’re threading the other.
Step 7: Hem the Skirt
The hem is the final touch that gives your skirt a polished, professional look.
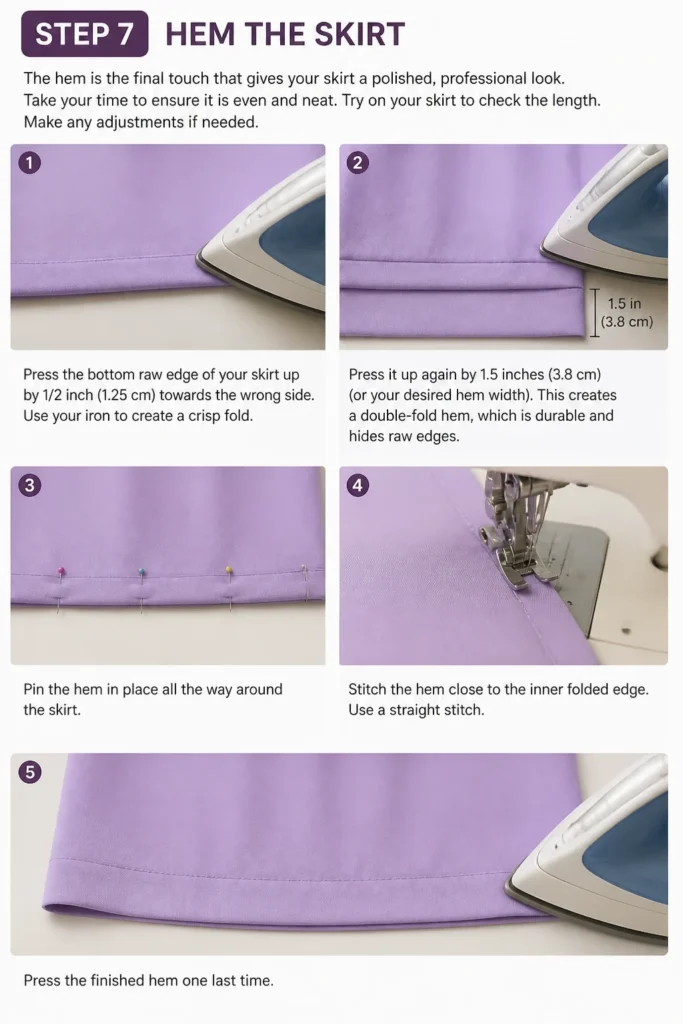
Take your time to ensure it is even and neat.
- Try on your skirt to check the length. Make any adjustments if needed.
- Press the bottom raw edge of your skirt up by 1/2 inch (1.25 cm) towards the wrong side. Use your iron to create a crisp fold.
- Press it up again by 1.5 inches (3.8 cm) (or your desired hem width). This creates a double-fold hem, which is durable and hides raw edges.
- Pin the hem in place all the way around the skirt.
- Stitch the hem close to the inner folded edge. Use a straight stitch.
- Press the finished hem one last time.
Step 8: Add Fastenings (If Needed)
If your skirt design requires a closure beyond an elastic waistband, now is the time to add it.
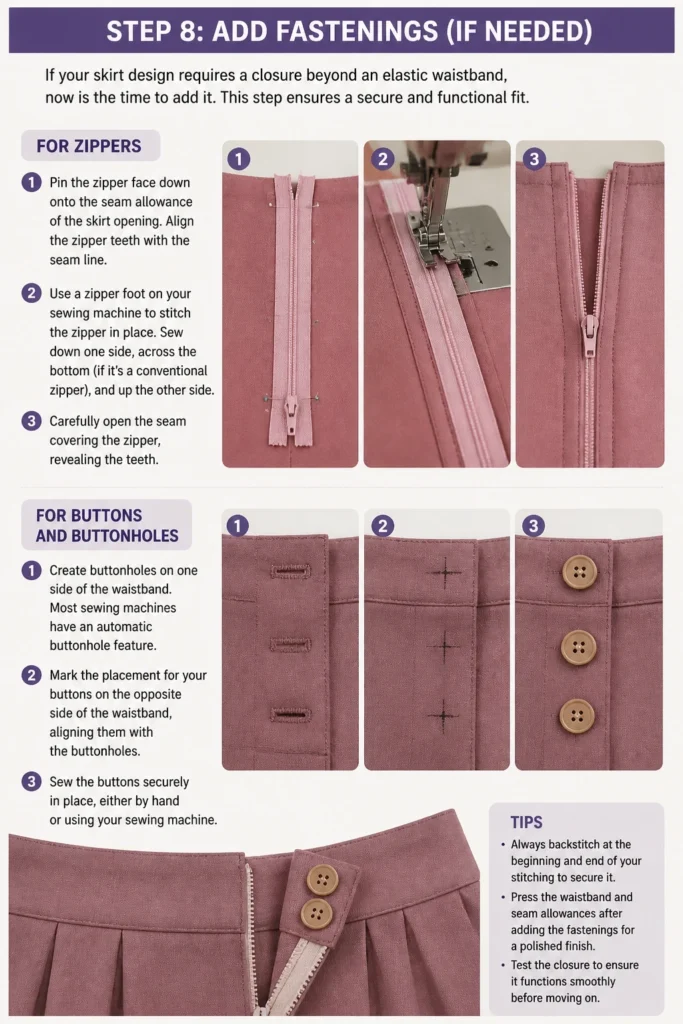
This step ensures a secure and functional fit.
- For zippers:
- Pin the zipper face down onto the seam allowance of the skirt opening. Align the zipper teeth with the seam line.
- Use a zipper foot on your sewing machine to stitch the zipper in place. Sew down one side, across the bottom (if it’s a conventional zipper), and up the other side.
- Carefully open the seam covering the zipper, revealing the teeth.
- For buttons and buttonholes:
- Create buttonholes on one side of the waistband. Most sewing machines have an automatic buttonhole feature.
- Mark the placement for your buttons on the opposite side of the waistband, aligning them with the buttonholes.
- Sew the buttons securely in place, either by hand or machine.
Pro Tip: Practice sewing a zipper or buttonhole on a scrap piece of fabric first. This builds confidence and helps you master the technique before working on your actual garment.
Common Mistakes to Avoid
Incorrect Measurements
Using inaccurate waist or hip measurements will inevitably lead to a skirt that simply doesn’t fit well. It will either be too tight and uncomfortable, or too loose and prone to slipping down.
Always double-check your measurements and consider using a mirror to ensure the tape measure is level all around your body.
Skipping Pre-Washing Fabric
Many fabrics, especially cottons and linens, are prone to shrinking the first time they are washed. If you don’t pre-wash your fabric, your perfectly fitting skirt might become too small after its first trip through the laundry.
Always wash and dry your fabric exactly as you plan to wash the finished garment, then iron it smooth before cutting.
Not Finishing Seams
Leaving raw fabric edges inside your skirt will lead to significant fraying over time, especially with repeated wear and washing. This weakens the seams and can make your skirt fall apart prematurely.
Use a zigzag stitch, an overlock stitch, or an serger on all raw seam allowances to enclose or trim them, making your garment much more durable.
Rushing the Hem
A poorly executed hem can instantly make an otherwise well-made garment look amateurish. Uneven, wavy, or puckered hems are common results of rushing this final step.
Take your time pressing, pinning, and stitching the hem. Use a seam gauge for consistent fold widths, and press thoroughly at each stage.
Troubleshooting
Skirt is Too Tight or Too Loose
If your skirt feels too tight, you might be able to let out the side seams slightly by unpicking the stitching and re-sewing with a smaller seam allowance, if you left enough fabric.
If it’s too loose, carefully unpick the side seams and re-sew them with a larger seam allowance, taking in a little more fabric on each side until the fit is comfortable.
Hem is Wavy or Uneven
This often happens when the fabric is stretched while sewing or not pressed properly. First, try pressing the hem again with plenty of steam to relax the fabric.
If it remains wavy, unpick a section of the hem, re-press the fold lines carefully, and re-pin more densely before re-stitching slowly, ensuring you don’t stretch the fabric as you sew.
Stitches are Skipping or Bunching
Skipping stitches usually indicates a dull or incorrect needle. Ensure you are using a sharp, appropriately sized needle for your fabric type (e.g., universal needle for wovens).
Bunching or tangled thread often means your machine isn’t threaded correctly or the tension is off. Re-thread both the top thread and the bobbin, ensuring the presser foot is up when threading the top, and test on a scrap piece of fabric.
Key Takeaways
- Accurate body measurements are fundamental for a well-fitting skirt.
- Always pre-wash and iron your fabric to prevent shrinkage and ensure smooth cutting.
- Finishing raw seams with a zigzag stitch or serger significantly increases garment durability.
- Pressing seams after each step is crucial for a professional and neat finish.
- Patience and attention to detail, especially during cutting and hemming, yield the best results.
- Don’t be afraid to use a seam ripper; it’s a tool for perfection, not a sign of failure.
Frequently Asked Questions
What’s the best fabric for a beginner skirt?
For your first skirt, opt for stable woven fabrics like quilting cotton, broadcloth, linen, chambray, or denim. These fabrics are easy to cut, don’t stretch, and are forgiving to sew, making them ideal for learning.
Can I make this skirt without a sewing machine?
Yes, it is possible to hand-sew a skirt. However, it will take significantly more time and patience. Use a strong running stitch for seams and a neat slip stitch for the hem. A machine will provide stronger, more consistent stitches much faster.
How do I choose the right elastic for my waistband?
For a comfortable elastic waistband, choose braided or knitted elastic that is at least 1 inch (2.5 cm) wide. The wider the elastic, the less likely it is to roll or twist inside the casing. Measure it to be slightly smaller than your waist for a snug fit.
What if my skirt ends up crooked or uneven?
Unevenness can stem from inaccurate cutting, stretching fabric while sewing, or an inconsistent hem. Re-pressing the fabric can sometimes correct minor issues. For more significant problems, carefully unpick the relevant seam or hem, re-measure, re-cut, and re-sew with extra care, ensuring the fabric lies flat.
Our Top Recommended Finds
- Good Quality Fabric Shears: Sharp scissors specifically for fabric make a world of difference in cutting accuracy and prevent frayed edges.
- Self-Healing Cutting Mat and Rotary Cutter: This duo offers speed and precision for cutting straight lines, especially helpful for skirt panels and waistbands.
- Iron and Ironing Board: An essential for pressing seams flat and creating crisp folds, leading to a much more professional-looking finished garment.
Your Handmade Skirt Awaits!
Congratulations on embarking on your skirt-making journey!
Each stitch you make is a step towards building a unique, custom wardrobe that truly reflects your style.
Don’t be afraid to experiment with different fabrics, lengths, and embellishments as your skills grow.
Wear your new handmade skirt with pride, knowing you created it with your own hands, and let it be the first of many sewing adventures.
Beginner-friendly templates, step-by-step guides,
and weekly project ideas in your inbox.