🌹 How To Make Roses Out Of Pipe Cleaners

Beginner-friendly templates, step-by-step guides,
and weekly project ideas in your inbox.
Creating beautiful roses from simple pipe cleaners is a surprisingly rewarding craft.
I remember making my first pipe cleaner rose, feeling a real sense of accomplishment as the petals took shape.
This guide shares all the practical tips and tricks I’ve learned, ensuring your project turns out perfectly.

Quick Overview
You’re about to transform fuzzy wires into elegant, lasting floral art. This project is both fun and incredibly satisfying.
- Time needed: 30-60 minutes per rose (after initial practice)
- Difficulty: Beginner
- What you’ll need: Pipe cleaners (various colors), scissors, a ruler (optional)
Step-by-Step Instructions
Step 1: Gather Your Supplies
Before you begin, make sure all your materials are within reach. Organization helps the process flow smoothly.
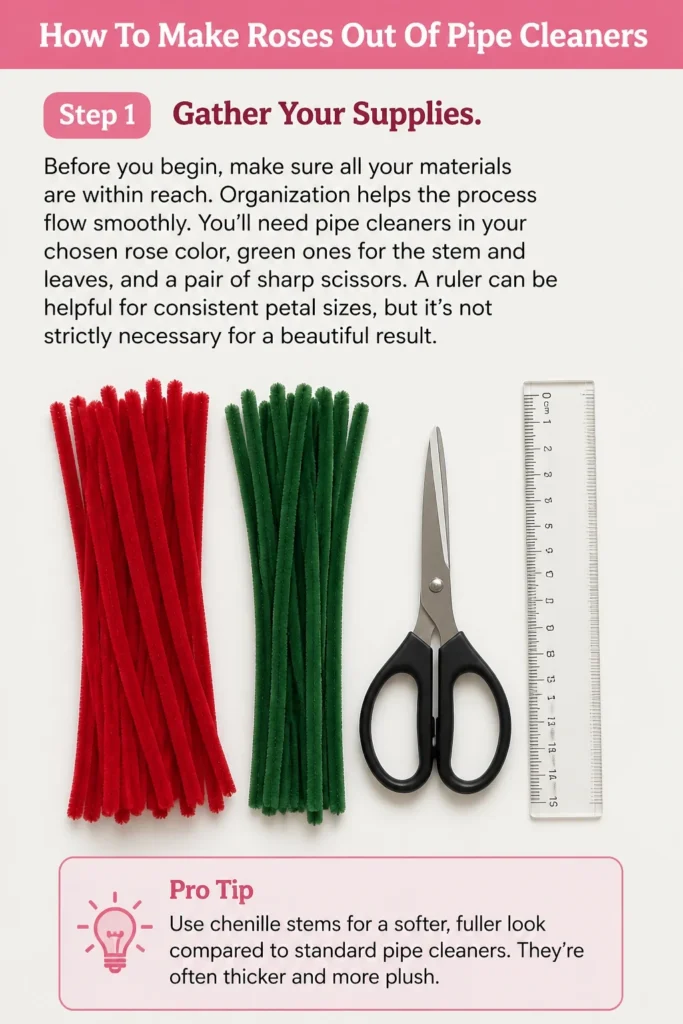
You’ll need pipe cleaners in your chosen rose color, green ones for the stem and leaves, and a pair of sharp scissors.
A ruler can be helpful for consistent petal sizes, but it’s not strictly necessary for a beautiful result.
Pro Tip: Use “chenille stems” for a softer, fuller look compared to standard pipe cleaners. They’re often thicker and more plush.
Step 2: Form the Rose’s Heart
Take one pipe cleaner in your main rose color. This will become the central bud of your flower.
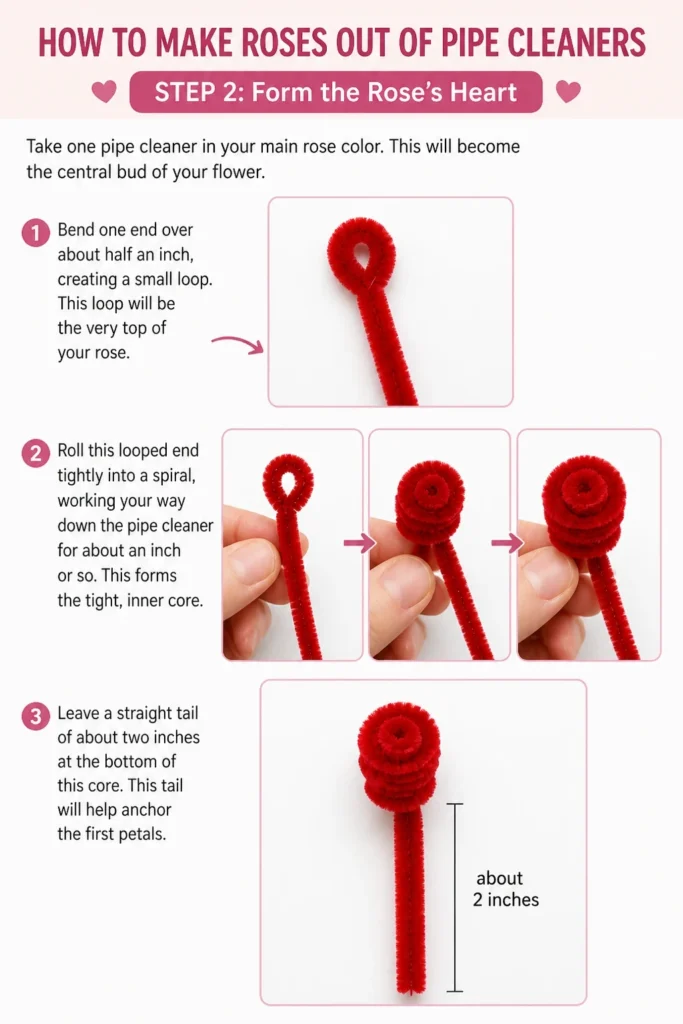
Bend one end over about half an inch, creating a small loop. This loop will be the very top of your rose.
Roll this looped end tightly into a spiral, working your way down the pipe cleaner for about an inch or so. This forms the tight, inner core.
Leave a straight “tail” of about two inches at the bottom of this core. This tail will help anchor the first petals.
Step 3: Craft the First Petals
Grab another pipe cleaner in your chosen rose color. Cut it into three equal pieces, each about 4 inches long.
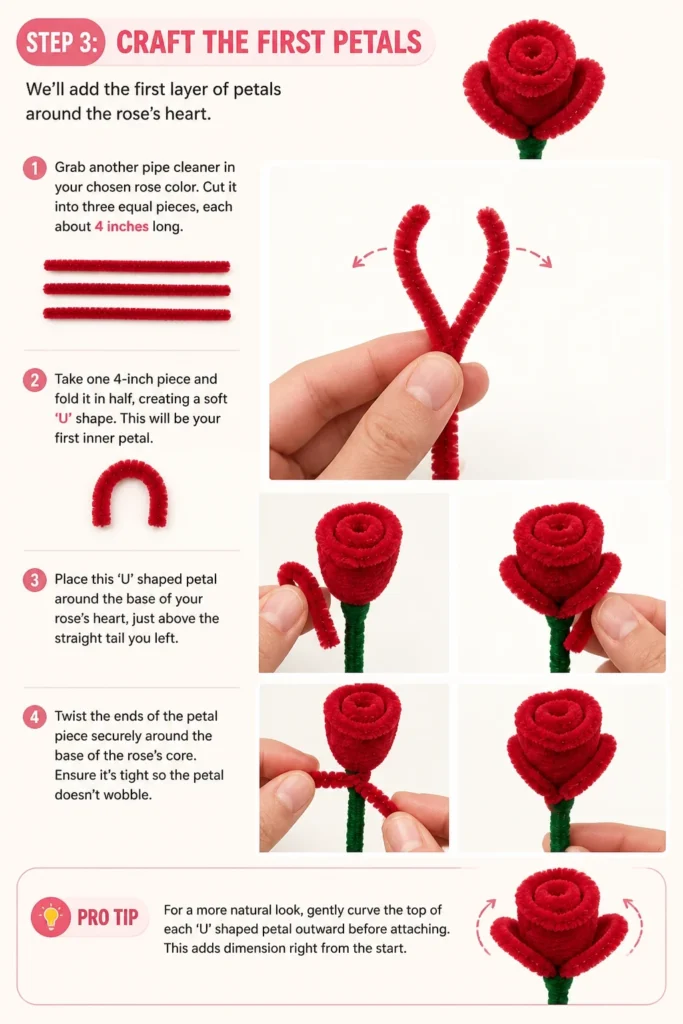
Take one 4-inch piece and fold it in half, creating a soft ‘U’ shape. This will be your first inner petal.
Place this ‘U’ shaped petal around the base of your rose’s heart, just above the straight tail you left.
Twist the ends of the petal piece securely around the base of the rose’s core. Ensure it’s tight so the petal doesn’t wobble.
Pro Tip: For a more natural look, gently curve the top of each ‘U’ shaped petal outward before attaching. This adds dimension right from the start.
Step 4: Building the Rose’s Body
Repeat the process from Step 3 with the remaining two 4-inch pipe cleaner pieces. Attach them around the core, slightly overlapping the first petal.
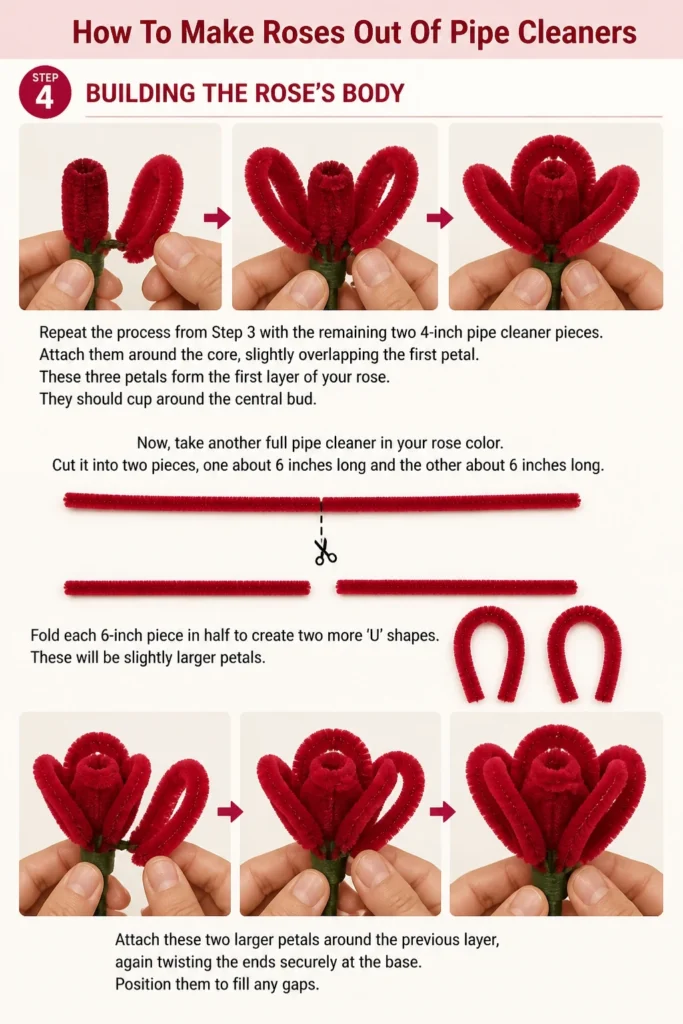
These three petals form the first layer of your rose. They should cup around the central bud.
Now, take another full pipe cleaner in your rose color. Cut it into two pieces, one about 6 inches long and the other about 6 inches long.
Fold each 6-inch piece in half to create two more ‘U’ shapes. These will be slightly larger petals.
Attach these two larger petals around the previous layer, again twisting the ends securely at the base. Position them to fill any gaps.
Step 5: Shaping for Natural Curves
As you add each petal, take a moment to gently shape it. Pipe cleaners are wonderfully pliable.
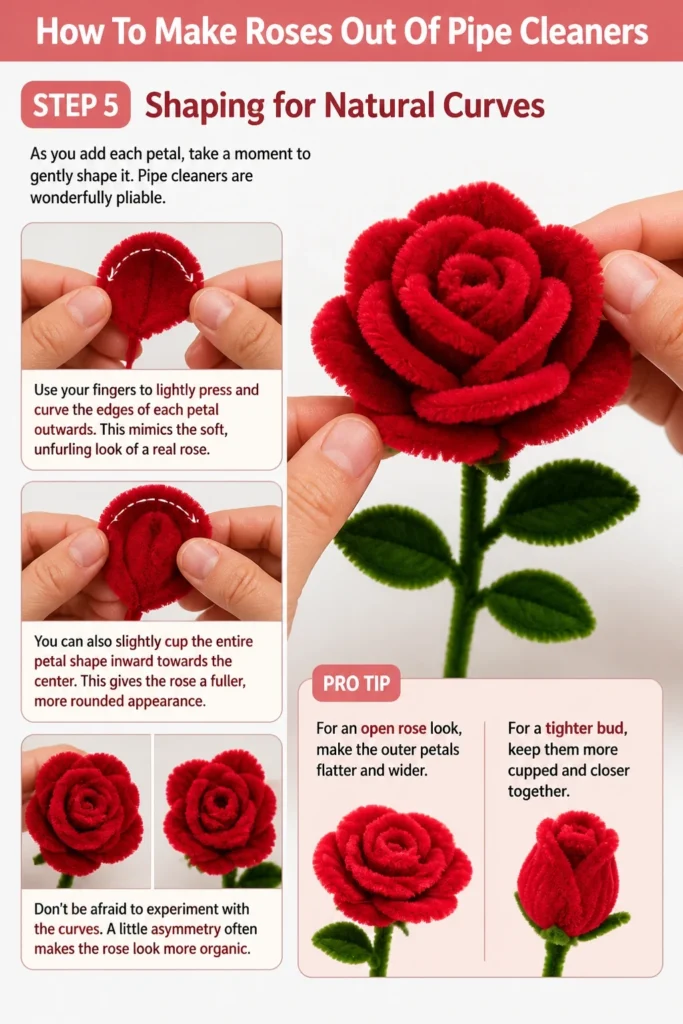
Use your fingers to lightly press and curve the edges of each petal outwards. This mimics the soft, unfurling look of a real rose.
You can also slightly cup the entire petal shape inward towards the center. This gives the rose a fuller, more rounded appearance.
Don’t be afraid to experiment with the curves. A little asymmetry often makes the rose look more organic.
Pro Tip: For an open rose look, make the outer petals flatter and wider. For a tighter bud, keep them more cupped and closer together.
Step 6: Adding the Green Calyx
Take a green pipe cleaner. Cut it into four equal pieces, each about 3 inches long. These will be the sepals, the small leaf-like structures under the rose head.
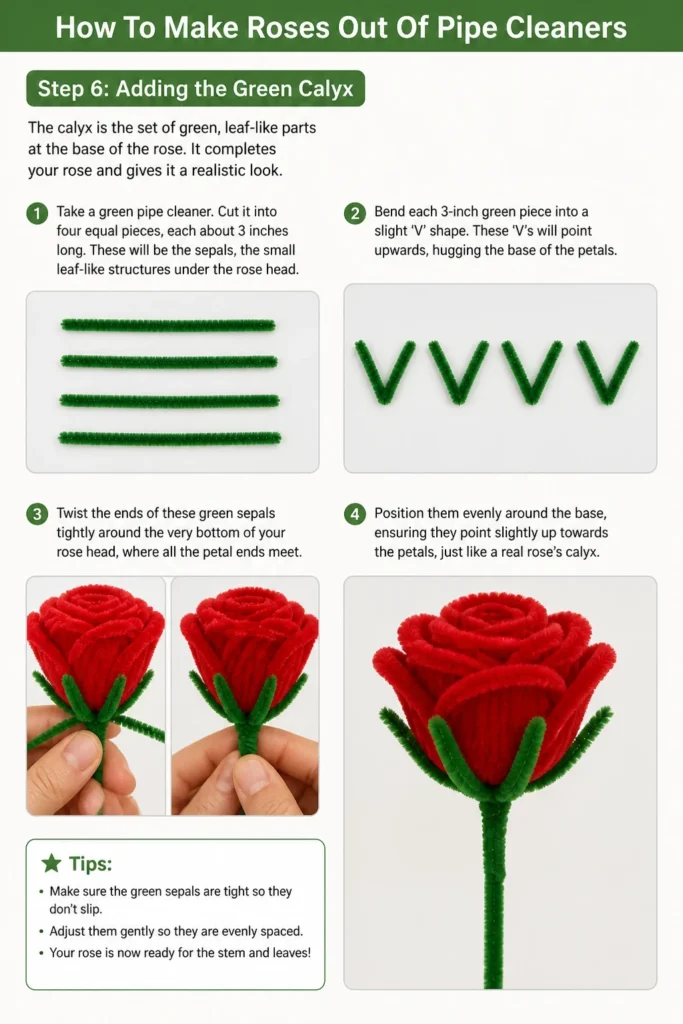
Bend each 3-inch green piece into a slight ‘V’ shape. These ‘V’s will point upwards, hugging the base of the petals.
Twist the ends of these green sepals tightly around the very bottom of your rose head, where all the petal ends meet.
Position them evenly around the base, ensuring they point slightly up towards the petals, just like a real rose’s calyx.
Step 7: Wrapping a Sturdy Stem
Now, take a full-length green pipe cleaner. This will form the main stem of your rose.
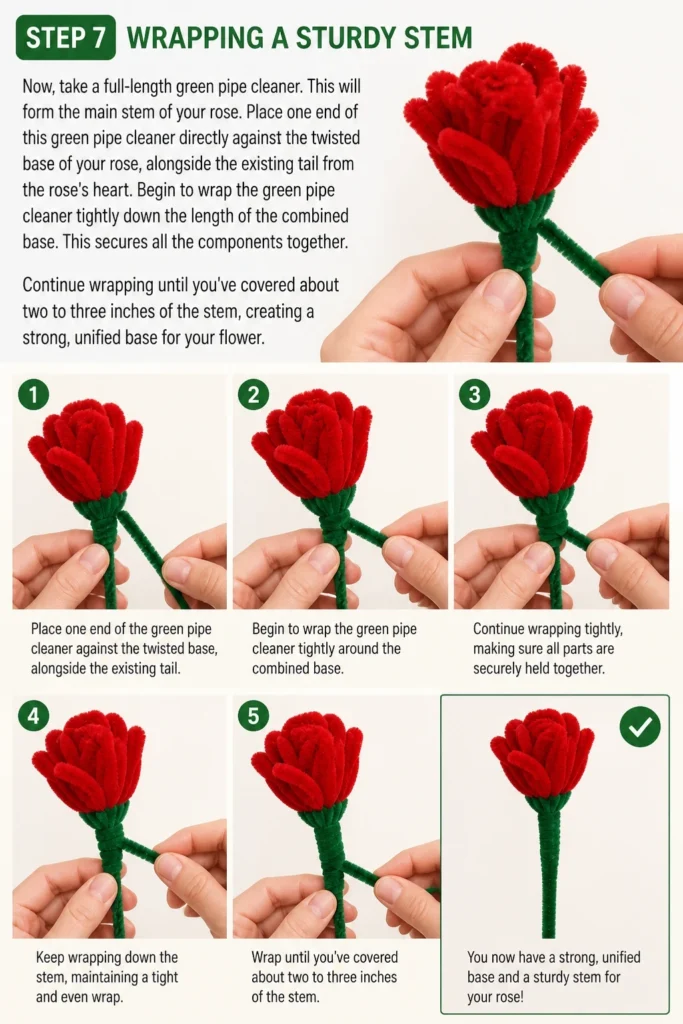
Place one end of this green pipe cleaner directly against the twisted base of your rose, alongside the existing “tail” from the rose’s heart.
Begin to wrap the green pipe cleaner tightly down the length of the combined base. This secures all the components together.
Continue wrapping until you’ve covered about two to three inches of the stem, creating a strong, unified base for your flower.
Step 8: Final Touches and Leaves
Once the stem is wrapped, give your rose a final shaping. Gently adjust any petals that seem out of place.
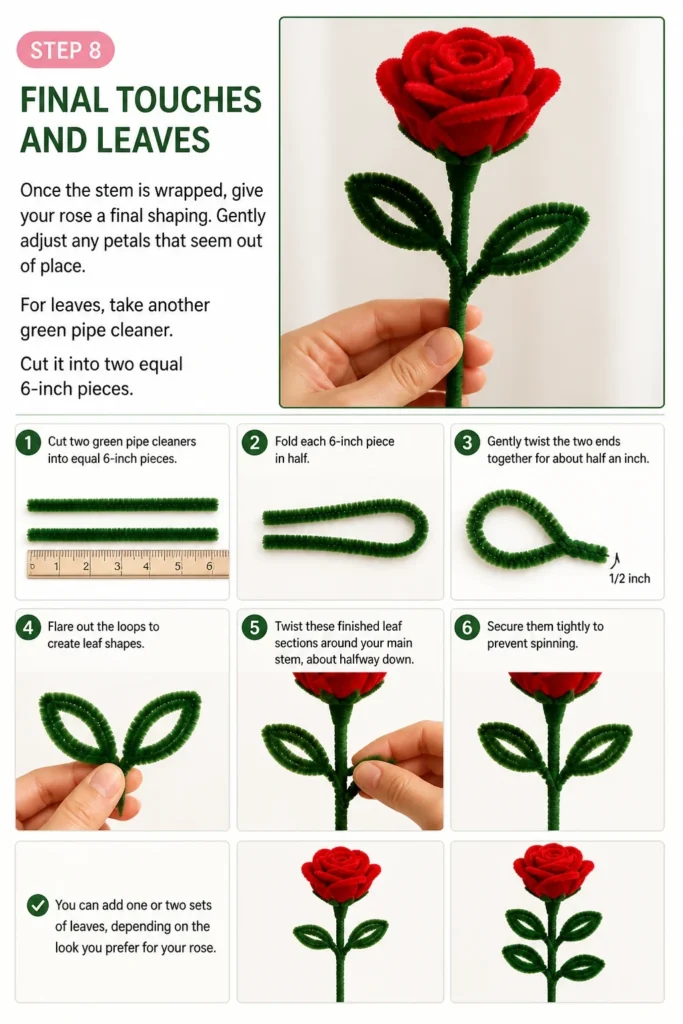
For leaves, take another green pipe cleaner. Cut it into two equal 6-inch pieces.
Fold each 6-inch piece in half, then gently twist the two ends together for about half an inch. Flare out the loops to create leaf shapes.
Twist these finished leaf sections around your main stem, about halfway down. Secure them tightly to prevent spinning.
You can add one or two sets of leaves, depending on the look you prefer for your rose.
Common Mistakes to Avoid
Using Too Few Petals
A common pitfall is not adding enough petals. A skimpy rose can look sparse and less like a real flower.
Ensure you’re using at least 6-8 individual petal pieces, built up in layers, to create a full and lush appearance.
Loose Construction
If your petals or stem feel wobbly, it means the twists aren’t tight enough. A loose rose will fall apart easily.
Always twist the ends of each petal piece very securely around the base. A firm foundation is crucial for durability.
Flat Petals
Leaving petals flat after attaching them can make your rose look two-dimensional and unnatural. Roses have depth and curves.
Remember to gently curve and cup each petal outward after attachment. This gives your rose a realistic, blooming quality.
Inconsistent Petal Sizing
While some variation is natural, wildly different petal sizes within the same layer can look messy. Aim for a gradual increase in size from the center outwards.
Cutting your pipe cleaner sections to approximate lengths before folding helps maintain a consistent, pleasing aesthetic.
Troubleshooting
Rose Looks Flimsy or Falls Apart
This usually indicates that the pipe cleaner twists connecting the petals to the base aren’t tight enough.
Carefully go back and re-twist each petal attachment point. Ensure the pipe cleaner ends are wrapped firmly around the central stem or previous layers.
You can also add a small dot of craft glue to the twisted connections for extra security, though it’s usually not needed with tight twists.
Petals Look Unnatural or Flat
The key to a realistic rose is in the shaping. Flat petals lack the organic feel of a real flower.
Gently use your thumb and forefinger to cup and curl the edges of each petal. Think about how a real rose unfurls.
You can also use a pencil or a thin dowel to help create a more pronounced curl on the outer edges of the petals.
Stem is Weak or Wobbly
A wobbly stem often means the green pipe cleaner wasn’t wrapped tightly enough, or the initial “tail” wasn’t secured.
Re-wrap the stem more firmly, making sure each coil of the green pipe cleaner is snug against the previous one.
If you’re making a larger rose, you might consider using two green pipe cleaners twisted together for a thicker, sturdier stem before wrapping.
Key Takeaways
- Start with a strong core: A tightly rolled center bud sets the foundation for your rose.
- Layer petals gradually: Build up your rose with progressively larger petals from the inside out.
- Shape each petal: Gently curving and cupping petals adds realism and dimension.
- Twist securely: Tight twists are crucial for a durable rose that holds its shape.
- Don’t forget the calyx: Green sepals at the base complete the authentic rose look.
- Practice makes perfect: Your first rose might not be flawless, but each one gets better.
Frequently Asked Questions
What kind of pipe cleaners work best?
Standard pipe cleaners work perfectly well, but “chenille stems” or “craft pipe cleaners” that are thicker and softer can give your roses a more luxurious, velvety texture.
Look for ones that are flexible but hold their shape when bent. Avoid very thin or flimsy varieties if you want a robust rose.
Can I make different size roses?
Absolutely! Adjust the length of your pipe cleaner pieces to create smaller or larger petals. Shorter pieces make a tighter, smaller rose, while longer pieces yield a grander, more open bloom.
You can also vary the number of petal layers. Fewer layers for a bud, more for a fully bloomed rose.
How do I make a bouquet?
To create a bouquet, simply make several roses in varying colors and sizes. Once finished, gather their stems together.
You can secure them with an extra green pipe cleaner wrapped tightly around the collective stems, or use floral tape for a professional finish.
Can these be washed?
Pipe cleaner roses are not generally designed to be washed. Water can cause the wire inside to rust and the fibers to lose their shape or color.
For cleaning, a light dusting with a soft brush or a gentle shake is usually sufficient to remove any accumulated dust.
Our Top Recommended Finds
- Assorted Color Pipe Cleaners: A large pack provides variety for many different rose creations.
- Craft Scissors: A sharp, comfortable pair makes cutting precise and easy.
- Floral Tape (optional): Great for wrapping stems together for a more polished bouquet look.
Craft Your Own Garden of Wonders
You now have all the knowledge to transform simple pipe cleaners into beautiful, lasting roses.
This craft is not just about the end product; it’s about the joy of creation and the satisfaction of making something with your own hands.
Gather your supplies today and begin crafting your very first pipe cleaner rose. You might just discover a new favorite hobby!
Beginner-friendly templates, step-by-step guides,
and weekly project ideas in your inbox.