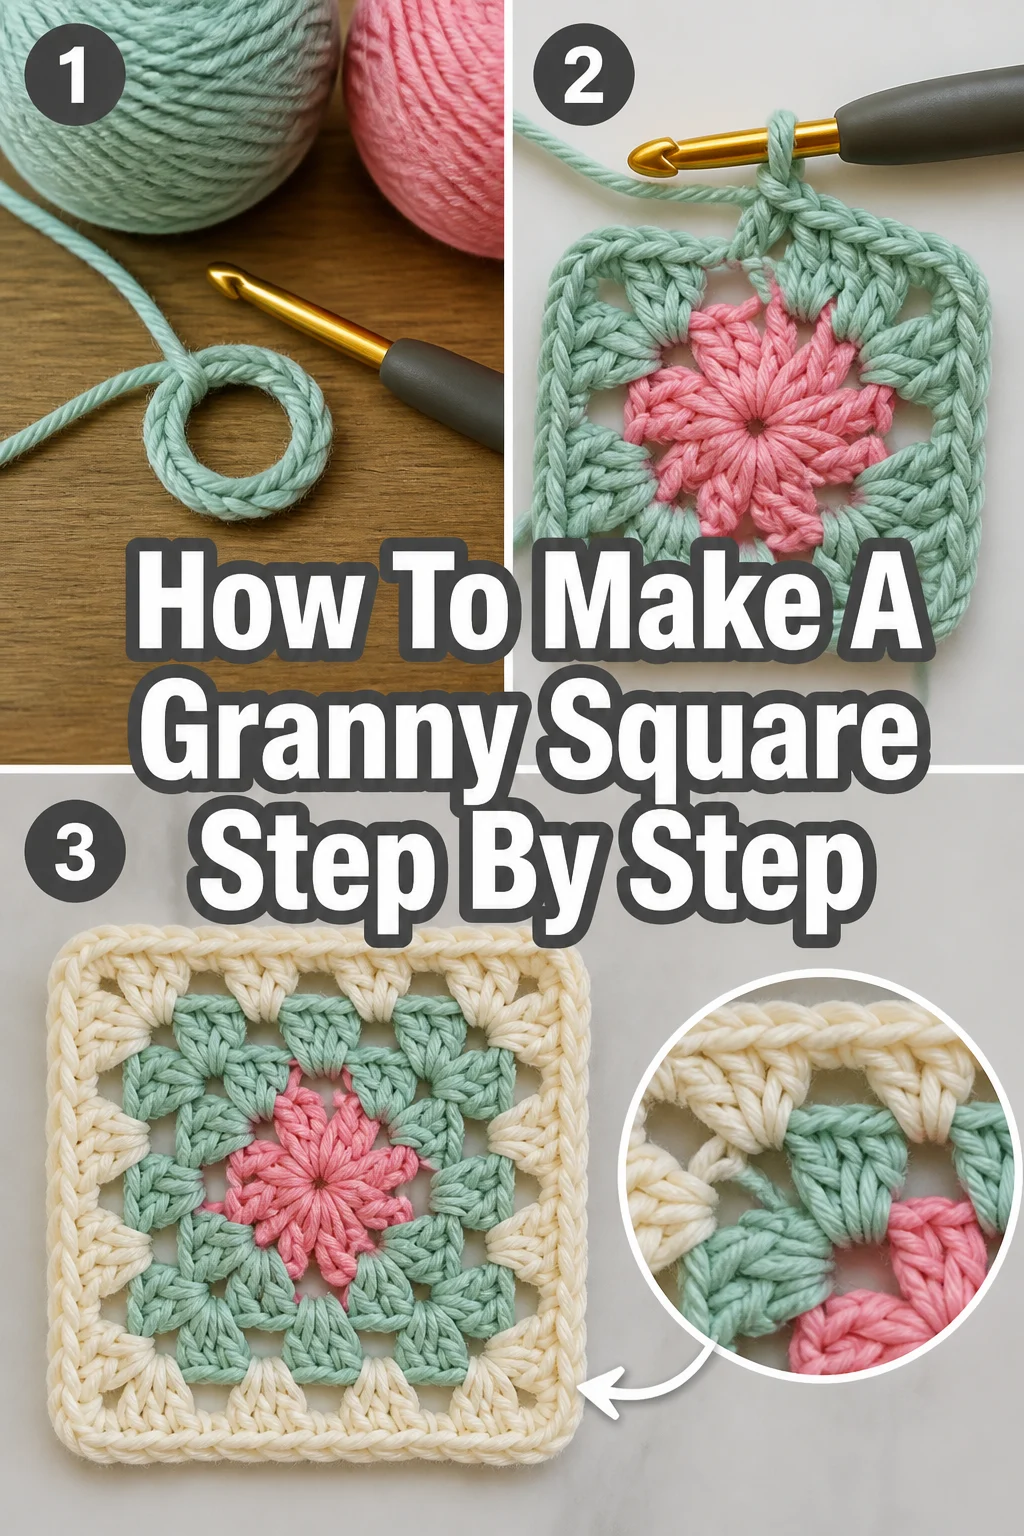
🧶 How To Make A Granny Square Step By Step

Beginner-friendly templates, step-by-step guides,
and weekly project ideas in your inbox.
Granny squares are a true classic in the world of crochet. Learning this fundamental stitch opens up a universe of creative projects. I remember the joy of making my very first one, turning a simple hook and yarn into something beautiful.
This guide comes from countless hours spent with yarn and hook, perfecting the technique, and teaching others. You can trust that these instructions are clear, practical, and designed for success, even if you’re a complete beginner.

Quick Overview
This guide will walk you through creating your very first traditional granny square. By the end, you’ll have a charming, colorful square ready for joining or display. It’s a foundational skill every crocheter should master.
- Time needed: 30-60 minutes for your first square
- Difficulty: Beginner
- What you’ll need: Yarn, crochet hook, scissors, yarn needle
Step-by-Step Instructions
Step 1: Gather Your Materials
Before you start, make sure you have everything ready. Choosing the right yarn and hook size makes a big difference. A medium-weight yarn (like worsted weight) and a corresponding hook (typically 5.0mm or H) are ideal for beginners.
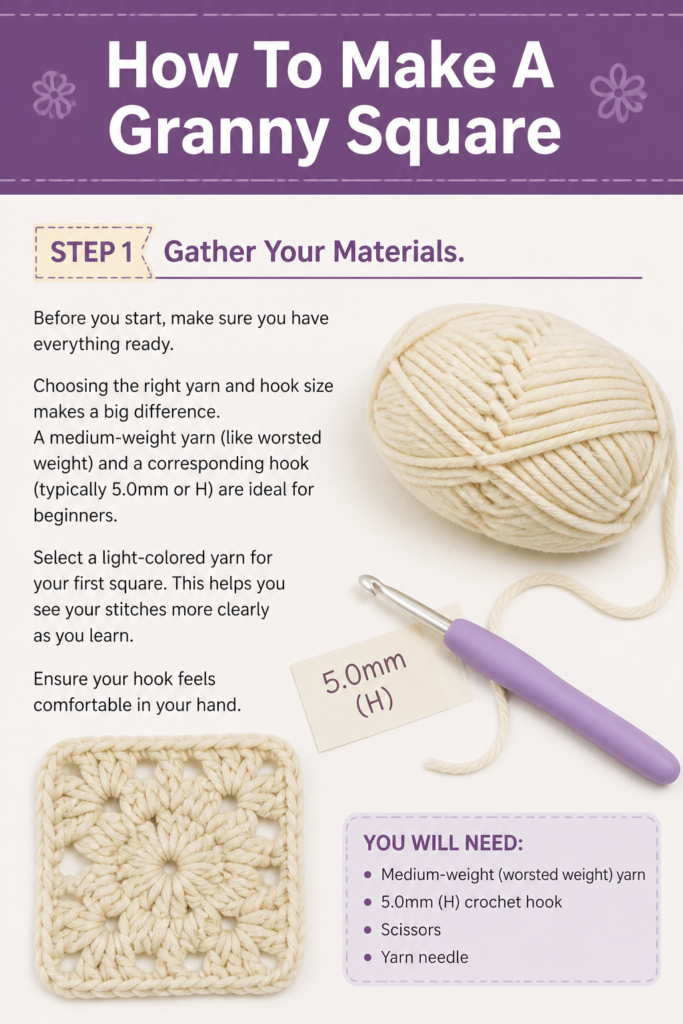
Select a light-colored yarn for your first square. This helps you see your stitches more clearly as you learn. Ensure your hook feels comfortable in your hand.
Step 2: Create a Slip Knot
Begin by making a slip knot on your crochet hook. Hold the yarn tail in one hand and wrap the working yarn around two fingers of your other hand. Cross the working yarn over the tail.
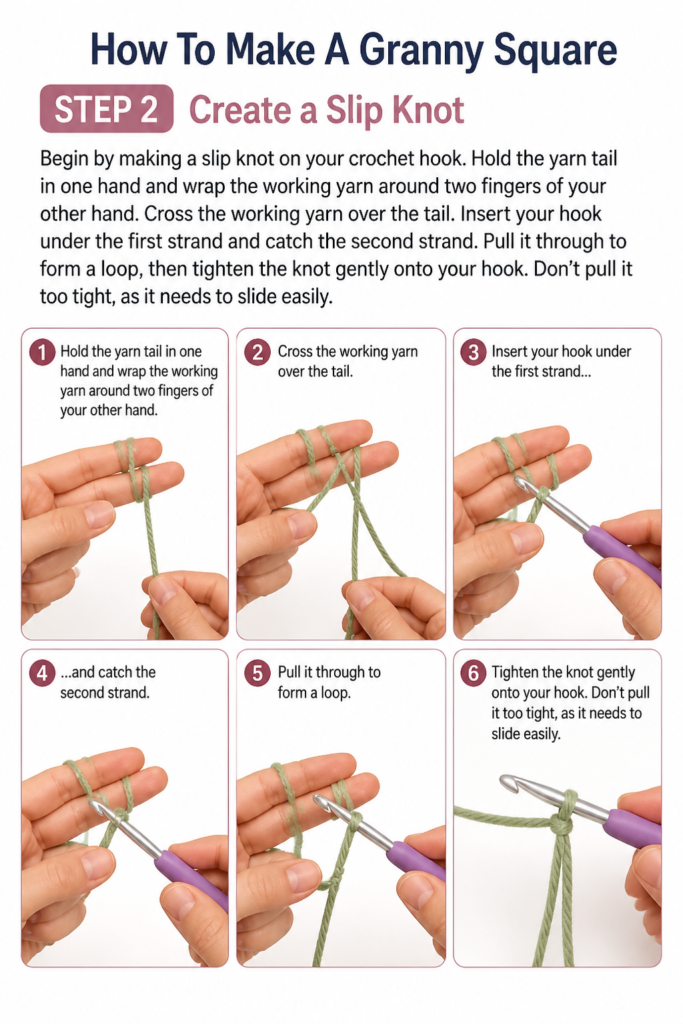
Insert your hook under the first strand and catch the second strand. Pull it through to form a loop, then tighten the knot gently onto your hook. Don’t pull it too tight, as it needs to slide easily.
Step 3: Chain Four
Now, you will create a foundation chain. Yarn over your hook (wrap the yarn from back to front) and pull it through the loop on your hook. This completes one chain stitch.
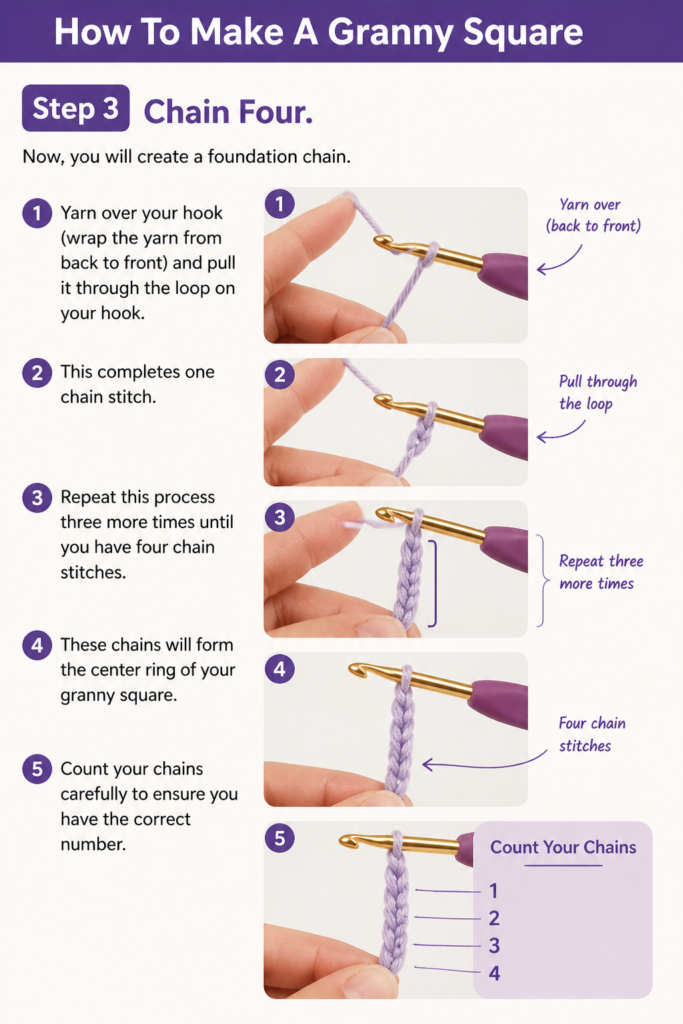
Repeat this process three more times until you have four chain stitches. These chains will form the center ring of your granny square. Count your chains carefully to ensure you have the correct number.
Step 4: Form the Center Ring
To close your chain into a ring, insert your hook into the very first chain stitch you made. This is the one furthest from your hook. Make sure you go under both loops of the chain.
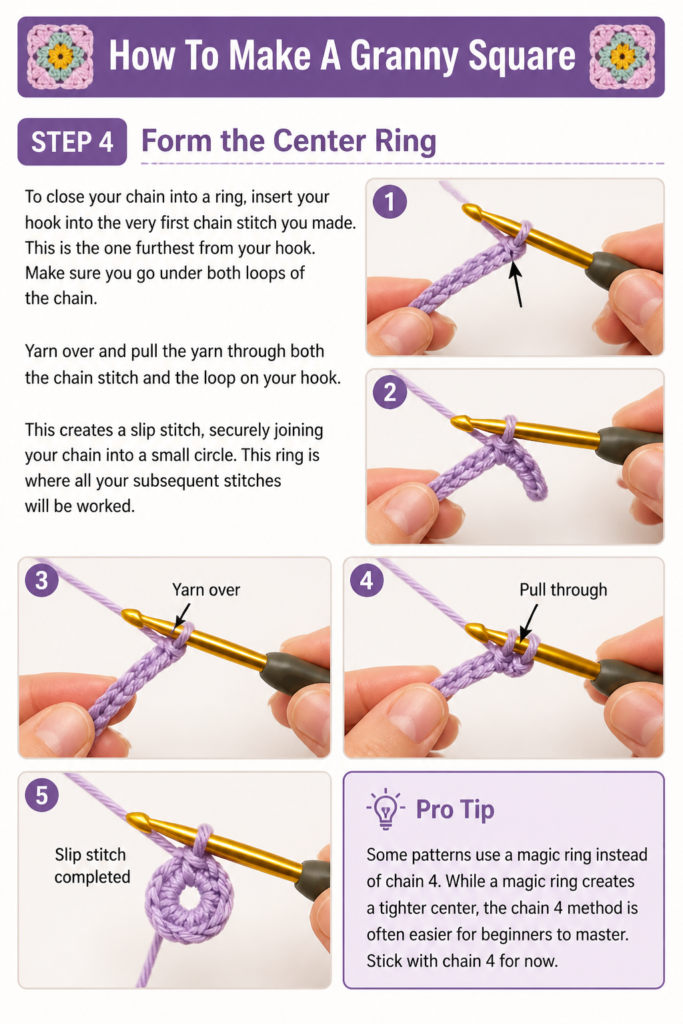
Yarn over and pull the yarn through both the chain stitch and the loop on your hook. This creates a slip stitch, securely joining your chain into a small circle. This ring is where all your subsequent stitches will be worked.
Pro Tip: Some patterns use a magic ring instead of chain 4. While a magic ring creates a tighter center, the chain 4 method is often easier for beginners to master. Stick with chain 4 for now.
Step 5: Start Round 1 with Chain 3 and Double Crochets
Chain three. This chain counts as your first double crochet stitch for this round. Now, you will make two double crochet stitches into the center ring.
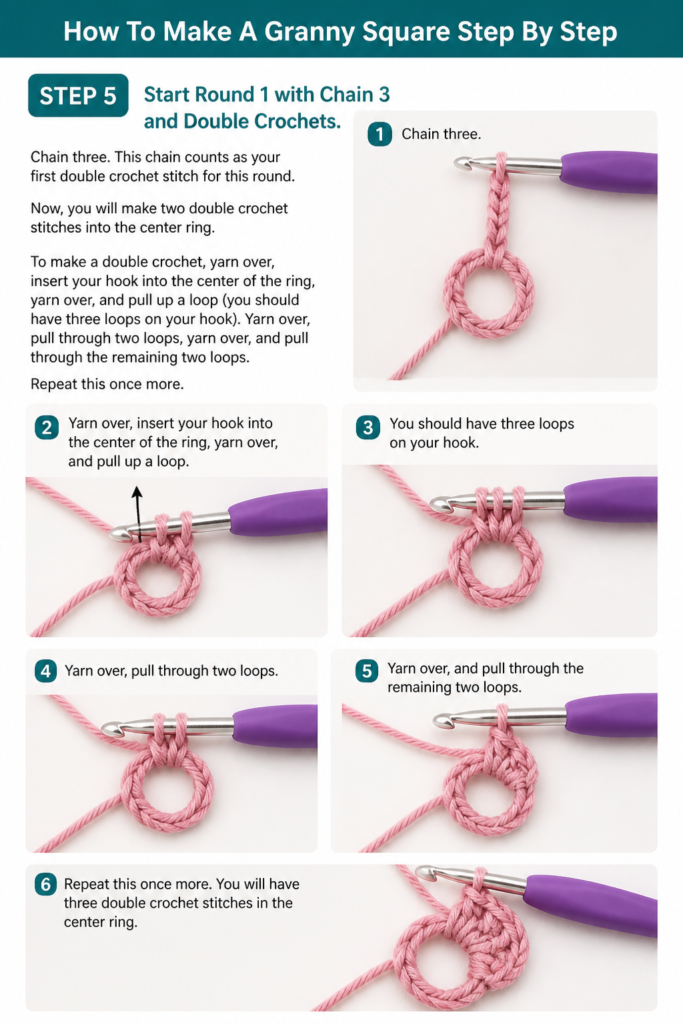
To make a double crochet, yarn over, insert your hook into the center of the ring, yarn over, and pull up a loop (you should have three loops on your hook). Yarn over, pull through two loops, yarn over, and pull through the remaining two loops. Repeat this once more.
Step 6: Create Your First Corner
After your three double crochets (the chain 3 and two actual double crochets), you need to create a corner space. Chain two stitches. This chain-2 space will form one of the square’s corners.
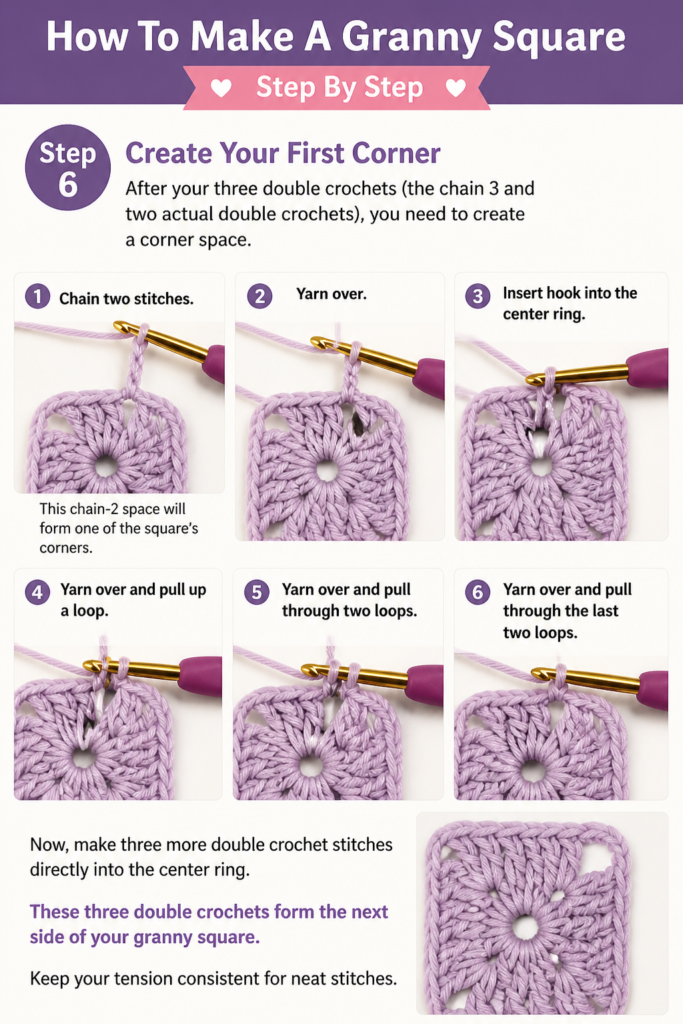
Now, make three more double crochet stitches directly into the center ring. These three double crochets form the next side of your granny square. Keep your tension consistent for neat stitches.
Step 7: Repeat Corners and Sides for Round 1
Continue this pattern to complete the first round. Chain two for the next corner, then make three double crochet stitches into the center ring. You will repeat this sequence one more time.
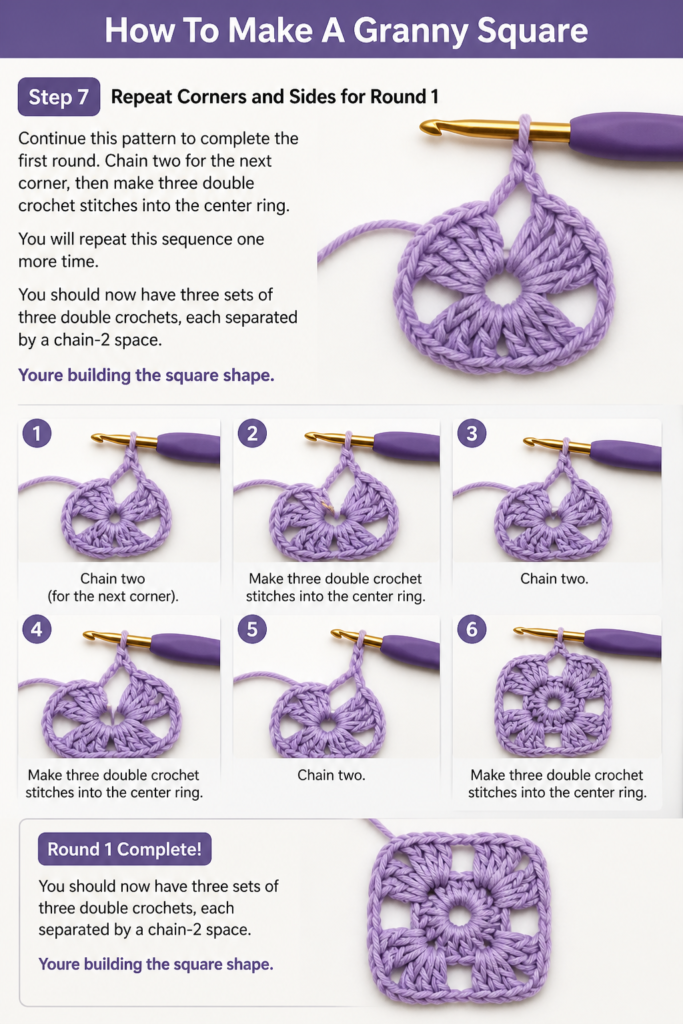
You should now have three sets of three double crochets, each separated by a chain-2 space. You’re building the square shape.
Step 8: Finish Round 1
After your last set of three double crochets, chain two to create the final corner space. Now, you need to join this round to the beginning. Find the top of the initial chain-3 you made at the very start of this round.
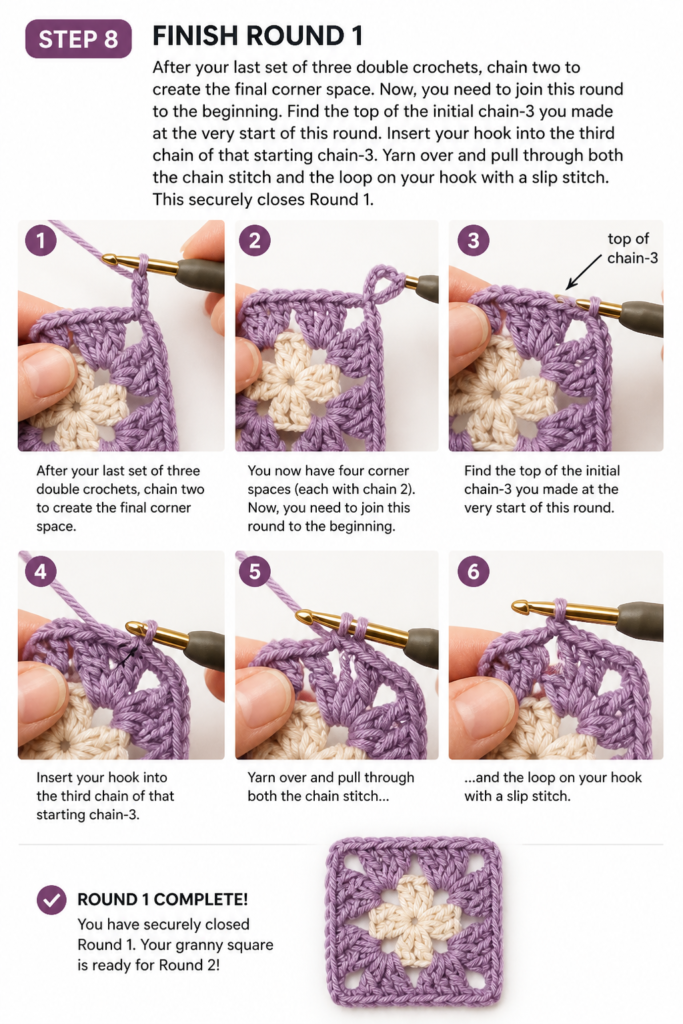
Insert your hook into the third chain of that starting chain-3. Yarn over and pull through both the chain stitch and the loop on your hook with a slip stitch. This securely closes Round 1.
Step 9: Start Round 2
For Round 2, you need to move your hook to the first chain-2 corner space. Slip stitch into the top of the next two double crochet stitches, then slip stitch into the chain-2 space itself. This positions your hook correctly for the next round.
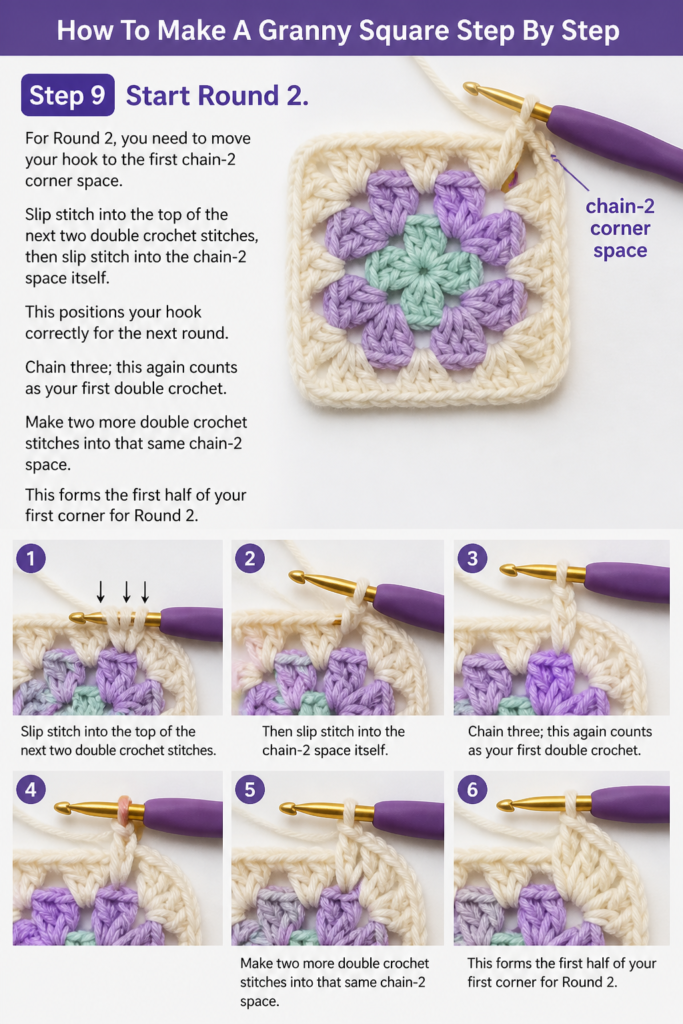
Chain three; this again counts as your first double crochet. Make two more double crochet stitches into that same chain-2 space. This forms the first half of your first corner for Round 2.
Step 10: Complete Round 2 Corners and Sides
Chain two to complete the first corner. Then, make three more double crochet stitches into the same chain-2 space. This completes your first corner for Round 2 (3 DC, Ch 2, 3 DC).
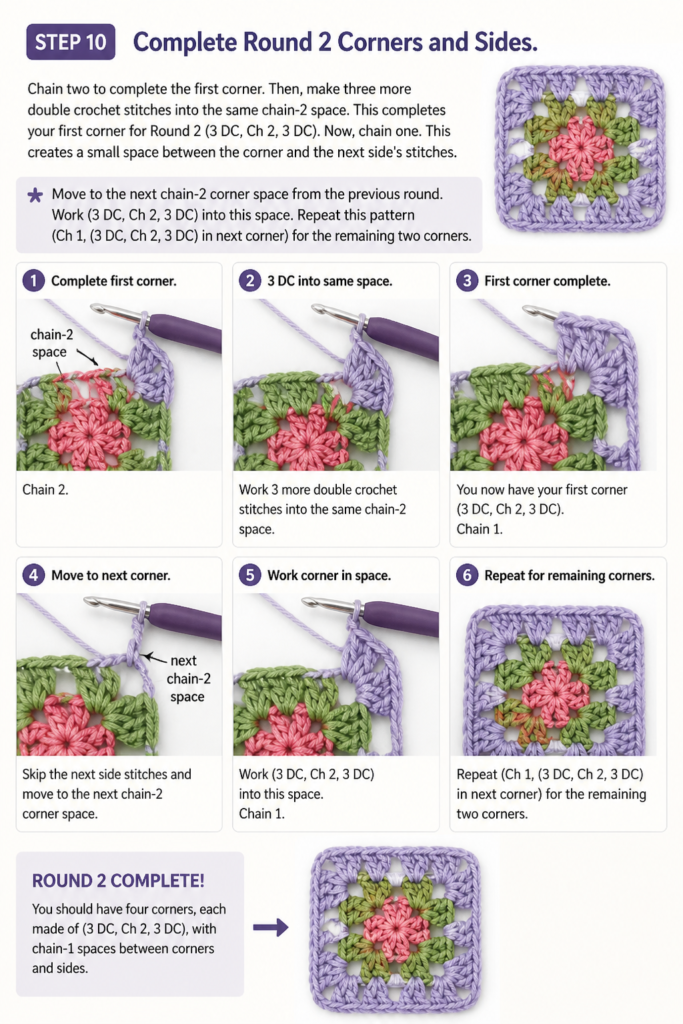
Now, chain one. This creates a small space between the corner and the next side’s stitches. Move to the next chain-2 corner space from the previous round. Work (3 DC, Ch 2, 3 DC) into this space. Repeat this pattern (Ch 1, (3 DC, Ch 2, 3 DC) in next corner) for the remaining two corners.
Step 11: Finish Round 2 and Beyond
After completing the last corner (3 DC, Ch 2, 3 DC), chain one to create the final side space. Slip stitch into the top of the initial chain-3 from the start of Round 2, just like you did for Round 1. This closes Round 2.
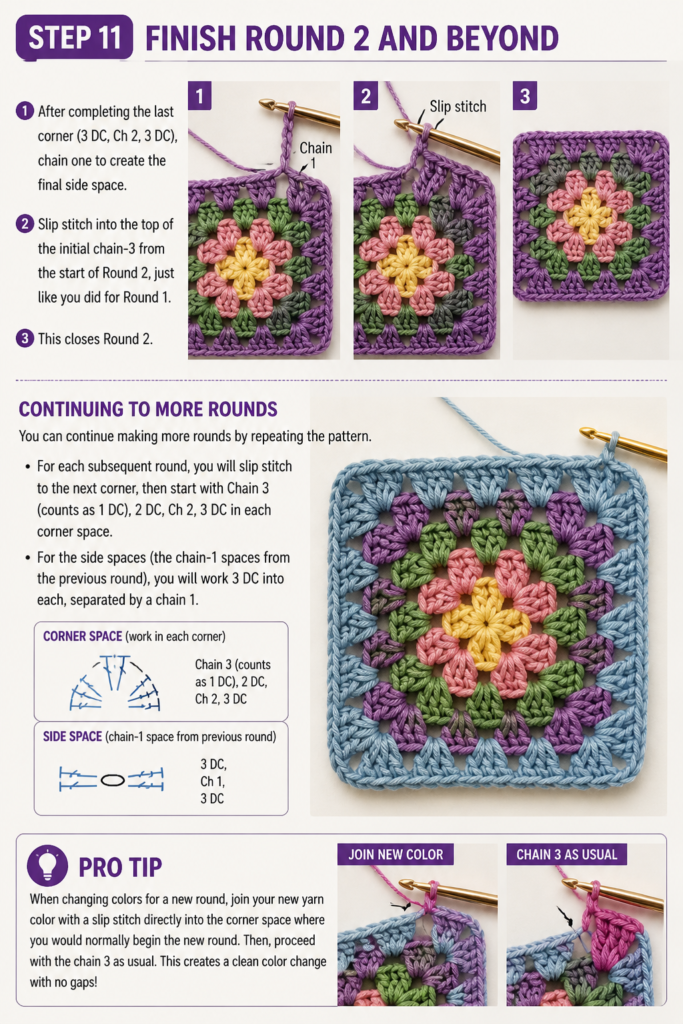
You can continue making more rounds by repeating the pattern. For each subsequent round, you will slip stitch to the next corner, then start with Chain 3 (counts as 1 DC), 2 DC, Ch 2, 3 DC in each corner space. For the side spaces (the chain-1 spaces from the previous round), you will work 3 DC into each, separated by a chain 1.
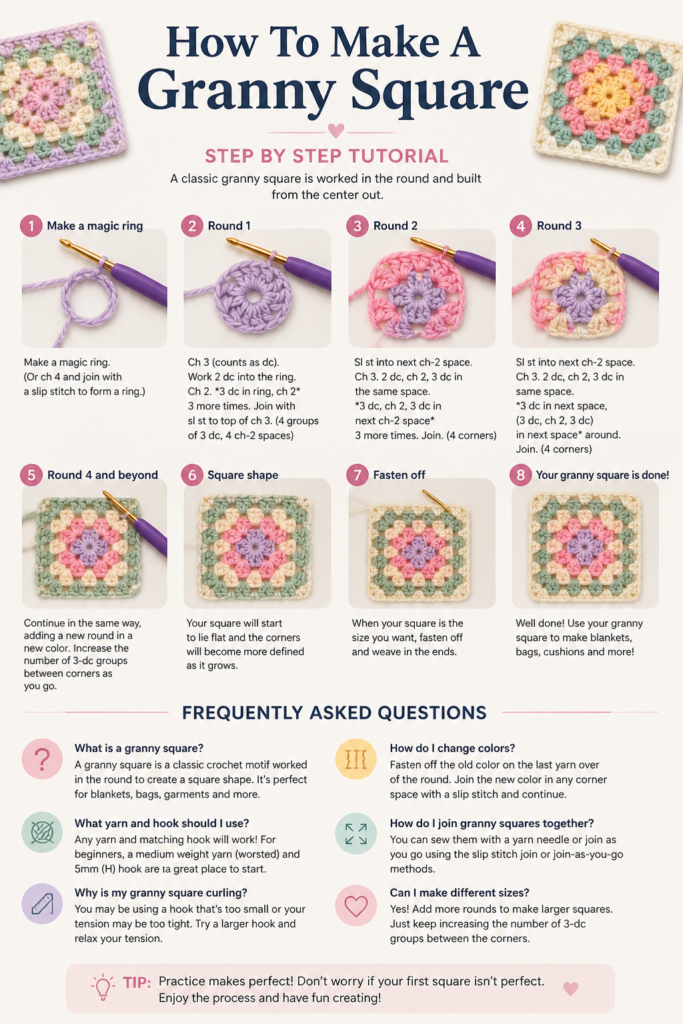
Pro Tip: When changing colors for a new round, join your new yarn color with a slip stitch directly into the corner space where you would normally begin the new round. Then, proceed with the chain 3 as usual. This creates a neat color transition.
Step 12: Fasten Off and Weave In Ends
Once your granny square reaches your desired size, it’s time to finish. Cut your yarn, leaving a tail of about 6 inches. Yarn over your hook and pull the tail completely through the last loop on your hook. Pull it tight to secure it.
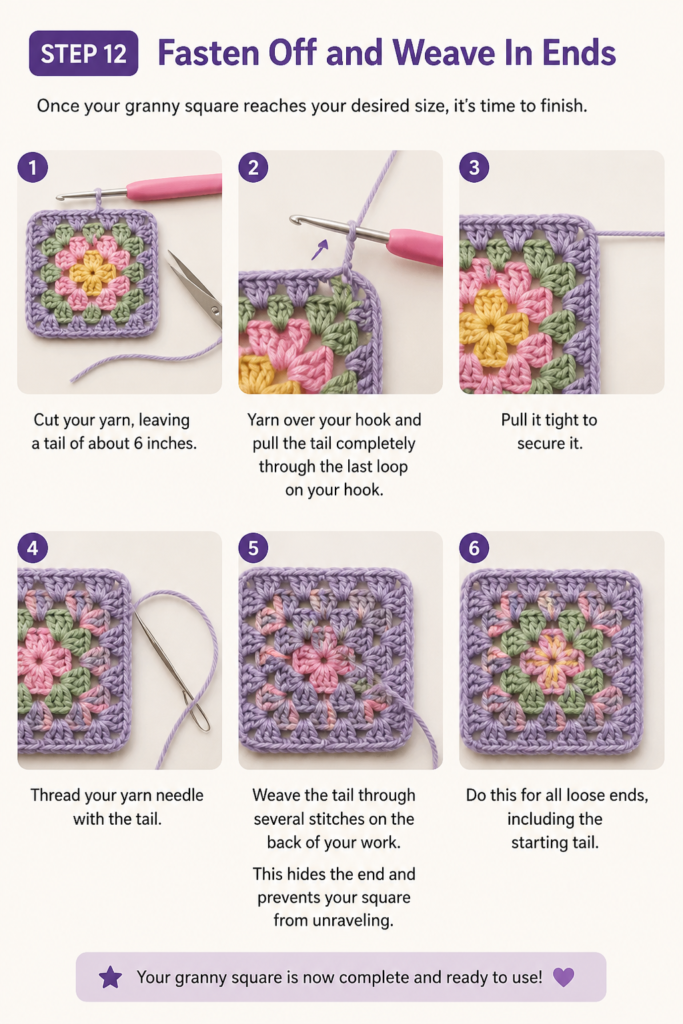
Thread your yarn needle with the tail. Weave the tail through several stitches on the back of your work. This hides the end and prevents your square from unraveling. Do this for all loose ends, including the starting tail.
Common Mistakes to Avoid
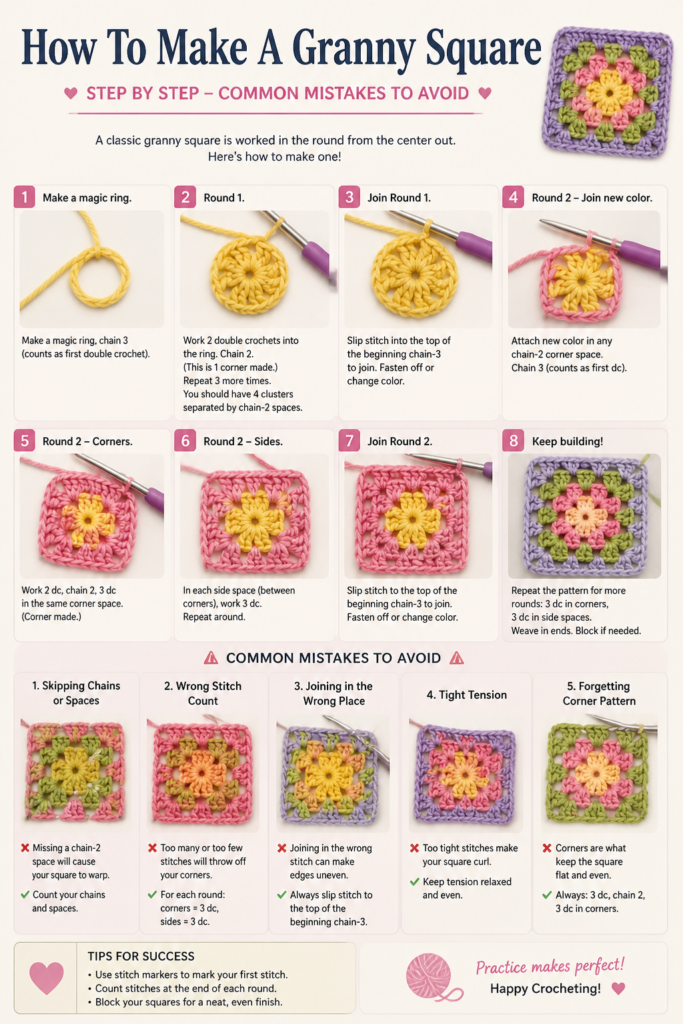
Skipping Chain Stitches
A common issue for beginners is forgetting to chain between clusters or in the corners. This results in a square that looks tight, puckered, or doesn’t lay flat. The chain stitches are crucial for creating the open, lacy structure of a granny square and defining its shape. Always double-check your pattern for chain counts, especially in the corners (usually chain 2) and between side clusters (usually chain 1).
Inconsistent Tension
Holding the yarn too tightly or too loosely can make your granny square appear uneven. Tight tension can make it stiff and difficult to work into, while loose tension can make it floppy and gappy. Practice maintaining a consistent tension throughout your work. If your hands cramp, take a break. Your tension will improve with practice, leading to more uniform stitches and a neater square.
Miscounting Stitches or Rounds
It’s easy to lose track of stitches, especially the starting chain-3 that counts as a double crochet. Miscounting can lead to lopsided squares or incorrect cluster numbers. Always count your stitches and clusters at the end of each round. Use stitch markers if needed to identify the top of your starting chain-3. Take your time and recount if something looks off.
Troubleshooting
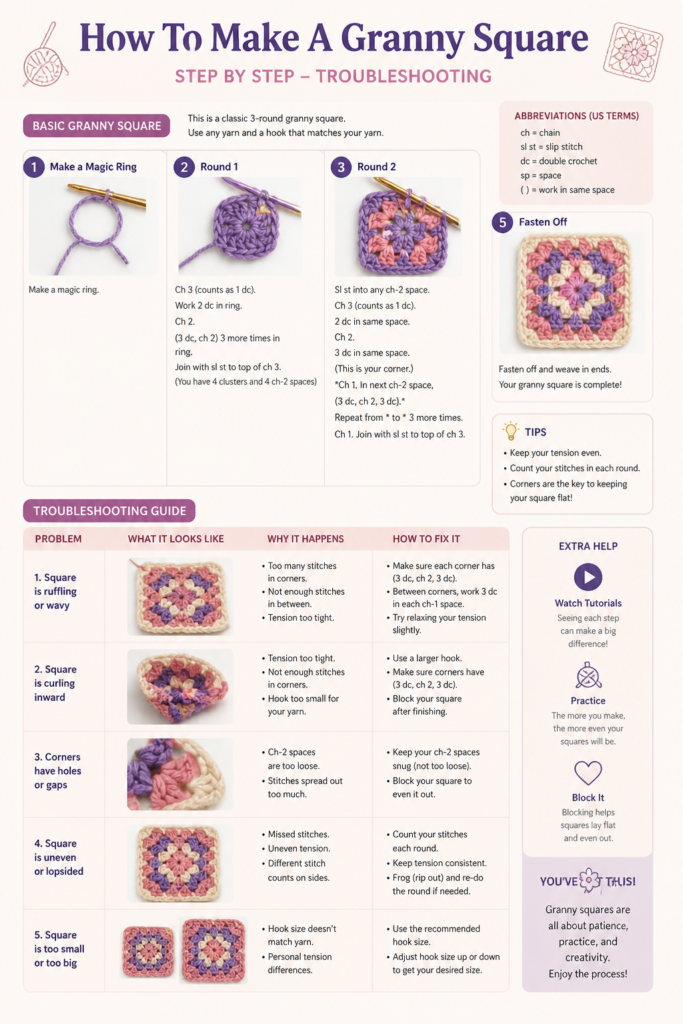
My Granny Square is Cupping or Ruffling
If your granny square is either cupping inwards like a bowl or ruffling outwards like a skirt, it’s likely an issue with your stitch count or tension. Cupping often means you don’t have enough stitches or chain spaces, pulling the fabric inward. Ruffling suggests you have too many stitches or chain spaces, causing the fabric to expand too much.
To fix this, carefully re-read the pattern and recount your stitches per side and corner chain spaces. Ensure you’re making the correct number of double crochet clusters and chain stitches in each round. Adjust your hook size if your tension is consistently too tight or too loose – a larger hook for cupping, a smaller hook for ruffling.
My Corners Aren’t Sharp or Defined
If your granny square corners look rounded or indistinct, it’s usually because your chain-2 spaces in the corners are too small or you’re not placing enough stitches there. The chain-2 (or sometimes chain-3) space is what creates the distinct angle of the corner.
Make sure you are consistently making two chain stitches in each corner. Also, ensure you are working a full (3 DC, Ch 2, 3 DC) cluster into these corner spaces in subsequent rounds. Sometimes, simply paying closer attention to these specific stitches will sharpen your corners.
Key Takeaways
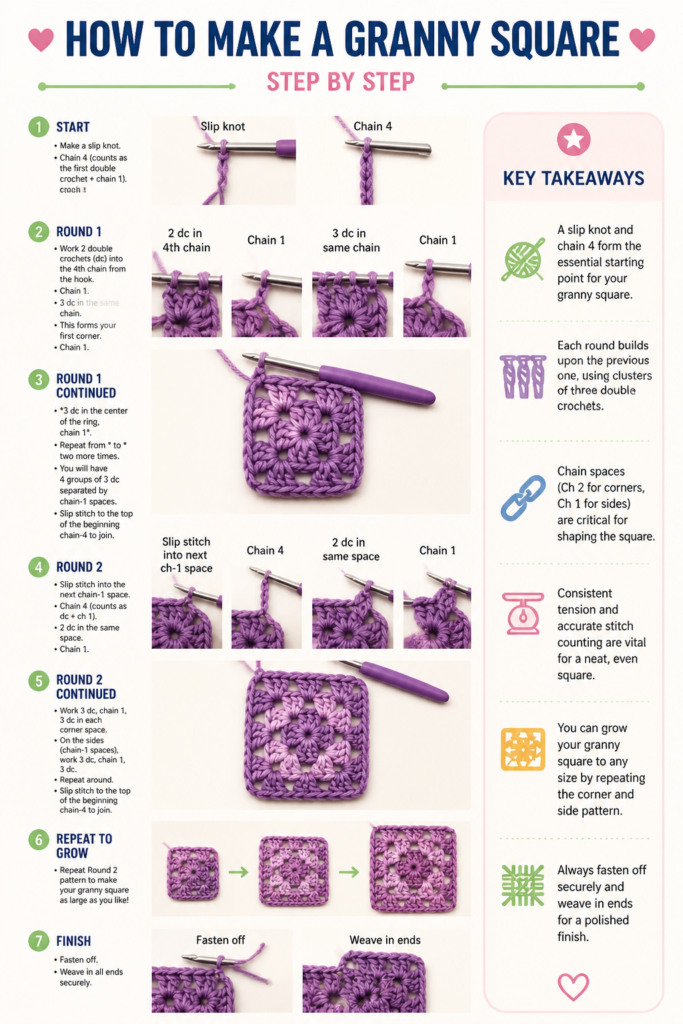
- A slip knot and chain 4 form the essential starting point for your granny square.
- Each round builds upon the previous one, using clusters of three double crochets.
- Chain spaces (Ch 2 for corners, Ch 1 for sides) are critical for shaping the square.
- Consistent tension and accurate stitch counting are vital for a neat, even square.
- You can grow your granny square to any size by repeating the corner and side pattern.
- Always fasten off securely and weave in ends for a polished finish.
Frequently Asked Questions
Can I use different types of yarn?
Yes, absolutely! Granny squares are incredibly versatile. You can use almost any yarn weight or fiber. Just be sure to match your hook size to the yarn’s recommended size. Different yarns will give your square different drape and texture.
How do I change colors in a granny square?
To change colors neatly, finish the last stitch of your current color. When you’re ready to make the slip stitch to join the round, use your new color to complete that slip stitch. You can also simply cut the old yarn, tie on the new yarn in a corner space, and begin the next round.
What can I make with granny squares?
The possibilities are endless! Granny squares are perfect for blankets, scarves, bags, sweaters, coasters, and even garments. You can join many squares together or make one large square that becomes the entire project. They are fantastic for using up yarn scraps.
How do I make a bigger granny square?
To make a bigger granny square, simply continue adding rounds! Each subsequent round will follow the same pattern: (3 DC, Ch 2, 3 DC) in each corner space, and (3 DC, Ch 1) in each side space (the chain-1 spaces from the previous round). Just keep going until your square reaches the desired size.
Our Top Recommended Finds
- Ergonomic Crochet Hook Set: Comfortable handles reduce hand fatigue, making long crochet sessions enjoyable.
- Worsted Weight Acrylic Yarn: Affordable, widely available, and perfect for practicing stitches and making vibrant projects.
- Blunt-Tip Yarn Needles: Essential for weaving in ends neatly without splitting your yarn, giving your finished squares a professional look.
Your Journey into Crochet Begins Now
You’ve just learned the fundamental steps to creating a timeless granny square. This small square is a building block for countless crochet projects and a testament to your newfound skill.
Don’t stop here! Practice making a few more, experimenting with different colors. Soon, you’ll be ready to explore joining techniques or even try a variation like the solid granny square. Grab your hook and yarn today and let your creativity flourish!
Beginner-friendly templates, step-by-step guides,
and weekly project ideas in your inbox.