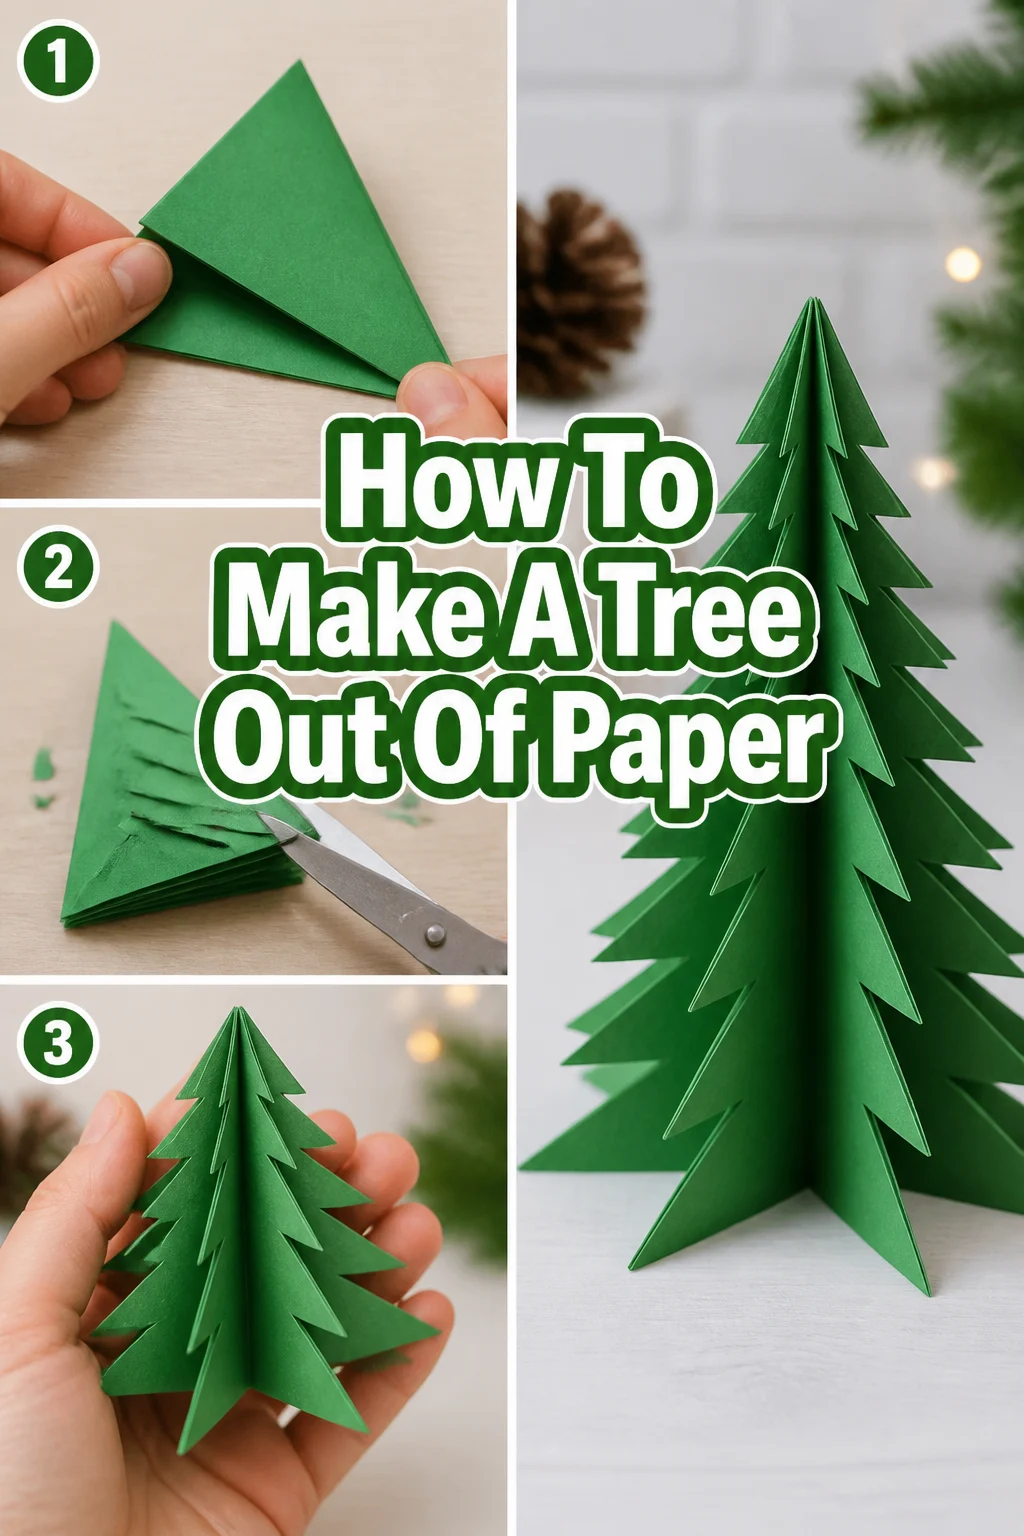
🌳 How To Make A Tree Out Of Paper

Beginner-friendly templates, step-by-step guides,
and weekly project ideas in your inbox.
There’s something truly satisfying about crafting something beautiful with your own hands.
I remember making my very first paper tree for a school project, and the joy of seeing it stand tall on my desk was unforgettable.
This guide draws from years of simple paper crafting, designed to help you create your own charming paper tree with ease.

Quick Overview
Get ready to transform basic paper into a delightful, three-dimensional tree.
Whether for decoration, a school diorama, or just for fun, this project is accessible and rewarding.
- Time needed: 30-60 minutes
- Difficulty: Beginner
- What you’ll need: Paper, scissors, glue, a pencil, and optionally, a ruler.
Step-by-Step Instructions
Step 1: Gather Your Materials
Before you begin, lay out all your necessary items on a clean, flat surface.
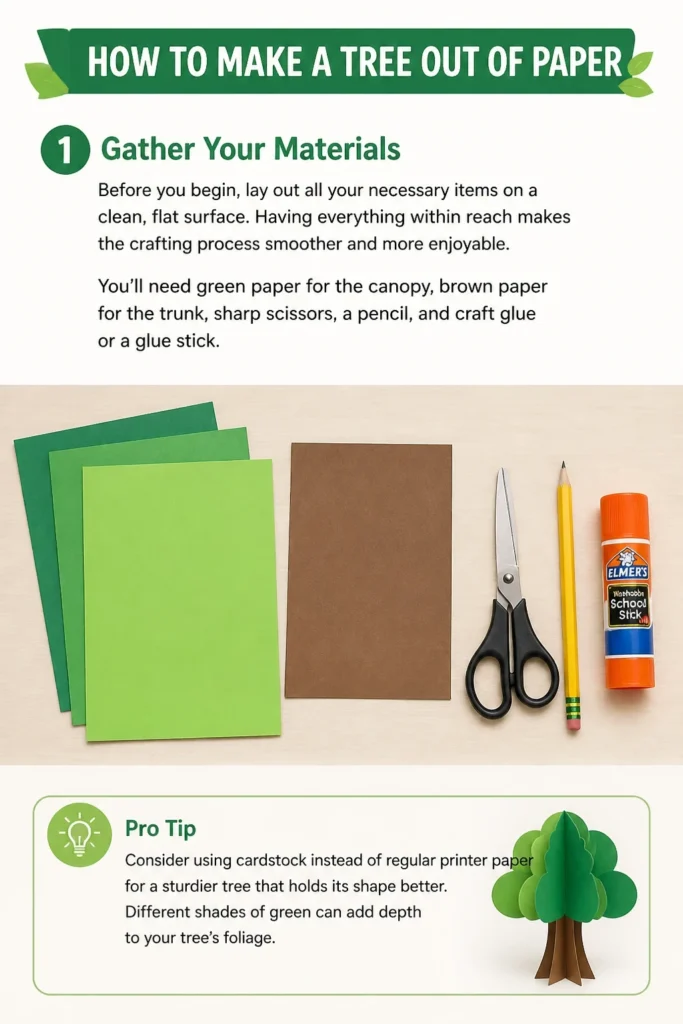
Having everything within reach makes the crafting process smoother and more enjoyable.
You’ll need green paper for the canopy, brown paper for the trunk, sharp scissors, a pencil, and craft glue or a glue stick.
Pro Tip: Consider using cardstock instead of regular printer paper for a sturdier tree that holds its shape better. Different shades of green can add depth to your tree’s foliage.
Step 2: Create the Tree Trunk
Take your brown paper and decide on the height of your tree trunk.
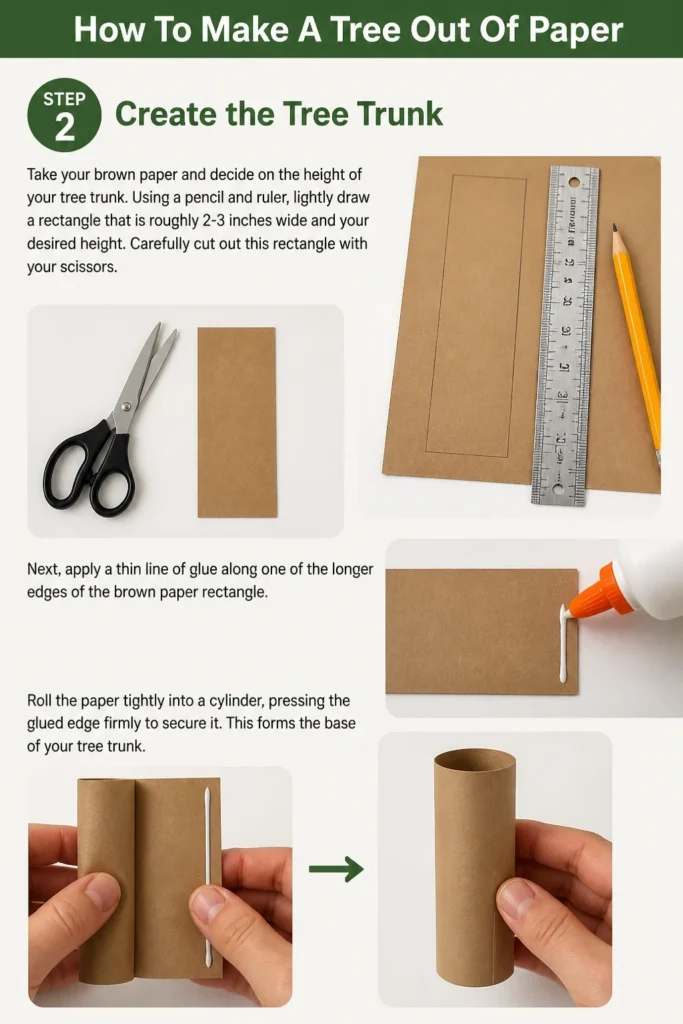
Using a pencil and ruler, lightly draw a rectangle that is roughly 2-3 inches wide and your desired height.
Carefully cut out this rectangle with your scissors.
Next, apply a thin line of glue along one of the longer edges of the brown paper rectangle.
Roll the paper tightly into a cylinder, pressing the glued edge firmly to secure it.
This forms the base of your tree trunk.
Step 3: Prepare the Tree Canopy Leaves
Now, let’s focus on the green paper for the tree’s foliage.
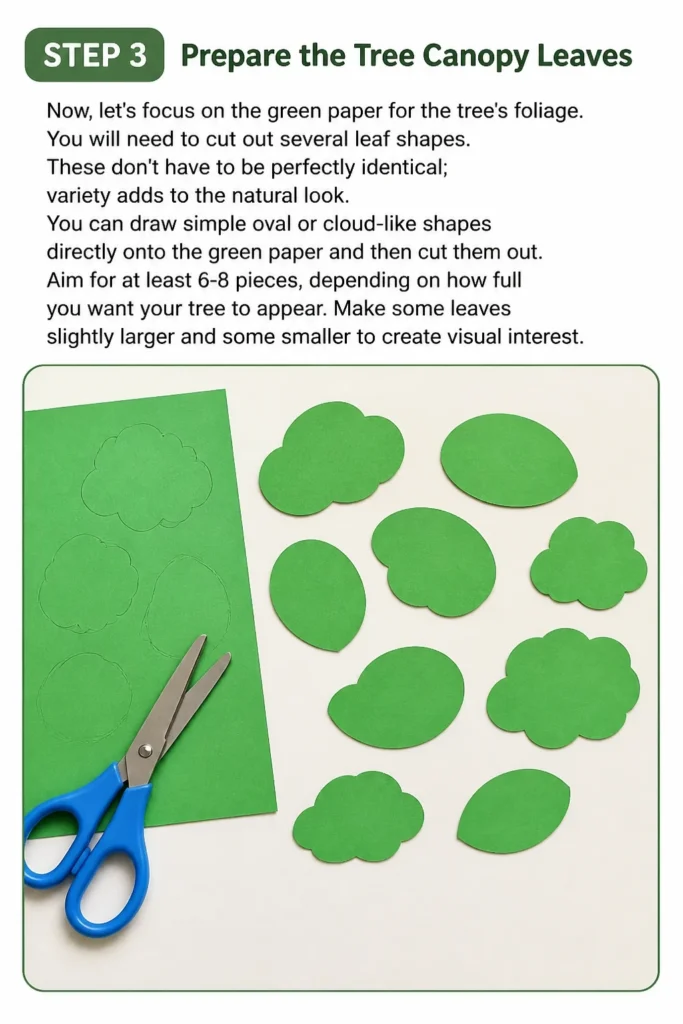
You will need to cut out several leaf shapes. These don’t have to be perfectly identical; variety adds to the natural look.
You can draw simple oval or cloud-like shapes directly onto the green paper and then cut them out.
Aim for at least 6-8 pieces, depending on how full you want your tree to appear.
Make some leaves slightly larger and some smaller to create visual interest.
Step 4: Fold and Shape the Leaves
To give your canopy a three-dimensional quality, you’ll need to fold each leaf shape.
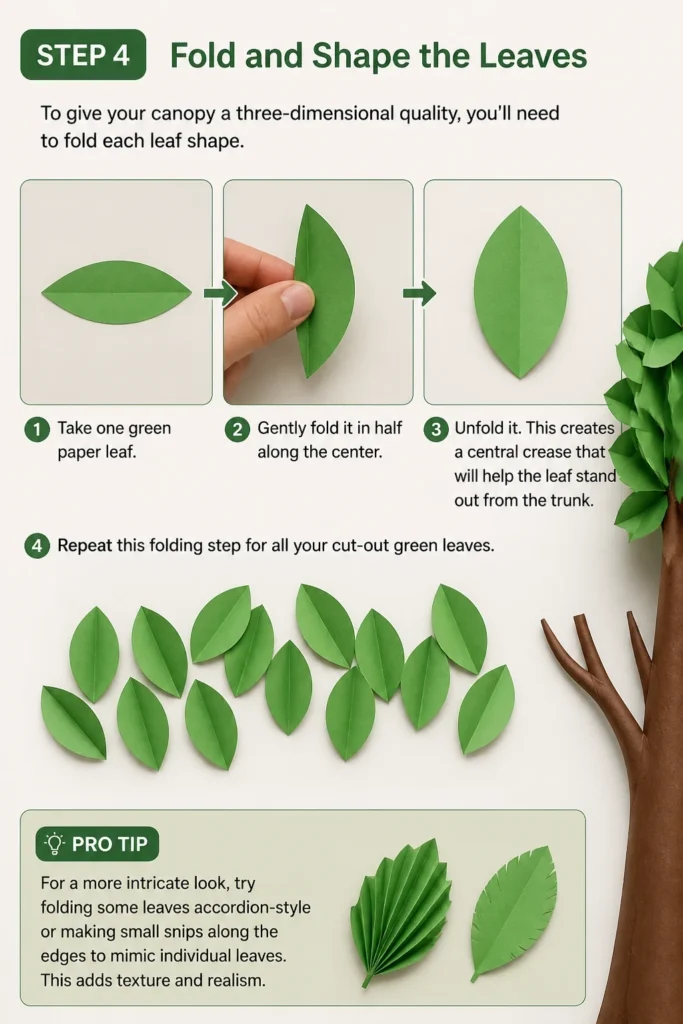
Take one green paper leaf and gently fold it in half, then unfold it.
This creates a central crease that will help the leaf stand out from the trunk.
Repeat this folding step for all your cut-out green leaves.
Pro Tip: For a more intricate look, try folding some leaves accordion-style or making small snips along the edges to mimic individual leaves. This adds texture and realism.
Step 5: Attach Leaves to the Trunk
With your trunk cylinder ready and your leaves folded, it’s time to assemble the tree.
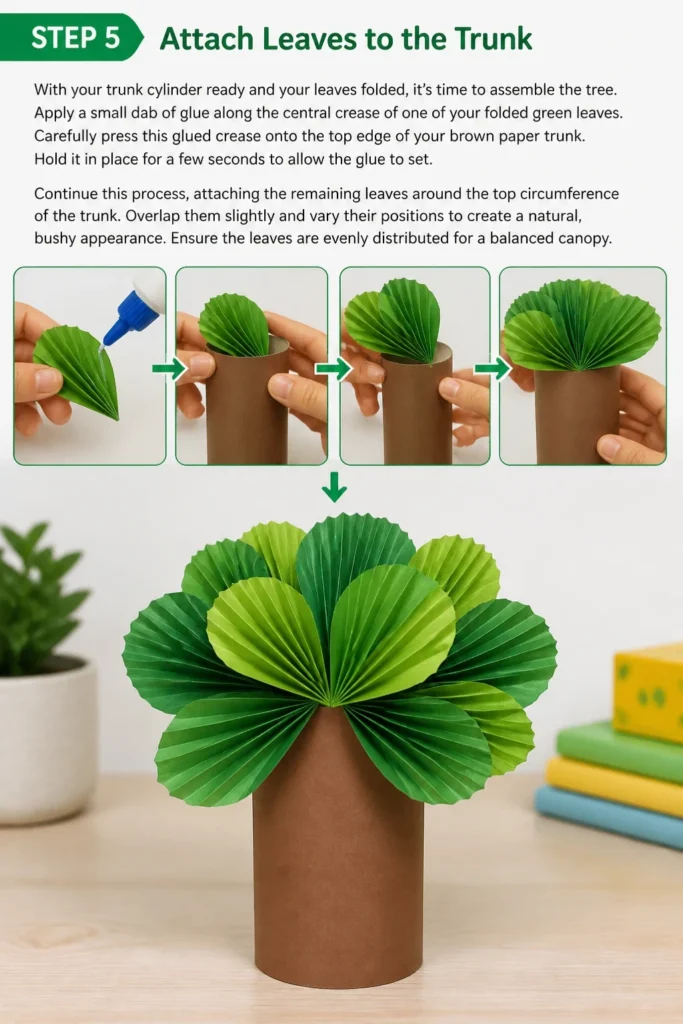
Apply a small dab of glue along the central crease of one of your folded green leaves.
Carefully press this glued crease onto the top edge of your brown paper trunk.
Hold it in place for a few seconds to allow the glue to set.
Continue this process, attaching the remaining leaves around the top circumference of the trunk.
Overlap them slightly and vary their positions to create a natural, bushy appearance.
Ensure the leaves are evenly distributed for a balanced canopy.
Step 6: Build Up the Canopy Layers
To achieve a full and lush tree, you’ll want to add multiple layers of leaves.
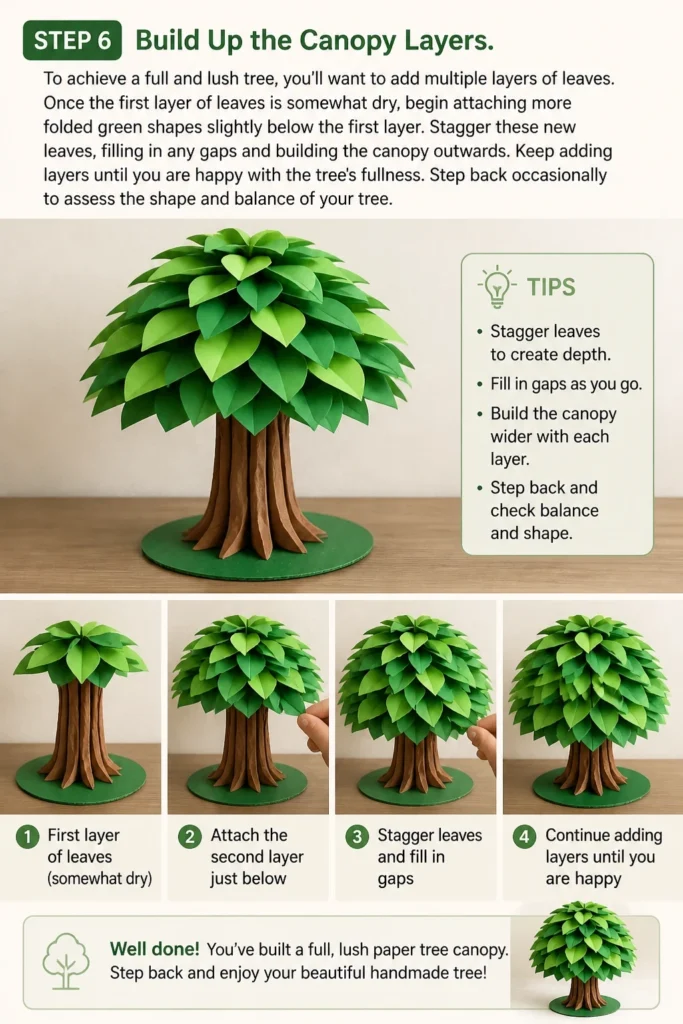
Once the first layer of leaves is somewhat dry, begin attaching more folded green shapes slightly below the first layer.
Stagger these new leaves, filling in any gaps and building the canopy outwards.
Keep adding layers until you are happy with the tree’s fullness.
Step back occasionally to assess the shape and balance of your tree.
Step 7: Add Finishing Touches and Details
Your paper tree is almost complete, but a few final touches can make it truly special.
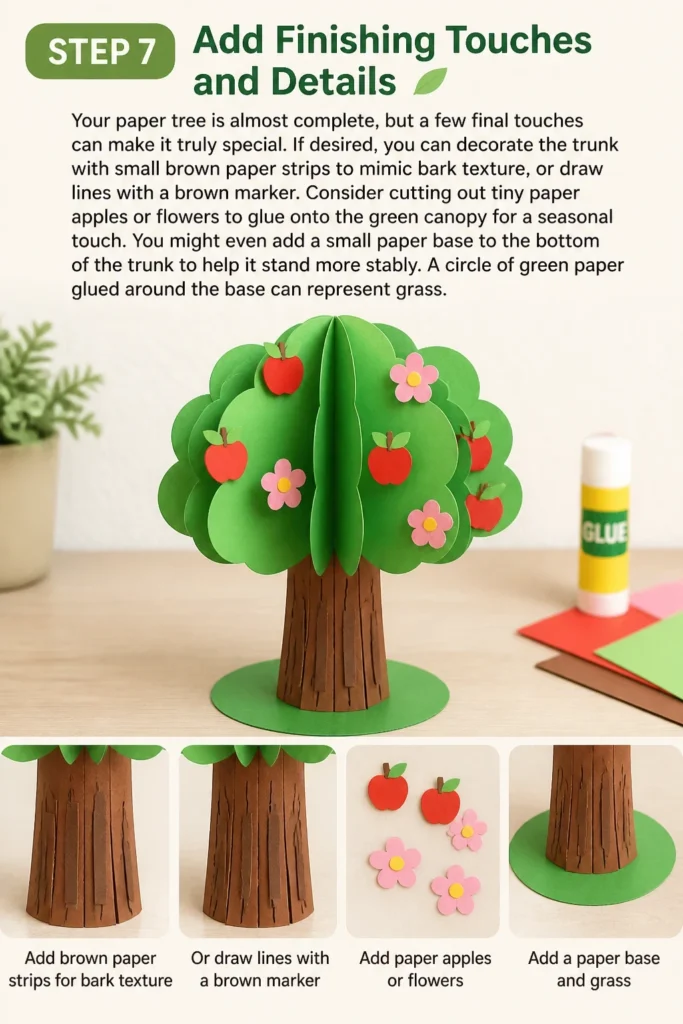
If desired, you can decorate the trunk with small brown paper strips to mimic bark texture, or draw lines with a brown marker.
Consider cutting out tiny paper apples or flowers to glue onto the green canopy for a seasonal touch.
You might even add a small paper base to the bottom of the trunk to help it stand more stably.
A circle of green paper glued around the base can represent grass.
Step 8: Let It Dry and Display
Once you are satisfied with your paper tree, it’s crucial to allow all the glue to dry completely.
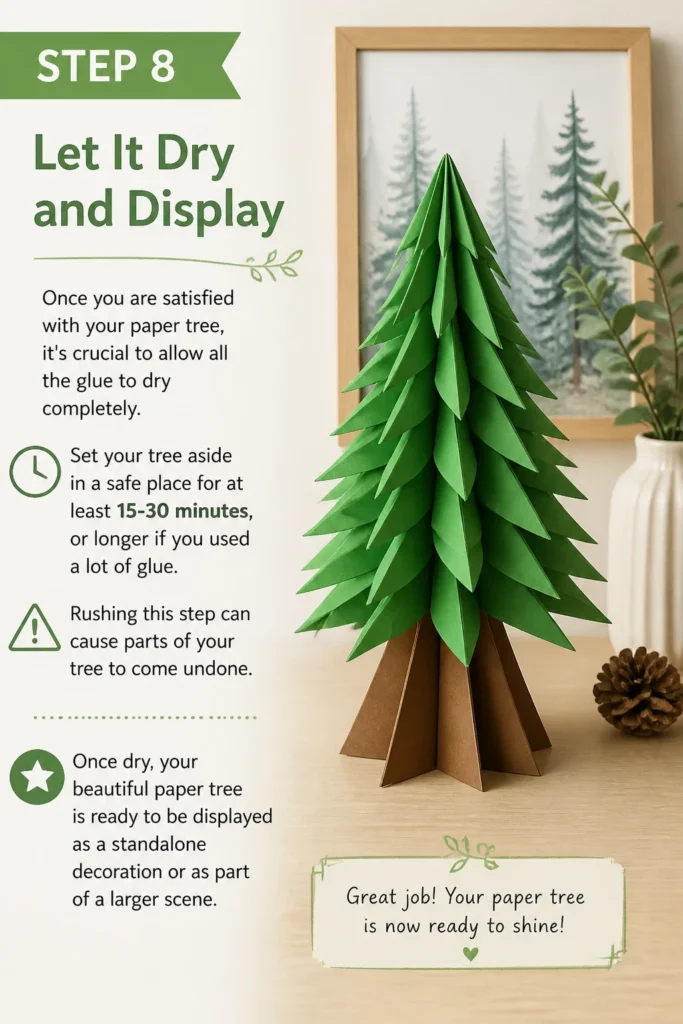
Set your tree aside in a safe place for at least 15-30 minutes, or longer if you used a lot of glue.
Rushing this step can cause parts of your tree to come undone.
Once dry, your beautiful paper tree is ready to be displayed as a standalone decoration or as part of a larger scene.
Common Mistakes to Avoid
Using Too Much Glue
A common pitfall is applying excessive amounts of glue, especially when attaching the leaves.
Too much glue can saturate the paper, causing it to wrinkle, warp, or even tear.
It also takes much longer to dry, and can leave visible, shiny residue.
Always use a thin, even layer of glue. A small dot or a thin line is usually sufficient for securing paper pieces.
If using a glue stick, apply it lightly and evenly.
Cutting Identical Leaf Shapes
While uniformity might seem appealing, cutting all your green leaves in exactly the same size and shape can make the tree look less organic.
Real trees have leaves of varying sizes, and this natural imperfection adds to the charm of your paper craft.
Instead, intentionally vary the size and slightly alter the shape of your leaves.
This creates a more dynamic and realistic canopy.
Rushing the Drying Process
Patience is a virtue in crafting, particularly when it comes to glue.
Trying to move or handle the tree before the glue is fully dry can lead to pieces detaching, the trunk unraveling, or the canopy collapsing.
Always allow ample drying time. If you’re in a hurry, use quick-drying craft glue, but still give it a few minutes to set.
A good rule of thumb is to let it sit undisturbed for at least 15 minutes after the final piece is attached.
Neglecting the Base
Many beginners focus solely on the trunk and canopy, forgetting about the stability of the finished piece.
A tree with a poorly constructed trunk or no base will easily tip over, especially if the canopy is large.
Ensure your trunk cylinder is firmly glued and consider adding a small, flat paper circle to the bottom as a stable base.
This simple addition significantly improves the tree’s ability to stand upright.
Troubleshooting
My Tree Trunk Won’t Stand Up Straight
If your trunk cylinder is wobbly or collapses, it’s likely due to insufficient glue or paper that’s too thin.
Ensure the glued seam of your cylinder is secure and has dried completely.
For added stability, you can roll a second, slightly smaller brown paper cylinder and insert it inside the first, gluing them together.
Also, consider gluing the trunk onto a wider, flat circle of paper or cardboard to create a stable base.
The Canopy Looks Sparse or Uneven
A sparse canopy usually means you haven’t used enough leaves or haven’t layered them effectively.
If your tree looks thin, simply cut out more green leaf shapes and continue to glue them onto the trunk, focusing on filling gaps.
For unevenness, step back and view the tree from all angles. Add leaves strategically to areas that look bare or unbalanced until it achieves a pleasing shape.
My Leaves Are Falling Off
This issue often arises from not using enough glue, using a weak adhesive, or handling the tree before the glue has dried.
Re-glue any fallen leaves, ensuring a small but definite amount of adhesive is applied to the crease.
Press firmly for a few seconds and then leave the tree completely undisturbed to dry.
If using a glue stick, make sure it’s a strong craft type, or switch to a liquid craft glue for better adhesion.
Key Takeaways
- Always gather all your materials before you begin crafting to ensure a smooth process.
- Use varying sizes and shapes for your green leaves to create a more natural and appealing canopy.
- Apply glue sparingly to avoid warping and ensure quicker drying times.
- Allow sufficient drying time after each major gluing step to prevent pieces from detaching.
- Consider adding a base to your tree trunk for enhanced stability and display.
- Embrace imperfections; they often add character and a handcrafted charm to your finished tree.
Frequently Asked Questions
Can I use different colors of paper for the leaves?
Absolutely! Using different shades of green, or even autumnal colors like red, orange, and yellow, can create a stunning seasonal tree.
Feel free to experiment with blues for a fantastical tree or white for a winter wonderland effect.
What if I don’t have a ruler for the trunk?
No ruler? No problem! You can simply fold a piece of brown paper lengthwise to create a straight edge, then trim to your desired width.
Alternatively, freehand drawing a rectangle is perfectly fine; a slightly irregular trunk can add to its natural appeal.
How can I make my paper tree more stable for display?
To make your tree more stable, glue the bottom of the trunk cylinder onto a slightly larger, flat piece of cardstock or cardboard.
You can cut this base into a circle or square and even decorate it to look like grass or a patch of dirt.
For extra weight, you could glue a few coins to the underside of the base.
Can children make this craft?
This is an excellent craft for children, especially with adult supervision for cutting with scissors.
The steps are straightforward, and it encourages creativity and fine motor skills.
Younger children might need help with the precise gluing of the trunk and initial leaf placement.
Our Top Recommended Finds
- Assorted Construction Paper Pack: Offers a wide range of colors and is thicker than printer paper, ideal for sturdy crafts.
- Craft Glue Stick: Less messy than liquid glue, perfect for children and for quick, clean adhesion.
- Safety Scissors: Essential for younger crafters, providing a safe way to cut paper shapes.
Your Next Creative Adventure Awaits
Creating a paper tree is more than just a craft; it’s an exercise in patience and creativity.
You’ve learned the fundamental techniques to bring a miniature forest to life from simple sheets of paper.
Now that you’ve mastered the basic paper tree, why not explore variations?
Try making trees of different sizes, adding intricate details like tiny paper birds, or even creating a whole paper forest scene.
Grab your paper and glue today, and let your imagination take root!
Beginner-friendly templates, step-by-step guides,
and weekly project ideas in your inbox.