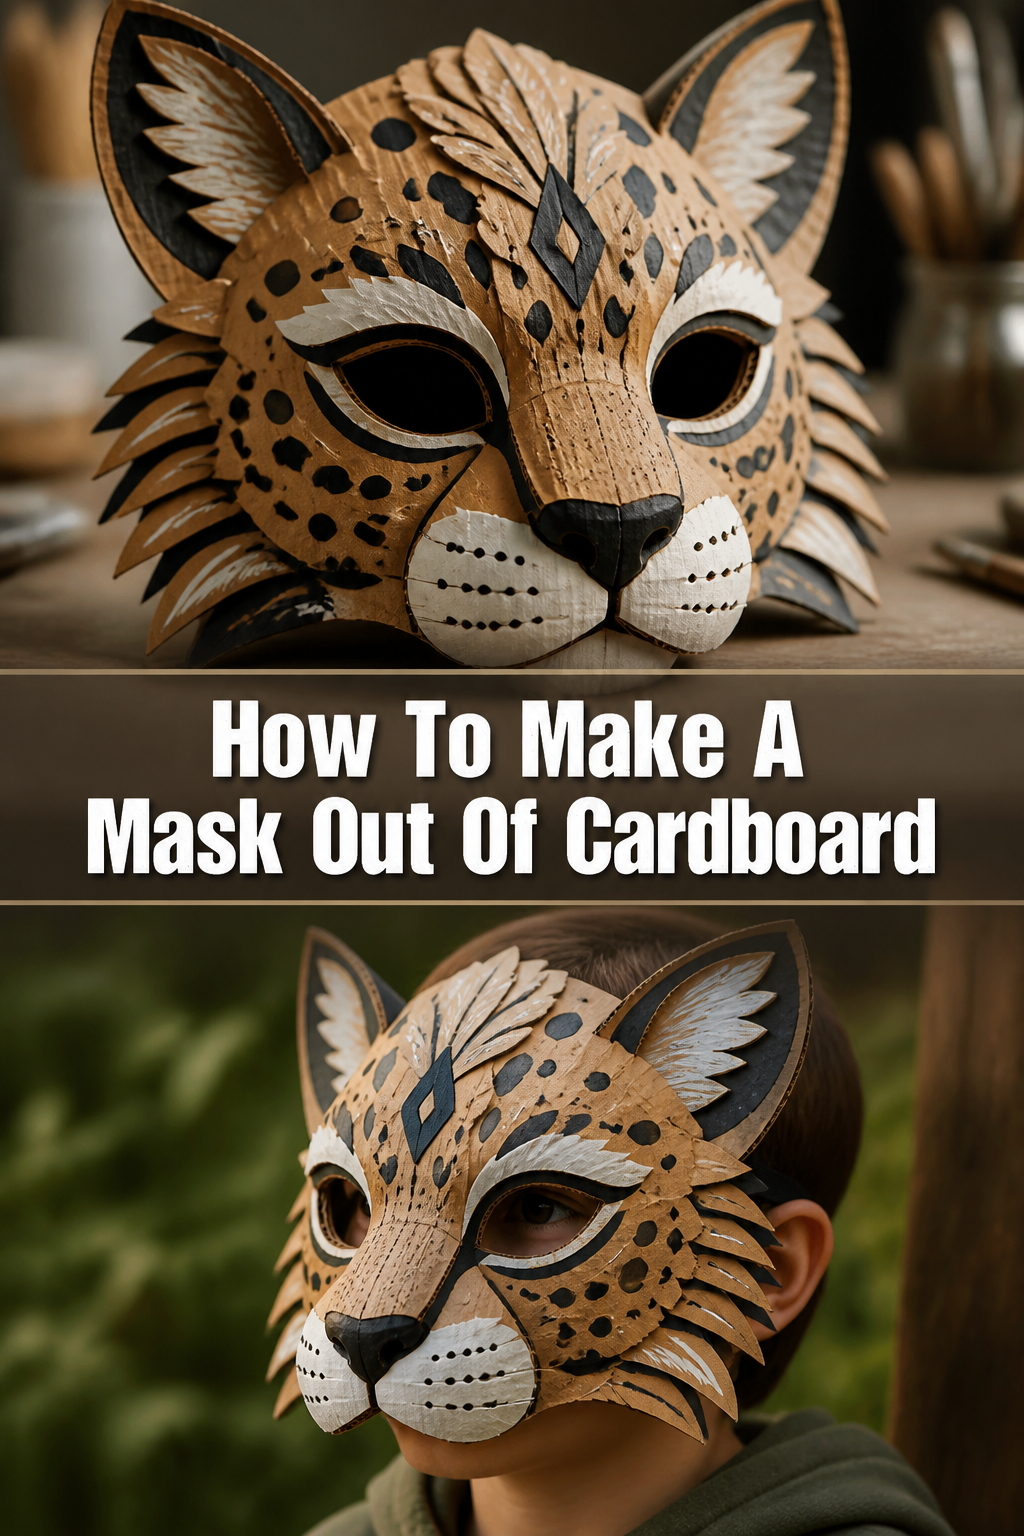
✨ How To Make A Mask Out Of Cardboard

Beginner-friendly templates, step-by-step guides,
and weekly project ideas in your inbox.
Creating a mask out of cardboard is a fantastic way to unleash your creativity and make something truly unique.
I’ve personally spent countless hours transforming humble cardboard boxes into elaborate costumes and props for various events.
This guide distills years of hands-on experience into practical, easy-to-follow steps, ensuring your cardboard mask project is a success.
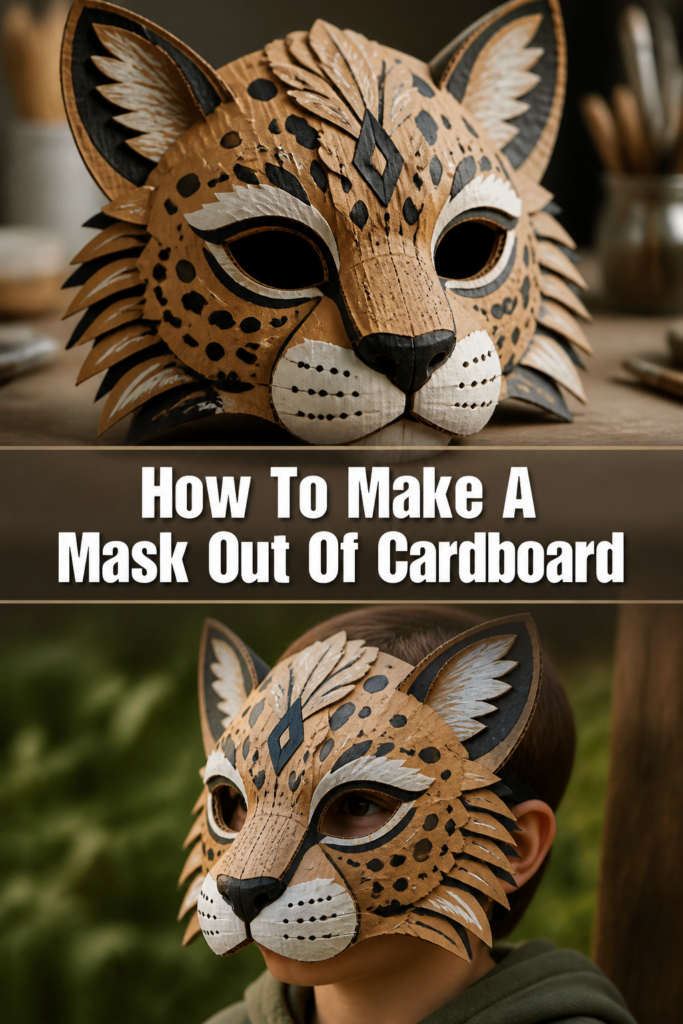
Quick Overview
You’re about to embark on a fun, rewarding project that transforms simple cardboard into a wearable piece of art. This guide will walk you through every stage, from initial design to final decoration.
- Time needed: 3-6 hours (depending on complexity and drying times)
- Difficulty: Beginner to Intermediate
- What you’ll need: Cardboard, scissors, craft knife, ruler, pencil, hot glue gun, paint, brushes, and a few optional embellishments.
Step-by-Step Instructions
Step 1: Gather Your Materials and Workspace
Before you begin, make sure you have all your tools and materials ready. A clear, flat workspace will make the entire process smoother and more enjoyable.
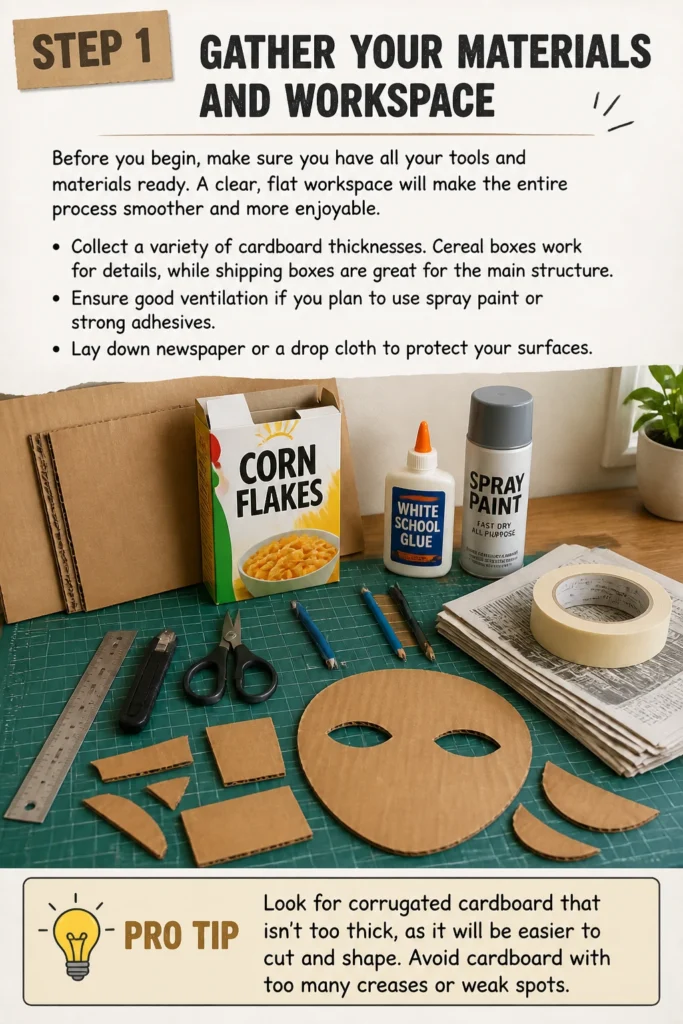
Collect a variety of cardboard thicknesses. Cereal boxes work for details, while shipping boxes are great for the main structure.
Ensure good ventilation if you plan to use spray paint or strong adhesives. Lay down newspaper or a drop cloth to protect your surfaces.
Pro Tip: Look for corrugated cardboard that isn’t too thick, as it will be easier to cut and shape. Avoid cardboard with too many creases or weak spots.
Step 2: Design Your Mask
This is where your imagination takes flight. Think about the character or creature you want your mask to represent.
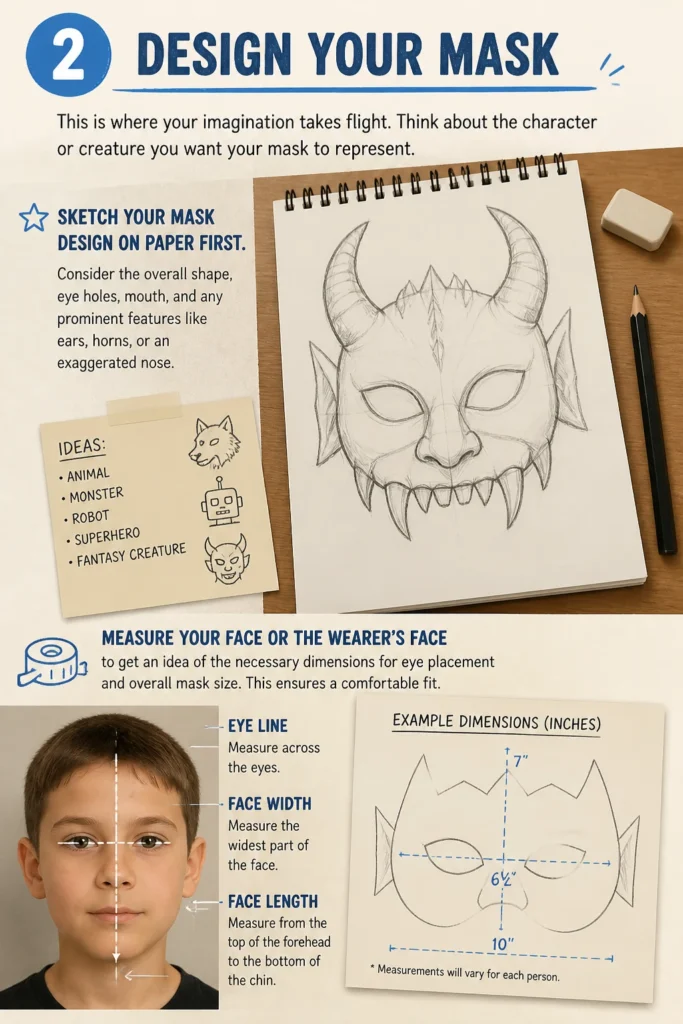
Sketch your mask design on paper first. Consider the overall shape, eye holes, mouth, and any prominent features like ears, horns, or an exaggerated nose.
Measure your face or the wearer’s face to get an idea of the necessary dimensions for eye placement and overall mask size. This ensures a comfortable fit.
Step 3: Cut Out the Base Shape
Transfer your design from paper to cardboard. This forms the foundation of your mask.
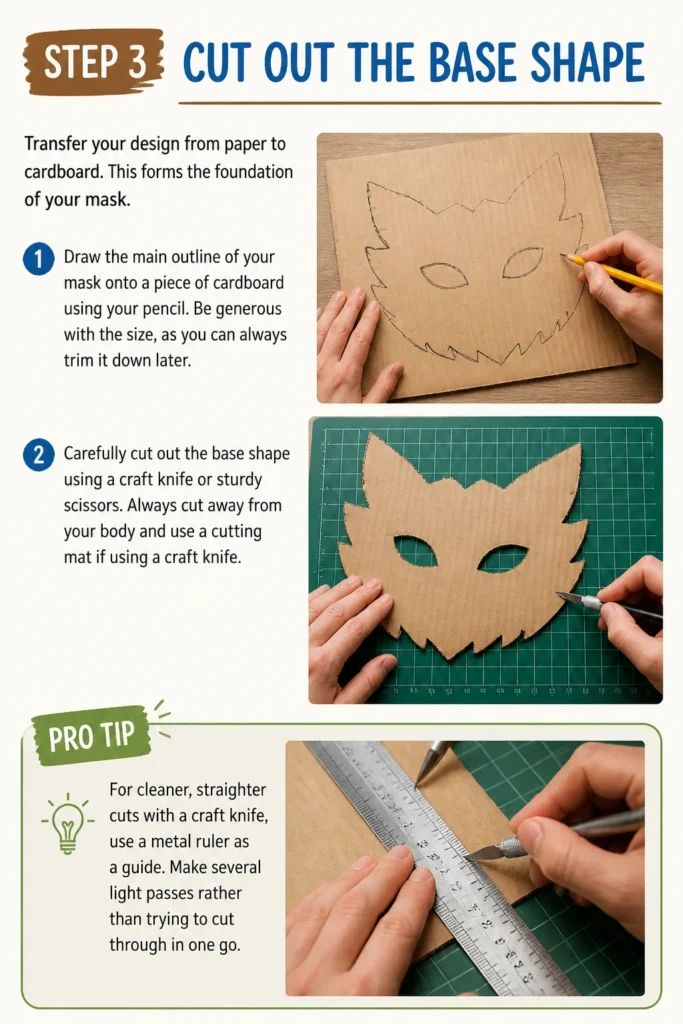
Draw the main outline of your mask onto a piece of cardboard using your pencil. Be generous with the size, as you can always trim it down later.
Carefully cut out the base shape using a craft knife or sturdy scissors. Always cut away from your body and use a cutting mat if using a craft knife.
Pro Tip: For cleaner, straighter cuts with a craft knife, use a metal ruler as a guide. Make several light passes rather than trying to cut through in one go.
Step 4: Create Facial Features and Dimension
Add depth and character to your mask by building out its features. This is where it starts to truly come alive.
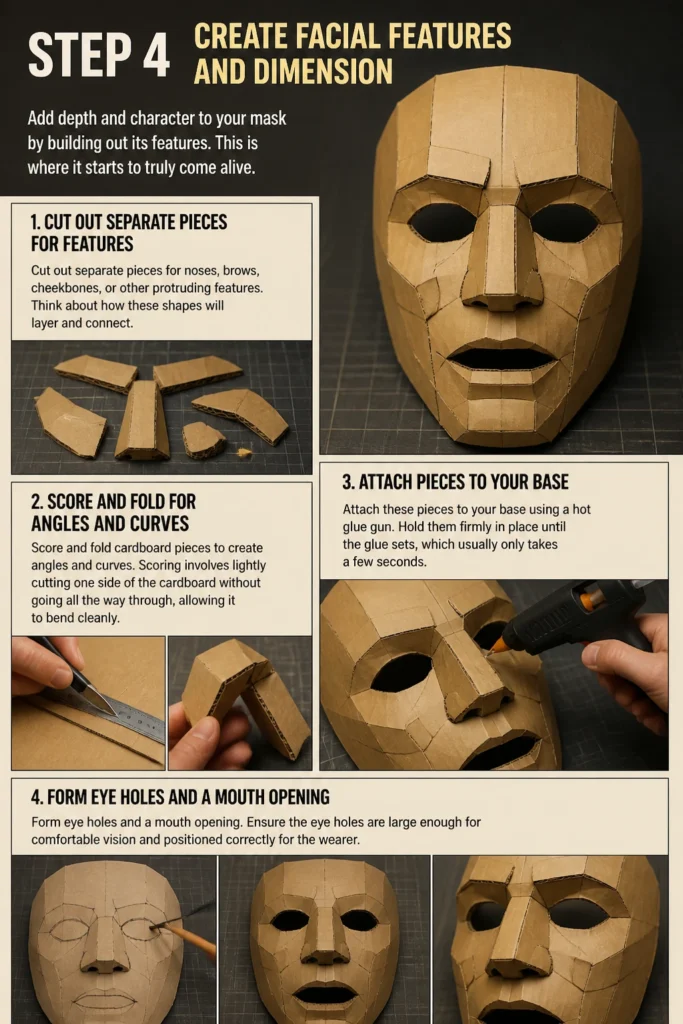
Cut out separate pieces for noses, brows, cheekbones, or other protruding features. Think about how these shapes will layer and connect.
Score and fold cardboard pieces to create angles and curves. Scoring involves lightly cutting one side of the cardboard without going all the way through, allowing it to bend cleanly.
Attach these pieces to your base using a hot glue gun. Hold them firmly in place until the glue sets, which usually only takes a few seconds.
Form eye holes and a mouth opening. Ensure the eye holes are large enough for comfortable vision and positioned correctly for the wearer.
Step 5: Refine and Smooth the Surface
This step prepares your mask for painting and ensures a polished final look.
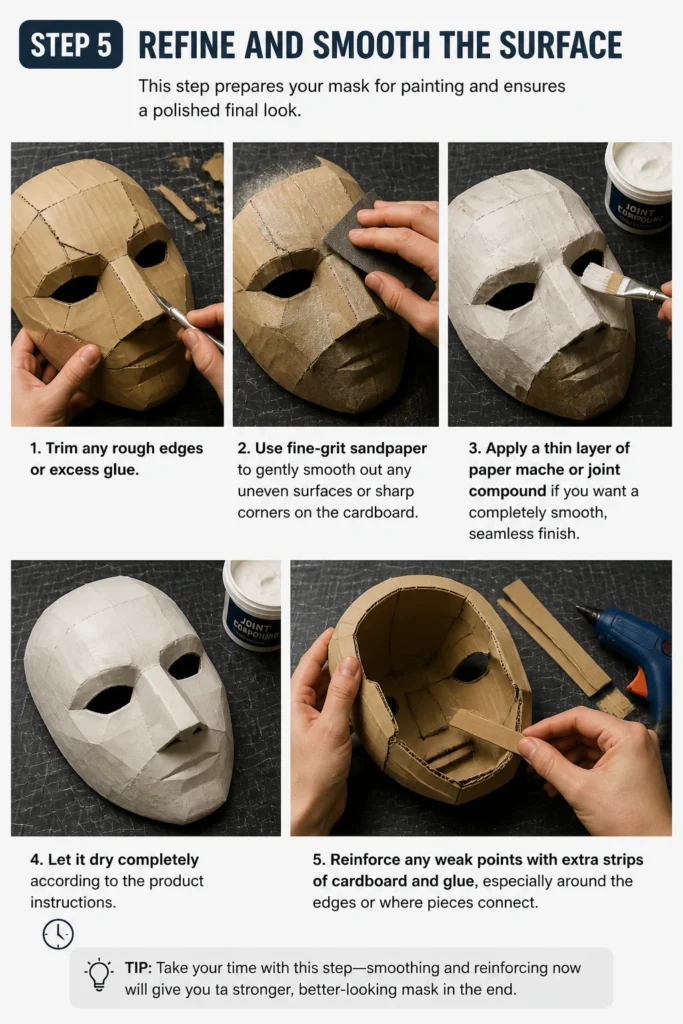
Trim any rough edges or excess glue. Use fine-grit sandpaper to gently smooth out any uneven surfaces or sharp corners on the cardboard.
Apply a thin layer of paper mache or joint compound if you want a completely smooth, seamless finish. Let it dry completely according to the product instructions.
Reinforce any weak points with extra strips of cardboard and glue, especially around the edges or where pieces connect.
Step 6: Prepare for Painting (Priming)
Priming your mask creates a uniform surface, allowing your paint colors to appear more vibrant and adhere better.
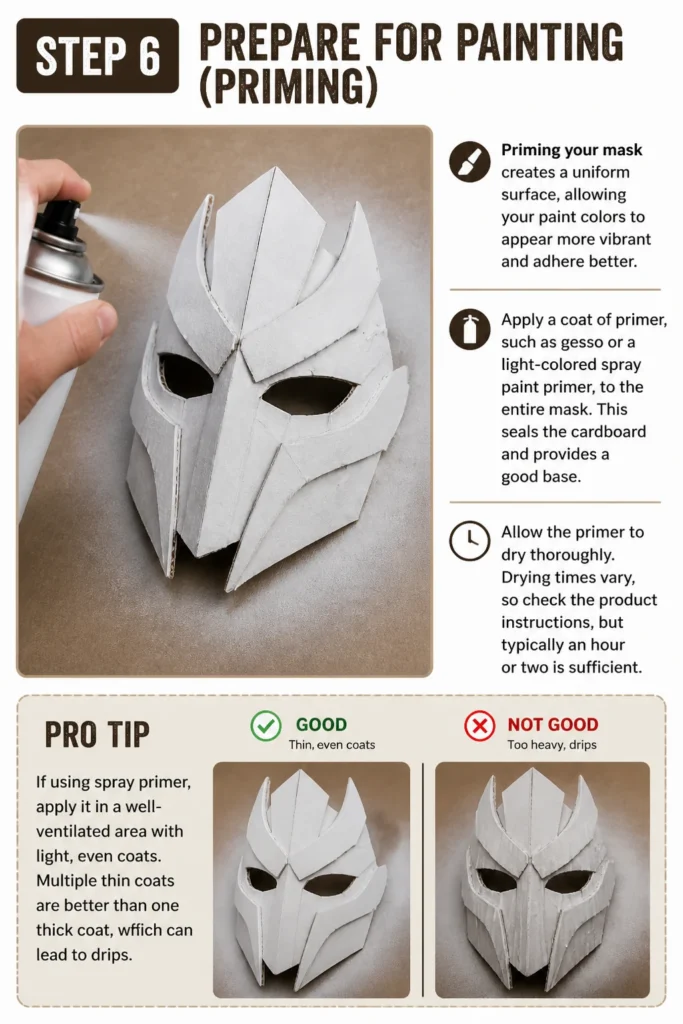
Apply a coat of primer, such as gesso or a light-colored spray paint primer, to the entire mask. This seals the cardboard and provides a good base.
Allow the primer to dry thoroughly. Drying times vary, so check the product instructions, but typically an hour or two is sufficient.
Pro Tip: If using spray primer, apply it in a well-ventilated area with light, even coats. Multiple thin coats are better than one thick coat, which can lead to drips.
Step 7: Paint and Decorate Your Mask
Bring your mask to life with color and intricate details. This is often the most fun and transformative part of the process.
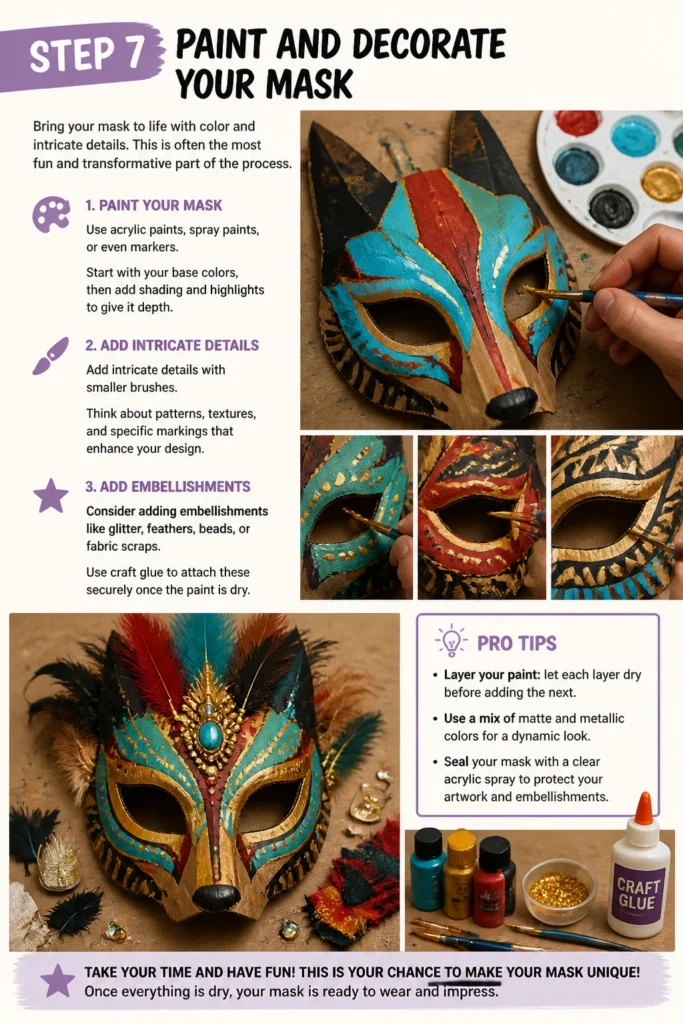
Paint your mask using acrylic paints, spray paints, or even markers. Start with your base colors, then add shading and highlights to give it depth.
Add intricate details with smaller brushes. Think about patterns, textures, and specific markings that enhance your design.
Consider adding embellishments like glitter, feathers, beads, or fabric scraps. Use craft glue to attach these securely once the paint is dry.
Step 8: Add Straps or Attachments
The final step is to make your mask wearable. Choose the attachment method that best suits your design and comfort needs.
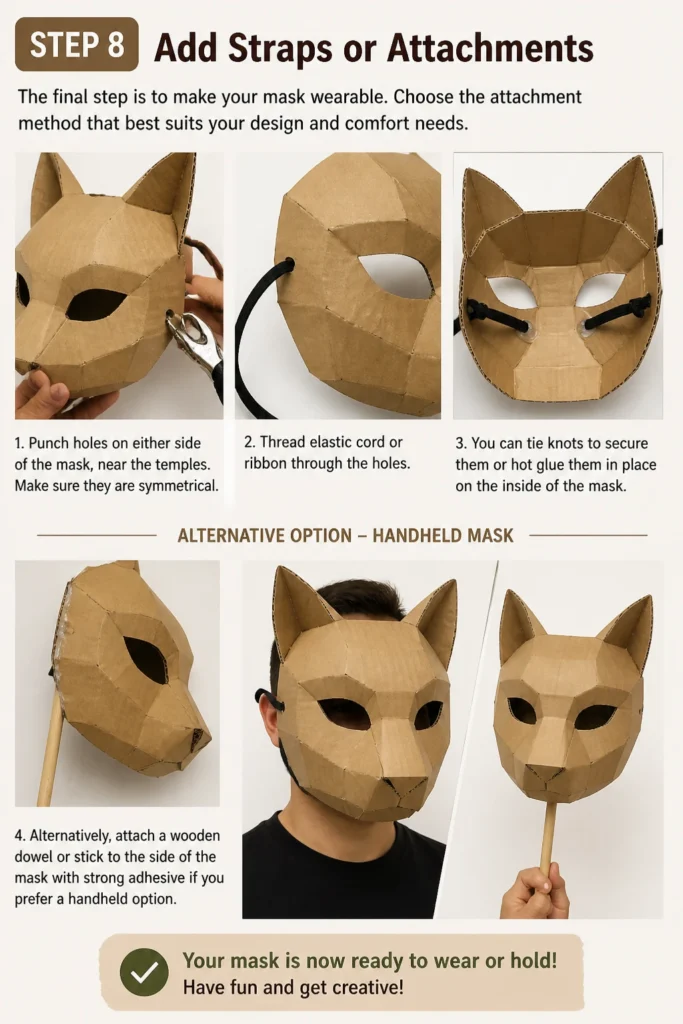
Punch holes on either side of the mask, near the temples. Make sure they are symmetrical.
Thread elastic cord or ribbon through the holes. You can tie knots to secure them or hot glue them in place on the inside of the mask.
Alternatively, attach a wooden dowel or stick to the side of the mask with strong adhesive if you prefer a handheld option.
Common Mistakes to Avoid
Rushing the Drying Process
Impatience can lead to a messy mask. Applying layers of glue or paint before the previous one is fully dry can cause smudges, cracking, or weaken the structure. Always allow ample drying time for each stage.
Take breaks and let materials cure properly. This ensures a stronger, more professional-looking finish that will last longer.
Ignoring Fit and Comfort
A mask that doesn’t fit well or is uncomfortable will quickly become unusable. Forgetting to measure eye placement or making the mask too heavy can ruin the experience.
Regularly test the fit during construction. Make adjustments to eye holes, nose bridges, and strap placement early on to ensure it’s comfortable for extended wear.
Over-saturating Cardboard with Glue or Paint
Cardboard can warp, buckle, or become flimsy when exposed to too much moisture. Applying excessive amounts of wet glue or thick layers of paint can compromise its structural integrity.
Use hot glue sparingly and precisely. Apply paint in thin, even coats, allowing each layer to dry before adding the next. This preserves the cardboard’s strength and shape.
Using Dull Tools
Working with dull scissors or a blunt craft knife makes cutting difficult and dangerous. It can lead to jagged edges, frustration, and a higher risk of injury as you apply more force.
Always use sharp tools. Replace craft knife blades regularly and ensure your scissors are keen. Sharp tools provide cleaner cuts and a safer working experience.
Troubleshooting
Mask Feels Flimsy or Weak
Sometimes, despite your best efforts, parts of the mask might feel less sturdy than desired. This is common, especially with larger or more complex designs.
Reinforce weak areas by gluing additional strips of cardboard to the inside of the mask, particularly along edges or at stress points. You can also apply a layer of paper mache over the entire interior for added strength.
Paint is Cracking or Peeling
This usually happens if the cardboard wasn’t primed properly, or if thick layers of paint were applied without sufficient drying time. The paint isn’t adhering well to the surface.
Gently sand down the affected areas to remove loose paint. Re-prime those spots and then reapply paint in thin, even coats, ensuring each layer is completely dry before adding the next. A clear sealant can also help prevent future issues.
Eye Holes are Misaligned or Too Small
Poor visibility or an uncomfortable fit around the eyes can ruin the mask. This is a common issue if initial measurements weren’t precise.
Carefully trim the eye holes larger with a craft knife, taking off small amounts at a time. If they are severely misaligned, you might need to cover the existing holes with new cardboard and cut fresh ones. Always prioritize comfort and vision.
Key Takeaways
- Design First: Always sketch your mask on paper and measure for fit before cutting cardboard.
- Layer for Dimension: Build up features with separate cardboard pieces to create a 3D effect.
- Precision Cutting: Use sharp tools and a ruler for clean, accurate cuts, especially with a craft knife.
- Allow Drying Time: Patience with glue and paint drying ensures a strong, durable, and clean finish.
- Prime the Surface: A primer coat creates a better base for paint, leading to more vibrant colors and better adhesion.
- Prioritize Comfort: Ensure eye holes and straps are well-placed and comfortable for the wearer.
Frequently Asked Questions
What kind of cardboard is best for making masks?
Corrugated cardboard from shipping boxes or appliance packaging is ideal for structural parts, as it’s sturdy yet workable. Cereal boxes or poster board can be used for smaller details, layered effects, or smoother surfaces.
Can I use regular white glue instead of a hot glue gun?
Yes, you can use strong white craft glue or wood glue, but it will require much longer drying and clamping times. Hot glue is recommended for its quick setting time, which speeds up the construction process significantly.
How can I make my cardboard mask waterproof?
To make your mask more resistant to moisture, you can apply a clear acrylic sealant or varnish after all paint and decorations are completely dry. Several thin coats will offer better protection than one thick coat. This will not make it fully waterproof, but water-resistant.
What if my mask feels too heavy?
A heavy mask can be uncomfortable. To reduce weight, use lighter cardboard for non-structural elements and avoid excessive layers of glue or heavy embellishments. Consider hollowing out or using lighter materials for large protruding features. Proper strap distribution can also help manage weight.
Our Top Recommended Finds
- Hot Glue Gun with Glue Sticks: Essential for quick, strong bonds and efficient construction.
- Craft Knife and Cutting Mat: Provides precise cuts and protects your workspace.
- Acrylic Paint Set: Offers a wide range of colors, dries quickly, and is versatile for cardboard.
Your Cardboard Masterpiece Awaits
You now have all the knowledge and steps needed to transform a simple piece of cardboard into an incredible mask.
Don’t be afraid to experiment with shapes, colors, and textures.
Gather your materials, choose your design, and start creating your very own wearable art today!
Beginner-friendly templates, step-by-step guides,
and weekly project ideas in your inbox.