🌸 How To Make Flowers Out Of Paper

Beginner-friendly templates, step-by-step guides,
and weekly project ideas in your inbox.
There’s a unique joy in crafting something beautiful with your own hands. Few things offer that satisfaction quite like transforming simple paper into delicate, everlasting blooms.
I remember my grandmother teaching me how to fold paper cranes, and that sparked a lifelong love for paper crafts. Making paper flowers is a wonderful extension of that tradition, offering a tangible way to bring beauty into any space. This guide shares my tried-and-true methods, ensuring you can create stunning paper flowers, even if you’re just starting out.
Quick Overview
Get ready to transform plain paper into beautiful, lasting floral art. This guide will walk you through the entire process, from selecting your materials to adding the final touches. You’ll learn fundamental techniques that can be adapted to countless flower styles.
- Time needed: 1-3 hours (depending on flower complexity and quantity)
- Difficulty: Beginner to Intermediate
- What you’ll need: Paper, scissors, glue, pencil, ruler, optional shaping tools
Step-by-Step Instructions
Step 1: Gather Your Materials
Before you begin, lay out all your necessary tools and supplies. Having everything within reach makes the creative process smoother and more enjoyable. A clean, well-lit workspace is also incredibly helpful.
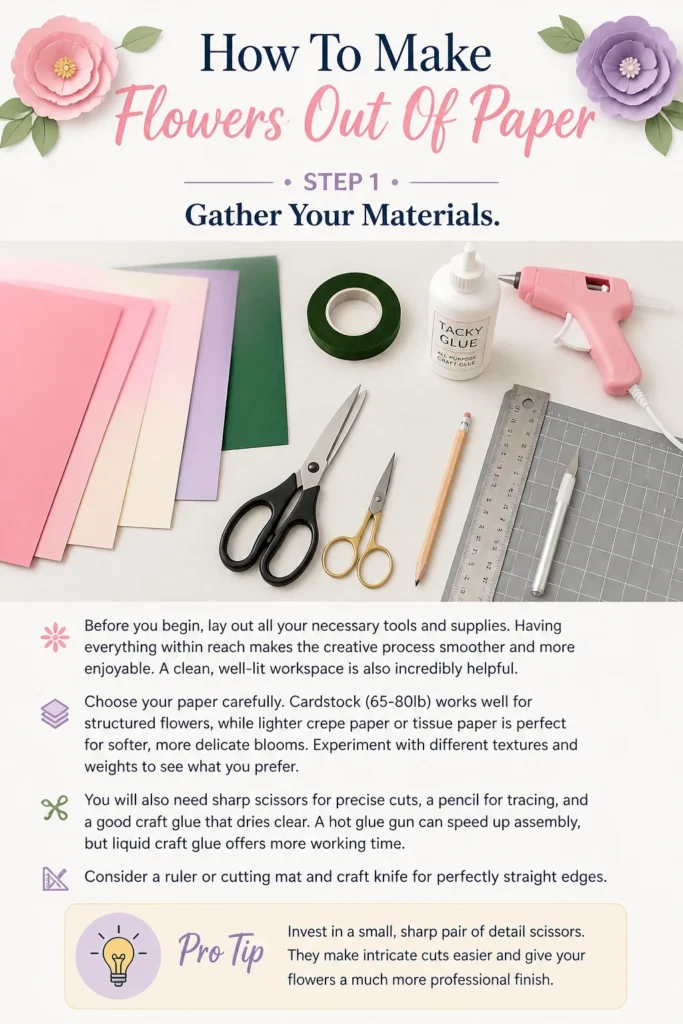
Choose your paper carefully. Cardstock (65-80lb) works well for structured flowers, while lighter crepe paper or tissue paper is perfect for softer, more delicate blooms. Experiment with different textures and weights to see what you prefer.
You will also need sharp scissors for precise cuts, a pencil for tracing, and a good craft glue that dries clear. A hot glue gun can speed up assembly, but liquid craft glue offers more working time. Consider a ruler or cutting mat and craft knife for perfectly straight edges.
Pro Tip: Invest in a small, sharp pair of detail scissors. They make intricate cuts much easier and cleaner, especially for delicate petal shapes.
Step 2: Choose Your Design & Paper
The world of paper flowers is vast, so select a specific flower type to guide your initial creation. A simple rose, a layered peony, or a fringed daisy are excellent starting points for beginners. Each flower has distinct petal shapes and assembly methods.
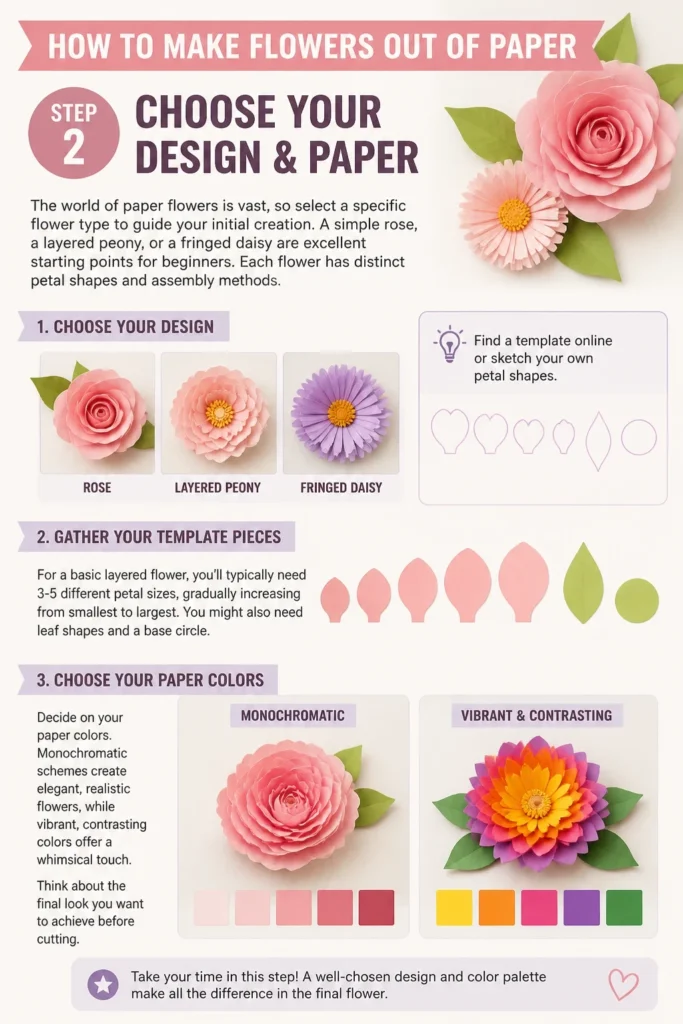
Find a template online or sketch your own petal shapes. For a basic layered flower, you’ll typically need 3-5 different petal sizes, gradually increasing from smallest to largest. You might also need leaf shapes and a base circle.
Decide on your paper colors. Monochromatic schemes create elegant, realistic flowers, while vibrant, contrasting colors offer a whimsical touch. Think about the final look you want to achieve before cutting.
Step 3: Cut Your Petals and Base
With your chosen design and paper ready, it’s time to cut out your components. This step requires patience and precision for the best results.
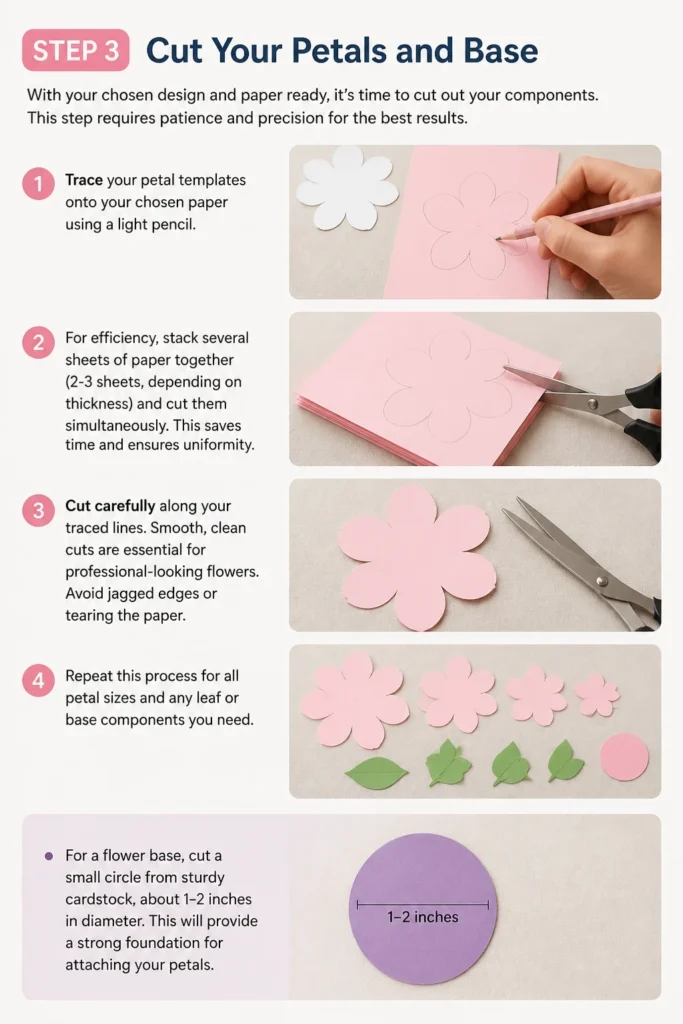
Trace your petal templates onto your chosen paper using a light pencil. For efficiency, stack several sheets of paper together (2-3 sheets, depending on thickness) and cut them simultaneously. This saves time and ensures uniformity.
Cut carefully along your traced lines. Smooth, clean cuts are essential for professional-looking flowers. Avoid jagged edges or tearing the paper. Repeat this process for all petal sizes and any leaf or base components you need.
For a flower base, cut a small circle from sturdy cardstock, about 1-2 inches in diameter. This will provide a strong foundation for attaching your petals.
Step 4: Shape Your Petals
This is where your flat paper pieces truly begin to transform into lifelike petals. Shaping adds dimension, curve, and realism to your flowers.
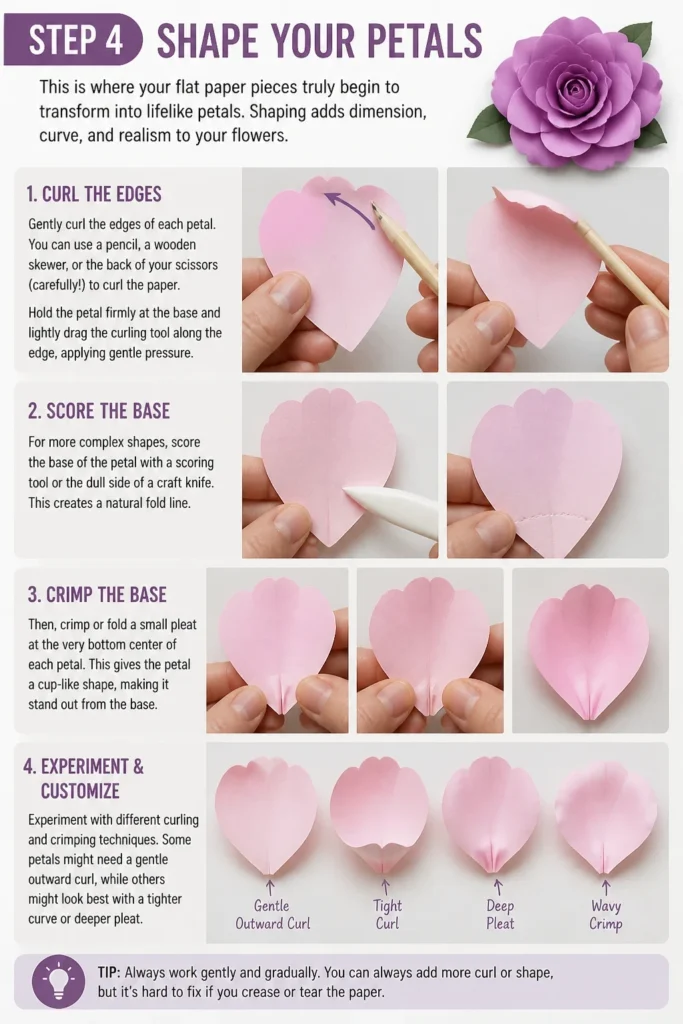
Gently curl the edges of each petal. You can use a pencil, a wooden skewer, or the back of your scissors (carefully!) to curl the paper. Hold the petal firmly at the base and lightly drag the curling tool along the edge, applying gentle pressure.
For more complex shapes, score the base of the petal with a scoring tool or the dull side of a craft knife. This creates a natural fold line. Then, crimp or fold a small pleat at the very bottom center of each petal. This gives the petal a cup-like shape, making it stand out from the base.
Experiment with different curling and crimping techniques. Some petals might need a gentle outward curl, while others might benefit from an inward curve or a soft wave. The goal is to make each petal unique, mimicking nature.
Pro Tip: For realistic texture, gently stretch the middle of crepe paper petals. This creates a beautiful, organic ripple effect that mimics natural petal veins.
Step 5: Assemble the Flower Base
Now that your petals are shaped, it’s time to start building your flower. The base provides the structure and starting point for your bloom.
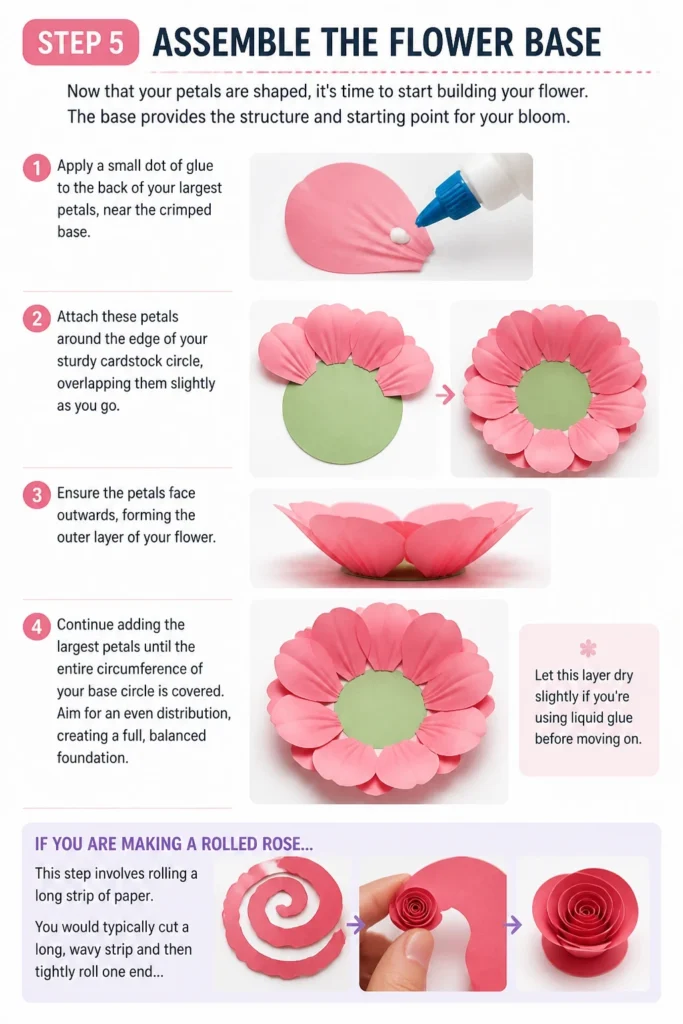
Apply a small dot of glue to the back of your largest petals, near the crimped base. Attach these petals around the edge of your sturdy cardstock circle, overlapping them slightly as you go. Ensure the petals face outwards, forming the outer layer of your flower.
Continue adding the largest petals until the entire circumference of your base circle is covered. Aim for an even distribution, creating a full, balanced foundation. Let this layer dry slightly if you’re using liquid glue before moving on.
If you are making a rolled rose, this step involves rolling a long strip of paper. You would typically cut a long, wavy strip and then tightly roll one end, gradually loosening the roll as you go to create the bloom.
Step 6: Add Layers and Dimension
With the first layer established, you’ll now build inwards, adding depth and fullness to your paper flower. This layering process is key to creating a realistic look.
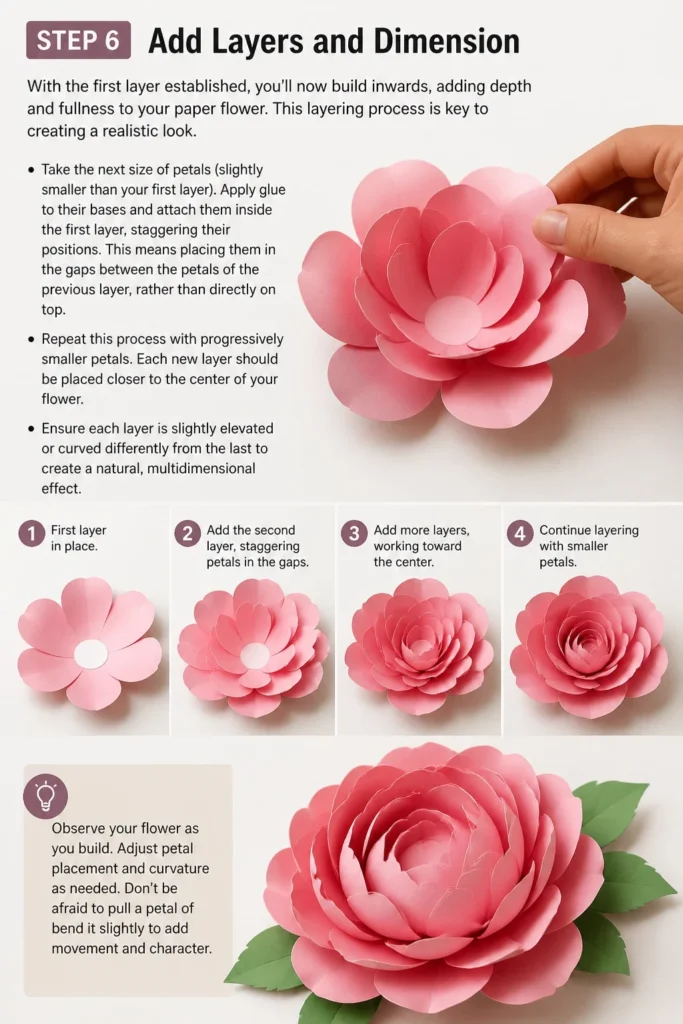
Take the next size of petals (slightly smaller than your first layer). Apply glue to their bases and attach them inside the first layer, staggering their positions. This means placing them in the gaps between the petals of the previous layer, rather than directly on top.
Repeat this process with progressively smaller petals. Each new layer should be placed closer to the center of your flower. Ensure each layer is slightly elevated or curved differently from the last to create a natural, multidimensional effect.
Observe your flower as you build. Adjust petal placement and curvature as needed. Don’t be afraid to pull a petal off and re-glue it if it doesn’t look right.
Step 7: Create the Center
The flower’s center is often its focal point, adding a final touch of detail and realism. There are several ways to approach this, depending on your chosen flower type.
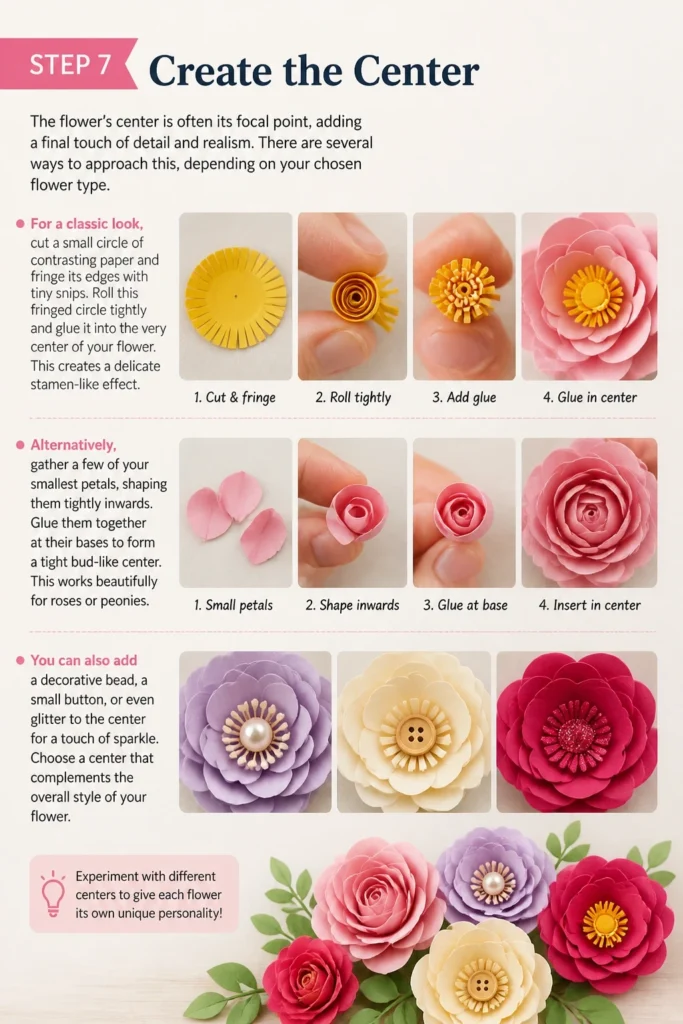
For a classic look, cut a small circle of contrasting paper and fringe its edges with tiny snips. Roll this fringed circle tightly and glue it into the very center of your flower. This creates a delicate stamen-like effect.
Alternatively, gather a few of your smallest petals, shaping them tightly inwards. Glue them together at their bases to form a tight bud-like center. This works beautifully for roses or peonies.
You can also add a decorative bead, a small button, or even glitter to the center for a touch of sparkle. Choose a center that complements the overall style of your flower.
Step 8: Finish and Embellish
Your paper flower is nearly complete! This final step involves refining its appearance and adding any desired embellishments.
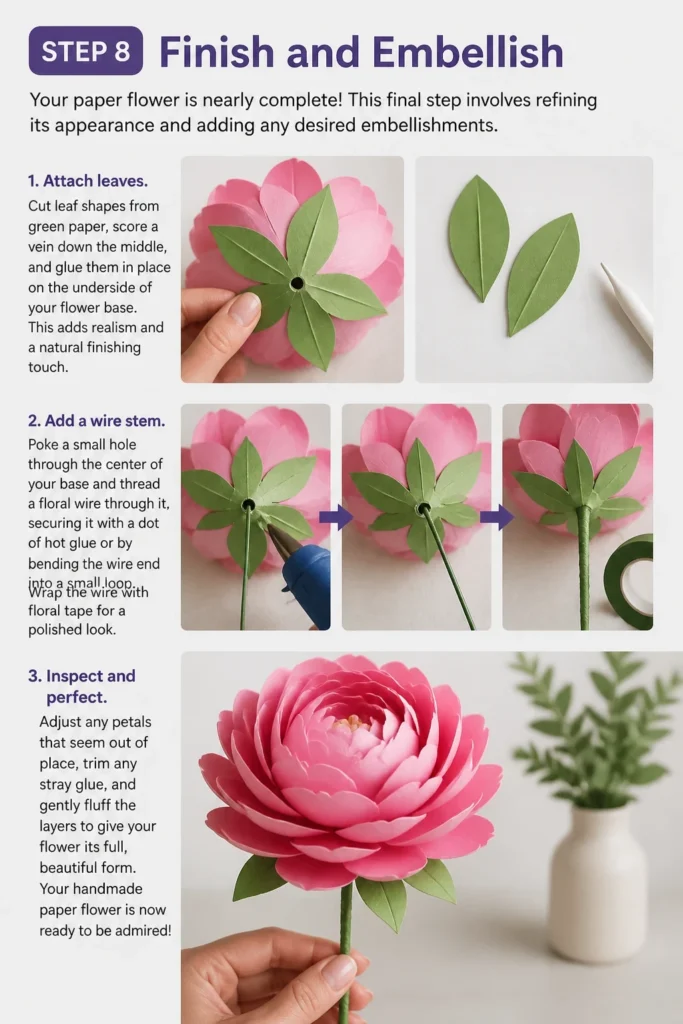
Attach leaves to the underside of your flower base. Cut leaf shapes from green paper, score a vein down the middle, and glue them in place. This adds realism and a natural finishing touch.
Consider adding a wire stem. Poke a small hole through the center of your base and thread a floral wire through it, securing it with a dot of hot glue or by bending the wire end into a small loop. Wrap the wire with floral tape for a polished look.
Finally, inspect your creation. Adjust any petals that seem out of place, trim any stray glue, and gently fluff the layers to give your flower its full, beautiful form. Your handmade paper flower is now ready to be admired!
Common Mistakes to Avoid
Using Dull Scissors
Cutting paper with dull scissors can lead to frustrating results. Instead of clean lines, you’ll get jagged edges, tears, and a generally messy appearance. This detracts significantly from the delicate look you’re trying to achieve with paper flowers. Always ensure your scissors are sharp for crisp, precise cuts that make your petals look professional.
Applying Too Much Glue
It’s tempting to use a generous amount of glue to ensure everything sticks, but excess glue is a common pitfall. Too much glue can seep out, creating shiny, hardened spots, or even warp and wrinkle the paper. Always apply a small, controlled amount of glue, spreading it thinly if necessary. Less is often more when it comes to paper crafting adhesives.
Neglecting Petal Shaping
Skipping or rushing the petal shaping step is a major missed opportunity. Flat, unshaped petals will result in a flat, unrealistic flower that lacks dimension and life. Take the time to curl, crimp, and gently bend each petal. This crucial step is what transforms a simple paper cut-out into a convincing bloom, adding depth and organic movement.
Rushing the Drying Process
Patience is a virtue in paper crafting, especially with glue. Trying to move too quickly before glue has fully set can cause petals to shift, detach, or even tear. This can ruin your meticulous work. Allow adequate drying time between layers, especially if using liquid craft glue. Hot glue dries faster, but still requires a moment to set properly.
Troubleshooting
My Petals Aren’t Curling Properly
If your petals aren’t holding their curl, the paper might be too thick or you’re not applying enough pressure. Try using a slightly lighter weight paper for more delicate curls. Alternatively, apply firmer, consistent pressure with your curling tool along the entire edge of the petal. You can also try gently stretching the paper slightly as you curl.
The Flower Looks Flat and Lifeless
A flat flower usually means the petals haven’t been shaped enough or haven’t been layered with enough dimension. Go back and re-shape some of your petals, adding more pronounced curls or crimps. When layering, ensure each petal is positioned slightly differently from the ones below it, creating varied angles and depths. Don’t be afraid to gently fluff and separate the layers once the glue is dry.
Glue Marks Are Visible
Visible glue marks are often caused by using too much glue or not allowing it to dry clear. If you’re using liquid glue, ensure you’re applying a very thin layer, perhaps even dabbing off excess before pressing. If using hot glue, work quickly and use tiny dots. For existing marks, you can sometimes gently scrape off dried excess with a craft knife (very carefully!) or strategically cover them with a new petal or embellishment.
Key Takeaways
- Precision in cutting and shaping is crucial for realistic paper flowers.
- Layering petals with varied shapes and positions creates essential dimension.
- Patience with drying times prevents shifting and ensures strong bonds.
- Experiment with different papers and tools to discover new techniques.
- Don’t be afraid to adjust and refine your flower as you build it.
- The center of the flower adds a vital finishing touch and detail.
Frequently Asked Questions
What kind of paper is best for paper flowers?
The best paper depends on the flower style you’re aiming for. Cardstock (65-80lb) is excellent for structured, sturdy flowers like roses or peonies, offering good hold for shaping. Crepe paper (heavy or extra-fine) is ideal for more delicate, realistic blooms with natural stretch and texture. Tissue paper works well for very light, airy flowers like cherry blossoms.
Can I use a cutting machine like a Cricut or Silhouette?
Absolutely! Cutting machines are fantastic for creating precise and consistent petal shapes quickly. You can download or design your own SVG templates and let the machine do the intricate cutting. This is especially helpful for making many flowers or very complex designs, saving a lot of time and ensuring uniformity.
How do I make my paper flowers last longer?
To ensure your paper flowers last, keep them away from direct sunlight, which can fade colors over time. Protect them from moisture and excessive humidity, which can cause warping or damage. A light dusting with a soft brush or compressed air can keep them clean. You can also apply a clear craft sealant spray for added durability, though test it on a scrap piece first.
How can I make my paper flowers look more realistic?
Realism comes from careful shaping, layering, and attention to detail. Focus on natural curves, subtle variations in petal size and placement, and a well-crafted center. Observe real flowers for inspiration on color gradients and vein patterns. Adding a touch of color with pastels or ink to the petal edges can also enhance realism.
Our Top Recommended Finds
- Quality Cardstock Pack: A multi-color pack of 65lb cardstock provides versatility for various flower designs.
- Precision Craft Scissors: A small, sharp pair of scissors with fine tips for intricate cuts and clean edges.
- Craft Glue That Dries Clear: A reliable liquid glue like Tacky Glue or a good-quality hot glue gun for quick assembly.
Embrace Your Inner Florist
You’ve just learned the foundational techniques to create beautiful paper flowers. This isn’t just about glue and paper; it’s about bringing a lasting touch of beauty into your world. Each bloom you craft holds a piece of your creativity and patience.
Don’t stop here. Take these steps and let your imagination flourish. Experiment with new papers, different flower designs, and unique embellishments. Your next masterpiece is waiting to be made. Why not pick up some paper today and start your first bloom?
Beginner-friendly templates, step-by-step guides,
and weekly project ideas in your inbox.