✂️ How To Make A Life Size Cardboard Cutout

Beginner-friendly templates, step-by-step guides,
and weekly project ideas in your inbox.
Creating a life-size cardboard cutout is a fantastic project. It adds a unique touch to parties, events, or simply brings a beloved character to life in your home. I’ve made several for friends’ birthdays and charity events, and the reactions are always priceless.
This guide will walk you through every step, ensuring your cutout is sturdy, professional, and a true showstopper. You’ll gain the confidence to tackle this fun DIY project with ease.
Quick Overview
Making your own life-size cutout is a rewarding experience that combines creativity with practical skills. You’ll transform a simple image into a three-dimensional display piece. Get ready to impress everyone with your crafting prowess.
- Time needed: 6-10 hours (including drying time)
- Difficulty: Intermediate
- What you’ll need: A high-resolution image, cardboard, printer, adhesive, cutting tools, and material for a stand.
Step-by-Step Instructions
Step 1: Choose and Prepare Your Image
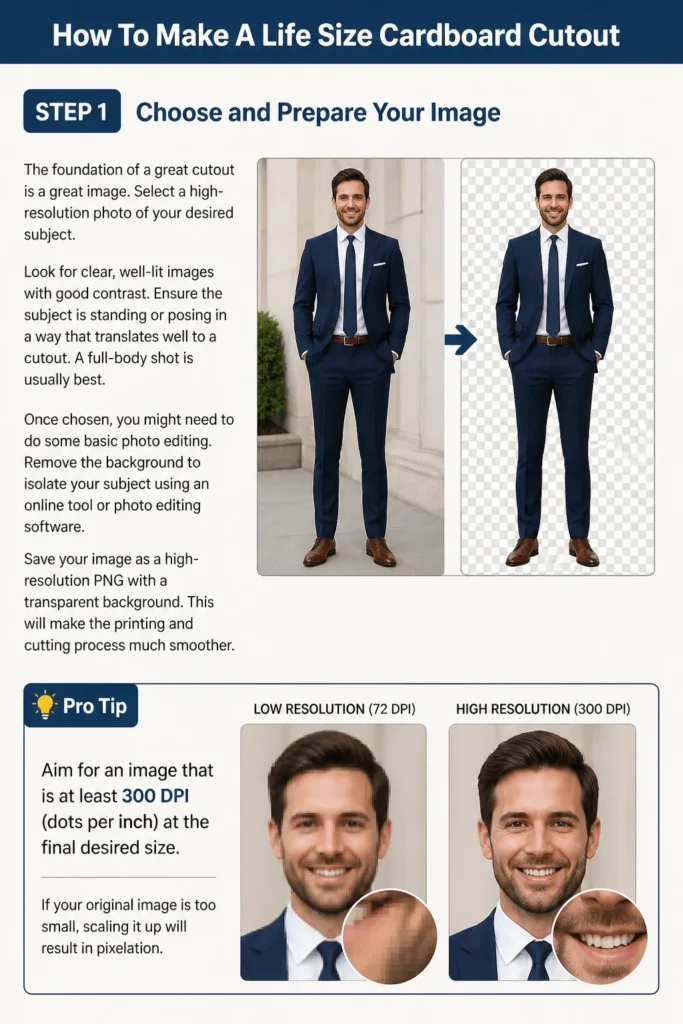
The foundation of a great cutout is a great image. Select a high-resolution photo of your desired subject. Look for clear, well-lit images with good contrast.
Ensure the subject is standing or posing in a way that translates well to a cutout. A full-body shot is usually best.
Once chosen, you might need to do some basic photo editing. Remove the background to isolate your subject using an online tool or photo editing software.
Save your image as a high-resolution PNG with a transparent background. This will make the printing and cutting process much smoother.
Pro Tip: Aim for an image that is at least 300 DPI (dots per inch) at the final desired size. If your original image is too small, scaling it up will result in pixelation.
Step 2: Scale and Print Your Image
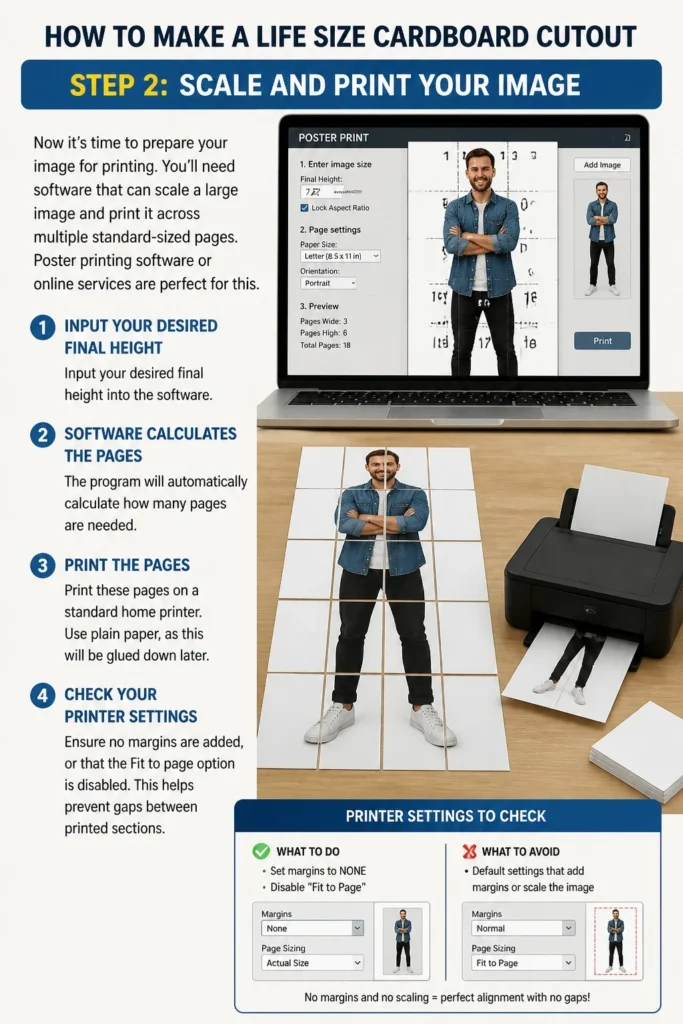
Now it’s time to prepare your image for printing. You’ll need software that can scale a large image and print it across multiple standard-sized pages. Poster printing software or online services are perfect for this.
Input your desired final height into the software. The program will automatically calculate how many pages are needed.
Print these pages on a standard home printer. Use plain paper, as this will be glued down later.
Check your printer settings to ensure no margins are added, or that the “fit to page” option is disabled. This helps prevent gaps between printed sections.
Step 3: Assemble the Printed Sections
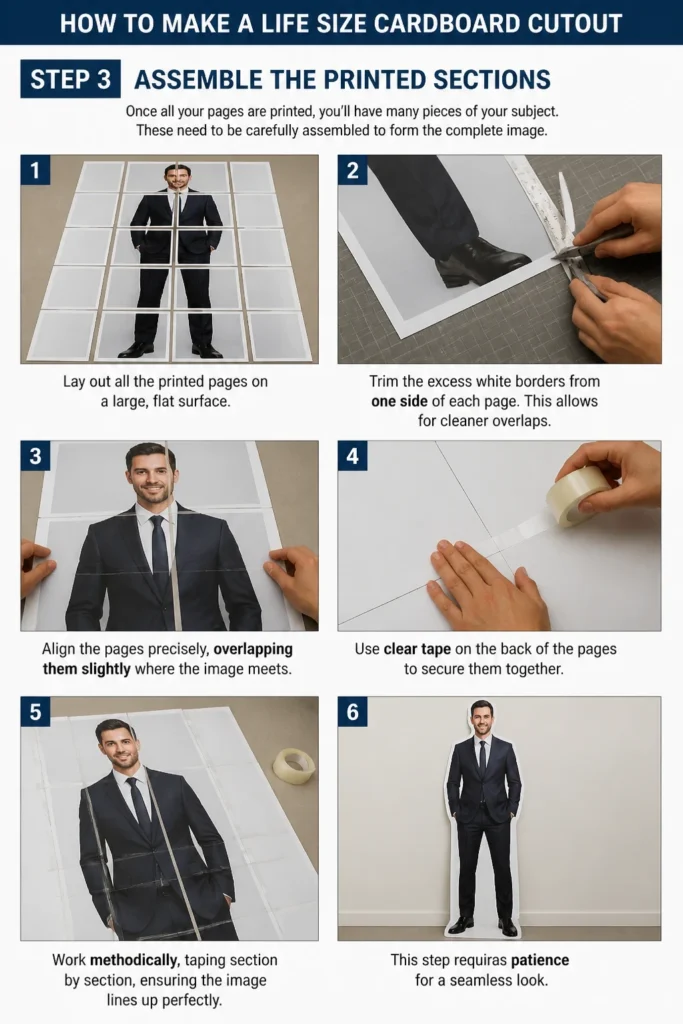
Once all your pages are printed, you’ll have many pieces of your subject. These need to be carefully assembled to form the complete image.
Lay out all the printed pages on a large, flat surface. Arrange them in the correct order, matching the image.
Trim the excess white borders from one side of each page. This allows for cleaner overlaps.
Align the pages precisely, overlapping them slightly where the image meets. Use clear tape on the back of the pages to secure them together.
Work methodically, taping section by section, ensuring the image lines up perfectly. This step requires patience for a seamless look.
Step 4: Attach the Image to Cardboard
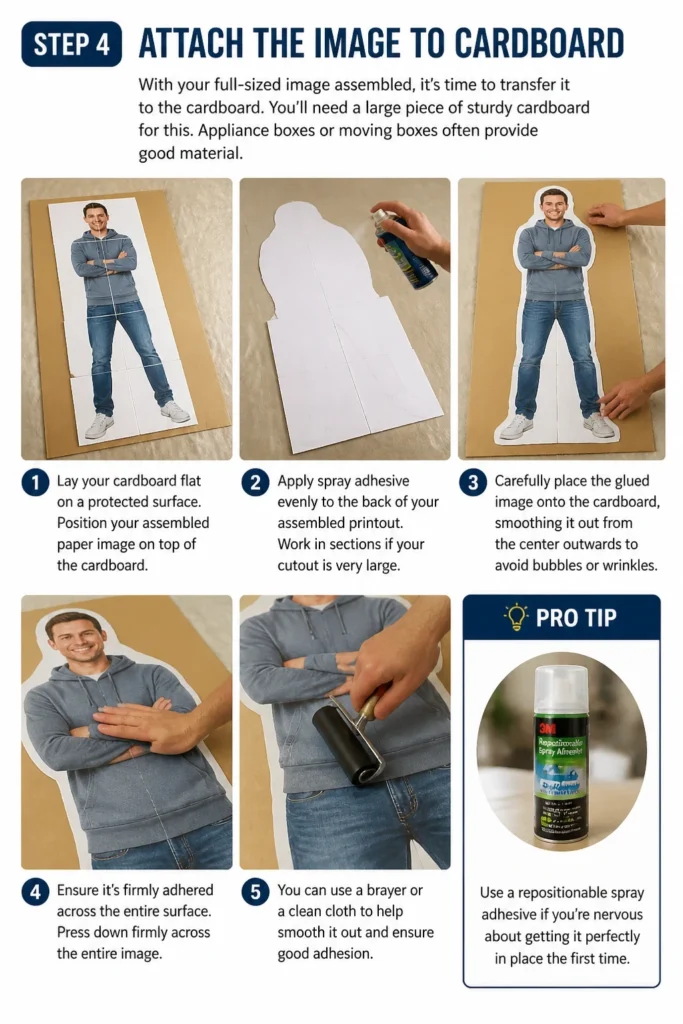
With your full-sized image assembled, it’s time to transfer it to the cardboard. You’ll need a large piece of sturdy cardboard for this. Appliance boxes or moving boxes often provide good material.
Lay your cardboard flat on a protected surface. Position your assembled paper image on top of the cardboard.
Apply spray adhesive evenly to the back of your assembled printout. Work in sections if your cutout is very large.
Carefully place the glued image onto the cardboard, smoothing it out from the center outwards to avoid bubbles or wrinkles. Ensure it’s firmly adhered across the entire surface.
Press down firmly across the entire image. You can use a brayer or a clean cloth to help smooth it out and ensure good adhesion.
Pro Tip: Use a repositionable spray adhesive if you’re nervous about getting it right the first time. It allows for minor adjustments before it sets permanently.
Step 5: Carefully Cut Out the Shape
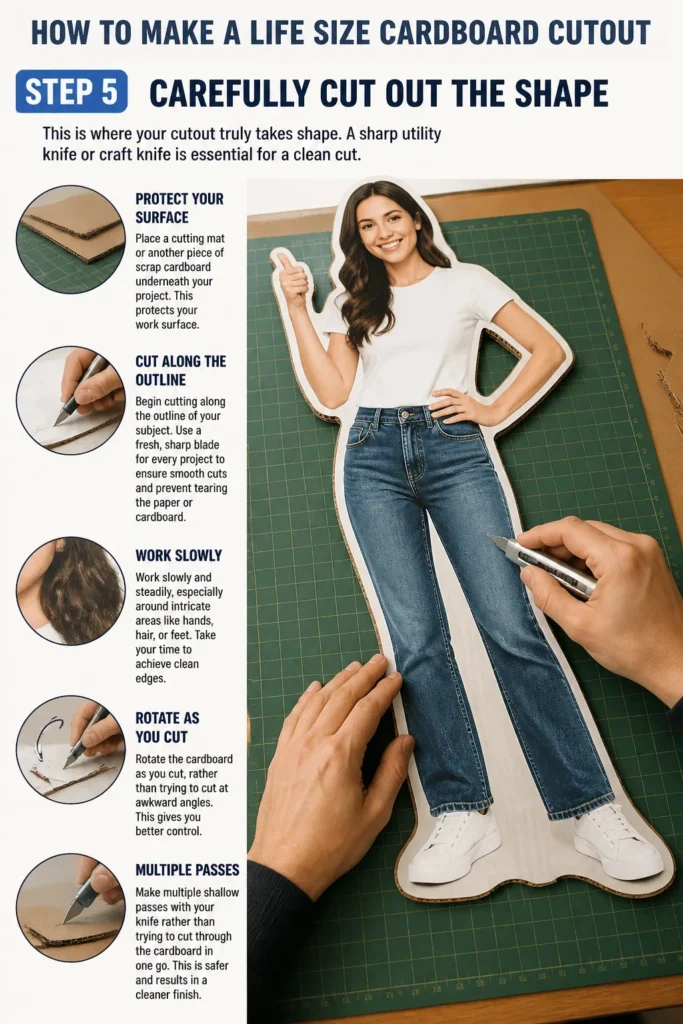
This is where your cutout truly takes shape. A sharp utility knife or craft knife is essential for a clean cut.
Place a cutting mat or another piece of scrap cardboard underneath your project. This protects your work surface.
Begin cutting along the outline of your subject. Use a fresh, sharp blade for every project to ensure smooth cuts and prevent tearing the paper or cardboard.
Work slowly and steadily, especially around intricate areas like hands, hair, or feet. Take your time to achieve clean edges.
Rotate the cardboard as you cut, rather than trying to cut at awkward angles. This gives you better control.
Make multiple shallow passes with your knife rather than trying to cut through the cardboard in one go. This is safer and results in a cleaner finish.
Step 6: Reinforce Edges (Optional but Recommended)
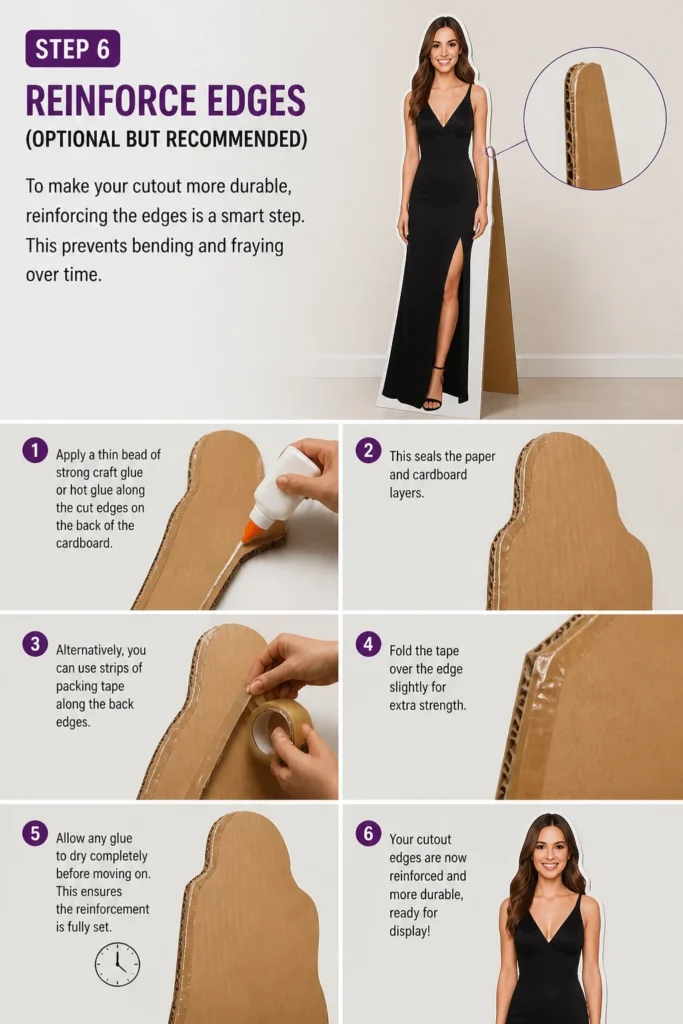
To make your cutout more durable, reinforcing the edges is a smart step. This prevents bending and fraying over time.
Apply a thin bead of strong craft glue or hot glue along the cut edges on the back of the cardboard. This seals the paper and cardboard layers.
Alternatively, you can use strips of packing tape along the back edges. Fold the tape over the edge slightly for extra strength.
Allow any glue to dry completely before moving on. This ensures the reinforcement is fully set.
Step 7: Create a Sturdy Stand
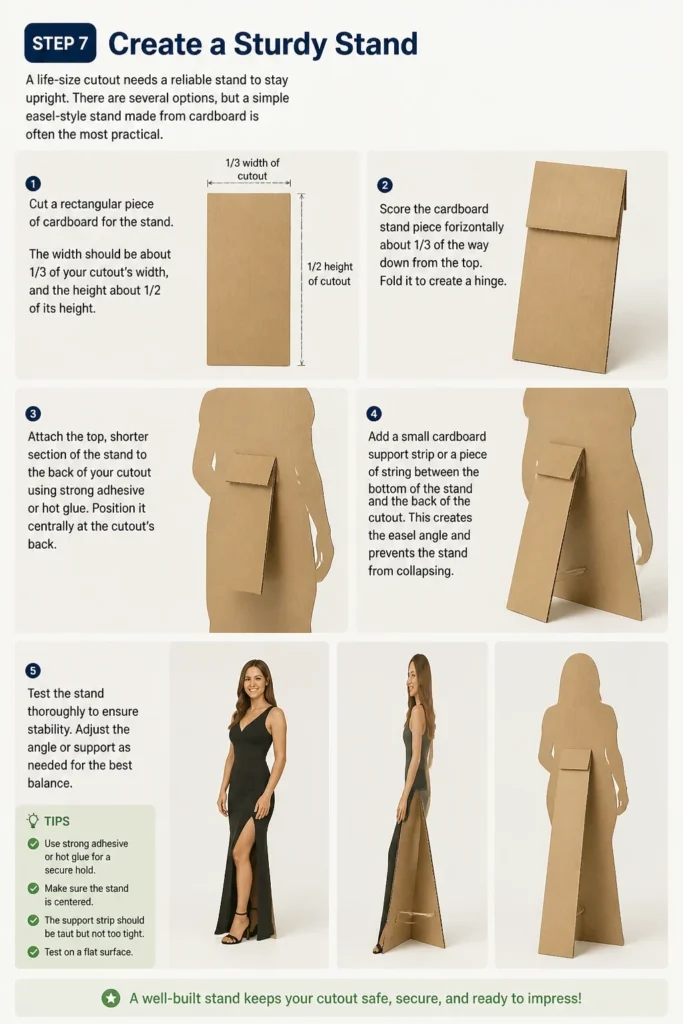
A life-size cutout needs a reliable stand to stay upright. There are several options, but a simple easel-style stand made from cardboard is often the most practical.
Cut a rectangular piece of cardboard for the stand. The width should be about 1/3 of your cutout’s width, and the height about 1/2 of its height.
Score the cardboard stand piece horizontally about 1/3 of the way down from the top. Fold it to create a hinge.
Attach the top, shorter section of the stand to the back of your cutout using strong adhesive or hot glue. Position it centrally at the cutout’s back.
Add a small cardboard support strip or a piece of string between the bottom of the stand and the back of the cutout. This creates the “easel” angle and prevents the stand from collapsing.
Test the stand thoroughly to ensure stability. Adjust the angle of the support strip if needed.
Step 8: Final Touches and Display
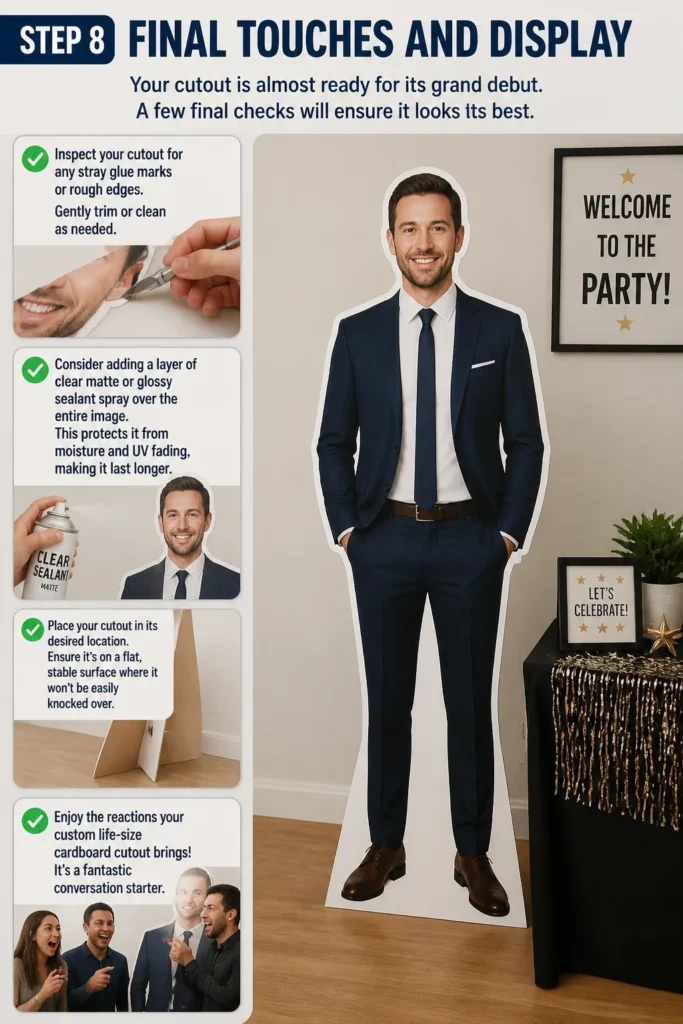
Your cutout is almost ready for its grand debut. A few final checks will ensure it looks its best.
Inspect your cutout for any stray glue marks or rough edges. Gently trim or clean as needed.
Consider adding a layer of clear matte or glossy sealant spray over the entire image. This protects it from moisture and UV fading, making it last longer.
Place your cutout in its desired location. Ensure it’s on a flat, stable surface where it won’t be easily knocked over.
Enjoy the reactions your custom life-size cardboard cutout brings! It’s a fantastic conversation starter.
Common Mistakes to Avoid
Poor Image Resolution
Starting with a low-resolution image is a common pitfall. When scaled up to life size, these images become pixelated and blurry. Always aim for the highest resolution possible, ideally 300 DPI at the target size, to ensure a crisp and professional-looking cutout.
Rushing the Cutting Process
Impatience during cutting often leads to jagged edges or accidental cuts into the subject. Take your time, use a sharp blade, and make multiple light passes. Rushing this step will compromise the overall appearance of your finished project.
Using Weak Adhesive
Some glues can warp the paper or peel over time, causing your image to bubble or detach from the cardboard. Invest in a good quality spray adhesive specifically designed for paper and cardboard. Ensure even application and firm pressing for a secure bond.
Inadequate Stand Support
A wobbling or collapsing cutout is both frustrating and potentially damaging. Many DIYers underestimate the importance of a sturdy stand. Design a stand that is proportionate to the cutout’s size and weight, using strong glue and proper bracing to ensure stability.
Troubleshooting
My Cutout Wobbles and Falls Over
This usually indicates an unstable stand. Check if the stand’s base is wide enough for your cutout’s height. Reinforce the connection points between the stand and the cutout with more glue or additional cardboard strips. Experiment with the angle of the stand’s support to find the most stable position.
Print Lines or Gaps are Visible Between Pages
If you see lines or gaps, the pages weren’t perfectly aligned or trimmed. For future projects, ensure “borderless printing” is selected if available, or trim carefully. For current issues, you can try to fill small gaps with a matching colored marker or paint, or carefully apply a very thin strip of paper over the gap.
Cut Edges Look Rough or Frayed
Rough edges are often caused by a dull blade or cutting too quickly. Replace your utility knife blade frequently for clean cuts. To fix existing rough edges, you can gently sand them with fine-grit sandpaper. Alternatively, carefully trim away the frayed bits with a very sharp craft knife.
Key Takeaways
- Image Quality is Paramount: Always start with a high-resolution image to avoid pixelation when scaled.
- Patience Pays Off: Take your time with printing, assembling, and especially cutting for a professional finish.
- Sturdy Materials Matter: Use strong cardboard and quality adhesive for durability and longevity.
- Sharp Tools are Essential: A fresh, sharp blade makes all the difference in achieving clean, precise cuts.
- Don’t Skimp on the Stand: A well-designed, stable stand is crucial for your cutout to display properly.
- Reinforce for Longevity: Strengthening edges and applying a sealant protects your hard work.
Frequently Asked Questions
How large can I make my cardboard cutout?
The size is primarily limited by the availability of large cardboard sheets and your printer’s ability to handle multi-page printing. With enough cardboard and patience, you can make cutouts several feet tall. Most common cutouts are between 5 to 7 feet tall, matching average human height.
What kind of cardboard is best for this project?
Corrugated cardboard, typically found in appliance or moving boxes, is ideal. Look for double-walled corrugated cardboard for extra rigidity if your cutout is very large or needs to be extra durable. Avoid thin poster board as it won’t be sturdy enough.
Can I make my cutout waterproof for outdoor use?
While cardboard is not inherently waterproof, you can add some protection. After gluing and cutting, spray the entire cutout (front, back, and edges) with multiple coats of a clear, waterproof sealant or lacquer. This will offer some resistance to light moisture, but it’s not truly waterproof and prolonged exposure to rain will still damage it.
Our Top Recommended Finds
- Heavy-Duty Spray Adhesive: Ensures a strong, lasting bond between your print and the cardboard without warping.
- Precision Craft Knife Set with Extra Blades: Essential for intricate cutting, providing clean lines and easy blade replacement.
- Large Self-Healing Cutting Mat: Protects your work surface and extends the life of your knife blades during the cutting process.
Bring Your Vision to Life
You now have all the knowledge and steps needed to create your very own life-size cardboard cutout. From selecting the perfect image to crafting a sturdy stand, each stage is an opportunity to add your personal touch. This project is more than just cutting cardboard; it’s about transforming an idea into a tangible, impressive display.
So, gather your materials, clear your workspace, and get ready to create something truly memorable. Don’t wait—start planning your first life-size cardboard cutout today and watch your vision come to life!
Beginner-friendly templates, step-by-step guides,
and weekly project ideas in your inbox.