👗 How To Make A Dress Out Of A Shirt

Beginner-friendly templates, step-by-step guides,
and weekly project ideas in your inbox.
Transforming an old shirt into a stylish new dress is one of the most rewarding sewing projects you can undertake. I’ve personally upcycled countless forgotten garments into unique, wearable pieces. This guide will walk you through every practical step to create your own shirt-to-dress masterpiece.
You don’t need years of sewing experience to achieve fantastic results. Just a little patience and the right instructions are all it takes.

Quick Overview
This project will empower you to create a custom-fitted dress from a shirt you already own, giving it a brand new life. You’ll gain valuable sewing skills and end up with a truly unique garment.
- Time needed: 3-6 hours (depending on detail and experience)
- Difficulty: Beginner
- What you’ll need: An oversized shirt, sewing machine (or needle), thread, fabric scissors, pins, measuring tape, fabric chalk, seam ripper.
Step-by-Step Instructions
Step 1: Choose Your Shirt & Vision
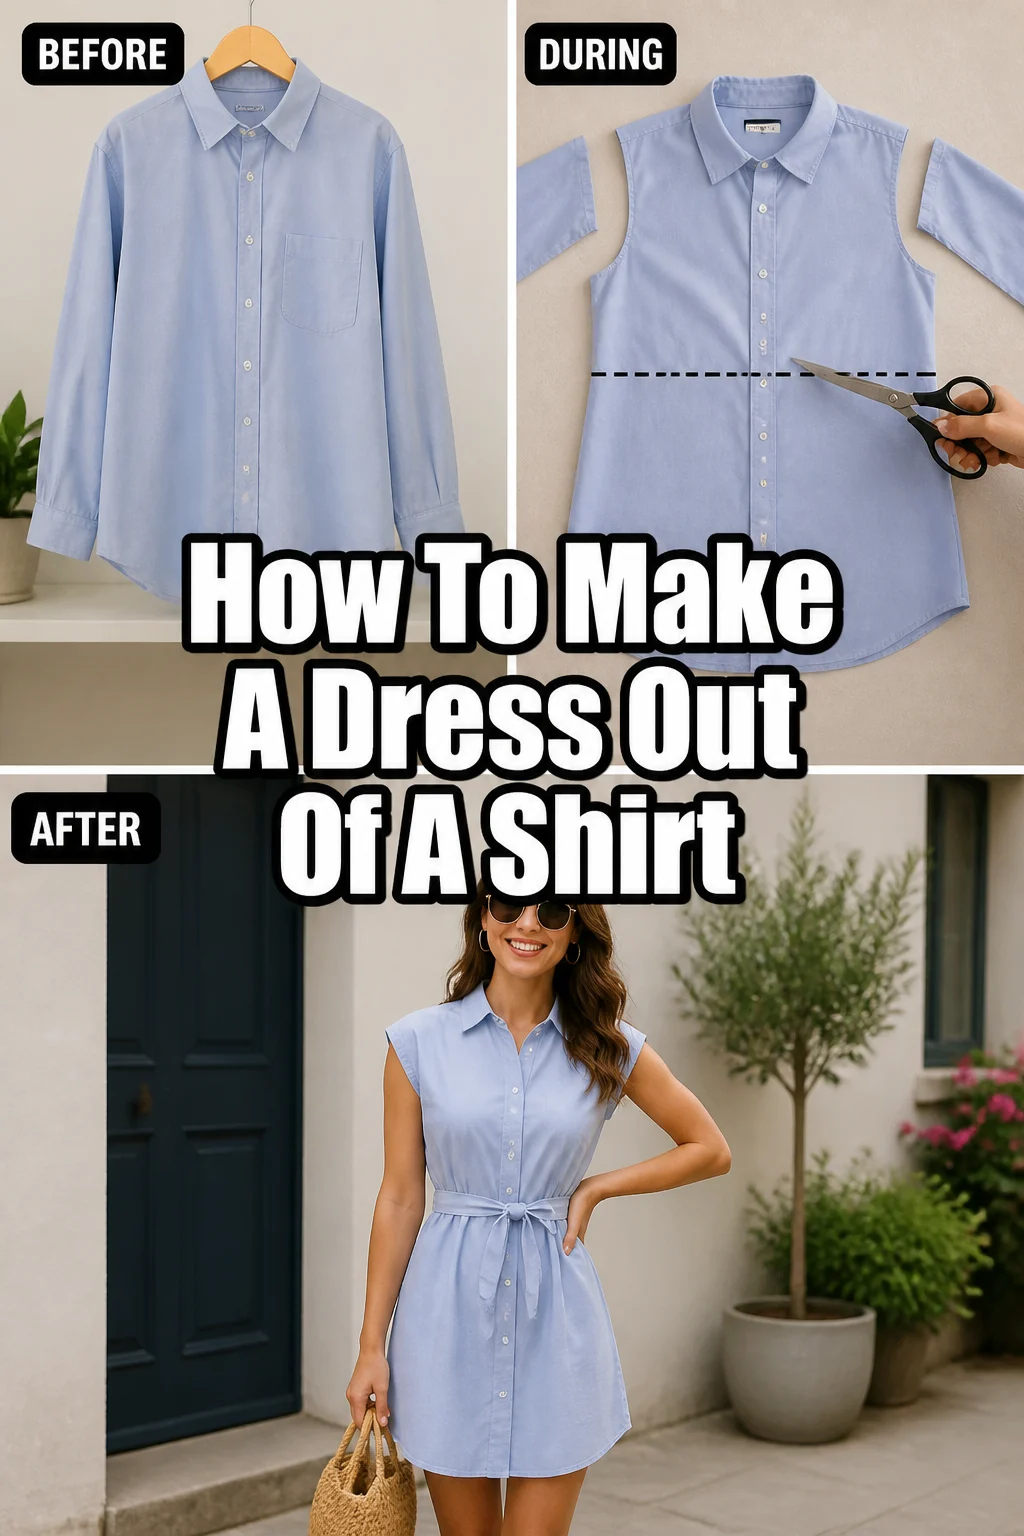
Begin by selecting the perfect shirt for your transformation. An oversized men’s button-down shirt is often ideal due to its generous fabric and structure, but a large t-shirt or tunic can also work. Consider the fabric type – cotton, linen, or chambray are excellent choices for beginners because they are easy to work with.
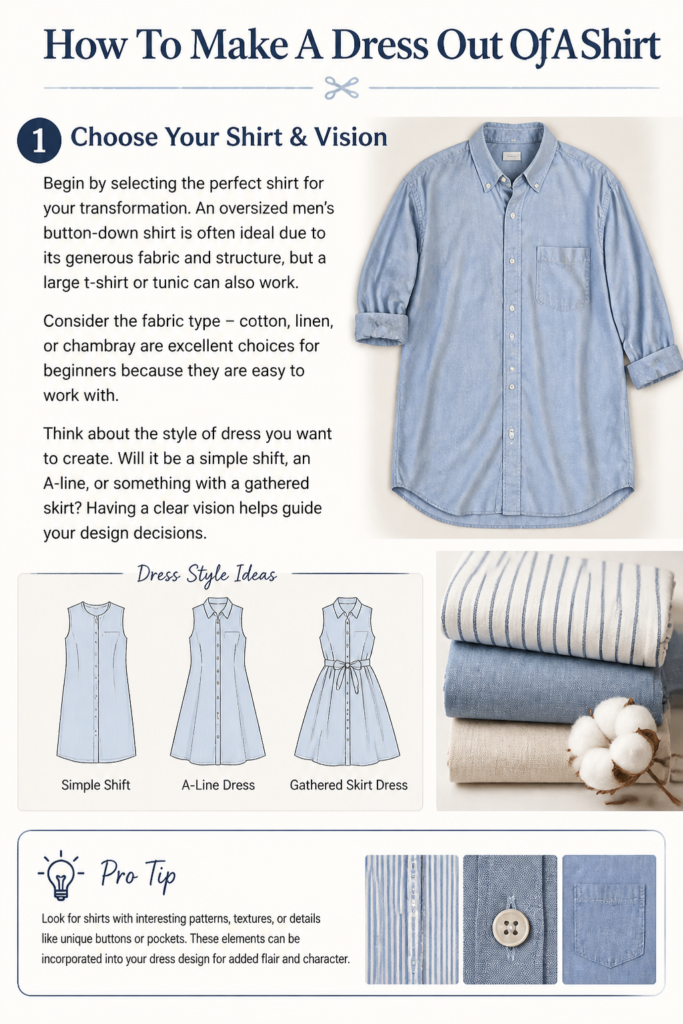
Think about the style of dress you want to create. Will it be a simple shift, an A-line, or something with a gathered skirt? Having a clear vision helps guide your design decisions.
Pro Tip: Look for shirts with interesting patterns, textures, or details like unique buttons or pockets. These elements can be incorporated into your dress design for added flair and character.
Step 2: Prepare Your Workspace & Tools
Clear a large, flat surface for cutting and laying out your fabric. A clean floor or dining table works well. Gather all your essential tools; having everything within reach streamlines the process.
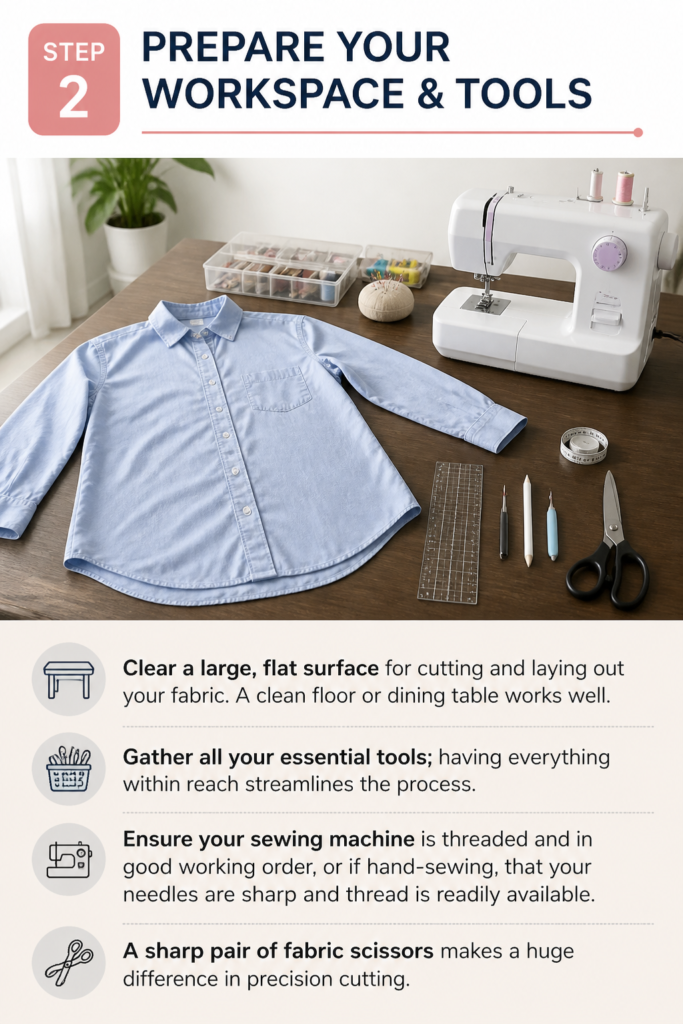
Ensure your sewing machine is threaded and in good working order, or if hand-sewing, that your needles are sharp and thread is readily available. A sharp pair of fabric scissors makes a huge difference in precision cutting.
Step 3: Measure & Mark Your Cut Lines
First, try on the shirt and decide on the desired length of your dress. Use a measuring tape to mark this length from your shoulder down, adding an extra inch for the hem. Mark this point with fabric chalk or a pin.
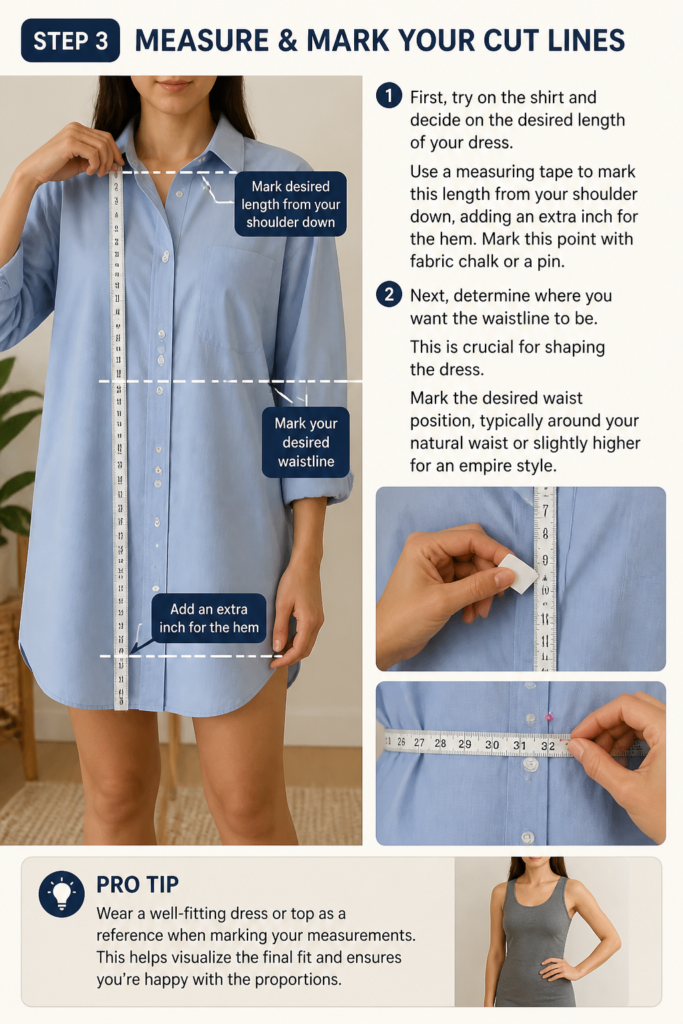
Next, determine where you want the waistline to be. This is crucial for shaping the dress. Mark the desired waist position, typically around your natural waist or slightly higher for an empire style.
Pro Tip: Wear a well-fitting dress or top as a reference when marking your measurements. This helps visualize the final fit and ensures you’re happy with the proportions.
Step 4: Deconstruct & Cut the Shirt
Carefully lay your shirt flat and smooth it out. Using your fabric chalk, draw a straight line across the shirt at your marked waistline. This will separate the top (bodice) from the bottom (skirt).
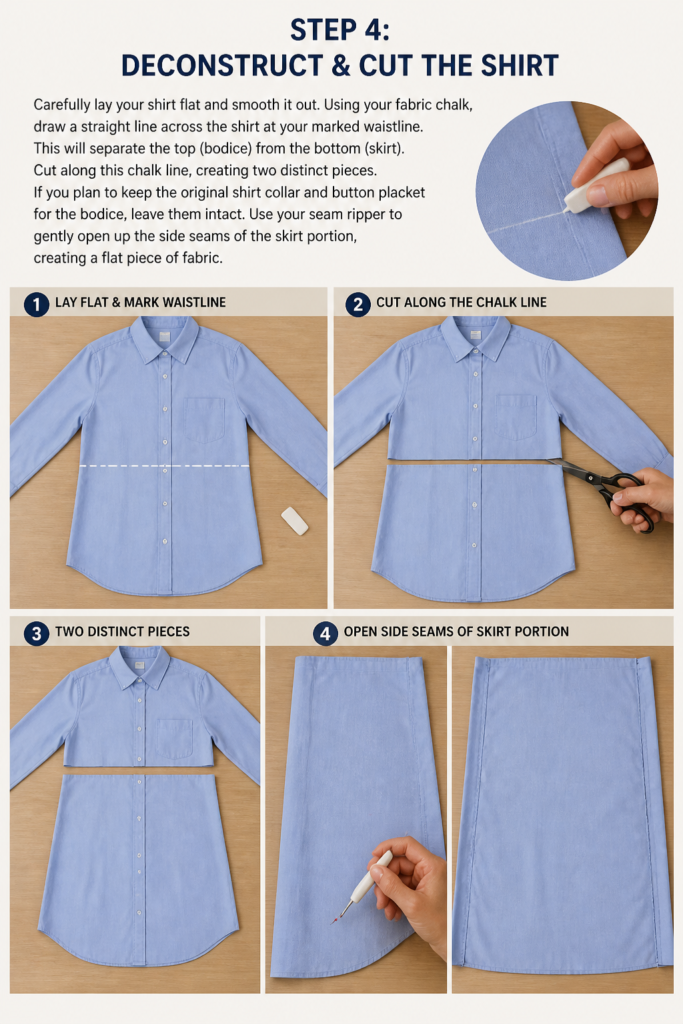
Cut along this chalk line, creating two distinct pieces. If you plan to keep the original shirt collar and button placket for the bodice, leave them intact. Use your seam ripper to gently open up the side seams of the skirt portion, creating a flat piece of fabric.
Step 5: Shape the Bodice
Put on the shirt bodice and pin it to fit your body snugly but comfortably. Focus on the side seams and the underarm area. Take it off carefully, then draw new seam lines following your pins with fabric chalk.
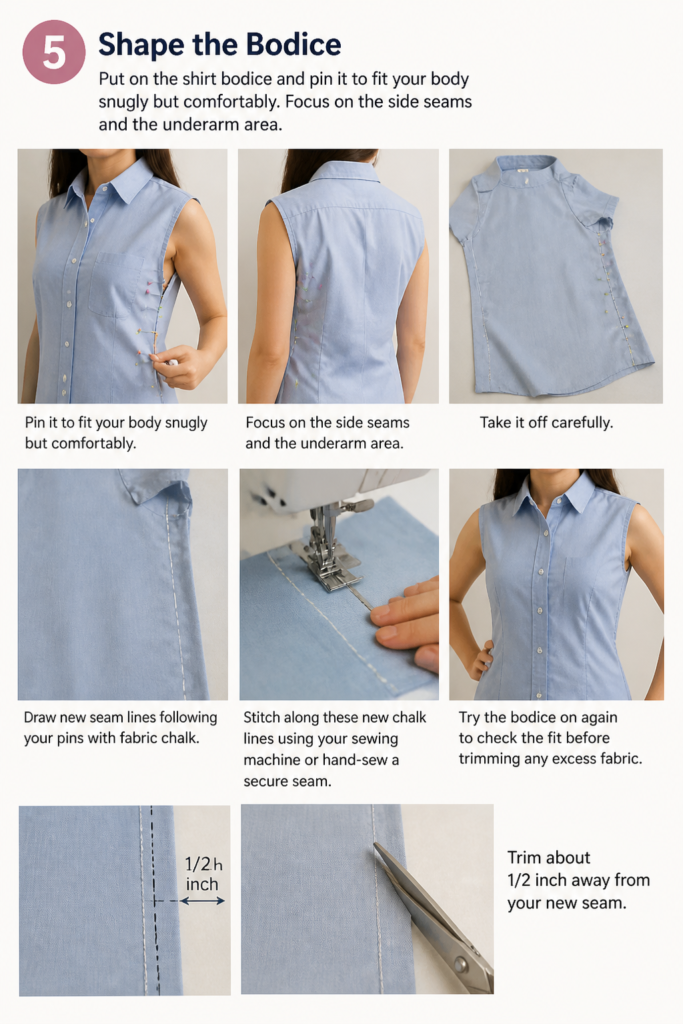
Stitch along these new chalk lines using your sewing machine or hand-sew a secure seam. Try the bodice on again to check the fit before trimming any excess fabric. Trim about 1/2 inch away from your new seam.
Step 6: Prepare the Skirt Panel
Take the deconstructed skirt fabric and lay it flat. For a simple A-line, you might just keep the width as is. For a gathered skirt, you’ll want to utilize the full width of the fabric from the bottom of the shirt.
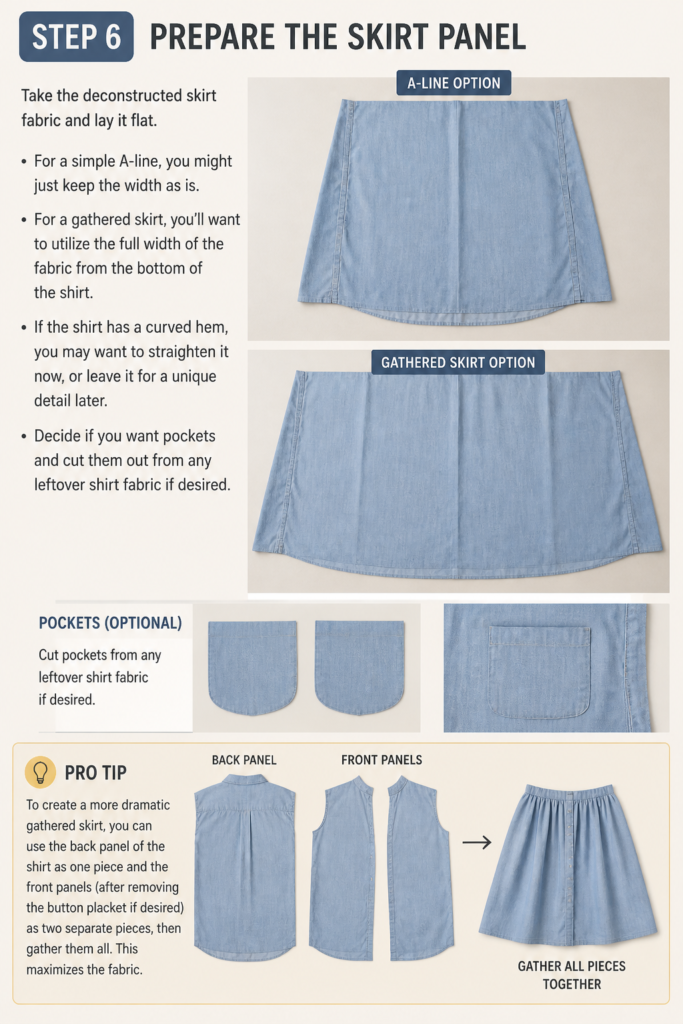
If the shirt has a curved hem, you may want to straighten it now, or leave it for a unique detail later. Decide if you want pockets and cut them out from any leftover shirt fabric if desired.
Pro Tip: To create a more dramatic gathered skirt, you can use the back panel of the shirt as one piece and the front panels (after removing the button placket if desired) as two separate pieces, then gather them all. This maximizes the fabric.
Step 7: Attach the Skirt to the Bodice
If you’re creating a gathered skirt, run two rows of basting stitches along the top edge of your skirt panel. Gently pull the bobbin threads to gather the fabric until it matches the bottom circumference of your bodice. Distribute the gathers evenly.
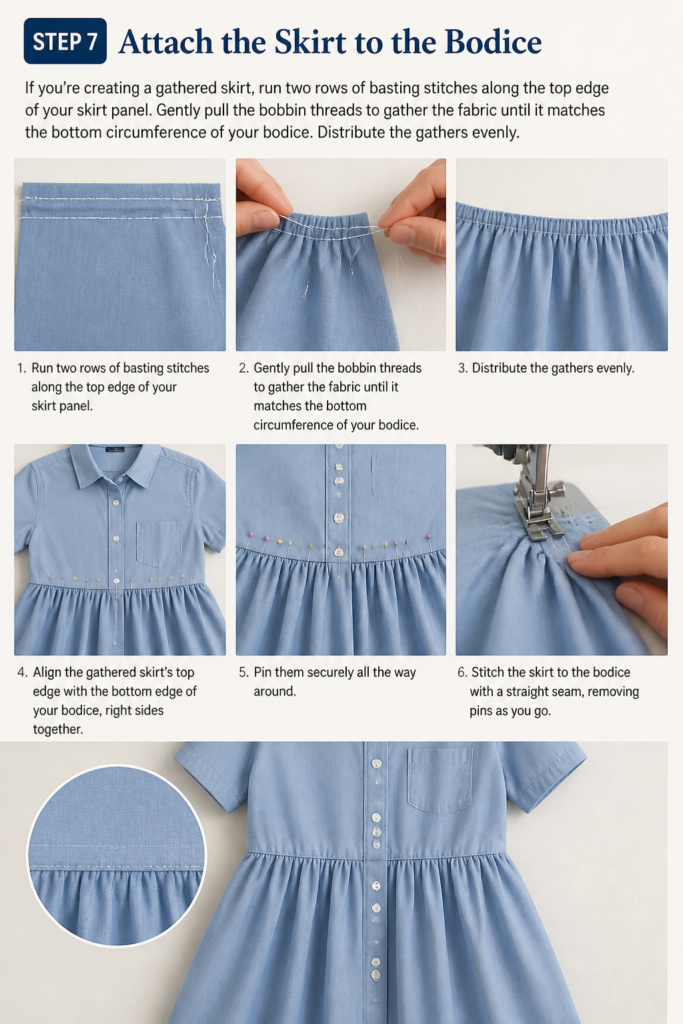
Align the gathered skirt’s top edge with the bottom edge of your bodice, right sides together. Pin them securely all the way around. Stitch the skirt to the bodice with a straight seam, removing pins as you go.
Step 8: Finish the Armholes & Neckline
If your original shirt had sleeves and you removed them, you’ll need to finish the raw armhole edges. You can do this by creating a narrow rolled hem, using bias tape, or adding small cap sleeves from leftover fabric. A simple rolled hem involves turning the fabric edge under twice and stitching.
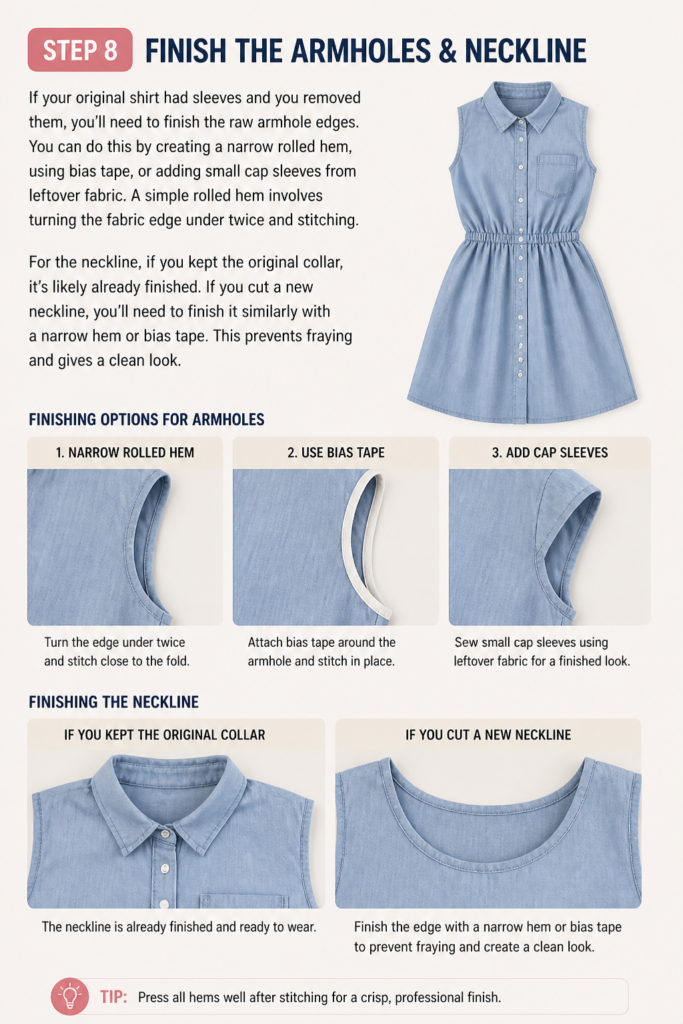
For the neckline, if you kept the original collar, it’s likely already finished. If you cut a new neckline, you’ll need to finish it similarly with a narrow hem or bias tape. This prevents fraying and gives a clean look.
Step 9: Hem the Dress
Try on your dress and re-confirm the desired length. Turn the raw bottom edge of the dress up by about 1/2 inch, press it flat, then turn it up another 1 inch and press again. This creates a neat double-fold hem.
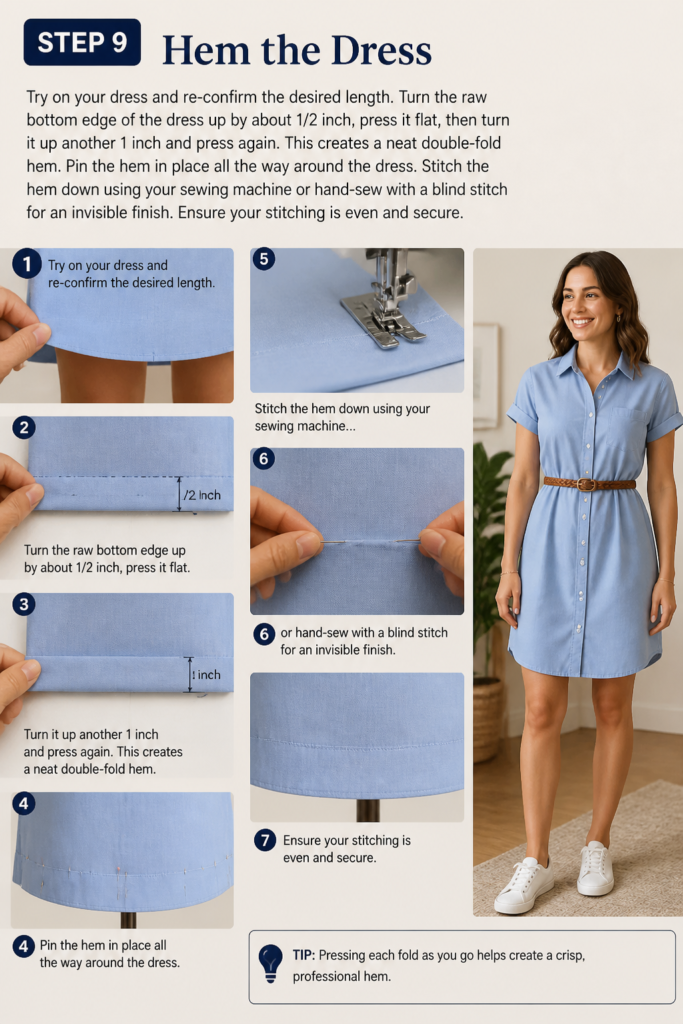
Pin the hem in place all the way around the dress. Stitch the hem down using your sewing machine or hand-sew with a blind stitch for an invisible finish. Ensure your stitching is even and secure.
Step 10: Personalize & Embellish
Now for the fun part – making the dress truly yours! Consider adding a fabric belt made from leftover shirt material, or attaching decorative buttons. You could also sew on appliques, embroidery, or fabric paint designs.
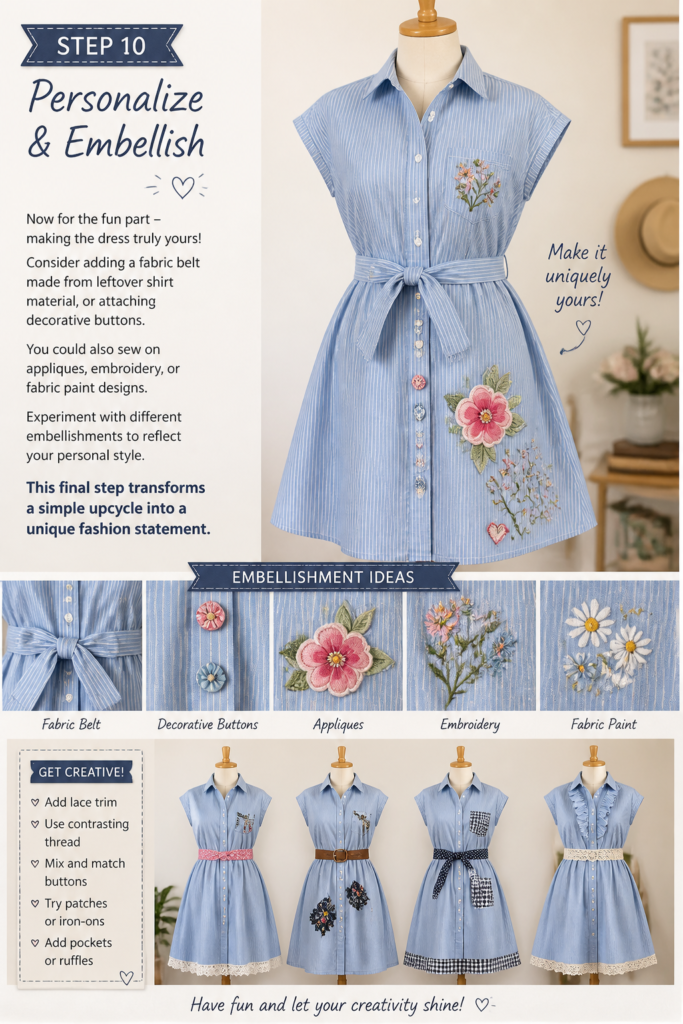
Experiment with different embellishments to reflect your personal style. This final step transforms a simple upcycle into a unique fashion statement.
Common Mistakes to Avoid
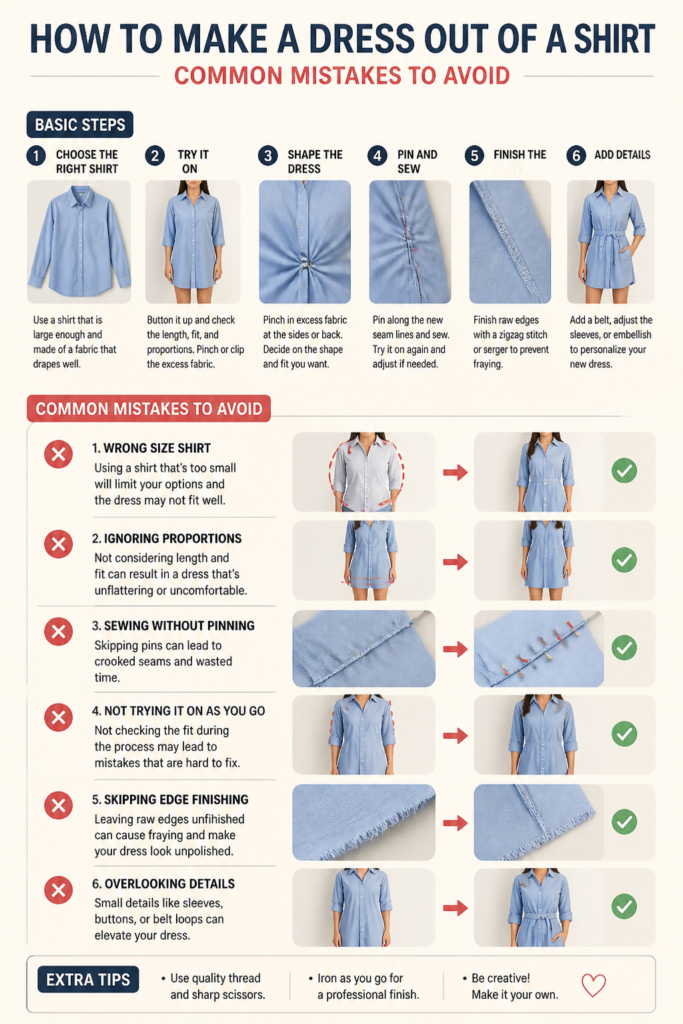
Not Pre-Washing Your Shirt
Skipping the pre-wash step can lead to disappointment later. Fabrics, especially cotton, can shrink significantly after the first wash. If you cut and sew your dress before washing, it might end up too small or distorted after its first laundering. Always wash and dry your shirt exactly as you would the finished dress before you start cutting.
Ignoring Fabric Grain
Cutting fabric against the grain can cause your dress to hang awkwardly or twist after washing. The fabric grain runs parallel to the selvage (the finished edge of the fabric). Always lay out your pattern pieces or mark your cut lines with the grain in mind to ensure your dress drapes correctly and maintains its shape. Pay attention to any existing seams or patterns on the shirt that indicate the grain direction.
Rushing Measurements and Cuts
Impatience often leads to irreversible errors. Taking the time to measure accurately and mark your lines clearly with fabric chalk is crucial. “Measure twice, cut once” is a golden rule in sewing for a reason. Rushing can result in uneven hemlines, ill-fitting bodices, or crooked seams that are difficult to correct.
Overlooking Seam Finishes
Leaving raw edges exposed within your dress can lead to fraying and unraveling over time, significantly shortening its lifespan. Always finish your seams, especially on woven fabrics. This can be done with a zigzag stitch, an overlock stitch on a serger, or by trimming and pressing the seams open before sewing a narrow hem on each raw edge.
Troubleshooting
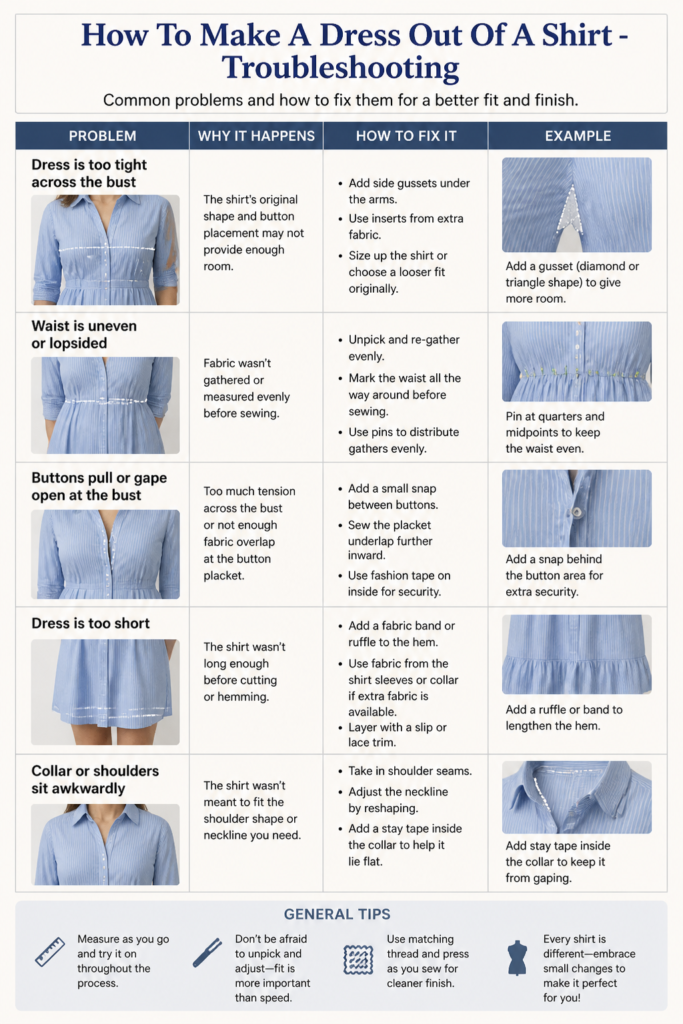
Dress Feels Too Tight or Too Loose
If your dress feels too tight, carefully inspect the side seams of the bodice. You might be able to unpick them slightly and re-sew with a smaller seam allowance to gain a little more room. If it’s too loose, put the dress on inside out and pin the side seams to your desired fit. Mark new lines with chalk and stitch them down, then trim the excess.
Seams Pucker or Gather Unevenly
Puckering often happens when your stitch length is too short for the fabric, or if you’re pulling the fabric as you sew. Try increasing your stitch length slightly. Ensure you’re not stretching the fabric while sewing; let the machine feed it through. Also, make sure your needle is sharp and appropriate for your fabric type.
Hem Is Uneven
An uneven hem can be frustrating. To fix it, put the dress on and stand in front of a mirror (or have a friend help). Use a ruler or measuring tape to mark your desired hem length consistently all the way around the bottom edge. Take the dress off, press a new hem along these marks, and then re-stitch it carefully. Precision in this step is key.
Key Takeaways
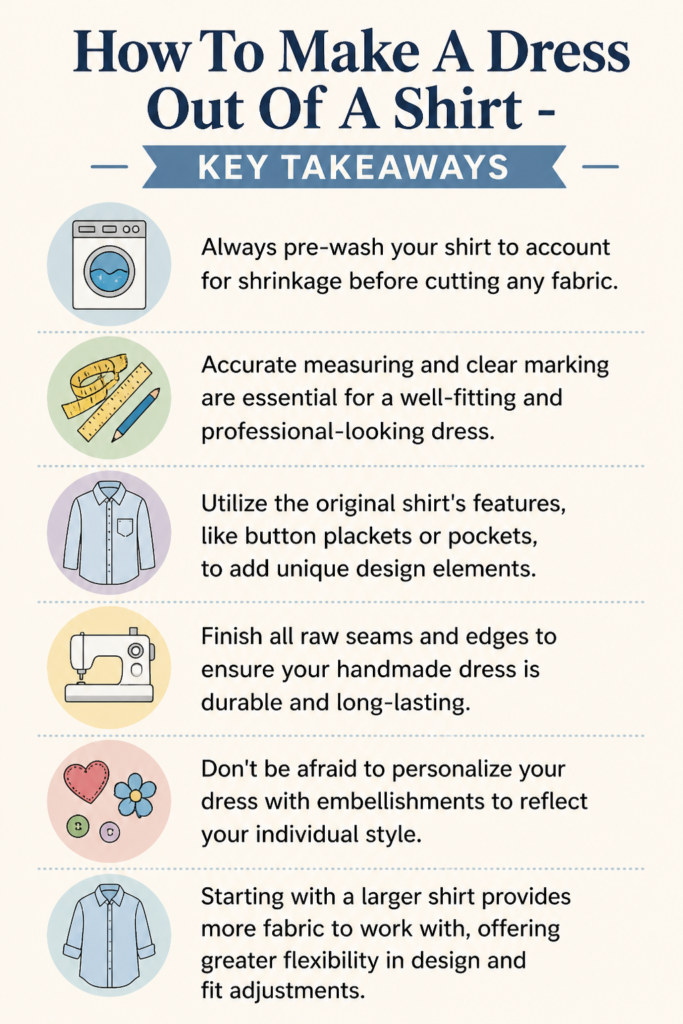
- Always pre-wash your shirt to account for shrinkage before cutting any fabric.
- Accurate measuring and clear marking are essential for a well-fitting and professional-looking dress.
- Utilize the original shirt’s features, like button plackets or pockets, to add unique design elements.
- Finish all raw seams and edges to ensure your handmade dress is durable and long-lasting.
- Don’t be afraid to personalize your dress with embellishments to reflect your individual style.
- Starting with a larger shirt provides more fabric to work with, offering greater flexibility in design and fit adjustments.
Frequently Asked Questions
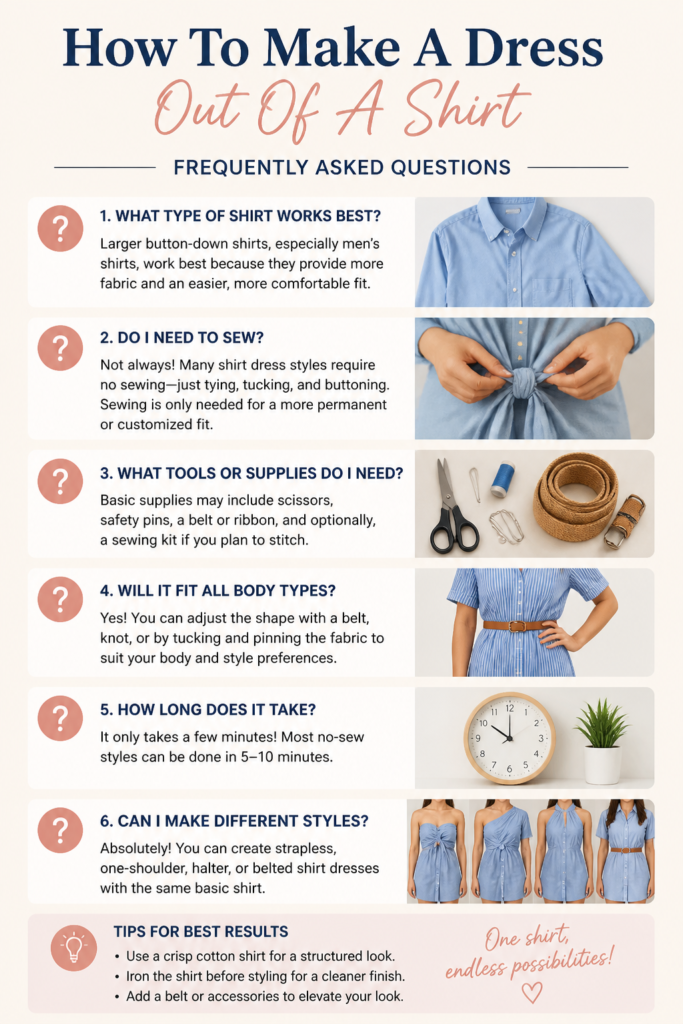
What kind of shirt works best for this project?
An oversized men’s button-down shirt made from cotton, linen, or chambray is often ideal. Its generous fabric allows for more design flexibility, and these natural fibers are easy for beginners to sew. T-shirts can also work but will result in a stretchier, more casual dress.
Can I hand sew this dress instead of using a machine?
Absolutely! While a sewing machine speeds up the process, you can definitely hand sew a dress from a shirt. Just be prepared for it to take more time and ensure your stitches are small, even, and secure for durability. Use a thimble to protect your fingers.
How do I make the dress more fitted at the waist?
After attaching the skirt to the bodice, you can add elastic to the waistline. Stitch a channel on the inside of the dress at the waist, then thread elastic through it. Alternatively, you can create fabric darts in the bodice or add a tie-back belt from leftover fabric for a cinched look.
What if my chosen shirt is too small to make a full dress?
If your shirt is too small to make a full dress from a single garment, consider combining it with another shirt or a coordinating piece of fabric. You could use the shirt for the bodice and add a new fabric for the skirt, or create panels to extend the width or length. This is a great way to patchwork and create a truly unique piece.
Our Top Recommended Finds
- Sharp Fabric Scissors: A good pair of fabric scissors makes clean cuts, preventing frayed edges and making your sewing much easier.
- Fabric Chalk or Disappearing Ink Pen: Essential for marking precise cut lines and seam allowances directly onto your fabric without leaving permanent marks.
- Basic Sewing Machine: A reliable entry-level sewing machine with straight and zigzag stitch options will handle most projects with ease and speed up your crafting.
Your New Favorite Wardrobe Piece Awaits
You now have all the tools and knowledge to transform an ordinary shirt into an extraordinary dress. This project isn’t just about sewing; it’s about creativity, sustainability, and making something truly unique with your own hands. Imagine the satisfaction of wearing a dress you crafted yourself!
Don’t let the fear of a first stitch hold you back. Pick out that old shirt, gather your supplies, and start your upcycling adventure today. This could be the beginning of a whole new world of creative fashion for you.
Beginner-friendly templates, step-by-step guides,
and weekly project ideas in your inbox.