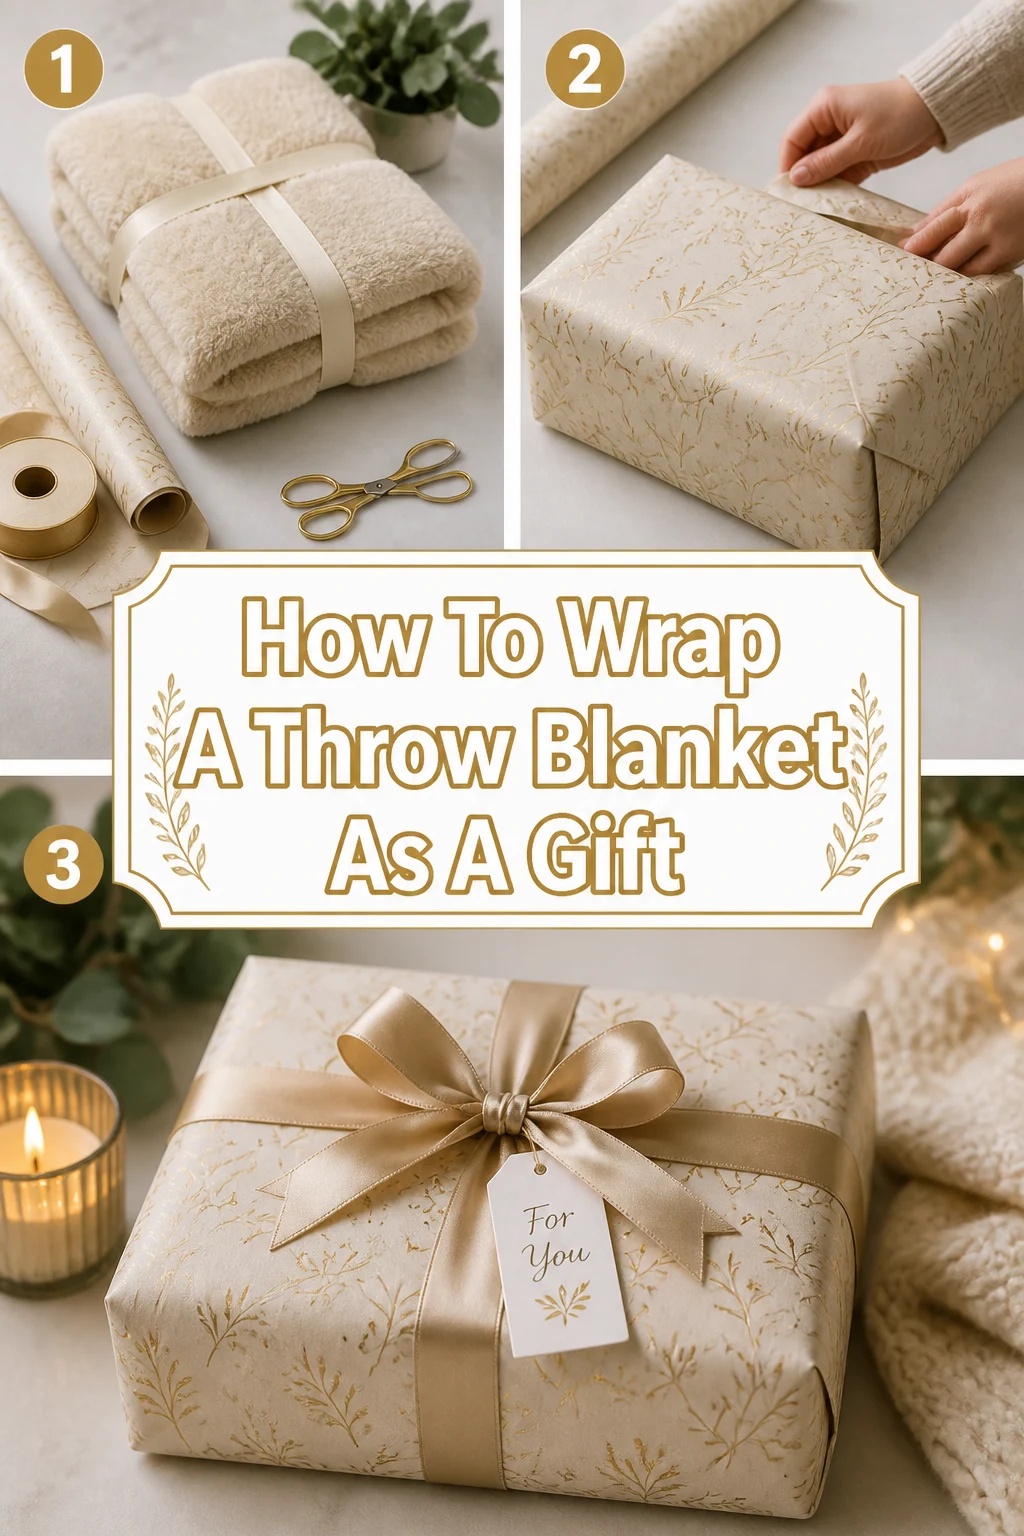
🎁 How To Wrap A Throw Blanket As A Gift

Beginner-friendly templates, step-by-step guides,
and weekly project ideas in your inbox.
Wrapping a throw blanket can sometimes feel like a wrestling match with a fluffy cloud.
I remember my first attempt; the final package resembled a lumpy, shapeless blob, far from the elegant gift I envisioned.
Over the years, I’ve refined several simple techniques to transform any throw blanket into a beautifully presented present, and I’m eager to share these tried-and-true methods with you.

Quick Overview
This guide will show you how to elegantly wrap a throw blanket, ensuring your gift looks as cozy and inviting on the outside as it is on the inside.
You’ll learn various methods, from classic box wrapping to creative no-box presentations, all designed for a polished finish.
- Time needed: 15-45 minutes (depending on chosen method and embellishments)
- Difficulty: Beginner
- What you’ll need: Throw blanket, scissors, tape, wrapping paper or gift box, ribbon, optional decorative elements
Step-by-Step Instructions
Step 1: Gather Your Essential Supplies
Before you begin, lay out all your materials on a clean, flat surface. This prevents interruptions and helps streamline the process.
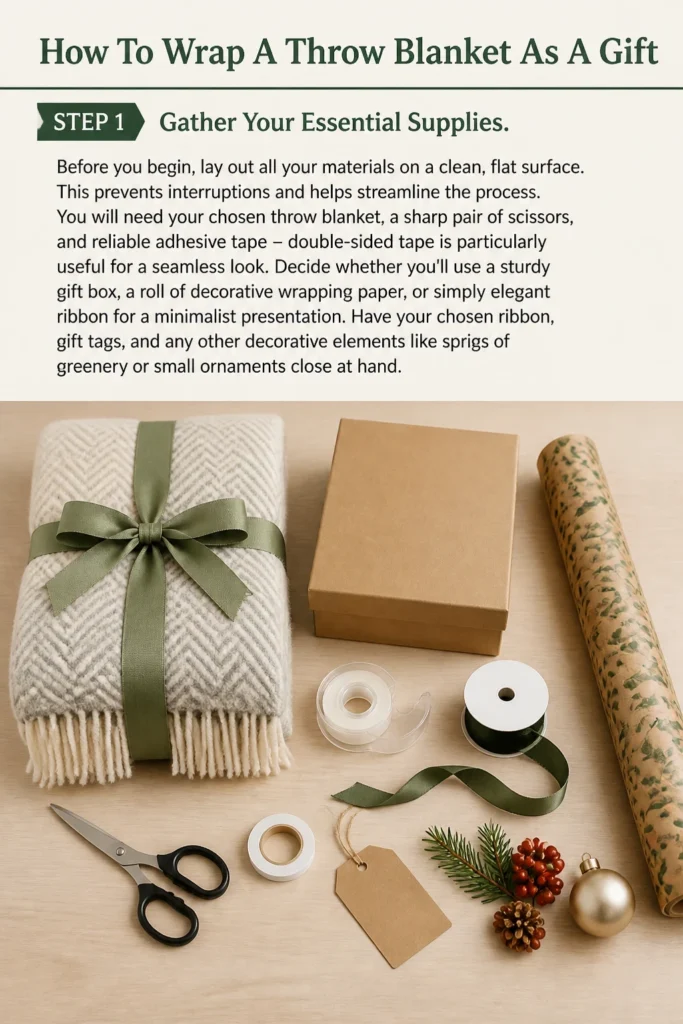
You will need your chosen throw blanket, a sharp pair of scissors, and reliable adhesive tape – double-sided tape is particularly useful for a seamless look.
Decide whether you’ll use a sturdy gift box, a roll of decorative wrapping paper, or simply elegant ribbon for a minimalist presentation.
Have your chosen ribbon, gift tags, and any other decorative elements like sprigs of greenery or small ornaments close at hand.
Step 2: Prepare and Fold Your Blanket
The foundation of a well-wrapped gift is a neatly prepared item. Gently shake out your throw blanket to remove any wrinkles or creases.
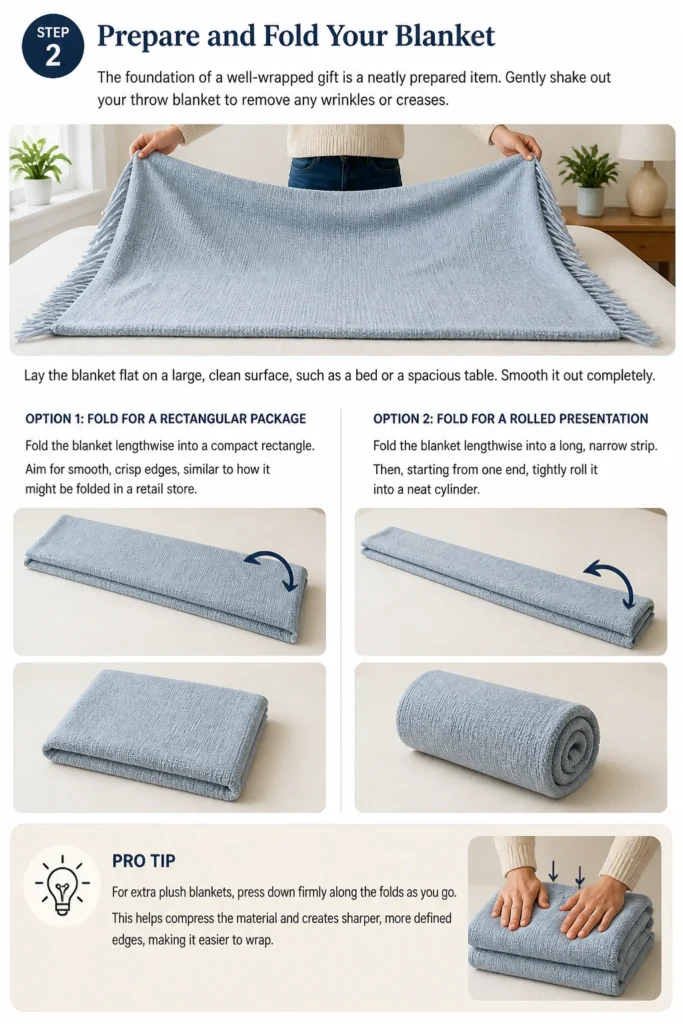
Lay the blanket flat on a large, clean surface, such as a bed or a spacious table. Smooth it out completely.
For a flat, rectangular package, fold the blanket lengthwise into a compact rectangle. Aim for smooth, crisp edges, similar to how it might be folded in a retail store.
Alternatively, for a rolled presentation, fold the blanket lengthwise into a long, narrow strip. Then, starting from one end, tightly roll it into a neat cylinder.
Pro Tip: For extra plush blankets, press down firmly along the folds as you go. This helps compress the material and creates sharper, more defined edges, making it easier to wrap.
Step 3: Select Your Wrapping Method
Your choice of wrapping method depends on the blanket’s size, its texture, and the desired aesthetic of your gift.
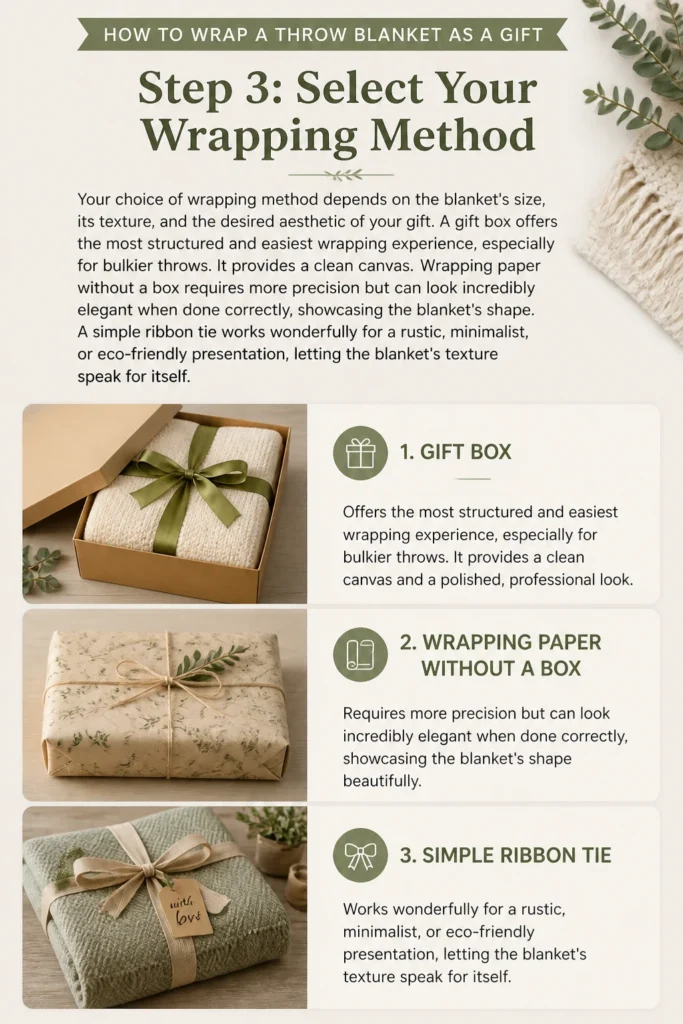
A gift box offers the most structured and easiest wrapping experience, especially for bulkier throws. It provides a clean canvas.
Wrapping paper without a box requires more precision but can look incredibly elegant when done correctly, showcasing the blanket’s shape.
A simple ribbon tie works wonderfully for a rustic, minimalist, or eco-friendly presentation, letting the blanket’s texture speak for itself.
Step 4: Method 1 – The Classic Box Wrap
If you’ve opted for a gift box, ensure it’s appropriately sized. The blanket should fit snugly inside without excessive forcing or leaving too much empty space.
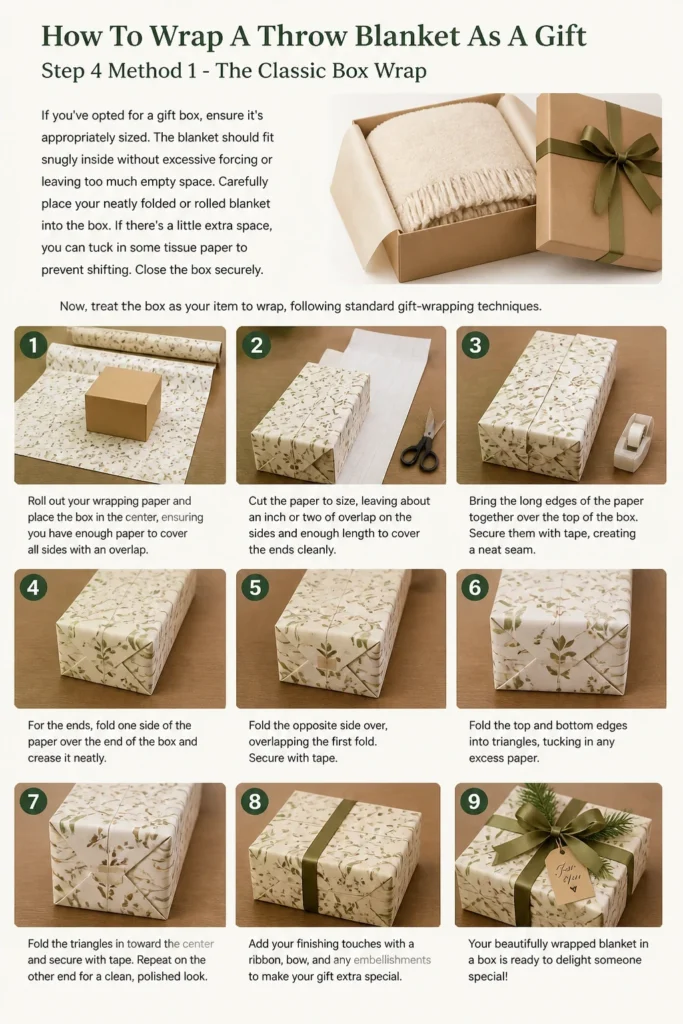
Carefully place your neatly folded or rolled blanket into the box. If there’s a little extra space, you can tuck in some tissue paper to prevent shifting.
Close the box securely. Now, treat the box as your item to wrap, following standard gift-wrapping techniques.
Roll out your wrapping paper and place the box in the center, ensuring you have enough paper to cover all sides with an overlap.
Cut the paper to size, leaving about an inch or two of overlap on the sides and enough length to cover the ends cleanly.
Bring the long edges of the paper together over the top of the box. Secure them with tape, creating a neat seam.
For the ends, fold in the sides to form neat triangles. Then, fold the top flap down and the bottom flap up, securing each with tape.
Pro Tip: Use double-sided tape for invisible seams on the box. For the ends, creasing the paper with your fingernail before folding helps achieve super sharp, professional-looking corners.
Step 5: Method 2 – The Elegant Paper Wrap (No Box)
This method requires a bit more finesse, as you’re directly wrapping the blanket’s shape.
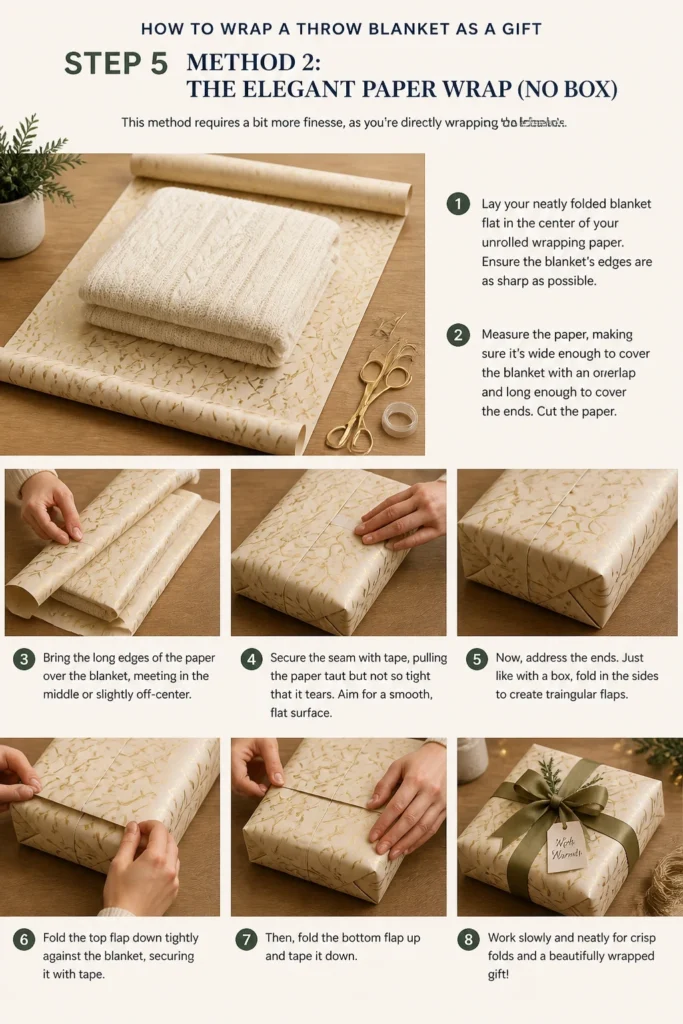
Lay your neatly folded blanket flat in the center of your unrolled wrapping paper. Ensure the blanket’s edges are as sharp as possible.
Measure the paper, making sure it’s wide enough to cover the blanket with an overlap and long enough to cover the ends.
Cut the paper. Bring the long edges of the paper over the blanket, meeting in the middle or slightly off-center.
Secure the seam with tape, pulling the paper taut but not so tight that it tears. Aim for a smooth, flat surface.
Now, address the ends. Just like with a box, fold in the sides to create triangular flaps.
Fold the top flap down tightly against the blanket, securing it with tape. Then, fold the bottom flap up and tape it down.
Work slowly and press firmly along all creases to ensure the paper conforms to the blanket’s shape without looking baggy.
Step 6: Method 3 – The Rolled and Tied Presentation
This is a wonderful option for showcasing the blanket itself, especially if it has a beautiful texture or pattern.
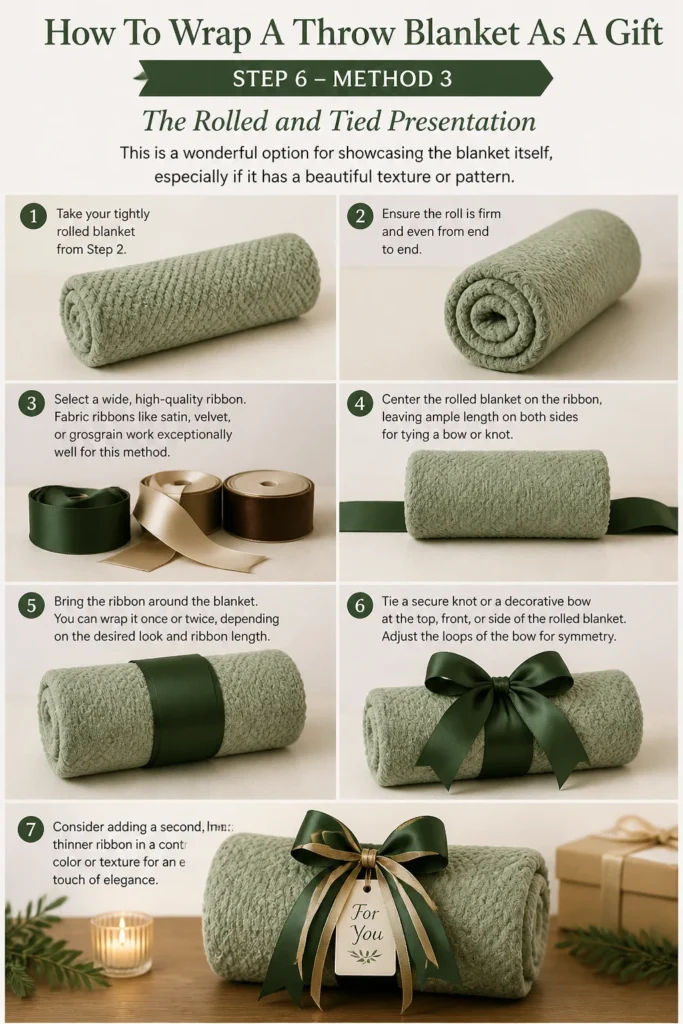
Take your tightly rolled blanket from Step 2. Ensure the roll is firm and even from end to end.
Select a wide, high-quality ribbon. Fabric ribbons like satin, velvet, or grosgrain work exceptionally well for this method.
Center the rolled blanket on the ribbon, leaving ample length on both sides for tying a bow or knot.
Bring the ribbon around the blanket. You can wrap it once or twice, depending on the desired look and ribbon length.
Tie a secure knot or a decorative bow at the top, front, or side of the rolled blanket. Adjust the loops of the bow for symmetry.
Consider adding a second, thinner ribbon in a contrasting color or texture for an extra touch of elegance.
Step 7: Add Embellishments and Finishing Touches
Once the blanket is wrapped or tied, it’s time to elevate its appearance with thoughtful embellishments.
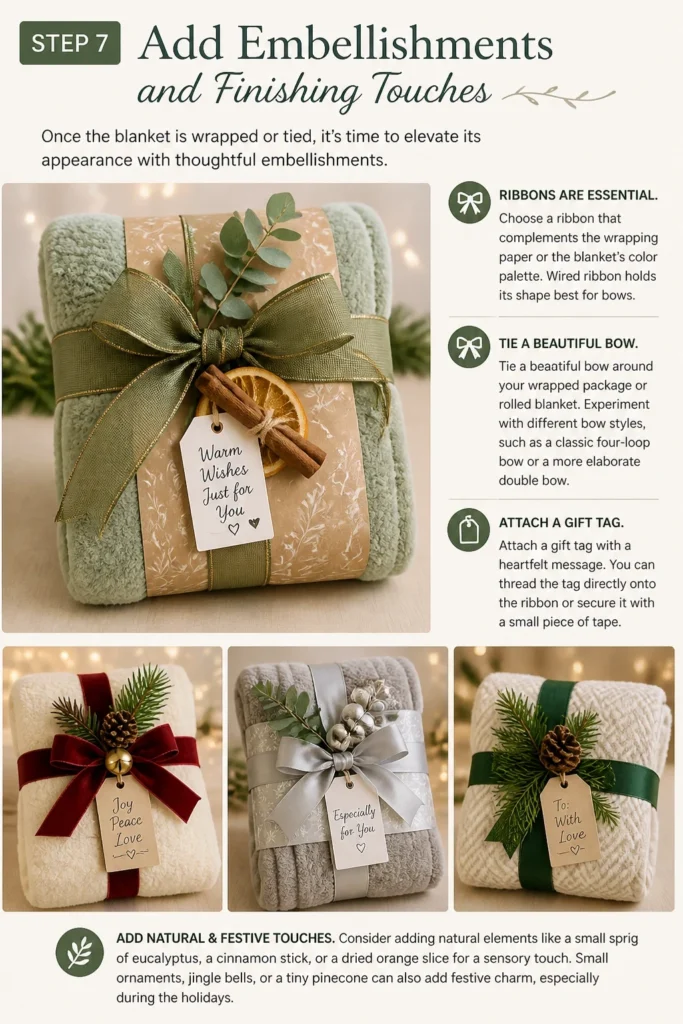
Ribbons are essential. Choose a ribbon that complements the wrapping paper or the blanket’s color palette. Wired ribbon holds its shape best for bows.
Tie a beautiful bow around your wrapped package or rolled blanket. Experiment with different bow styles, such as a classic four-loop bow or a more elaborate double bow.
Attach a gift tag with a heartfelt message. You can thread the tag directly onto the ribbon or secure it with a small piece of tape.
Consider adding natural elements like a small sprig of eucalyptus, a cinnamon stick, or a dried orange slice for a sensory touch.
Small ornaments, jingle bells, or a tiny pinecone can also add festive charm, especially during the holidays.
Step 8: Inspect and Perfect
Take a moment to step back and examine your wrapped gift from all angles. Look for any loose tape, uneven folds, or areas that could be tidied up.
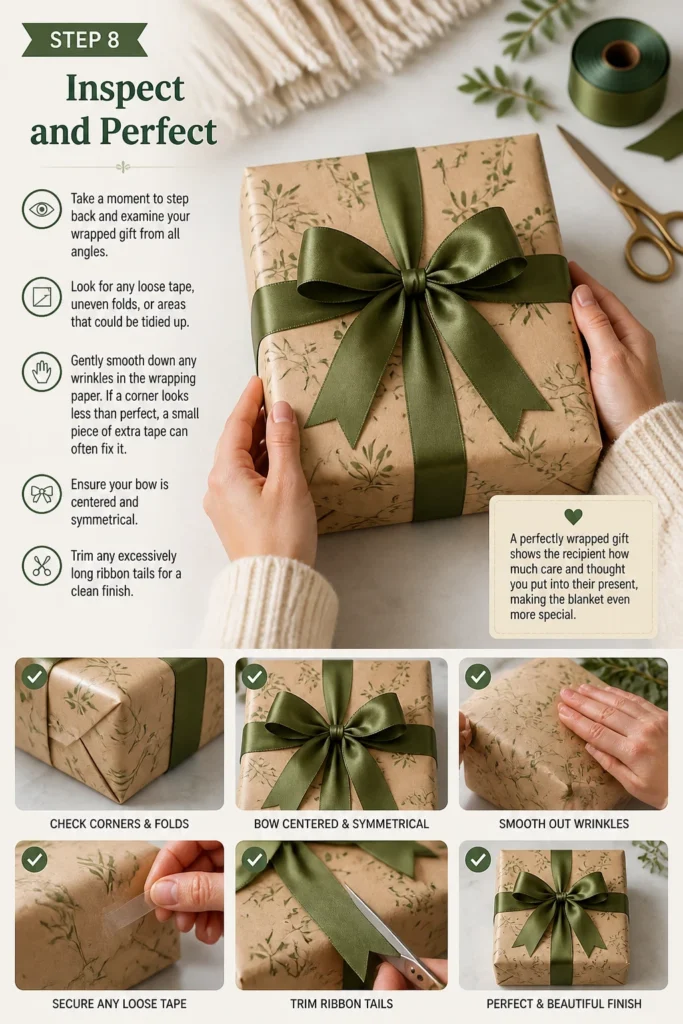
Gently smooth down any wrinkles in the wrapping paper. If a corner looks less than perfect, a small piece of extra tape can often fix it.
Ensure your bow is centered and symmetrical. Trim any excessively long ribbon tails for a clean finish.
A perfectly wrapped gift shows the recipient how much care and thought you put into their present, making the blanket even more special.
Common Mistakes to Avoid
Using Insufficient Wrapping Paper
A common pitfall is underestimating the amount of paper needed, especially for a bulky item like a throw blanket. This results in exposed edges or awkward, patched-up seams.
Always measure generously. It’s better to have too much paper and trim the excess than to have too little and struggle to cover the item completely.
When in doubt, use a larger piece of paper and practice your cuts. You can always fold or trim excess, but you cannot add more easily.
Ignoring the Blanket’s Bulk
Throw blankets, especially plush ones, can be surprisingly thick. Trying to force a thick blanket into a small box or wrap it too tightly can lead to tears in the paper or a lumpy, misshapen package.
Choose an appropriately sized box or allow for extra slack when wrapping directly with paper. Gentle compression is fine, but avoid excessive force.
Consider rolling very thick blankets instead of folding them flat, as a roll often presents a more uniform and manageable shape.
Skipping Crisp Folds and Edges
Haphazard folding of the blanket or sloppy creases in the wrapping paper can make even the most expensive paper look messy and unprofessional.
Take your time to create sharp, clean folds on the blanket itself before wrapping. This provides a solid foundation for the paper.
When folding the wrapping paper, use your fingers or a ruler to firmly crease all edges. This attention to detail makes a significant difference in the final presentation.
Over-Taping or Under-Taping
Too much visible tape can detract from the beauty of your wrapping paper, making the gift look cluttered. Conversely, too little tape can cause the package to unravel before it’s even opened.
Aim for strategic placement of tape. Use double-sided tape for invisible seams whenever possible, or place regular tape on the underside of folds.
Ensure all critical seams and flaps are securely fastened. A few well-placed pieces of strong tape are better than many weak ones.
Troubleshooting
The Package Looks Lumpy and Uneven
A lumpy appearance usually stems from the blanket not being folded or rolled tightly and evenly enough before wrapping. Uneven bulk creates unsightly bumps.
Unwrap the item and refold or reroll the blanket with greater care. Press down firmly along all creases to compress the material as much as possible.
If using a box, ensure the blanket fills the space uniformly. For paper-wrapped items, try to distribute the blanket’s bulk as evenly as you can.
Wrapping Paper Tears Easily
Thin or low-quality wrapping paper can be prone to tearing, especially around the corners of a bulky item like a blanket. This is frustrating and can ruin the look.
Consider reinforcing delicate areas with an extra layer of tissue paper underneath the main wrapping paper, especially on corners or sharp edges.
Alternatively, switch to a sturdier wrapping paper, such as kraft paper or a thicker, higher-gsm (grams per square meter) decorative paper.
Ribbon Keeps Slipping Off
If your chosen ribbon is too smooth or the blanket’s surface is slick, the ribbon might slide around, disrupting your carefully tied bow.
For wrapped packages, secure the ribbon to the package with a tiny, discreet piece of double-sided tape at the back or underneath the bow.
For rolled blankets, choose a ribbon with some texture, like grosgrain or velvet, which has more grip. You can also tie a small piece of twine around the blanket first, then layer your decorative ribbon over it.
Key Takeaways
- Preparation is Paramount: Always start with a neatly folded or rolled blanket and all your supplies at hand for a smooth process.
- Choose Your Method Wisely: Select between a box, direct paper wrap, or a simple ribbon tie based on the blanket’s bulk and your desired aesthetic.
- Precision in Folding: Achieving crisp folds on both the blanket and the wrapping paper is crucial for a professional, polished finish.
- Embellishments Elevate: Thoughtful additions like quality ribbon, a personalized tag, or natural elements transform a simple package into a memorable gift.
- Practice Makes Perfect: Don’t be afraid to unwrap and re-do if needed; each attempt refines your technique and leads to a more beautiful result.
Frequently Asked Questions
Can I wrap a very large or fluffy blanket without a box?
Yes, you absolutely can wrap a large or fluffy blanket without a box, but it requires careful folding and potentially sturdier paper. Roll the blanket tightly into a cylinder for the most compact shape, or fold it into a neat, flat rectangle that is as firm as possible. Use robust wrapping paper or even fabric for a unique, reusable wrap.
What type of ribbon works best for blankets?
For wrapped blankets, a wired ribbon is excellent as it holds its shape beautifully for bows. For rolled blankets, a wide fabric ribbon like satin, velvet, or grosgrain works wonderfully, adding texture and elegance. Choose a ribbon that complements the blanket’s color and feel.
How do I prevent the blanket from shifting inside the wrap?
If using a box, fill any empty spaces with tissue paper or crinkle paper to keep the blanket snug. When wrapping directly with paper, ensure the blanket is folded as compactly as possible, and the paper is wrapped snugly around it (without tearing) to minimize internal movement.
Should I remove the blanket’s tags before wrapping?
It’s generally a good idea to remove the blanket’s retail tags, especially if they are large or unsightly. This creates a cleaner, more personalized presentation, making the blanket feel less like a store-bought item and more like a carefully selected gift.
Our Top Recommended Finds
- Heavy-Duty Double-Sided Tape: Essential for invisible seams and securely attaching embellishments without visible tape lines.
- Wide Fabric Ribbon Assortment: A collection of satin, grosgrain, or velvet ribbons in various colors provides versatility for any blanket and occasion.
- Large Roll of Kraft Wrapping Paper: A sturdy, versatile, and eco-friendly option that can be dressed up or down, perfect for bulky items.
Crafting Coziness, One Wrap at a Time
Transforming a simple throw blanket into a beautifully presented gift is a small act that speaks volumes.
It shows thoughtfulness, care, and a desire to make the recipient feel truly special.
Now that you have these practical steps, grab your favorite blanket and supplies.
Start practicing your wrapping skills today and get ready to impress with your next cozy present!
Beginner-friendly templates, step-by-step guides,
and weekly project ideas in your inbox.