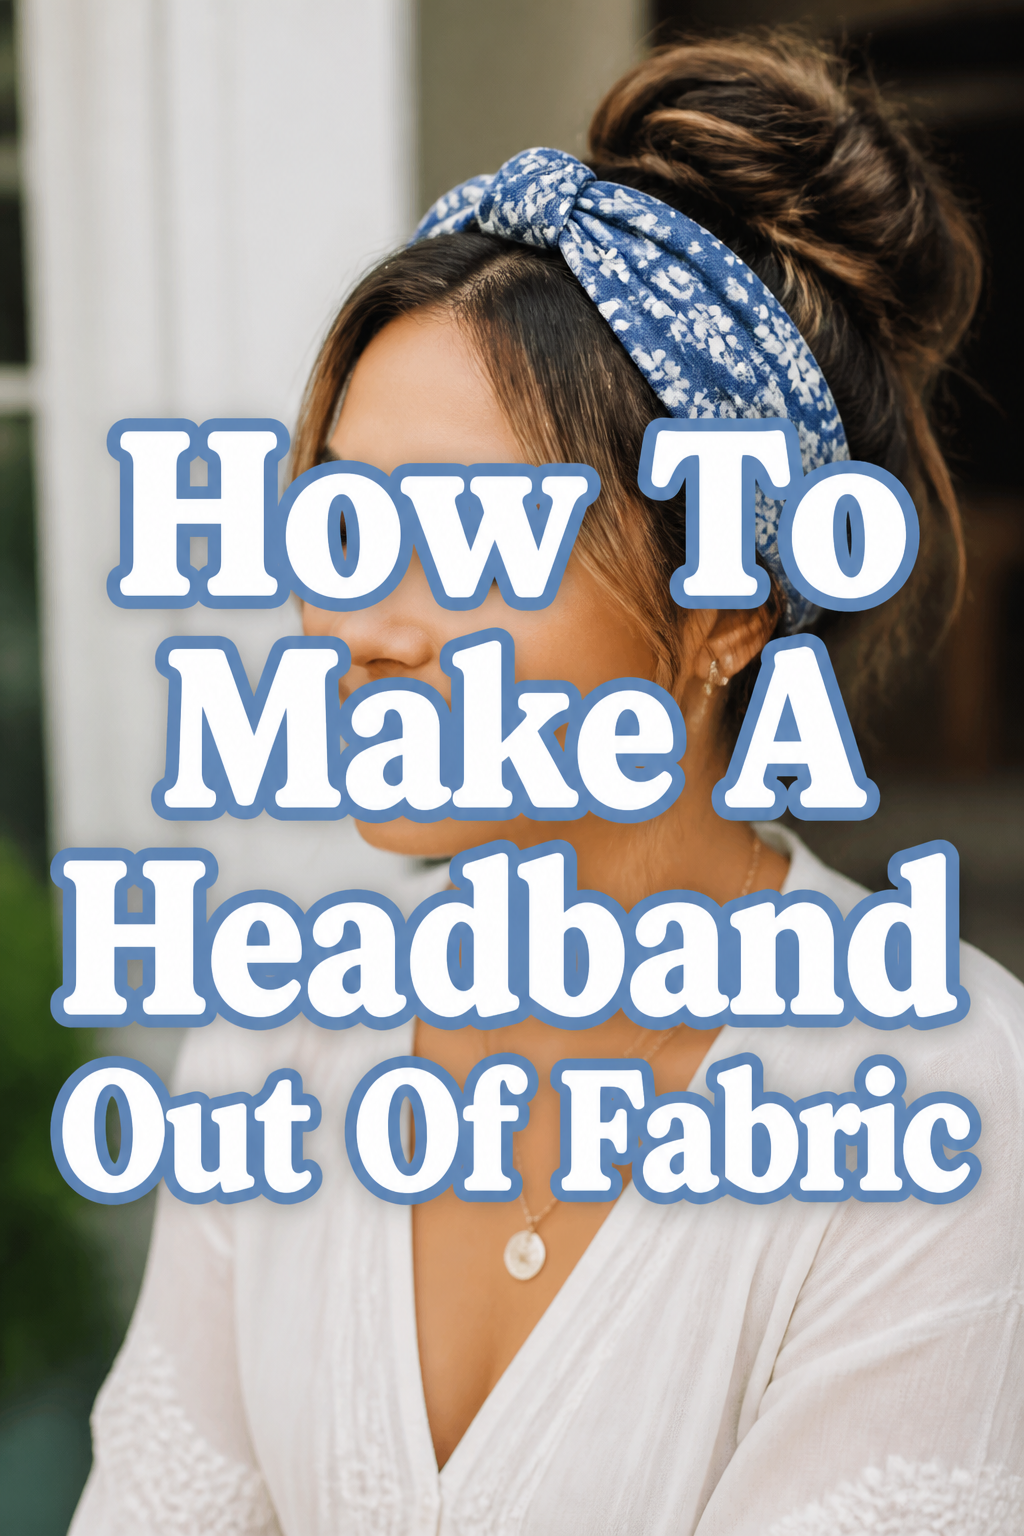
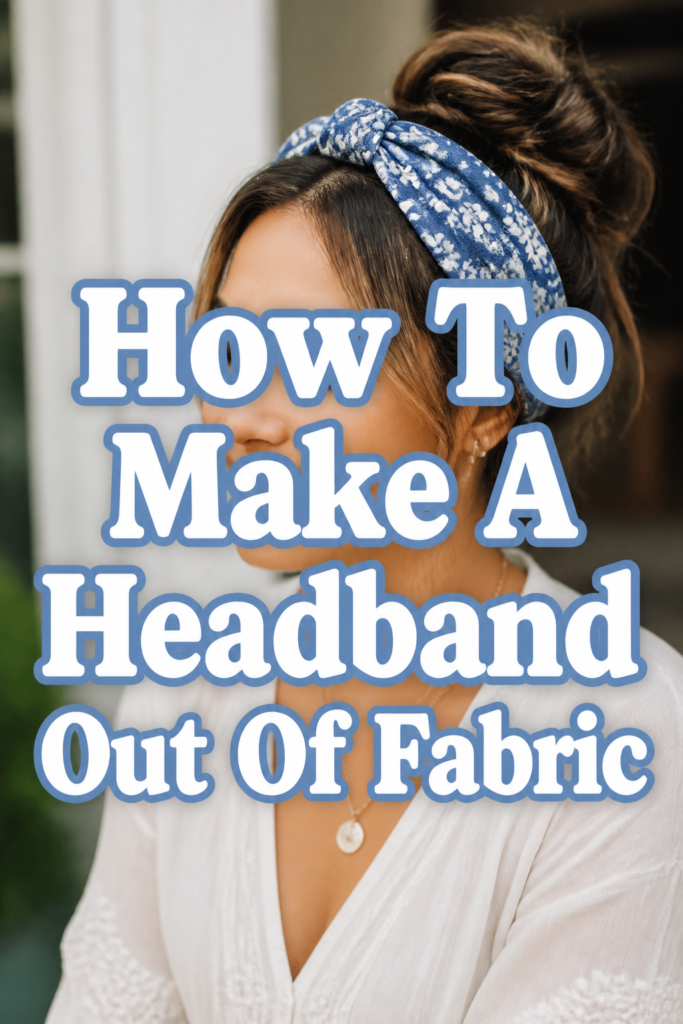
🧵 How To Make A Headband Out Of Fabric

Beginner-friendly templates, step-by-step guides,
and weekly project ideas in your inbox.
I remember the first time I made a fabric headband; it felt like a small victory. It wasn’t just about saving money, but about creating something uniquely mine. This guide shares that exact practical experience.
You can easily craft a stylish accessory that perfectly matches your outfits. This step-by-step approach ensures a beautiful, comfortable result every time.
Quick Overview
You are about to create a custom fabric headband, tailored to your style and comfort. This project is incredibly rewarding and offers endless possibilities for personalization.
You’ll gain practical sewing skills and a fantastic new accessory. Get ready to transform simple fabric into a wearable piece of art.
- Time needed: 1-2 hours
- Difficulty: Beginner
- What you’ll need: Fabric, elastic, sewing machine (or needle and thread), scissors, pins, measuring tape, safety pin, iron.
Step-by-Step Instructions
Step 1: Gather Your Materials
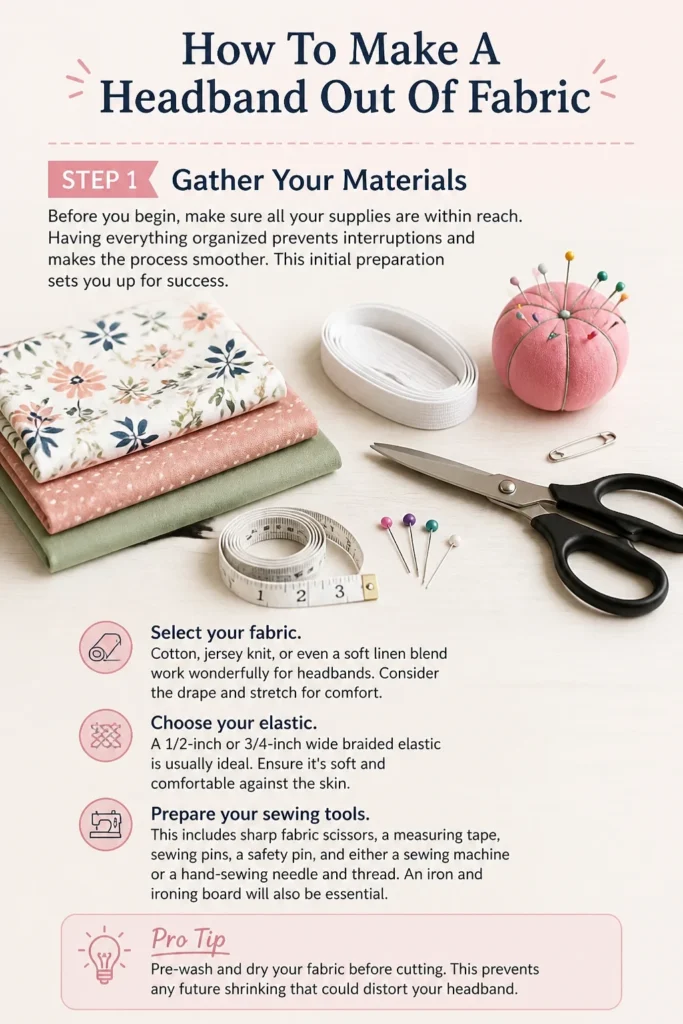
Before you begin, make sure all your supplies are within reach. Having everything organized prevents interruptions and makes the process smoother. This initial preparation sets you up for success.
Select your fabric. Cotton, jersey knit, or even a soft linen blend work wonderfully for headbands. Consider the drape and stretch for comfort.
Choose your elastic. A 1/2-inch or 3/4-inch wide braided elastic is usually ideal. Ensure it’s soft and comfortable against the skin.
Prepare your sewing tools. This includes sharp fabric scissors, a measuring tape, sewing pins, a safety pin, and either a sewing machine or a hand-sewing needle and thread. An iron and ironing board will also be essential.
Pro Tip: Pre-wash and dry your fabric before cutting. This prevents any future shrinking that could distort your finished headband. It also removes any manufacturing chemicals.
Step 2: Measure and Cut Your Fabric
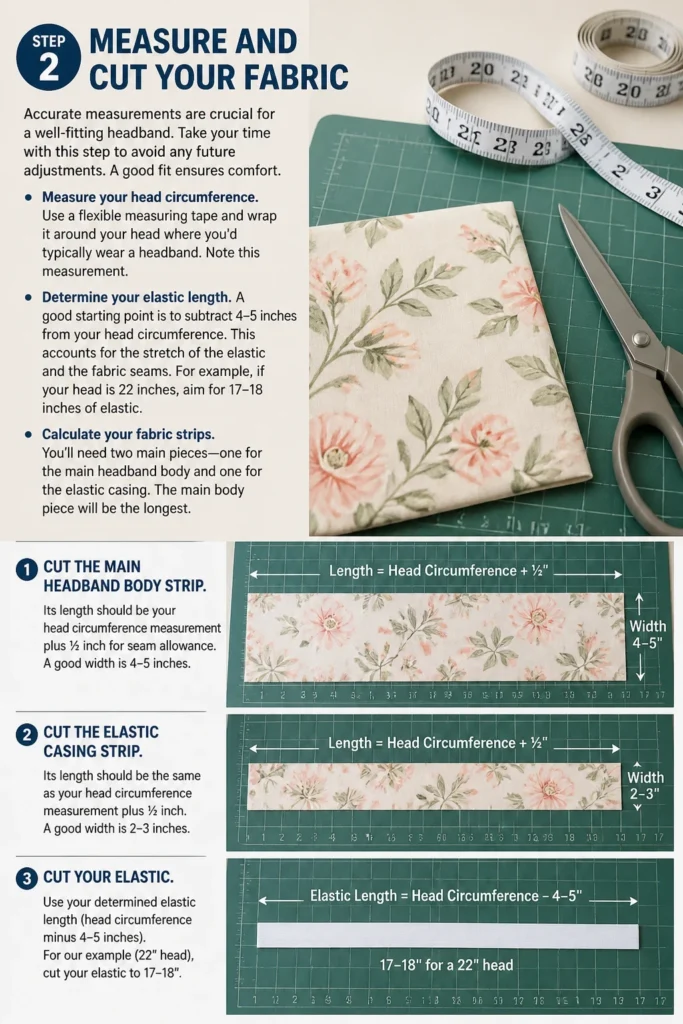
Accurate measurements are crucial for a well-fitting headband. Take your time with this step to avoid any future adjustments. A good fit ensures comfort.
Measure your head circumference. Use a flexible measuring tape and wrap it around your head where you’d typically wear a headband. Note this measurement.
Determine your elastic length. A good starting point is to subtract 4-5 inches from your head circumference. This accounts for the stretch of the elastic and the fabric seams. For example, if your head is 22 inches, aim for 17-18 inches of elastic.
Calculate your fabric strips. You’ll need two main pieces: one for the main headband body and one for the elastic casing. The main body piece will be the longest.
Cut the main headband body strip. Its length should be your head circumference minus the elastic length, plus 1 inch for seam allowances. The width should be 4-5 inches, depending on how wide you want the finished headband to be. So, if your head is 22 inches and elastic is 18 inches, the fabric strip would be (22 – 18) + 1 = 5 inches long.
Cut the elastic casing strip. This piece will house your elastic. Its length should be your elastic length plus 1 inch for seam allowances. Its width should be twice the width of your elastic, plus 1 inch for seam allowances. For example, for 1/2-inch elastic, cut a strip 2 inches wide.
Step 3: Prepare the Main Fabric Strip
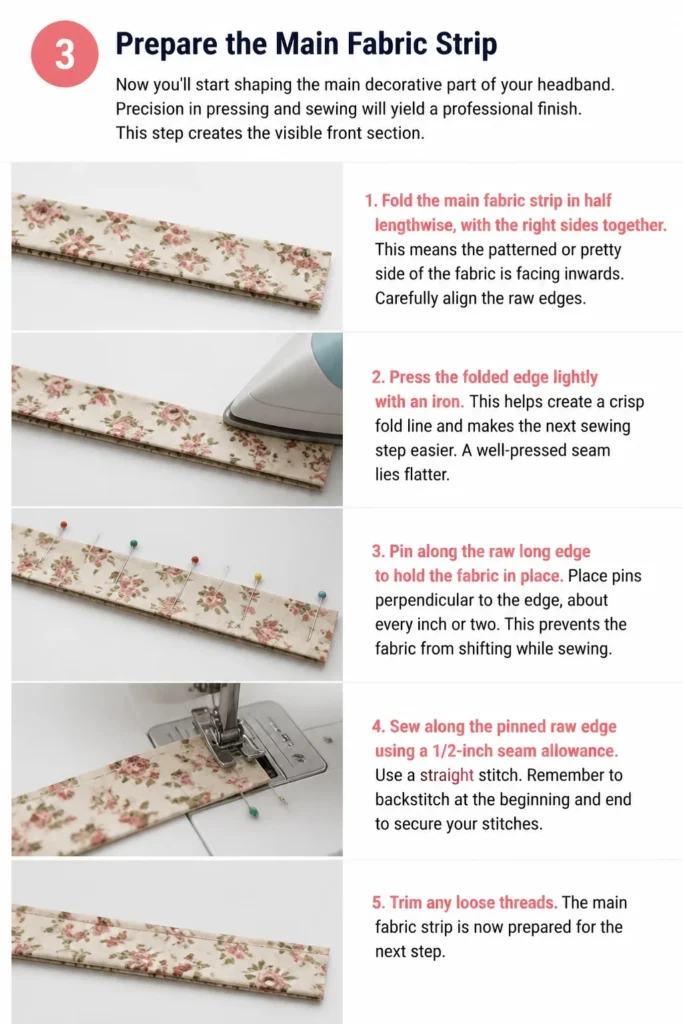
Now you’ll start shaping the main decorative part of your headband. Precision in pressing and sewing will yield a professional finish. This step creates the visible front section.
Fold the main fabric strip in half lengthwise, with the right sides together. This means the patterned or “pretty” side of the fabric is facing inwards. Carefully align the raw edges.
Press the folded edge lightly with an iron. This helps create a crisp fold line and makes the next sewing step easier. A well-pressed seam lies flatter.
Pin along the raw long edge to hold the fabric in place. Place pins perpendicular to the edge, about every inch or two. This prevents the fabric from shifting while sewing.
Sew along the pinned raw edge using a 1/2-inch seam allowance. Use a straight stitch. Remember to backstitch at the beginning and end to secure your stitches.
Trim the seam allowance to about 1/4 inch. This reduces bulk inside the headband. Be careful not to cut your stitches.
Turn the fabric tube right side out. You can use a safety pin attached to one end and guide it through the tube, or use a loop turner tool. Take your time to gently push the fabric through.
Press the main fabric tube flat, with the seam centered along the back. This gives it a clean, finished appearance. A good press makes all the difference.
Step 4: Create the Elastic Casing
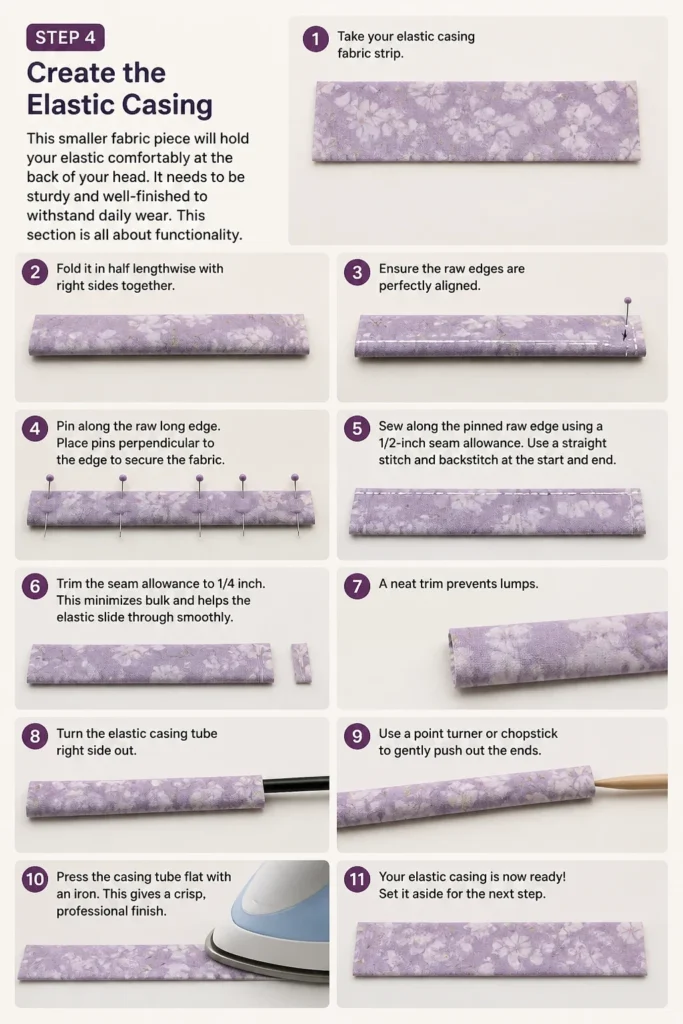
This smaller fabric piece will hold your elastic comfortably at the back of your head. It needs to be sturdy and well-finished to withstand daily wear. This section is all about functionality.
Take your elastic casing fabric strip. Just like the main strip, fold it in half lengthwise with right sides together. Ensure the raw edges are perfectly aligned.
Pin along the raw long edge. Again, place pins perpendicular to the edge to secure the fabric. This prevents any slipping during sewing.
Sew along the pinned raw edge using a 1/2-inch seam allowance. Use a straight stitch and backstitch at the start and end. This forms a narrow tube.
Trim the seam allowance to 1/4 inch. This minimizes bulk and helps the elastic slide through smoothly. A neat trim prevents lumps.
Turn the elastic casing tube right side out. This tube will be much narrower than the main headband piece. Use a safety pin or loop turner for this.
Press the elastic casing tube flat, with the seam centered along the back. This provides a neat, professional look. Pressing helps define the shape.
Step 5: Thread the Elastic
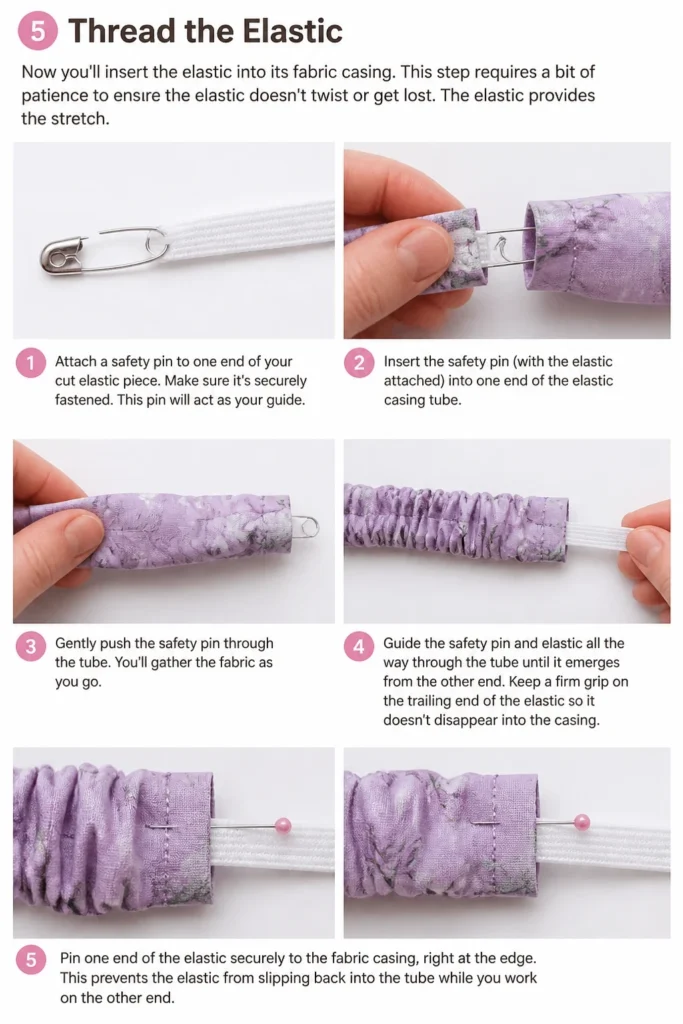
Now you’ll insert the elastic into its fabric casing. This step requires a bit of patience to ensure the elastic doesn’t twist or get lost. The elastic provides the stretch.
Attach a safety pin to one end of your cut elastic piece. Make sure it’s securely fastened. This pin will act as your guide.
Insert the safety pin (with the elastic attached) into one end of the elastic casing tube. Gently push the safety pin through the tube. You’ll gather the fabric as you go.
Guide the safety pin and elastic all the way through the tube until it emerges from the other end. Keep a firm grip on the trailing end of the elastic so it doesn’t disappear into the casing.
Pin one end of the elastic securely to the fabric casing, right at the edge. This prevents the elastic from slipping back into the tube while you work on the other side. Use a strong pin.
Gently pull the elastic until about 1/2 inch of the other end emerges from the casing. Make sure the elastic isn’t twisted inside the tube. Feel for any twists.
Step 6: Secure the Elastic
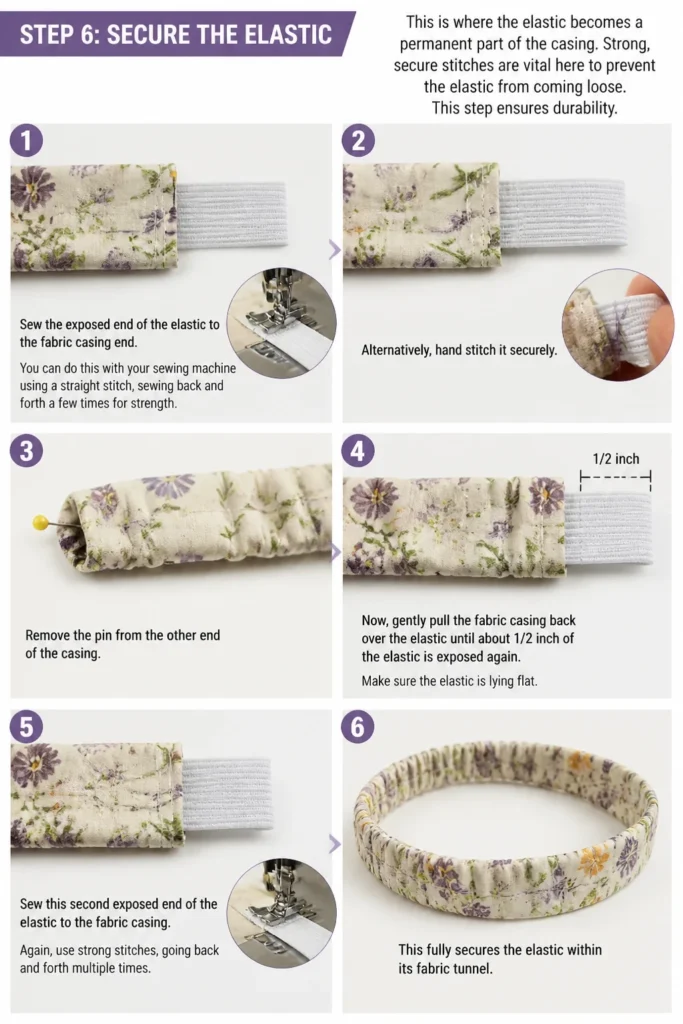
This is where the elastic becomes a permanent part of the casing. Strong, secure stitches are vital here to prevent the elastic from coming loose. This step ensures durability.
Sew the exposed end of the elastic to the fabric casing end. You can do this with your sewing machine using a straight stitch, sewing back and forth a few times for strength. Alternatively, hand stitch it securely.
Remove the pin from the other end of the casing. Now, gently pull the fabric casing back over the elastic until about 1/2 inch of the elastic is exposed again. Make sure the elastic is lying flat.
Sew this second exposed end of the elastic to the fabric casing. Again, use strong stitches, going back and forth multiple times. This fully secures the elastic within its fabric tunnel.
Step 7: Attach Elastic Section to Main Strip
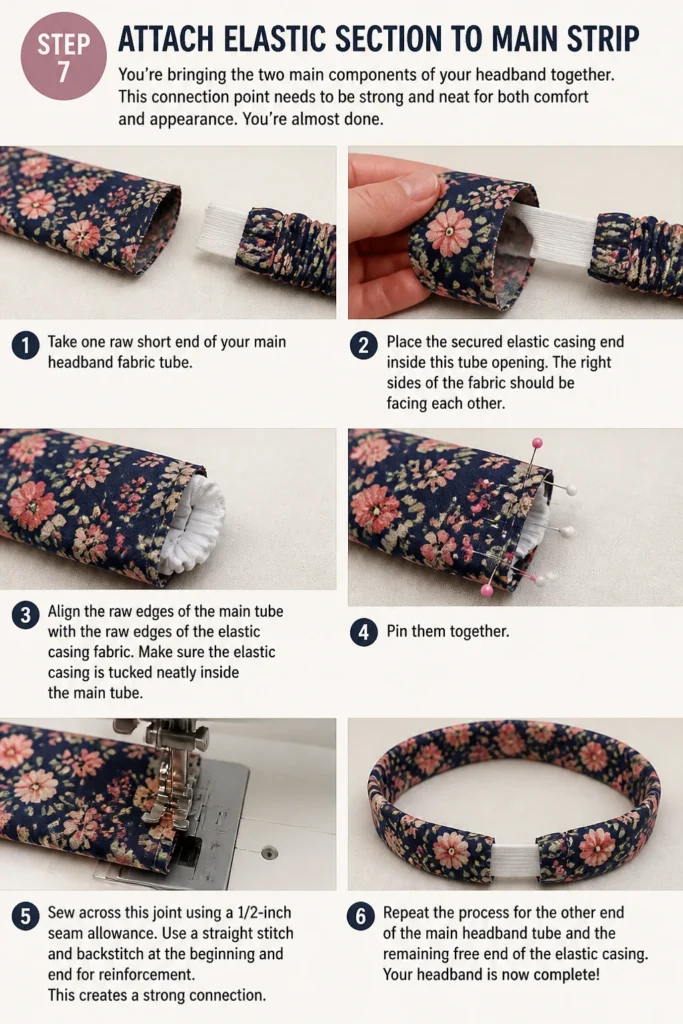
You’re bringing the two main components of your headband together. This connection point needs to be strong and neat for both comfort and appearance. You’re almost done.
Take one raw short end of your main headband fabric tube. Place the secured elastic casing end inside this tube opening. The right sides of the fabric should be facing each other.
Align the raw edges of the main tube with the raw edges of the elastic casing fabric. Make sure the elastic casing is tucked neatly inside the main tube. Pin them together.
Sew across this joint using a 1/2-inch seam allowance. Use a straight stitch and backstitch at the beginning and end for reinforcement. This creates a strong connection.
Repeat the process for the other end of the main headband tube and the remaining free end of the elastic casing. Ensure everything is aligned and pinned correctly before sewing.
Step 8: Finish the Seams
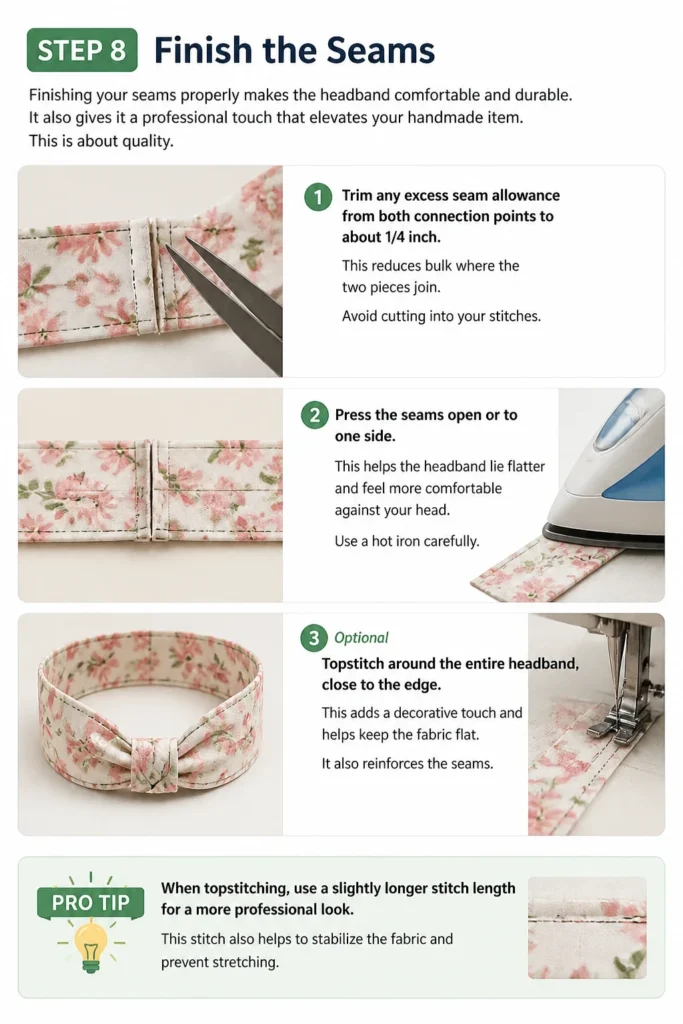
Finishing your seams properly makes the headband comfortable and durable. It also gives it a professional touch that elevates your handmade item. This is about quality.
Trim any excess seam allowance from both connection points to about 1/4 inch. This reduces bulk where the two pieces join. Avoid cutting into your stitches.
Press the seams open or to one side. This helps the headband lie flatter and feel more comfortable against your head. Use a hot iron carefully.
Optional: Topstitch around the entire headband, close to the edge. This adds a decorative touch and helps keep the fabric flat. It also reinforces the seams.
Pro Tip: When topstitching, use a slightly longer stitch length for a more professional look. This stitch also helps to stabilize the fabric and prevent stretching.
Step 9: Try On and Adjust
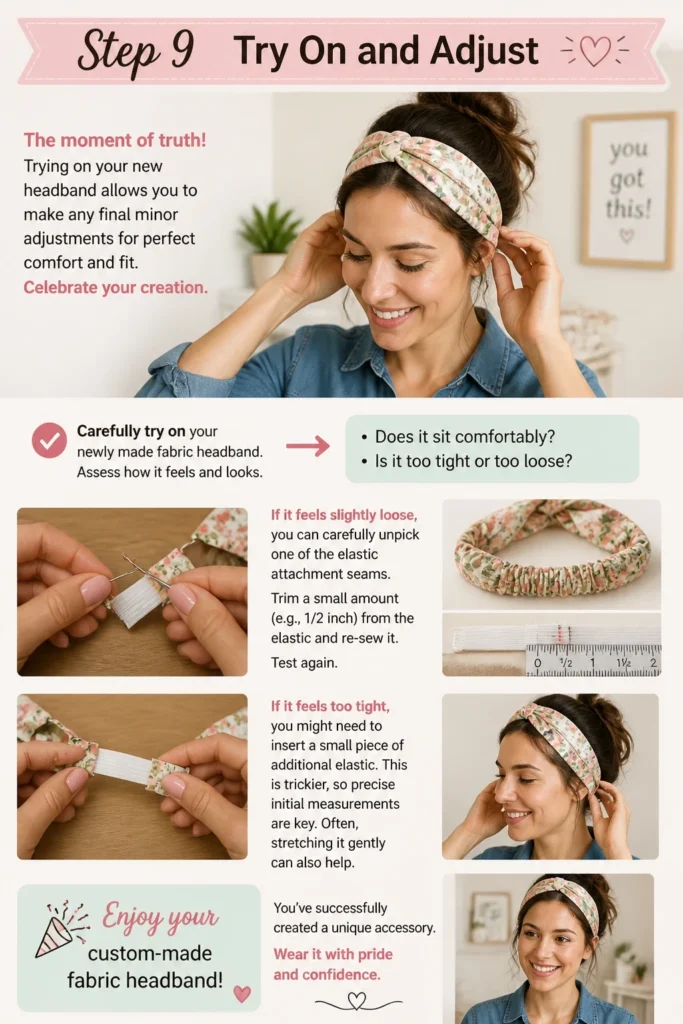
The moment of truth! Trying on your new headband allows you to make any final minor adjustments for perfect comfort and fit. Celebrate your creation.
Carefully try on your newly made fabric headband. Assess how it feels and looks. Does it sit comfortably? Is it too tight or too loose?
If it feels slightly loose, you can carefully unpick one of the elastic attachment seams. Trim a small amount (e.g., 1/2 inch) from the elastic and re-sew it. Test again.
If it feels too tight, you might need to insert a small piece of additional elastic. This is trickier, so precise initial measurements are key. Often, stretching it gently can also help.
Enjoy your custom-made fabric headband! You’ve successfully created a unique accessory. Wear it with pride and confidence.
Common Mistakes to Avoid
Incorrect Fabric Choice
Using the wrong type of fabric can make your headband uncomfortable or cause it to lose its shape quickly. Stiff fabrics might dig into your head, while overly stretchy ones without good recovery might sag. Always choose fabrics with a good drape and a comfortable feel, like cotton, jersey knit, or even a soft linen.
Skipping Pressing Steps
Neglecting to press your fabric at various stages can lead to sloppy seams and a less professional finish. Pressing helps to set stitches, create crisp folds, and flatten seams, making subsequent sewing steps much easier and more accurate. Always iron your fabric after each major sewing step.
Rushing Elastic Attachment
Improperly attaching the elastic can result in a twisted headband or weak points that unravel quickly. Ensure the elastic is flat inside its casing before securing both ends. Take your time to sew the elastic firmly in place with multiple passes of your sewing machine or strong hand stitches.
Inaccurate Measurements
A headband that doesn’t fit correctly is uncomfortable and won’t be worn. Measuring your head circumference precisely and calculating fabric and elastic lengths carefully are paramount. Always double-check your measurements before making any cuts to your fabric.
Troubleshooting
Headband is too tight/loose
If your headband is too tight, carefully unpick one of the elastic attachment seams. You can then insert a small piece of additional elastic, perhaps 1-2 inches, by sewing it between the existing elastic and the main fabric strip. Re-sew the seam securely.
For a headband that is too loose, you’ll also need to unpick one elastic attachment seam. Trim a small amount of elastic (e.g., 1/2 to 1 inch) from the end, then re-sew it firmly into the main fabric strip. Try it on again to check the fit.
Fabric puckers during sewing
Puckering often occurs when the fabric is being stretched while sewing, or if your stitch length is too short for the fabric type. Try using a walking foot on your sewing machine if you have one, especially with knit fabrics. Increase your stitch length slightly and ensure you’re not pulling the fabric through the machine.
Sometimes, using a stabilizer or even a piece of tissue paper under your fabric can help prevent puckering. After sewing, you can gently tear away the stabilizer. Always ensure your needle is sharp and appropriate for your fabric type.
Elastic twists inside the casing
This is a common frustration! To fix a twisted elastic, you’ll need to carefully unpick one of the elastic attachment seams. Once one end is free, gently pull and manipulate the elastic until it lies flat inside the casing.
Once the elastic is flat, re-pin and re-sew that end securely. To prevent this in the future, always keep a firm grip on both ends of the elastic as you’re threading it through the casing, and check for twists before securing the second end.
Key Takeaways
- Accurate head and fabric measurements are essential for a comfortable, well-fitting headband.
- Pre-washing your fabric prevents shrinkage and ensures a consistent fit over time.
- Pressing your fabric after each major sewing step creates crisp seams and a professional finish.
- Securely attaching the elastic is crucial for the headband’s durability and functionality.
- Choosing the right fabric type (e.g., cotton, jersey knit) significantly impacts comfort and drape.
- Don’t be afraid to make small adjustments for a perfect, personalized fit.
Frequently Asked Questions
What type of fabric is best for headbands?
Soft, breathable fabrics with a little drape are ideal. Cotton, linen blends, jersey knits, and even lightweight denim work well. For extra comfort, consider fabrics like rayon challis or bamboo knit. Avoid anything too stiff or overly slippery.
Can I make a fabric headband without a sewing machine?
Absolutely! While a sewing machine speeds up the process, you can hand-sew your headband. Use a strong backstitch for all seams to ensure durability. It will take a bit longer, but the result can be just as beautiful and sturdy.
How do I wash my fabric headband?
For best results, hand wash your fabric headband in cool water with a mild detergent. Gently squeeze out excess water, then lay it flat or hang it to air dry. If your fabric is machine-washable, you can put the headband in a mesh laundry bag on a delicate cycle.
How wide should a headband be?
The width is entirely a matter of personal preference. A common finished width for headbands is between 1.5 to 2.5 inches. If you prefer a wider, more statement-making headband, you can go up to 3 or 4 inches. Remember to double your desired finished width when cutting your fabric strip.
Our Top Recommended Finds
- Good Quality Fabric Shears: A sharp pair of fabric scissors makes cutting precise and effortless, leading to better results.
- Sewing Machine (Beginner-Friendly): An entry-level machine with basic stitches is perfect for this and many other simple sewing projects.
- Braided Elastic (1/2″ or 3/4″): Investing in good quality elastic ensures comfort and long-lasting stretch for your headband.
Your Next Creative Project Awaits
You’ve just created a beautiful, custom fabric headband – a testament to your growing sewing skills! This project is just the beginning of what you can achieve. Think of all the fabric scraps you can now transform.
Why not experiment with different fabric patterns and textures? You could add embellishments like bows, buttons, or even embroidery for a unique touch. Consider making a matching set for friends or family.
Embrace the joy of handmade items. Every stitch tells a story, and now you have a practical, stylish accessory to show for your efforts. Start planning your next fabric adventure today!
Beginner-friendly templates, step-by-step guides,
and weekly project ideas in your inbox.